在App开发中经常会用到渐变色进度条控件,而自定义进度条的实现也不难,下面提供了两种渐变色进度条的实现方案。
效果图如下:
第一种实现方案:使用图层layer实现
层级结构如图所示:

构建过程如下:
1.创建容器
容器创建方案上采用的是生成UIView的子视图:LabelProgressBar,
把LabelProgressBar当作一个类似容器的控件而面向客户端。
好处是:可以方便的使用LabelProgressBar在Xib,StoryBoard,代码中。
而如果用其他的方式,却做不到这样使用上的灵活。
2.添加渐变色图层到容器
添加渐变色到容器就比较容易了,代码如下:
//添加渐变色图层gradientLayer
let gradientLayer = CAGradientLayer()
gradientLayer.colors = [UIColor(hex: "4DABF4").cgColor, UIColor(hex: "9B30C1").cgColor]
//(I.e. [0,0] is the bottom-left corner of the layer, [1,1] is the top-right corner.)
gradientLayer.startPoint = CGPoint(x: 0, y: 0)
gradientLayer.endPoint = CGPoint(x: 1, y: 0)
gradientLayer.position = CGPoint(x: width*0.5, y: height*0.5)
gradientLayer.bounds = CGRect(origin: CGPoint.zero, size: CGSize( width, height: height))
self.layer.insertSublayer(gradientLayer, at: 0)
3.添加文字视图到容器
添加文字视图到容器也是常规操作,代码如下:
 lazy var contextLabel: UILabel = {
        let label = UILabel()
        label.text = " %"
        label.font = UIFont.systemFont(ofSize: 12)
        label.textColor = UIColor.white
        label.textAlignment = NSTextAlignment.center
        label.backgroundColor = UIColor.clear
        return label
    }()

 contextLabel.frame = CGRect(x: 0, y: 0,  width, height: height)
self.addSubview(contextLabel)
进度变化过程
1.根据进度比例生成一个贝塞尔曲线
2.创建一个CALayer图层,将进度贝塞尔曲线赋值给它的path属性
3.拿到渐变色图层,将贝塞尔曲线图层赋值给它的mask属性
func maskLayer() {
    let temp = CGPoint(x: 0, y: 0)
    let bez = UIBezierPath()
    bez.move(to: temp)
    bez.addLine(to: CGPoint(x: progressWidth, y: 0))
    bez.addArc(withCenter: CGPoint(x: progressWidth, y: height*0.5), radius: height*0.5, startAngle: -CGFloat(M_PI_2), endAngle: CGFloat(M_PI_2), clockwise: true)
    bez.addLine(to: CGPoint(x: 0, y: height))
    bez.close()

    msLayer.path = bez.cgPath
    bottomLayer!.mask = msLayer
}
4.不同重复1-3的过程
这四个步骤也是不断调用maskLayer()方法的过程
第一种实现方案:使用CoreGraphics实现
主要实现思想:使用CoreGraphics,不断绘制
构建过程:
1.创建UIView的子类PartArcView
2.填充UIView提供的钩子函数func draw(_ rect: CGRect),draw方法内的实现为:
a.在当前上下文中,从左到右绘制满线性渐变色内容
b.绘制中间为镂空半圆弧的白色矩形内容,铺满上下文
c.在圆弧的右半部分绘制灰色遮盖弧,去覆盖渐变色圆弧。达到进度不断变化的效果。
注意点:画弧时顺时针方向问题,上下文出栈入栈问题
上下文出栈入栈问题:
上下文对象是个单例对象,里面存储的是当前绘制面板的各种属性设置,包括(线色,线宽,填充色,折线圆角等)
如果不对当前上下文存储,就做修改,会修改整体属性,造成对下面绘制的污染。所以在绘制一段图像前先将当前上下文属性
入栈,等绘制完成后,在将刚才的原始上下文属性出栈,设置到上下文单例中来。如:代码中的绘制渐变色弧和灰色弧部分就
用到了上下文的出栈入栈操作(context?.saveGState(), context?.restoreGState())
画弧时顺时针方向问题:
CoreGraphics的坐标系弧度,与顺时针方向如图所示,注意不要用错了:
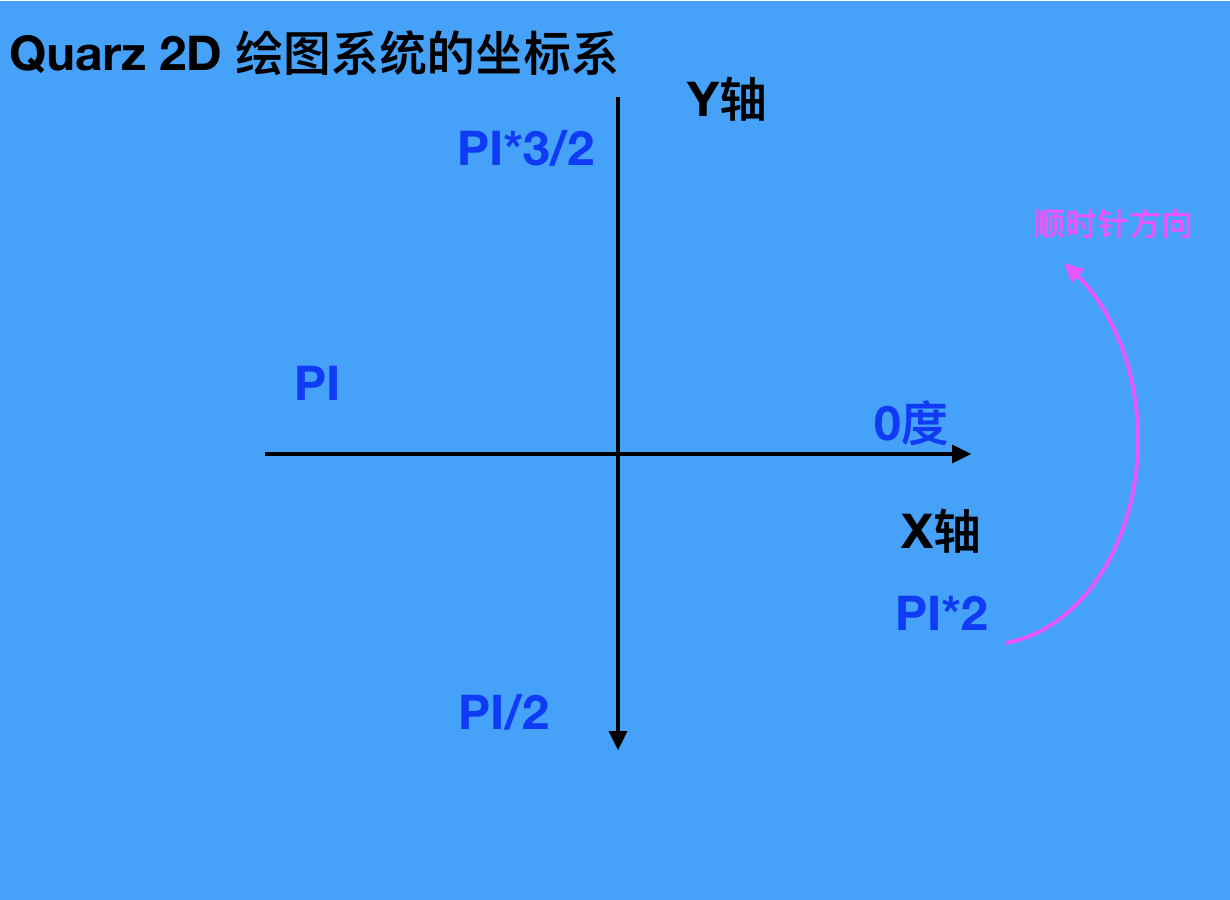
若要详情了解的话,请参考之前介绍过的一篇文章:https://www.cnblogs.com/zhou--fei/p/9859244.html
3.将进度值赋值PartArcView属性
4.调用setNeedsDisplay()
5.不断重复3-4步骤
部分代码如下:
let context = UIGraphicsGetCurrentContext()
//渐变色
let colorSpace = CGColorSpaceCreateDeviceRGB()
let locations:[CGFloat] = [0,1]
let startC = UIColor(hex: "EEA13A")
let endC = UIColor(hex: "B1283C")
let colors = [startC.cgColor,endC.cgColor]
let gradient = CGGradient(colorsSpace: colorSpace, colors: colors as CFArray, locations: locations)
context?.drawLinearGradient(gradient!, start: CGPoint(x: 0, y: 0), end: CGPoint(x: rect.size.width, y: 0), options: CGGradientDrawingOptions.drawsBeforeStartLocation)

//渐变色弧
context?.saveGState()
context?.addRect(rect)
context?.move(to: CGPoint(x: width-edgeDistance, y: bigOuterRadius))
context?.addArc(center: arcCenter, radius: bigOuterRadius, startAngle: 0, endAngle: CGFloat(M_PI), clockwise: true)
context?.addArc(center: CGPoint(x: smailRadius+edgeDistance, y: arcCenter.y), radius: smailRadius, startAngle: CGFloat(M_PI), endAngle: CGFloat(M_PI*2), clockwise: true)
context?.addArc(center: arcCenter, radius: bigInnerRadius, startAngle: CGFloat(M_PI), endAngle: CGFloat(M_PI*2), clockwise: false)
context?.addArc(center: CGPoint(x: width-smailRadius-edgeDistance, y: arcCenter.y), radius: smailRadius, startAngle: CGFloat(M_PI), endAngle: CGFloat(M_PI*2), clockwise: true)
context?.setFillColor(UIColor.white.cgColor)
context?.fillPath()


//灰色弧
context?.restoreGState()
let context1 = UIGraphicsGetCurrentContext()
var endAng =  CGFloat(M_PI*2) - (_progressValue * CGFloat(M_PI))
context1?.move(to: CGPoint(x: width-edgeDistance, y: bigOuterRadius))
context1?.addArc(center: arcCenter, radius: bigOuterRadius, startAngle: 0, endAngle: endAng, clockwise: true)

let midSmallX: CGFloat = arcCenter.x + cos(endAng)*(bigOuterRadius-smailRadius)
let midSmallY: CGFloat = arcCenter.y + sin(endAng)*(bigOuterRadius-smailRadius)

context1?.addArc(center: CGPoint(x: midSmallX, y: midSmallY), radius: smailRadius, startAngle: endAng, endAngle: endAng-CGFloat(M_PI), clockwise: false)

context1?.addArc(center: arcCenter, radius: bigInnerRadius, startAngle: endAng, endAngle: CGFloat(M_PI*2), clockwise: false)
context1?.addArc(center: CGPoint(x: width-smailRadius-edgeDistance, y: arcCenter.y), radius: smailRadius, startAngle: CGFloat(M_PI), endAngle: CGFloat(M_PI*2), clockwise: true)
context1?.setFillColor(UIColor(hex: "e7e3e3").cgColor)
context1?.fillPath()
点击首页列表的进度条目录进入