Vue 生成二维码优惠券
1、图标添加动画
  @keyframes go {
        0% {
           transform: rotateZ(0);
        }
        100% {
           transform: rotateZ(360deg);
        }
    }
结合vue的class动态绑定,当点击刷新时,class值改为活动,此时旋转,延时改为静止
HTML
<div class="bottom-button" @click="getNewQR">刷新</div>
Function
 // 获取二维码信息
    getNewQR() {
      this.refreash = true;
      this.BindQRCode();
      setTimeout(() => {
        this.refreash = false;
      }, 3000);
    },
animation
 .img-class {
           16px;
          height: 16px;
          object-fit: cover;
          background-size: 100% !important;
          display: inline-block;
          margin: auto;
          background: url("#{$imgSpacename}/icon_refreash.png") no-repeat center;

          @keyframes go {
            0% {
              transform: rotateZ(0);
            }
            100% {
              transform: rotateZ(360deg);
            }
          }

          &.img-class-active {
            animation-name: go;
            animation-duration: 3s;
            animation-iteration-count: infinite;
          }
        }
      }
2、生成二维码
首先安装生成二维码的依赖,在控制台执行
npm install qrcodejs2 --save
在页面中导入依赖,并使用(二维码的本质就是一个链接)
import QRCode from "qrcodejs2";
.....
.....


 data() {
    return {
      qrcodeUrl: this.$route.query.qrcodeUr, //从路由中获取url参数
      ......
    };
  },

  mounted() {
    this.BindQRCode();
     ......
  } ,

methods: {
 ......,

 BindQRCode() {
      document.getElementById("qrcode").innerHTML = "";
      new QRCode(this.$refs.qrCodeDiv, {
        text: `${this.qrcodeUrl}`,
         245,
        height: 245,
        colorDark: "#333333", //二维码颜色
        colorLight: "#ffffff" //二维码背景色
        // correctLevel: QRCode.CorrectLevel.L //容错率,L/M/H
      });
    }
}

.....
.....
在生成二维码的过程中,遇到了一个问题就是二维码的追加,在我重新生成二维码时,新的二维码会追加到旧二维码的下方,查阅资料,找到了在每次生成二维码前先元素置空。
document.getElementById("qrcode").innerHTML = "";
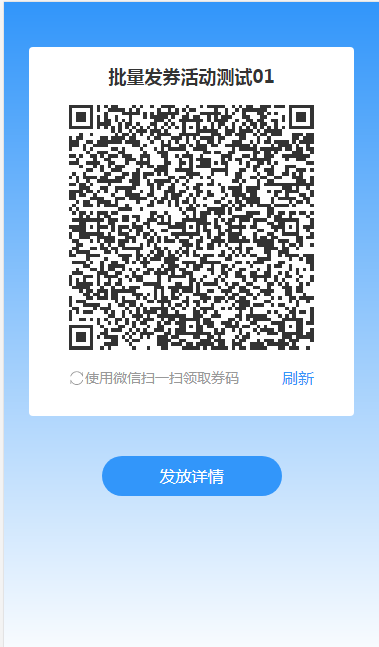
<template>
  <div class="qr">
    <div class="box">
      <div class="top">{{activityName}}</div>
      <div id="qrcode" ref="qrCodeDiv" class="BindQRCode"></div>
      <div class="box-bottom">
        <div class="pic-text">
          <i class="img-class" :class="{'img-class-active':refreash}"></i>
          <span>使用微信扫一扫领取券码</span>
        </div>
        <div class="bottom-button" @click="getNewQR">刷新</div>
      </div>
    </div>
    <div>
      <div class="more-detail" @click="goToMoreDetail">发放详情</div>
    </div>
  </div>
</template>

<script>
import { xxxs } from "../../api/api.js";
import QRCode from "qrcodejs2";

export default {
  data() {
    return {
      QR: "",
      refreash: false,
      qrcodeUrl: this.$route.query.qrcodeUrl,
      activityName: this.$route.query.activityName
    };
  },

  mounted() {
    this.BindQRCode();
  },

  created() {},

  methods: {
    goToMoreDetail() {
      this.$router.push({
        path: "/Givingout/GiveoutMoreDetail",
        query: {
          effectiveTime: this.$route.query.effectiveTime, // 券有效时长
        }
      });
    },

    // 获取二维码信息
    getNewQR() {
      this.refreash = true;
      this.BindQRCode();
      setTimeout(() => {
        this.refreash = false;
      }, 3000);
    },

    BindQRCode() {
      document.getElementById("qrcode").innerHTML = "";
      new QRCode(this.$refs.qrCodeDiv, {
        text: `${this.qrcodeUrl}`,
         245,
        height: 245,
        colorDark: "#333333", //二维码颜色
        colorLight: "#ffffff" //二维码背景色
        // correctLevel: QRCode.CorrectLevel.L //容错率,L/M/H
      });
    }
  }
};
</script>

<style lang="scss" scoped>
.qr {
  position: absolute;
  top: 0px;
  bottom: 0px;
  left: 0px;
  right: 0px;
  background: linear-gradient(
    360deg,
    rgba(255, 255, 255, 1) 0%,
    rgba(50, 150, 250, 1) 100%
  );
  padding-top: 40px;

  .box {
    width: 325px;
    background: rgba(255, 255, 255, 1);
    margin: 5px auto;
    border-radius: 4px;
    padding: 20px 40px 30px;
    display: flex;
    justify-content: center;
    align-items: center;
    flex-direction: column;

    .top {
      font-size: 18px;
      font-family: PingFangSC-Semibold, PingFang SC;
      font-weight: 600;
      color: rgba(51, 51, 51, 1);
      line-height: 18px;
    }

    .BindQRCode {
      margin: 20px 0px;
    }

    .box-bottom {
      display: flex;
      width: 100%;
      justify-content: space-between;
      align-items: center;

      .pic-text {
        display: flex;
        align-items: center;
        font-size: 14px;
        font-family: PingFangSC-Regular, PingFang SC;
        font-weight: 400;
        color: rgba(153, 153, 153, 1);
        line-height: 14px;

        .img-class {
          width: 16px;
          height: 16px;
          object-fit: cover;
          background-size: 100% !important;
          display: inline-block;
          margin: auto;
          background: url("#{$imgSpacename}/icon_refreash.png") no-repeat center;

          @keyframes go {
            0% {
              transform: rotateZ(0);
            }
            100% {
              transform: rotateZ(360deg);
            }
          }

          &.img-class-active {
            animation-name: go;
            animation-duration: 3s;
            animation-iteration-count: infinite;
          }
        }
      }

      .bottom-button {
        font-size: 16px;
        font-family: PingFangSC-Regular, PingFang SC;
        font-weight: 400;
        color: rgba(54, 151, 249, 1);
        line-height: 14px;
      }
    }
  }
  .more-detail {
    width: 180px;
    height: 40px;
    margin: 40px auto;
    background: rgba(50, 150, 250, 1);
    border-radius: 22px;
    display: flex;
    align-items: center;
    justify-content: center;
    font-size: 16px;
    font-family: PingFangSC-Regular, PingFang SC;
    font-weight: 400;
    color: rgba(255, 255, 255, 1);
    line-height: 16px;
  }
}
</style>
实际效果: