Android笔记--View绘制流程源码分析
View绘制之前框架流程分析
View绘制的分析始终是离不开Activity及其内部的Window的。在Activity的源码启动流程中,一并包含
着Activity中window的创建以及view的绘制流程。
在Activity启动流程进行到ActivityThread.performLaunchActivity时,利用反射创建了activity实例。
并且紧接着调用了activity的attach方法。进行activity的成员初始化工作。其中就包括对window对象的
初始化。
这段源码如下:(为了逻辑清晰,对其中有代码删减)
ActivityThread.performLaunchActivity(ActivityClientRecord r, Intent customIntent)方法
private Activity performLaunchActivity(ActivityClientRecord r, Intent customIntent) {
        // System.out.println("##### [" + System.currentTimeMillis() + "] ActivityThread.performLaunchActivity(" + r + ")");

        ...省略

        Activity activity = null;
        try {
            java.lang.ClassLoader cl = r.packageInfo.getClassLoader();
            activity = mInstrumentation.newActivity(//1 这里是activity实例化
                    cl, component.getClassName(), r.intent);
            StrictMode.incrementExpectedActivityCount(activity.getClass());
            r.intent.setExtrasClassLoader(cl);
            r.intent.prepareToEnterProcess();
            if (r.state != null) {
                r.state.setClassLoader(cl);
            }
        } catch (Exception e) {
            if (!mInstrumentation.onException(activity, e)) {
                throw new RuntimeException(
                    "Unable to instantiate activity " + component
                    + ": " + e.toString(), e);
            }
        }

        try {//2 拿到已经实例化过的app对象
            Application app = r.packageInfo.makeApplication(false, mInstrumentation);


            if (activity != null) {

                ....

                activity.attach(appContext, this, getInstrumentation(), r.token,
                        r.ident, app, r.intent, r.activityInfo, title, r.parent,
                        r.embeddedID, r.lastNonConfigurationInstances, config,
                        r.referrer, r.voiceInteractor);//3 对activity初始化

                .....

                //4 调用onCreate回调
                if (r.isPersistable()) {
                    mInstrumentation.callActivityOnCreate(activity, r.state, r.persistentState);
                } else {
                    mInstrumentation.callActivityOnCreate(activity, r.state);
                }

                .....

                if (!r.activity.mFinished) {
                    activity.performStart();//5 onStart回调
                    r.stopped = false;
                }


                .....

        } catch (SuperNotCalledException e) {
            throw e;

        } catch (Exception e) {
            if (!mInstrumentation.onException(activity, e)) {
                throw new RuntimeException(
                    "Unable to start activity " + component
                    + ": " + e.toString(), e);
            }
        }

        return activity;
    }
步骤3 对activity初始化 | Activity.attach方法
final void attach(Context context, ActivityThread aThread,
            Instrumentation instr, IBinder token, int ident,
            Application application, Intent intent, ActivityInfo info,
            CharSequence title, Activity parent, String id,
            NonConfigurationInstances lastNonConfigurationInstances,
            Configuration config, String referrer, IVoiceInteractor voiceInteractor) {
        attachBaseContext(context);

        mFragments.attachHost(null /*parent*/);

        mWindow = new PhoneWindow(this);//得到Window对象

        ...省略

        mWindow.setWindowManager(//给当前activity的 Window对象设置WM,mToken是一个IBinder,
        //WMS就是通过这个IBinder来管理Activity里的View
                (WindowManager)context.getSystemService(Context.WINDOW_SERVICE),
                mToken, mComponent.flattenToString(),
                (info.flags & ActivityInfo.FLAG_HARDWARE_ACCELERATED) != 0);
        if (mParent != null) {
            mWindow.setContainer(mParent.getWindow());
        }
        mWindowManager = mWindow.getWindowManager();
        mCurrentConfig = config;
    }
步骤4 调用onCreate回调
第四步以后会逐步调用到activity的onCreate方法。这个方法就是我们自己的Activity.onCreate方法中
的setContentView那一套。
源码调用如下:
Activity.setContentView方法:
public void setContentView(@LayoutRes int layoutResID) {
        getWindow().setContentView(layoutResID);//getWindow拿的是attach方法中的PhoneWindow
        //setContentView就是PhoneWindow的方法
        initWindowDecorActionBar();
    }
PhoneWindow.setContentView
@Override
    public void setContentView(int layoutResID) {

        if (mContentParent == null) {
            installDecor();//这里生成一个DecorView
        } else if (!hasFeature(FEATURE_CONTENT_TRANSITIONS)) {
            mContentParent.removeAllViews();
        }

       。。。省略
    }
PhoneWindow.installDecor
 private void installDecor() {
        if (mDecor == null) {
            mDecor = generateDecor();
            //...省略
        }


            //省略
    }
到onCreate完成为止,window和decorview还并未产生联系
直到ActivityThread.handleResumeActivity执行
ActivityThread.handleResumeActivity会触发Activity.onResume方法回调
final void handleResumeActivity(IBinder token,
            boolean clearHide, boolean isForward, boolean reallyResume) {

        。。。省略

        //拿到acitivty记录,执行activity.performResume,最终回调onResume
        ActivityClientRecord r = performResumeActivity(token, clearHide);

        if (r != null) {
            final Activity a = r.activity;

            。。。省略

            if (r.window == null && !a.mFinished && willBeVisible) {
                r.window = r.activity.getWindow();
                View decor = r.window.getDecorView();
                decor.setVisibility(View.INVISIBLE);
                ViewManager wm = a.getWindowManager();
                WindowManager.LayoutParams l = r.window.getAttributes();
                a.mDecor = decor;
                l.type = WindowManager.LayoutParams.TYPE_BASE_APPLICATION;
                l.softInputMode |= forwardBit;
                if (a.mVisibleFromClient) {
                    a.mWindowAdded = true;
                    wm.addView(decor, l);
                }


            } else if (!willBeVisible) {
                ...省略
            }


            if (!r.activity.mFinished && willBeVisible
                    && r.activity.mDecor != null && !r.hideForNow) {

                。。。省略


                r.activity.mVisibleFromServer = true;
                mNumVisibleActivities++;
                if (r.activity.mVisibleFromClient) {
                    r.activity.makeVisible();//这里将window和decorview关联
                }
            }

            。。。省略

        } else {
            // If an exception was thrown when trying to resume, then
            // just end this activity.
            try {
                ActivityManagerNative.getDefault()
                    .finishActivity(token, Activity.RESULT_CANCELED, null, false);
            } catch (RemoteException ex) {
            }
        }
    }
Activity.makeVisiable
void makeVisible() {
        if (!mWindowAdded) {
            ViewManager wm = getWindowManager();
            wm.addView(mDecor, getWindow().getAttributes());
            mWindowAdded = true;
        }
        mDecor.setVisibility(View.VISIBLE);
    }
可见onResume方法回调时并不会显示UI,而是随后调用的mDecor.setVisibility(View.VISIBLE);
让界面可见。
wm.addView(mDecor, getWindow().getAttributes());让decor和phonewindow关联起来
WindowManager的addView的具体实现在WindowManagerImpl中。而WindowManagerImpl是对WindowManagerGlobal
的一个静态代理类
WindowManagerGlobal.addView
public void addView(View view, ViewGroup.LayoutParams params,
            Display display, Window parentWindow) {

        。。。省略

        ViewRootImpl root;
        View panelParentView = null;


            。。。省略


            root = new ViewRootImpl(view.getContext(), display);//这里真正new出了负责绘制流程的类


            view.setLayoutParams(wparams);//对传入的decorview设置布局参数

            mViews.add(view);
            mRoots.add(root);
            mParams.add(wparams);


        try {
            root.setView(view, wparams, panelParentView);
        } catch (RuntimeException e) {
            ...省略
        }
    }
WindowManagerGlobal.addView之后真正开始绘制流程
root.setView(view, wparams, panelParentView);
这个方法的调用意味着decorl利用window的布局参数开始了绘制的管理工作。
ViewRootImpl继承了ViewParent接口。实现了requestLayout invalidateChild等方法。实现对视图的操作。
正如ViewRootImpl类的描述信息所说:
/**
 * The top of a view hierarchy, implementing the needed protocol between View
 * and the WindowManager.  This is for the most part an internal implementation
 * detail of {@link WindowManagerGlobal}.
 *  这个类管理着视图结构。实现了View和WM之间必要的联系
 * {@hide}
 */
ViewRootImpl会得到decorview中的viewparent对象。当某些view的viewparent相同时意味着他们在
同一个view树下。
所以每次调用view.requestLayout 其实就是在调用ViewRootImpl。因此整个的绘制流程都在由ViewRootImpl把控
因为在ViewRootImpl的setView方法调用的时候,decorView已经把自己的ViewParent设置为ViewRootImpl:
/**
     * We have one child
     */
    public void setView(View view, WindowManager.LayoutParams attrs, View panelParentView) {
        synchronized (this) {
            if (mView == null) {
                mView = view;

               ...省略

                mAttachInfo.mRootView = view;
                mAttachInfo.mScalingRequired = mTranslator != null;
                mAttachInfo.mApplicationScale =
                        mTranslator == null ? 1.0f : mTranslator.applicationScale;

                。。。省略

                try {
                    mOrigWindowType = mWindowAttributes.type;
                    mAttachInfo.mRecomputeGlobalAttributes = true;
                    collectViewAttributes();
                    res = mWindowSession.addToDisplay(mWindow, mSeq, mWindowAttributes,
                            getHostVisibility(), mDisplay.getDisplayId(),
                            mAttachInfo.mContentInsets, mAttachInfo.mStableInsets,
                            mAttachInfo.mOutsets, mInputChannel);
                } catch (RemoteException e) {
                   。。。省略
                } finally {
                    if (restore) {
                        attrs.restore();
                    }
                }

               ...省略

                view.assignParent(this);//在这里decorView把自己的ViewParent设置为ViewRootImpl
                。。。省略
            }
        }
    }
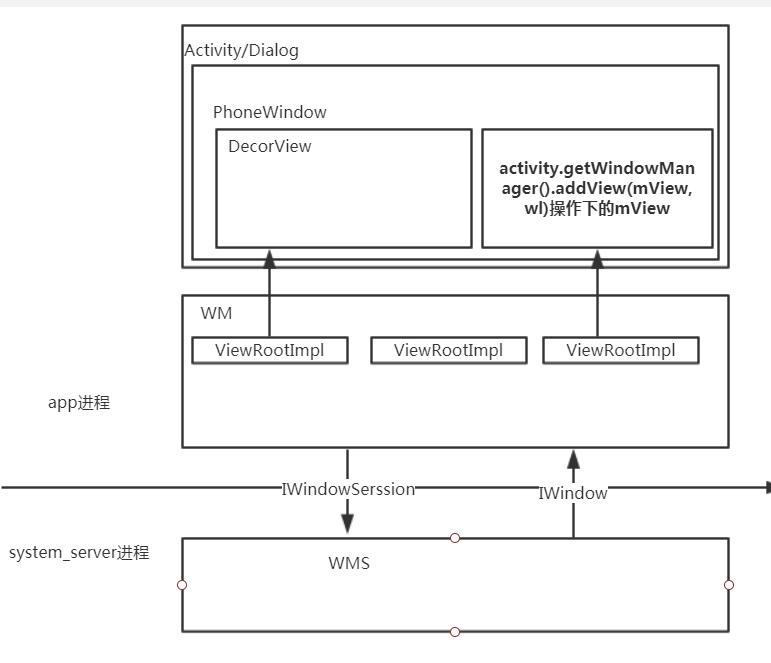
Window WindowManager WindowManagerService View四方的联系可以简化如下:

这里利用WindowManager.addView添加的mView使用的ViewParent是不同的ViewRootImpl提供的。
所以他们属于不同的view树。所以当你调用DecorView中某个View的requestLayout并不会对WM.addView的
视图产生影响。
从上面的源码分析可以得出以下结论:
-
activity中 getWindowManager().addView(mView,wl)和 addContentView(mView,wmParams)是有区别的
前者会调用WindowManagerGlobal的addView.重新产生一个ViewRootImpl给mView
后者是利用已经建立的ViewRootImpl给mView
-
ViewRootImpl是实际管理Window中所有View的类,每个Activity中ViewRootImpl数量取决于调用mWindowManager.
addView的调用次数 -
Window存在的意义在于优化代码结构:
从上面的分析可以得出Window或者说PhoneWindow没有做具体的View操作。
因为在整个过程中:activity提供app进程和system_server进程中WMS通信的token.而activity的DecorView则利用
实现了ViewParent接口的ViewRootImpl负责view树中绘制的整个流程。
期间没有Window的作用。但是window从代码结构上解开了activity和view的耦合。把从view的创建
到和viewrootimpl的交互中脱离出来。减轻activity的任务量。把acitivty和view有关的操作交给window去做。而window把任务交给viewRootImpl去完成
-
Dialog的使用过程中也会走和activity创建Window DecorView 关联两者 为DecorView添加ViewRootImpl
的整个流程。PopupWindow和dialog不同他不会创建一个新的Window.他的整个流程是利用的WindowManager.addView(decorView, p);
PopupWindow会生成一个新的DecorView ,并会重新产生一个ViewRootImpl给decorView