1.Hibernate框架简述
Hibernate的核心组件
在基于MVC设计模式的JAVA WEB应用中,Hibernate可以作为模型层/数据访问层。它通过配置文件(hibernate.properties或hibernate.cfg.xml)和映射文件(***.hbm.xml)把JAVA对象或PO(Persistent Object,持久化对象)映射到数据库中的数据库,然后通过操作PO,对数据表中的数据进行增,删,改,查等操作。
除配置文件,映射文件和持久化类外,Hibernate的核心组件包括以下几部分:
a)Configuration类:用来读取Hibernate配置文件,并生成SessionFactory对象。
b)SessionFactory接口:产生Session实例工厂。
c)Session接口:用来操作PO。它有get(),load(),save(),update()和delete()等方法用来对PO进行加载,保存,更新及删除等操作。它是Hibernate的核心接口。
d)Query接口:用来对PO进行查询操。它可以从Session的createQuery()方法生成。
e)Transaction接口:用来管理Hibernate事务,它主要方法有commit()和rollback(),可以从Session的beginTrancation()方法生成。
Persistent Object
持久化对象可以是普通的Javabeans,惟一特殊的是它们与(仅一个)Session相关联。JavaBeans在Hibernate中存在三种状态:
1.临时状态(transient):当一个JavaBean对象在内存中孤立存在,不与数据库中的数据有任何关联关系时,那么这个JavaBeans对象就称为临时对象(Transient Object)。
2.持久化状态(persistent):当一个JavaBean对象与一个Session相关联时,就变成持久化对象(Persistent Object)
3.脱管状态(detached):在这个Session被关闭的同时,这个对象也会脱离持久化状态,就变成脱管状态(Detached Object),可以被应用程序的任何层自由使用,例如可以做与表示层打交道的数据舆对象(Data Transfer Object)。
Hibernate的运行过程
Hibernate的运行过程如下:
A:应用程序先调用Configration类,该类读取Hibernate的配置文件及映射文件中的信息,并用这些信息生成一个SessionFactpry对象。
B:然后从SessionFactory对象生成一个Session对象,并用Session对象生成Transaction对象;可通过Session对象的get(),load(),save(),update(),delete()和saveOrUpdate()等方法对PO进行加载,保存,更新,删除等操作;在查询的情况下,可通过Session对象生成一个Query对象,然后利用Query对象执行查询操作;如果没有异常,Transaction对象将 提交这些操作结果到数据库中。
Hibernate的运行过程如下图: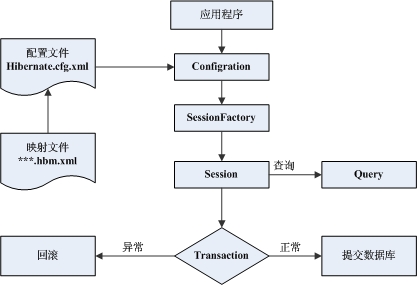
2.入门案例

01.准备各种jar包(我想就不用我教了吧)
02.准备学生实体类(用于操作对应数据库)
package cn.zhang.entity;
//实体类
public class Student {

    private int stuno;

    private String stuname;

    private int stuage;

    private int stuid;

    private int stuseat;

    public Student() {
        super();
        // TODO Auto-generated constructor stub
    }

    public Student(String stuname, int stuage, int stuid, int stuseat) {
        super();
        this.stuname = stuname;
        this.stuage = stuage;
        this.stuid = stuid;
        this.stuseat = stuseat;
    }

    public Student(int stuno, String stuname, int stuage, int stuid, int stuseat) {
        super();
        this.stuno = stuno;
        this.stuname = stuname;
        this.stuage = stuage;
        this.stuid = stuid;
        this.stuseat = stuseat;
    }


    public int getStuid() {
        return stuid;
    }

    public void setStuid(int stuid) {
        this.stuid = stuid;
    }


    public int getStuseat() {
        return stuseat;
    }


    public void setStuseat(int stuseat) {
        this.stuseat = stuseat;
    }


    public int getStuno() {
        return stuno;
    }

    public void setStuno(int stuno) {
        this.stuno = stuno;
    }

    public String getStuname() {
        return stuname;
    }

    public void setStuname(String stuname) {
        this.stuname = stuname;
    }

    public int getStuage() {
        return stuage;
    }

    public void setStuage(int stuage) {
        this.stuage = stuage;
    }


}
03.在src下设计Hibernate配置文件hibernate.cfg.xml
<?xml version='1.0' encoding='utf-8'?>
<!DOCTYPE hibernate-configuration PUBLIC
        "-//Hibernate/Hibernate Configuration DTD 3.0//EN"
        "http://www.hibernate.org/dtd/hibernate-configuration-3.0.dtd">

<hibernate-configuration>

    <session-factory>

        <!-- Database connection settings -->
        <property name="connection.driver_class">oracle.jdbc.OracleDriver</property>
        <property name="connection.url">jdbc:oracle:thin:@localhost:1521:orcl</property>
        <property name="connection.username">zhangzong</property>
        <property name="connection.password">123</property>

        <!-- SQL dialect (SQL 方言)-->
        <property name="dialect">org.hibernate.dialect.Oracle10gDialect</property>

        <!-- Drop and re-create the database schema on startup -->
         <property name="hbm2ddl.auto">update</property>

        <!-- Echo all executed SQL to stdout  在控制台打印后台的SQL语句-->
        <property name="show_sql">true</property>

        <!-- 格式化显示SQL -->
        <property name="format_sql">true</property>

        <!-- JDBC connection pool (use the built-in) -->
        <!-- <property name="connection.pool_size">1</property> -->

        <!-- Enable Hibernate's automatic session context management -->
        <!--  <property name="current_session_context_class">thread</property> -->

        <!-- Disable the second-level cache -->
        <!-- <property name="cache.provider_class">org.hibernate.cache.NoCacheProvider</property>-->

        <mapping resource="cn/zhang/entity/Student.hbm.xml" />

    </session-factory>

</hibernate-configuration>
04.在实体类下设计映射文件Student.hbm.xml(在配置文件hibernate.cfg.xml使用)
<?xml version="1.0"?>
<!DOCTYPE hibernate-mapping PUBLIC
        "-//Hibernate/Hibernate Mapping DTD 3.0//EN"
        "http://www.hibernate.org/dtd/hibernate-mapping-3.0.dtd">

    <hibernate-mapping package="cn.zhang.entity">
        <class name="Student" table="stuinfo">
        <id name="stuno" column="stuno">
           <!-- 主键生成策略:native:
           native:如果后台是Oracle
                      后台是MySQL,自动应用自增 -->
            <generator class="native"/>
        </id>
        <property name="stuname" type="string" column="stuname"/>
        <property name="stuage"/>

        <property name="stuid" type="int" column="stuid"/>
        <property name="stuseat"/>
    </class>

</hibernate-mapping>
05.添加测试类
001.更新(新增)一个学生记录
package cn.zhang.test;
//新增一条数据
import org.hibernate.SessionFactory;
import org.hibernate.Transaction;
import org.hibernate.cfg.Configuration;
import org.hibernate.classic.Session;

import cn.zhang.entity.Student;

public class InsertTest {

    public static void main(String[] args) {
        //准备对象
        Student student=new Student("光衣", 12,112333,2);//Student.hbm.xml已配置编号为自增,所以这里不用添加编号了
         //读取大配置文件,获取要连接的数据库信息
        Configuration configuration=new Configuration().configure();
         //创建SessionFactory
        SessionFactory factory = configuration.buildSessionFactory();
        //加工session
        Session openSession = factory.openSession();

        Transaction beginTransaction = openSession.beginTransaction();
        openSession.save(student);

        beginTransaction.commit();

        System.out.println("成功");

    }

}
002.修改一个学生信息
package cn.zhang.test;
import org.hibernate.SessionFactory;
import org.hibernate.Transaction;
import org.hibernate.cfg.Configuration;
import org.hibernate.classic.Session;

import cn.zhang.entity.Student;

public class UpdateTest {

    /**
     * @param args
     */
    public static void main(String[] args) {
        //1.读取大配置文件,获取要连接的数据库信息
        Configuration conf=new Configuration().configure();
        //2.创建SessionFactory
        SessionFactory factory =conf.buildSessionFactory();
        //3加工session
        Session session = factory.openSession();
        Transaction tx=session.beginTransaction();
        //获取对象
        Student stu =new Student(1,"光衣", 12,112333,2);
        //更新
        session.update(stu);
        //提交事务
        tx.commit();
        System.out.println("更新成功");


    }

}
003.删除一个指定学生信息
package cn.zhang.test;
import org.hibernate.SessionFactory;
import org.hibernate.Transaction;
import org.hibernate.cfg.Configuration;
import org.hibernate.classic.Session;

import cn.zhang.entity.Student;
public class DeleteTest {

    public static void main(String[] args) {
        //1.读取大配置文件,获取要连接的数据库信息
        Configuration conf=new Configuration().configure();
        //2.创建SessionFactory
        SessionFactory factory =conf.buildSessionFactory();
        //3.加工session
        Session session = factory.openSession();

        Transaction tx=session.beginTransaction();
        //获取对象
        Student stu =new Student();
        stu.setStuno(3);//指定要删除的编号
        //删除指定
        session.delete(stu);
        //提交事务
        tx.commit();
        System.out.println("删除成功");

    }

}
004.查询一个指定学生信息
package cn.zhang.test;

import org.hibernate.SessionFactory;
import org.hibernate.cfg.Configuration;
import org.hibernate.classic.Session;

import cn.zhang.entity.Student;

public class SelectTest {

    public static void main(String[] args) {
        //1.读取大配置文件,获取要连接的数据库信息
        Configuration conf=new Configuration().configure();
        //2.创建SessionFactory
        SessionFactory factory =conf.buildSessionFactory();
        //3.打开session
        Session session = factory.openSession();
        //4.加载数据操作
           //如果表中没有你指定的主键列,get()方法的是null
        Student student =(Student)session.get(Student.class, 4);
           //如果表中没有你指定的主键列,程序运行到student.getStuname()时会抛出异常
       //Student student =(Student)session.load(Student.class, 4);
        //5.输出数据
        System.out.println(student.getStuname());
        //6.关闭session
        session.close();


    }

}