转载: http://blog.csdn.net/tetrisos/article/details/7602307
这篇文章主要讲的表格的操作包括:标记行、移动行、删除行、插入行。
这次就不从头建立工程了,在http://www.oschina.net/code/snippet_164134_9876下载工程。这个工程就是最简单的产生一个表格并向其中写入数据。用Xcode 4.2打开它,在这个工程基础上实现以上操作。
1、标记行
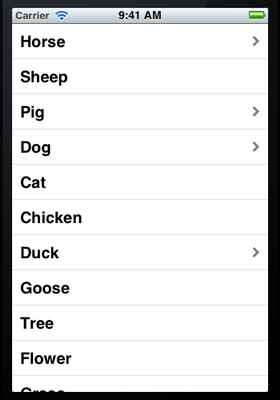
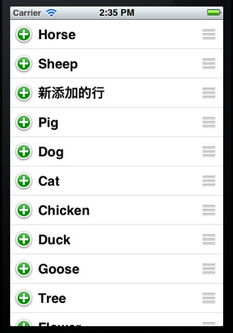
这里讲的标记行指的是单击此行,可以实现在此行右边出现一个勾,如下图所示:

为了实现标记功能,在ViewController.m中@end之前添加代码:
#pragma mark -
#pragma mark Table Delegate Methods
- (void)tableView:(UITableView *)tableView didSelectRowAtIndexPath:(NSIndexPath *)indexPath {
    UITableViewCell *oneCell = [tableView cellForRowAtIndexPath: indexPath];
    if (oneCell.accessoryType == UITableViewCellAccessoryNone) {
        oneCell.accessoryType = UITableViewCellAccessoryCheckmark;
    } else
        oneCell.accessoryType = UITableViewCellAccessoryNone;
    [tableView deselectRowAtIndexPath:indexPath animated:YES];
}
该代码实现:单击某行时,若此行未被标记,则标记此行;若此行已经被标记,则取消标记。
运行效果如上图。
上面的代码实际上就是修改某行的accessoryType属性,这个属性可以设为四个常量:
UITableViewCellAccessoryCheckmark
UITableViewCellAccessoryDetailDisclosureButton
UITableViewCellAccessoryDisclosureIndicator
UITableViewCellAccessoryNone
效果依次如下图所示:


UITableViewCellAccessoryCheckmark UITableViewCellAccessoryDetailDisclosureButton

UITableViewCellAccessoryDisclosureIndicator UITableViewCellAccessoryNone
注意,上面第二张图片中的蓝色圆圈不仅仅是一个图标,还是一个控件,点击它可以触发事件,在上一篇博客《iOS开发16:使用Navigation Controller切换视图》使用过。
2、移动行
想要实现移动或者删除行这样的操作,需要启动表格的编辑模式。使用的是setEditing:animated:方法。
2.1 打开ViewController.xib,将其中的表格控件映射成Outlet到ViewController.h,名称为myTableView。
2.2 打开ViewController.m,在viewDidLoad方法最后添加代码:
//启动表格的编辑模式
[self.myTableView setEditing:YES animated:YES];
2.3 在@end之前添加代码:
//打开编辑模式后,默认情况下每行左边会出现红的删除按钮,这个方法就是关闭这些按钮的
- (UITableViewCellEditingStyle)tableView:(UITableView *)tableView
           editingStyleForRowAtIndexPath:(NSIndexPath *)indexPath {
    return UITableViewCellEditingStyleNone;
}

//这个方法用来告诉表格 这一行是否可以移动
- (BOOL)tableView:(UITableView *)tableView canMoveRowAtIndexPath:(NSIndexPath *)indexPath {
    return YES;
}

//这个方法就是执行移动操作的
- (void)tableView:(UITableView *)tableView moveRowAtIndexPath:(NSIndexPath *)
        sourceIndexPath toIndexPath:(NSIndexPath *)destinationIndexPath {
    NSUInteger fromRow = [sourceIndexPath row];
    NSUInteger toRow = [destinationIndexPath row];

    id object = [list objectAtIndex:fromRow];
    [list removeObjectAtIndex:fromRow];
    [list insertObject:object atIndex:toRow];
}
editingStyleForRowAtIndexPath这个方法中用到了常量UITableViewCellEditingStyleNone,它表示不可编辑,这里的编辑指的是删除和插入。表示表格行的编辑模式的常量有:
UITableViewCellEditingStyleDelete
UITableViewCellEditingStyleInsert
UITableViewCellEditingStyleNone
顾名思义,第一个表示删除,第二个表示插入,第三个表示不可编辑。
若将editingStyleForRowAtIndexPath方法中的UITableViewCellEditingStyleNone依次换成上面三个值,则它们运行的效果依次如下图所示:

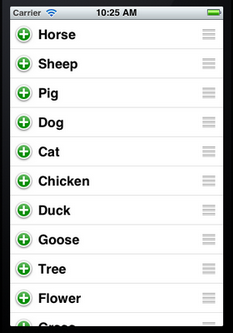
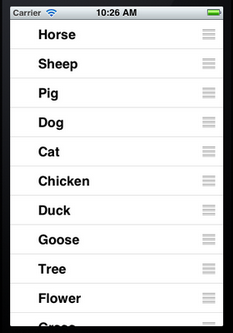
2.4 运行,从下图可以看到实现了行的移动:

但是也会发现,现在无法对每行进行标记了。这说明,在编辑模式下,无法选择行,从而didSelectRowAtIndexPath这个方法不会执行。
3、删除行
从第2步过来,实现删除某行,其实比较简单了。
3.1将editingStyleForRowAtIndexPath方法中的UITableViewCellEditingStyleNone修改成UITableViewCellEditingStyleDelete。
3.2 在@end之前添加代码:
//这个方法根据参数editingStyle是UITableViewCellEditingStyleDelete
//还是UITableViewCellEditingStyleDelete执行删除或者插入
- (void)tableView:(UITableView *)tableView commitEditingStyle:
    (UITableViewCellEditingStyle)editingStyle forRowAtIndexPath:(NSIndexPath *)indexPath {
    NSUInteger row = [indexPath row];
    if (editingStyle == UITableViewCellEditingStyleDelete) {
        [self.list removeObjectAtIndex:row];
        [tableView deleteRowsAtIndexPaths:[NSArray arrayWithObject:indexPath]
                         withRowAnimation:UITableViewRowAnimationAutomatic];
    }
}
在这个方法中又出现了一个常量:UITableViewRowAnimationAutomatic,它表示删除时的效果,类似的常量还有:
UITableViewRowAnimationAutomatic
UITableViewRowAnimationTop
UITableViewRowAnimationBottom
UITableViewRowAnimationLeft
UITableViewRowAnimationRight
UITableViewRowAnimationMiddle
UITableViewRowAnimationFade
UITableViewRowAnimationNone
它们的效果就不一一介绍了,可以在实际使用时试试。
3.3 运行,看看效果:
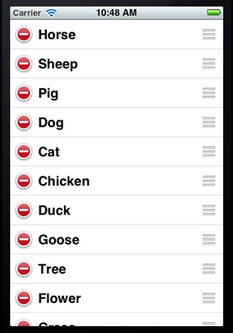


刚运行时显示如左边的图片,点击某一行左边的圆圈图标,会显示如中间图片所示。然后点击Delegate按钮,那一行就会被删除掉,如右边的那张图片所示,它显示的是删除时的效果。
4、插入行
这个与删除行类似。
4.1 首先将editingStyleForRowAtIndexPath方法中的UITableViewCellEditingStyleDelete修改成UITableViewCellEditingStyleInsert。
4.2在3.2添加的方法中添加代码:
else {
    //我们实现的是在所选行的位置插入一行,因此直接使用了参数indexPath
    NSArray *insertIndexPaths = [NSArray arrayWithObjects:indexPath,nil];
    //同样,将数据加到list中,用的row
    [self.list insertObject:@"新添加的行" atIndex:row];
    [tableView insertRowsAtIndexPaths:insertIndexPaths withRowAnimation:UITableViewRowAnimationRight];
}
上面的代码中也可以不用insertRowsAtIndexPaths方法,而直接使用[tableView reloadData];语句,但是这样就没有添加的效果了。
4.3 好了,运行一下:


刚运行时如上面左图所示,单击了某个加号后,新的一行就从右边飞进来了,因为在insertRowsAtIndexPaths中用了参数UITableViewRowAnimationRight。
UITableView每个cell之间的默认分割线如何去掉
很简单,只需要
tableView.separatorStyle = NO;
UITableView
-、建立 UITableView
DataTable = [[UITableView alloc]initWithFrame:CGRectMake(0, 0, 320, 420)];
[DataTable setDelegate:self];
[DataTable setDataSource:self];
[self.view addSubview:DataTable];
[DataTable release];
二、UITableView各Method说明
//Section总数
- (NSArray *)sectionIndexTitlesForTableView:(UITableView*)tableView{
return TitleData;
}
// Section Titles
//每个section显示的标题
- (NSString *)tableView:(UITableView *)tableViewtitleForHeaderInSection:(NSInteger)section{
return @"";
}
//指定有多少个分区(Section),默认为1
- (NSInteger)numberOfSectionsInTableView:(UITableView *)tableView{
return 4;
}
//指定每个分区中有多少行,默认为1
- (NSInteger)tableView:(UITableView *)tableViewnumberOfRowsInSection:(NSInteger)section{
}
//绘制Cell
-(UITableViewCell *)tableView:(UITableView *)tableViewcellForRowAtIndexPath:(NSIndexPath *)indexPath {
static NSString *SimpleTableIdentifier =@"SimpleTableIdentifier";
UITableViewCell *cell = [tableViewdequeueReusableCellWithIdentifier:
SimpleTableIdentifier];
if (cell ==nil) {
cell = [[[UITableViewCell alloc]initWithStyle:UITableViewCellStyleDefault
reuseIdentifier: SimpleTableIdentifier]
autorelease];
}
cell.imageView.image=image;//未选cell时的图片
cell.imageView.highlightedImage=highlightImage;//选中cell后的图片
cell.text=//.....
return cell;
}
//行缩进
-(NSInteger)tableView:(UITableView *)tableViewindentationLevelForRowAtIndexPath:(NSIndexPath *)indexPath{
NSUInteger row = [indexPath row];
return row;
}
//改变行的高度
- (CGFloat)tableView:(UITableView *)tableViewheightForRowAtIndexPath:(NSIndexPath *)indexPath{
return40;
}
//定位
[TopicsTable setContentOffset:CGPointMake(0, promiseNum * 44 +Chapter * 20)];
//返回当前所选cell
NSIndexPath *ip = [NSIndexPath indexPathForRow:rowinSection:section];
[TopicsTable selectRowAtIndexPath:ip animated:YESscrollPosition:UITableViewScrollPositionNone];
[tableViewsetSeparatorStyle:UITableViewCellSelectionStyleNone];
//选中Cell响应事件
- (void)tableView:(UITableView *)tableViewdidSelectRowAtIndexPath:(NSIndexPath *)indexPath{
[tableView deselectRowAtIndexPath:indexPathanimated:YES];//选中后的反显颜色即刻消失
}
//判断选中的行(阻止选中第一行)
-(NSIndexPath *)tableView:(UITableView *)tableViewwillSelectRowAtIndexPath:(NSIndexPath *)indexPath
{
NSUIntegerrow = [indexPath row];
if (row ==0)
return nil;
returnindexPath;
}
//划动cell是否出现del按钮
- (BOOL)tableView:(UITableView *)tableViewcanEditRowAtIndexPath:(NSIndexPath *)indexPath {
}
//编辑状态
- (void)tableView:(UITableView *)tableViewcommitEditingStyle:(UITableViewCellEditingStyle)editingStyle
forRowAtIndexPath:(NSIndexPath *)indexPath
{
}
[topicsTable setContentSize:CGSizeMake(0,controller.promiseNum *44)];
//右侧添加一个索引表
- (NSArray *)sectionIndexTitlesForTableView:(UITableView*)tableView{
}
//返回Section标题内容
- (NSString *)tableView:(UITableView *)tableViewtitleForHeaderInSection:(NSInteger)section{
}
//自定义划动时del按钮内容
- (NSString *)tableView:(UITableView *)tableView
titleForDeleteConfirmationButtonForRowAtIndexPath:(NSIndexPath*)indexPath
//跳到指的row or section
[tableView scrollToRowAtIndexPath:[NSIndexPath indexPathForRow:0inSection:0] atScrollPosition:UITableViewScrollPositionBottomanimated:NO];
三、在UITableViewCell上建立UILable多行显示
- (UITableViewCell *)tableView:(UITableView *)tableViewcellForRowAtIndexPath:(NSIndexPath *)indexPath {
staticNSString *CellIdentifier =@"Cell";
UITableViewCell *cell = [tableViewdequeueReusableCellWithIdentifier:CellIdentifier];
if (cell ==nil) {
cell = [[[UITableViewCell alloc] initWithFrame:CGRectZeroreuseIdentifier:CellIdentifier] autorelease];
UILabel *Datalabel = [[UILabelalloc] initWithFrame:CGRectMake(10, 0, 320, 44)];
[Datalabel setTag:100];
Datalabel.autoresizingMask =UIViewAutoresizingFlexibleWidth |UIViewAutoresizingFlexibleHeight;
[cell.contentViewaddSubview:Datalabel];
[Datalabel release];
}
UILabel *Datalabel = (UILabel *)[cell.contentViewviewWithTag:100];
[Datalabel setFont:[UIFontboldSystemFontOfSize:18]];
Datalabel.text = [data.DataArrayobjectAtIndex:indexPath.row];
cell.accessoryType =UITableViewCellAccessoryDisclosureIndicator;
returncell;
}
//选中cell时的颜色
typedef enum {
UITableViewCellSelectionStyleNone,
UITableViewCellSelectionStyleBlue,
UITableViewCellSelectionStyleGray
} UITableViewCellSelectionStyle
//cell右边按钮格式
typedef enum {
UITableViewCellAccessoryDisclosureIndicator, // regular chevron. doesn't track
UITableViewCellAccessoryDetailDisclosureButton, // blue button w/chevron. tracks
UITableViewCellAccessoryCheckmark // checkmark. doesn't track
} UITableViewCellAccessoryType
//是否加换行线
typedef enum {
UITableViewCellSeparatorStyleNone,
UITableViewCellSeparatorStyleSingleLine
} UITableViewCellSeparatorStyle
//改变换行线颜色
tableView.separatorColor =[UIColor
blueColor];
解决自定义UITableViewCell在浏览中出现数据行重复的问题
原创作品,允许转载,转载时请务必以超链接形式标明文章 原始出处 、作者信息和本声明。否则将追究法律责任。http://ddkangfu.blog.51cto.com/311989/
我在写一个App的时候自定义了一个UITableViewCell,但是这个UITableView在运行的时候出现了每6行数据就循环重复显示的问题,而直接使用cell.textLabel.text显示是没有这个问题,以下是我实现的代码。
- - (UITableViewCell *)tableView:(UITableView *)tableView cellForRowAtIndexPath:(NSIndexPath *)indexPath
- {
- NSInteger section = [indexPath section];
- NSInteger row = [indexPath row];
- UITableViewCell *cell;
- switch (section)
- {
- case 0:
- //do something.
- case 1:
- cell = [tableView dequeueReusableCellWithIdentifier:@"Cell"];
- if (cell == nil)
- {
- cell = [[[UITableViewCell alloc] initWithStyle:UITableViewCellStyleDefault reuseIdentifier:@"Cell"] autorelease];
- //Image
- UIImageView *image = [[UIImageView alloc] initWithFrame:CGRectMake(0.0f, 14.0f, 45.0f, 50.0f)];
- image.backgroundColor = [UIColor clearColor];
- image.image = [UIImage imageNamed:@"folder.png"];
- [cell.contentView addSubview:image];
- [image release];
- //Label
- UILabel *titleLabel = [[UILabel alloc] initWithFrame:CGRectMake(45.0f, 6.0f, 214.0f, 50.0f)];
- titleLabel.text = (NSString *)[(NSArray *)[self.categoryArray objectAtIndex:1] objectAtIndex:row];
- NSLog(@"%@ -- %d", titleLabel.text, row);
- titleLabel.textAlignment = UITextAlignmentLeft;
- titleLabel.numberOfLines = 3;
- titleLabel.tag = 201;
- titleLabel.font = [UIFont boldSystemFontOfSize:14];
- [cell.contentView addSubview:titleLabel];
- [titleLabel release];
- }
- cell.accessoryType = UITableViewCellAccessoryDetailDisclosureButton;
- break;
- }
- cell.selectionStyle = UITableViewCellSelectionStyleNone;
- return cell;
- }
google了一下,目前已有的解决方案是将
- cell = [tableView dequeueReusableCellWithIdentifier:@"Cell"];
替换成
- cell = [tableView cellForRowAtIndexPath:indexPath];
或者
- cell = nil;
这们做的目的去掉Cell的重用机制,但是这种方法都会在后台随着表格滚动一直在创建cell,通过上面源代码中Label定义里那句NSLog在控制台输出就可以看到,虽然会自动回收内存,但肯定也会给系统带来不小开销,所以不到万一得以还是不会用的。
还有一种解决方案是自己定义Cell数组,在tableView:tableView cellForRowAtIndexPath:中进设置要显示的cell,这是手工维护cell的一种方式,对大数据量的情况肯定是不适用的,不过也能算得上是一种思路吧,可以参考一下。其代码如下:
- //在构造函数里定义cell数组
- for(int i = 0; i < 31; i ++)
- {
- static NSString *MyBookMarkIdentifier = @"CityMangerCell";
- cityCell[i] = [[CityMangerCell alloc] initWithFrame:CGRectZero reuseIdentifier:MyBookMarkIdentifier initIndex:i];
- }
- //使用它
- - (UITableViewCell *)tableView:(UITableView *)tableView cellForRowAtIndexPath:(NSIndexPath *)indexPath
- {
- if((0 <= indexPath.row) && (indexPath.row < 31))
- return cityCell[indexPath.row];
- return nil;
- }
后来我仔细分析了一下程序,找到了问题所在:
原因是在if (cell == nil)判断内部不应该对其label进行赋值,即不使用这句:
- titleLabel.text = (NSString *)[(NSArray *)[self.categoryArray objectAtIndex:1] objectAtIndex:row];
正确的做法应该是在if (cell == nil){}判断后面进行赋值。即
- if (cell == nil)
- {
- ....
- }
- UILabel *l1 = (UILabel *)[cell.contentView viewWithTag: 201];
- l1.text = (NSString *)[(NSArray *)[self.categoryArray objectAtIndex:1] objectAtIndex:row];
分析原因如下:
UITableView中被实例化的cell个数由屏高和每个cell的高度决定,因为我的cell高度设置为80,一屏只能
显示6个Cell(只有6个cell被实例化),也就是只有这6个cell才会执行if (cell ==
nil){}中的代码,从第6行往后的cell都是重用的这6个cell,也就是说从第7行开始将不会执行if (cell =
nil){}中的代码,当UITableView需要绘制第7行cell的时候,会取得第1个cell进行重用,如果我们不把原来第1行cell中的
Label内容进行修改,那么第7行将完全显示第1行中的内容,所以才会在第6行之后开始出现数据重复的情况。
现在我将Label内容设置的代码放到if (cell == nil){}之后,它将会对每一个被重用的cell的Label进行设定,也就不会再出现cell内容重复的现象。
希望这个问题的解决过程会对大家有所帮助。这个问题解决出自 “一叶障目” 博客,请务必保留此出处http://ddkangfu.blog.51cto.com/311989/465557