1.布局
 1 <TabHost xmlns:android="http://schemas.android.com/apk/res/android"
 2     xmlns:tools="http://schemas.android.com/tools"
 3     android:id="@+id/tabHost"
 4     android:layout_width="match_parent"
 5     android:layout_height="match_parent" >
 6
 7     <LinearLayout
 8         android:id="@+id/tab1"
 9         android:layout_width="match_parent"
10         android:layout_height="match_parent"
11         android:orientation="vertical"
12         tools:context=".AndroidTabHostActivity" >
13
14         <TextView
15             android:layout_width="wrap_content"
16             android:layout_height="wrap_content"
17             android:layout_centerHorizontal="true"
18             android:layout_centerVertical="true"
19             android:text="第一个" />
20     </LinearLayout>
21
22     <LinearLayout
23         android:id="@+id/tab2"
24         android:layout_width="match_parent"
25         android:layout_height="match_parent"
26         android:orientation="vertical"
27         tools:context=".AndroidTabHostActivity" >
28
29         <TextView
30             android:layout_width="wrap_content"
31             android:layout_height="wrap_content"
32             android:layout_centerHorizontal="true"
33             android:layout_centerVertical="true"
34             android:text="第二个" />
35     </LinearLayout>
36
37     <LinearLayout
38         android:id="@+id/tab3"
39         android:layout_width="match_parent"
40         android:layout_height="match_parent"
41         android:orientation="vertical"
42         tools:context=".AndroidTabHostActivity" >
43
44         <TextView
45             android:layout_width="wrap_content"
46             android:layout_height="wrap_content"
47             android:layout_centerHorizontal="true"
48             android:layout_centerVertical="true"
49             android:text="第三个" />
50     </LinearLayout>
51
52 </TabHost>
2.逻辑控制
 1 package com.example.androidtabhost;
 2
 3 import android.os.Bundle;
 4 import android.app.Activity;
 5 import android.app.TabActivity;
 6 import android.view.LayoutInflater;
 7 import android.view.Menu;
 8 import android.widget.TabHost;
 9
10 public class AndroidTabHostActivity extends TabActivity {
11 //注意:extends TabActivity
12     @Override
13     protected void onCreate(Bundle savedInstanceState) {
14         super.onCreate(savedInstanceState);
15         //setContentView(R.layout.activity_android_tab_host);
16         TabHost tabHost=getTabHost();//(TabHost)this.findViewById(R.id.tabHost);
17         //设置TabHost布局
18         LayoutInflater.from(this).inflate(R.layout.activity_android_tab_host,tabHost.getTabContentView(),true);
19         //添加第一个标签页
20         tabHost.addTab(tabHost.newTabSpec("tab01").setIndicator("已接电话").setContent(R.id.tab1));
21         //添加第2个标签页
22         tabHost.addTab(tabHost.newTabSpec("tab02").setIndicator("呼出电话",getResources().getDrawable(R.drawable.sj)).setContent(R.id.tab2));
23         //添加第3个标签页
24         tabHost.addTab(tabHost.newTabSpec("tab03").setIndicator("未接电话").setContent(R.id.tab3));
25
26     }
27
28     @Override
29     public boolean onCreateOptionsMenu(Menu menu) {
30         // Inflate the menu; this adds items to the action bar if it is present.
31         getMenuInflater().inflate(R.menu.activity_android_tab_host, menu);
32         return true;
33     }
34
35 }
TabHost是整个Tab的容器,包括两部分,TabWidget和FrameLayout。TabWidget就是每个tab的标签,FrameLayout则是tab内容
TabHost的二种实现方式:
第一种:继承TabActivity
1、如果我们使用extendsTabAcitivty,如同ListActivity,TabHost必须设置为@android:id/tabhost
2、TabWidget必须设置android:id为@android:id/tabs
3、FrameLayout需要设置android:id为@android:id/tabcontent
第二种:只是单纯的继承Activity类
布局文件 和上面一样 只是TabHost 的id 换为
tabHost = (TabHost)findViewById(R.id.m_tabhost);
//如果通过findViewById得到TabHost一定要调用 TabHost.setup();
LocalActivityManagerlocalAcManager = new LocalActivityManager(MainActivity.this,true);
localAcManager.dispatchCreate(savedInstanceState);
tabHost.setup(localAcManager);
还可以自定义标签,将TabWidget android:visibility="gone" 然后自己弄些控件替代
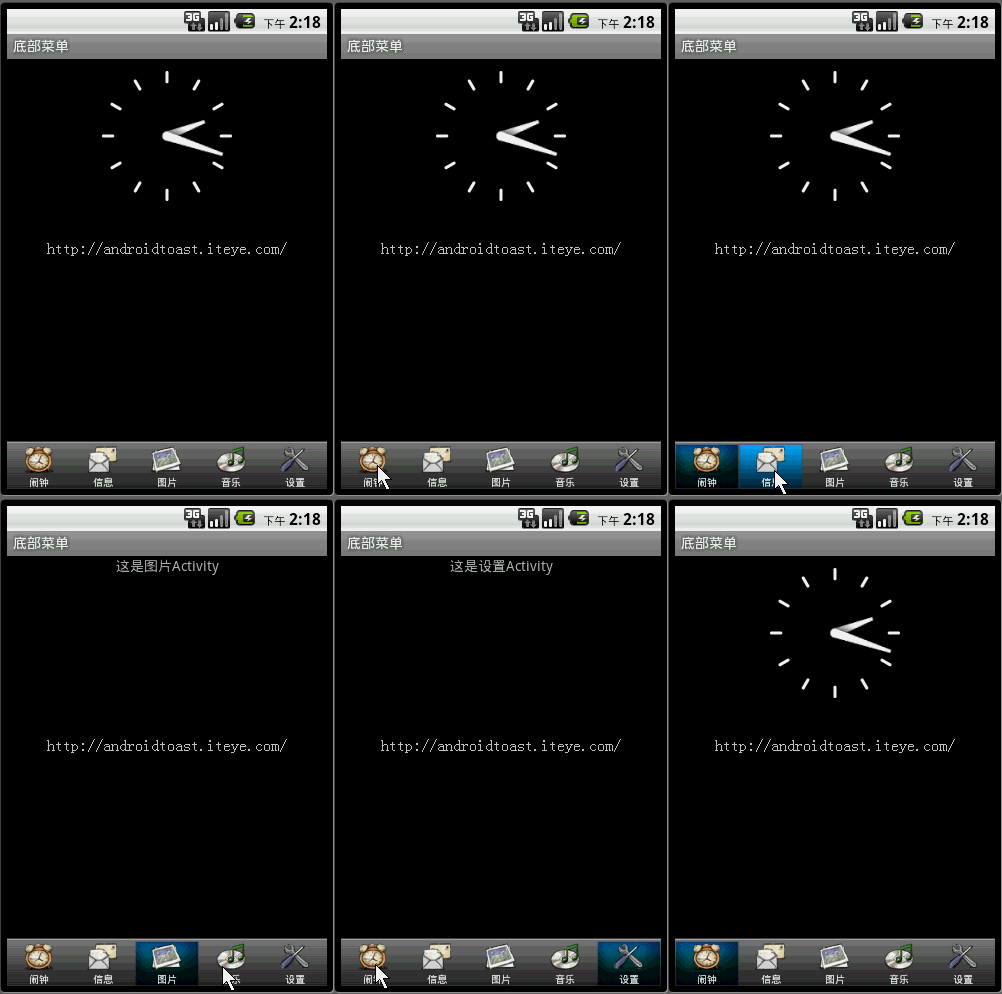
另一实现自定义底部菜单
布局文件
 1 <?xml version="1.0" encoding="UTF-8"?>
 2 <TabHost android:id="@android:id/tabhost" android:layout_width="fill_parent" android:layout_height="fill_parent"
 3   xmlns:android="http://schemas.android.com/apk/res/android">
 4     <LinearLayout
 5         android:orientation="vertical"
 6         android:layout_width="fill_parent"
 7         android:layout_height="fill_parent">
 8         <FrameLayout
 9             android:id="@android:id/tabcontent"
10             android:layout_width="fill_parent"
11             android:layout_height="0.0dip"
12             android:layout_weight="1.0" />
13         <TabWidget
14             android:id="@android:id/tabs"
15             android:visibility="gone"
16             android:layout_width="fill_parent"
17             android:layout_height="wrap_content"
18             android:layout_weight="0.0" />
19         <RadioGroup
20             android:gravity="center_vertical"
21             android:layout_gravity="bottom"
22             android:orientation="horizontal"
23             android:id="@+id/main_radio"
24             android:background="@drawable/maintab_toolbar_bg"
25             android:layout_width="fill_parent"
26             android:layout_height="wrap_content">
27             <RadioButton
28                 android:id="@+id/radio_button0"
29                 android:tag="radio_button0"
30                 android:layout_marginTop="2.0dip"
31                 android:text="@string/alarm"
32                 android:drawableTop="@drawable/icon_1"
33                 style="@style/main_tab_bottom" />
34             <RadioButton
35                 android:id="@+id/radio_button1"
36                 android:tag="radio_button1"
37                 android:layout_marginTop="2.0dip"
38                 android:text="@string/message"
39                 android:drawableTop="@drawable/icon_2"
40                 style="@style/main_tab_bottom" />
41             <RadioButton
42                 android:id="@+id/radio_button2"
43                 android:tag="radio_button2"
44                 android:layout_marginTop="2.0dip"
45                 android:text="@string/photo"
46                 android:drawableTop="@drawable/icon_3"
47                 style="@style/main_tab_bottom" />
48             <RadioButton
49                 android:id="@+id/radio_button3"
50                 android:tag="radio_button3"
51                 android:layout_marginTop="2.0dip"
52                 android:text="@string/music"
53                 android:drawableTop="@drawable/icon_4"
54                 style="@style/main_tab_bottom" />
55             <RadioButton
56                 android:id="@+id/radio_button4"
57                 android:tag="radio_button4"
58                 android:layout_marginTop="2.0dip"
59                 android:text="@string/setting"
60                 android:drawableTop="@drawable/icon_5"
61                 style="@style/main_tab_bottom" />
62         </RadioGroup>
63     </LinearLayout>
64 </TabHost>
隐藏了系统默认的Widget,取而代之的是带有图片的Button
java
 1 package com.iteye.androidtoast;
 2
 3 import android.app.TabActivity;
 4 import android.content.Intent;
 5 import android.os.Bundle;
 6 import android.widget.RadioGroup;
 7 import android.widget.RadioGroup.OnCheckedChangeListener;
 8 import android.widget.TabHost;
 9
10 public class MainActivity extends TabActivity implements OnCheckedChangeListener{
11     /** Called when the activity is first created. */
12     private TabHost mHost;
13     private RadioGroup radioderGroup;
14     @Override
15     public void onCreate(Bundle savedInstanceState) {
16         super.onCreate(savedInstanceState);
17         setContentView(R.layout.maintabs);
18         //实例化TabHost
19         mHost=this.getTabHost();
20
21         //添加选项卡
22         mHost.addTab(mHost.newTabSpec("ONE").setIndicator("ONE")
23                     .setContent(new Intent(this,OneActivity.class)));
24         mHost.addTab(mHost.newTabSpec("TWO").setIndicator("TWO")
25                 .setContent(new Intent(this,TwoActivity.class)));
26         mHost.addTab(mHost.newTabSpec("THREE").setIndicator("THREE")
27                 .setContent(new Intent(this,ThreeActivity.class)));
28         mHost.addTab(mHost.newTabSpec("FOUR").setIndicator("FOUR")
29                 .setContent(new Intent(this,FourActivity.class)));
30         mHost.addTab(mHost.newTabSpec("FIVE").setIndicator("FIVE")
31                 .setContent(new Intent(this,FiveActivity.class)));
32
33         radioderGroup = (RadioGroup) findViewById(R.id.main_radio);
34         radioderGroup.setOnCheckedChangeListener(this);
35     }
36     @Override
37     public void onCheckedChanged(RadioGroup group, int checkedId) {
38         switch(checkedId){
39         case R.id.radio_button0:
40             mHost.setCurrentTabByTag("ONE");
41             break;
42         case R.id.radio_button1:
43             mHost.setCurrentTabByTag("TWO");
44             break;
45         case R.id.radio_button2:
46             mHost.setCurrentTabByTag("THREE");
47             break;
48         case R.id.radio_button3:
49             mHost.setCurrentTabByTag("FOUR");
50             break;
51         case R.id.radio_button4:
52             mHost.setCurrentTabByTag("FIVE");
53             break;
54         }
55     }
56 }
