Multi-node setup on CentOS
参考官网:https://docs.citusdata.com/en/v6.2/installation/production_rhel.html
Test Environments
CentOS Linux release 7.2.1511 (Core)
Three nodes(citus1,citus2,citus3)
Steps to be executed on all nodes
1. Add repository
curl https://install.citusdata.com/community/rpm.sh | sudo bash
2. Install PostgreSQL + Citus and initialize a database
sudo yum install -y citus62_96
sudo service postgresql-9.6 initdb || sudo /usr/pgsql-9.6/bin/postgresql96-setup initdb
echo "shared_preload_libraries = 'citus'" | sudo tee -a /var/lib/pgsql/9.6/data/postgresql.conf
3. Configure connection and authentication
sudo vi /var/lib/pgsql/9.6/data/postgresql.conf

sudo vi /var/lib/pgsql/9.6/data/pg_hba.conf
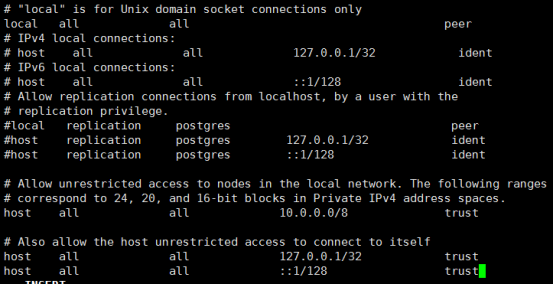
Note:Your DNS settings may differ. Also these settings are too permissive for some environments.The configuration is shown below:
https://www.postgresql.org/docs/9.6/static/auth-pg-hba-conf.html
4. Start database servers, create Citus extension
sudo service postgresql-9.6 restart
sudo chkconfig postgresql-9.6 on
You must add the Citus extension to every database you would like to use in a cluster. The following example adds the extension to the default database which is named postgres.
sudo -i -u postgres psql -c "CREATE EXTENSION citus;"
Steps to be executed only on the coordinator node
1. Add worker node
sudo -i -u postgres psql -c "SELECT * from master_add_node('citus2', 5432);"
sudo -i -u postgres psql -c "SELECT * from master_add_node('citus3', 5432);"
2. Verify
sudo -i -u postgres psql -c "SELECT * FROM master_get_active_worker_nodes();"
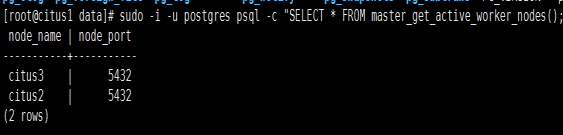
Succeeded!
Notes:Remove worker node command(If you add a node wrong)
sudo -i -u postgres psql -c "SELECT * from master_remove_node('work', 5432);"
See the details below:
https://docs.citusdata.com/en/v6.2/reference/user_defined_functions.html
Test
Download sample data
curl https://examples.citusdata.com/tutorial/companies.csv > /var/lib/pgsql/companies.csv
curl https://examples.citusdata.com/tutorial/campaigns.csv > /var/lib/pgsql/campaigns.csv
curl https://examples.citusdata.com/tutorial/ads.csv > /var/lib/pgsql/ads.csv
Creating tables
To start, you can first connect to the Citus co-ordinator(citus1) using psql.
# sudo -i -u postgres psql
CREATE TABLE companies ( id bigint NOT NULL, name text NOT NULL, image_url text, created_at timestamp without time zone NOT NULL, updated_at timestamp without time zone NOT NULL );

CREATE TABLE campaigns ( id bigint NOT NULL, company_id bigint NOT NULL, name text NOT NULL, cost_model text NOT NULL, state text NOT NULL, monthly_budget bigint, blacklisted_site_urls text[], created_at timestamp without time zone NOT NULL, updated_at timestamp without time zone NOT NULL );

CREATE TABLE ads ( id bigint NOT NULL, company_id bigint NOT NULL, campaign_id bigint NOT NULL, name text NOT NULL, image_url text, target_url text, impressions_count bigint DEFAULT 0, clicks_count bigint DEFAULT 0, created_at timestamp without time zone NOT NULL, updated_at timestamp without time zone NOT NULL );
Next, you can create primary key indexes on each of the tables just like you would do in PostgreSQL
ALTER TABLE companies ADD PRIMARY KEY (id);
ALTER TABLE campaigns ADD PRIMARY KEY (id, company_id);
ALTER TABLE ads ADD PRIMARY KEY (id, company_id);
Distributing tables and loading data
SELECT create_distributed_table('companies', 'id');
SELECT create_distributed_table('campaigns', 'company_id');
SELECT create_distributed_table('ads', 'company_id');
Load the data
postgres=# copy companies from '/var/lib/pgsql/companies.csv' with csv;
COPY 100
postgres=# copy campaigns from '/var/lib/pgsql/campaigns.csv' with csv;
COPY 978
postgres=# copy ads from '/var/lib/pgsql/ads.csv' with csv;
COPY 7364
Running queries
postgres=# INSERT INTO companies VALUES (5000, 'New Company', 'https://randomurl/image.png', now(), now());
INSERT 0 1
postgres=# UPDATE campaigns
postgres-# SET monthly_budget = monthly_budget*2
postgres-# WHERE company_id = 5;
UPDATE 12
postgres=# BEGIN;
BEGIN
postgres=# DELETE from campaigns where id = 46 AND company_id = 5;
DELETE 1
postgres=# DELETE from ads where campaign_id = 46 AND company_id = 5;
DELETE 7
postgres=# COMMIT;
COMMIT
postgres=# SELECT name, cost_model, state, monthly_budget
postgres-# FROM campaigns
postgres-# WHERE company_id = 5
postgres-# ORDER BY monthly_budget DESC
postgres-# LIMIT 10;
name | cost_model | state | monthly_budget
-------------------------+---------------------+----------+----------------
Wondra | cost_per_impression | running | 16732
Quicksilver | cost_per_click | paused | 12664
Cyborg | cost_per_impression | running | 8198
Agent Hancock | cost_per_impression | running | 6996
Mr Cyclops I | cost_per_click | paused | 6122
Sasquatch Eyes | cost_per_impression | archived | 5828
Ultra Namor | cost_per_impression | paused | 5554
Carnage | cost_per_impression | paused | 4300
Cyborg Two-Face Machine | cost_per_click | archived | 4086
Binary | cost_per_impression | paused | 3620
(10 rows)