1、集群的作用
(1): 主从备份 防止主机宕机
(2): 读写分离,分担master的任务
(3): 任务分离,如从服分别分担备份工作与计算工作
2、集群的方式
(1)树形集群
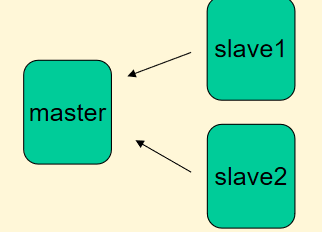
(2)线性集群
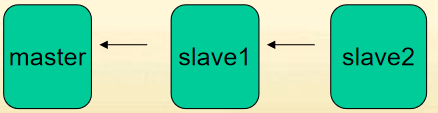
线性集群的好处就是当主服务器宕机之后,可以直接切换到slave1上。
3、集群的原理

当从服务器启动的时,会将rdb文件全部备份过来,再将aof中的缓读取过来,之后会有一个replicationFeedSlaves进程维护双方的关系。
4、集群任务分配
主服务器-master:
- 地址:127.0.0.1:6379
- 任务:开启aof日志功能
从服务器-slave1:
- 地址:127.0.0.1:6380
- 任务:开启rdb数据持久功能
从服务器-slave2:
- 地址:127.0.0.1:6381
5、修改配置文件
(1)主服务器配置:redis.conf
#开启aof功能
appendonly yes
appendfsync everysec
no-appendfsync-on-rewrite yes
auto-aof-rewrite-percentage 100
auto-aof-rewrite-min-size 64mb

#禁止rdb功能由从服务器slave1担任
#save 900 1
#save 300 10
#save 60 10000

#配置访问密码
requirepass zbbiex
(2)slave1配置:redis6380.conf
#修改端口
port 6380
#修改pid文件
pidfile /var/run/redis_6380.pid
#设置主服务器连接密码
masterauth zbbiex

#禁掉aof功能
appendonly no

#开启rdb功能
save 900 1
save 300 10
save 60 10000

#配置主服务器信息
slaveof 127.0.0.1 6379
(3)slave2配置:redis6381.conf
#修改端口
port 6381
#修改pid文件
pidfile /var/run/redis_6381.pid
#设置主服务器连接密码
masterauth zbbiex

#禁掉aof功能
appendonly no

#禁掉rdb功能
#save 900 1
#save 300 10
#save 60 10000

#配置主服务器信息
slaveof 127.0.0.1 6379
6、启动三个redis服务
/bin/redis-server redis.conf
/bin/redis-server redis6380.conf
/bin/redis-server redis6381.conf
7、测试数据
主服务->127.0.0.1:6381
./redis-cli -h 127.0.0.1 -p 6379
127.0.0.1:6379> sit name zbbiex
(error) ERR unknown command `sit`, with args beginning with: `name`, `zbbiex`,
127.0.0.1:6379> auth zbbiex
OK
127.0.0.1:6379> set name zbbiex
OK
127.0.0.1:6379>
slave1->127.0.0.1:6380
./redis-cli -h 127.0.0.1 -p 6380
127.0.0.1:6380> auth zbbiex
OK
127.0.0.1:6380> get name
"zbbiex"
127.0.0.1:6380>
slave2->127.0.0.1:6381
 ./redis-cli -h 127.0.0.1 -p 6381
127.0.0.1:6381> auth zbbiex
OK
127.0.0.1:6381> get name
"zbbiex"
127.0.0.1:6381
完成!!!