大家好,我是一叶,今天我们继续踩坑。今天的内容是vuex快速入门,页面传值不多的话,不建议vuex,直接props进行父子间传值就行,使用vuex就显得比较臃肿。
我们先预览一下效果,如图1所示。

图1
1、创建vue-cli项目
如果不会用vue-cli构建项目的小伙伴可以看看以前我发过的文章:
http://www.yyzhiqiu.com/?post=14
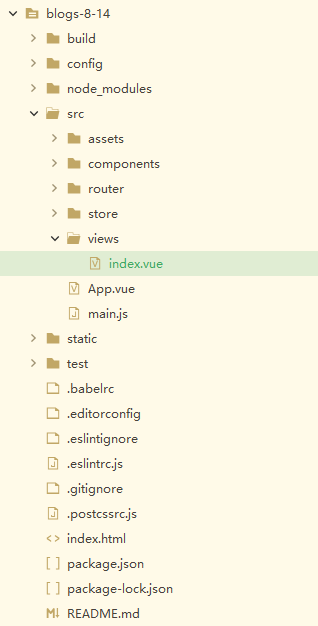
目录结构如图2所示。

图2
2、下载、引入vuex、axios
执行命令行:
cnpm install vuex
cnpm install axios
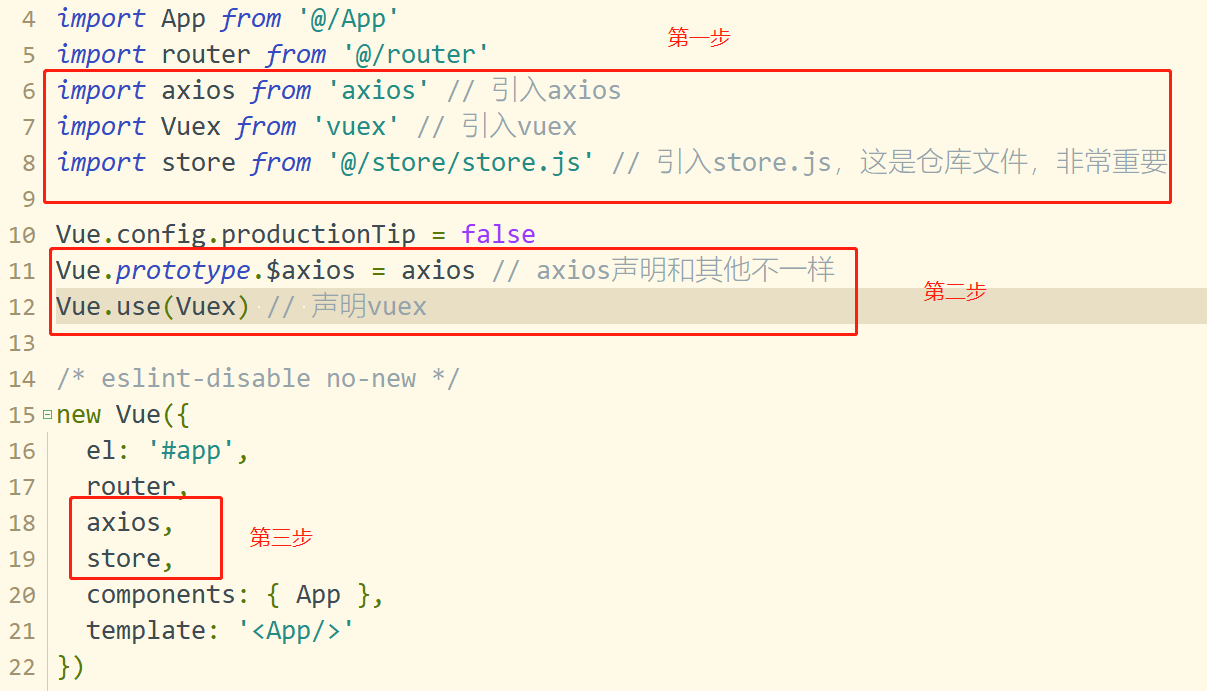
在src目录下创建store目录,再创建store.js文件。在main.js中引入vuex,如图3所示。

图3
如果有的小伙伴不想敲代码,直接复制就可以运行。
代码如下,按需引入:
main.js:
 1 import Vue from 'vue'
 2 import App from '@/App'
 3 import router from '@/router'
 4 import axios from 'axios' // 引入axios
 5 import Vuex from 'vuex' // 引入vuex
 6 import store from '@/store/store.js' // 引入store.js,这是仓库文件,非常重要
 7
 8 Vue.config.productionTip = false
 9 Vue.prototype.$axios = axios // axios声明和其他不一样
10 Vue.use(Vuex) // 声明vuex
11
12 /* eslint-disable no-new */
13 new Vue({
14   el: '#app',
15   router,
16   axios,
17   store,
18   components: { App },
19   template: '<App/>'
20 })
直接po代码,结合底下的注解就能明白了。
App.vue:
 1 <template>
 2   <div id="app">
 3     <img src="./assets/logo.png">
 4     <router-view/>
 5   </div>
 6 </template>
 7
 8 <script>
 9 export default {
10   name: 'App'
11 }
12 </script>
13
14 <style>
15 #app {
16   font-family: 'Avenir', Helvetica, Arial, sans-serif;
17   -webkit-font-smoothing: antialiased;
18   -moz-osx-font-smoothing: grayscale;
19   text-align: center;
20   color: #2c3e50;
21   margin-top: 60px;
22 }
23 </style>
store.js:

 1 import Vue from 'vue'
 2 import App from '@/App.vue'
 3 import Vuex from 'vuex'
 4
 5 Vue.use(Vuex)
 6
 7 const state = {
 8   studentData: [
 9     {name: '蔡徐坤', sex: '男', age: 21},
10     {name: '鸡你太美', sex: '女', age: 21},
11     {name: '蔡唱', sex: '男', age: 21},
12     {name: '蔡跳', sex: '女', age: 21},
13     {name: '蔡rap', sex: '男', age: 21},
14     {name: '蔡篮球', sex: '女', age: 21}
15   ]
16 }
17
18 const getters = {
19   getStudents: (state) => {
20     let getStudents = state.studentData.map(student => {
21       return {
22         name: student.name,
23         sex: student.sex,
24         age: student.age
25       }
26     })
27     return getStudents
28   }
29 }
30
31 const mutations = {
32   getStuData (state, payload) {
33     let newstudent = state.studentData.forEach(student => {
34       student.age = student.age + payload
35     })
36   }
37 }
38
39 const actions = {
40   getStuDataAsync (context, payload) {
41     setTimeout(() => {
42       context.commit('getStuData', payload) // context提交
43     }, 2000)
44   }
45 }
46
47 export default new Vuex.Store({
48   state, getters, mutations, actions
49 })
index.vue:

 1 <template>
 2   <div>
 3     <h2>vuex学习使用案例</h2>
 4     <div class="test">
 5       <ul>
 6         <li><span>姓名</span><span>性别</span><span>年龄</span></li>
 7         <li v-for="(student,index) in students" :key="index">
 8           <span class="name">{{ student.name }}</span>
 9           <span class="sex">{{ student.sex}}</span>
10           <span class="sex">{{ student.age}}</span>
11         </li>
12         <button @click="getStuData">增加年龄</button> <!-- //添加按钮 -->
13         <button @click="getStuDataAsync">异步增加年龄</button> <!-- //添加按钮 -->
14       </ul>
15     </div>
16   </div>
17 </template>
18
19 <script>
20 // import store from '@/store/store.js'
21 import store from '@/store/store.js';
22 export default {
23   name: 'index',
24   data() {
25     return {
26       students : this.$store.state.studentData
27     };
28   },
29   mounted() {
30   },
31   methods: {
32     getStuData() {
33         this.$store.commit('getStuData', 2); //提交`getStuData,payload为2
34     },
35     getStuDataAsync() {
36         this.$store.dispatch('getStuDataAsync', 5); //分发actions中的getStuDataAsync这个异步函数
37     }
38   },
39   components: {
40   }
41 };
42 </script>
43
44 <style>
45   .test ul li{ 500px;height: 50px;list-style: none;margin: 0 auto;border: #42B983 1px solid;}
46   .test ul li span{ 33%;height: 50px;line-height: 50px;font-size: 24px;float: left;}
47   button{ 150px;height: 50px;margin: 20px;background: #42B983;color: #fff;border: 0;font-size: 20px;border-radius: 5px;}
48 </style>
3、核心概念
3.1、state:
state 就是Vuex中的公共的状态,可以把 state 看作是所有组件的data,用于保存所有组件的公共数据。
代码如下:
 1 const state = {
 2   studentData: [
 3     {name: '蔡徐坤', sex: '男', age: 21},
 4     {name: '鸡你太美', sex: '女', age: 21},
 5     {name: '蔡唱', sex: '男', age: 21},
 6     {name: '蔡跳', sex: '女', age: 21},
 7     {name: '蔡rap', sex: '男', age: 21},
 8     {name: '蔡篮球', sex: '女', age: 21}
 9   ]
10 }
3.2、getters:
getters 属性可以理解为所有组件的 computed 属性, 也就是计算属性。 vuex的官方文档也是说到可以将getter理解为store的计算属性,getters的返回值会根据它的依赖被缓存起来,且只有当它的依赖值发生了改变才会被重新计算。
代码如下:
 1 const getters = {
 2   getStudents: (state) => {
 3     let getStudents = state.studentData.map(student => {
 4       return {
 5         name: student.name,
 6         sex: student.sex,
 7         age: student.age
 8       }
 9     })
10     return getStudents
11   }
12 }
其中map()函数的功能是循环,需要返回值,即return,功能和for循环一致。
3.3、mutaions:
mutaions 可以理解为 store 中的 methods, mutations 对象中保存着更改数据的回调函数,该函数名官方规定叫 type ,第一个参数是 state , 第二参数是 payload , 也就是自定义的参数。
getStuData回调函数将用于年龄的增加,增加payload岁。代码如下:
1 const mutations = {
2   getStuData (state, payload) {
3     let newstudent = state.studentData.forEach(student => {
4       student.age = student.age + payload
5     })
6   }
7 }
其中 forEach()函数也是循环函数,不需要返回值。循环函数的优缺点感兴趣的小伙伴可以自行百度,我就不赘述了。
增加年龄的功能 getStuData()写好了,我们得去触发才行啊。所以进入到 index.vue 里添加一个按钮,按钮触发 getStuData()
代码如下:
 1 <template>
 2   <div>
 3     <h2>vuex学习使用案例</h2>
 4     <div class="test">
 5       <ul>
 6         <li><span>姓名</span><span>性别</span><span>年龄</span></li>
 7         <li v-for="(student,index) in students" :key="index">
 8           <span class="name">{{ student.name }}</span>
 9           <span class="sex">{{ student.sex}}</span>
10           <span class="sex">{{ student.age}}</span>
11         </li>
12         <button @click="getStuData">增加年龄</button>
13       </ul>
14     </div>
15   </div>
16 </template>
在 js 里注册一下 getStuData 方法,在该方法中commit一下mutaions中的 getStuData 这个回调函数。
注意:调用mutaions中回调函数, 只能使用store.commit(type, payload)
 1 <script>
 2 // import store from '@/store/store.js'
 3 import store from '@/store/store.js';
 4 export default {
 5   name: 'index',
 6   data() {
 7     return {
 8       students : this.$store.state.studentData
 9     };
10   },
11   mounted() {
12   },
13   methods: {
14     getStuData() {
15         this.$store.commit('getStuData', 2); //提交`getStuData,payload为2
16     }
17   },
18   components: {
19   }
20 };
21 </script>
点击按钮,会发现年龄增加了2岁,即增加了payload。
3.4、actions:
actions 类似于 mutations,不同在于:
actions提交的是mutations而不是直接变更状态actions中可以包含异步操作,mutations中不能出现异步actions中的回调函数的第一个参数是context, 是一个与store实例具有相同属性和方法的对象
在store.js中,增加 actions 方法,代码如下:
1 const actions = {
2   getStuDataAsync (context, payload) {
3     setTimeout(() => {
4       context.commit('getStuData', payload) // context提交
5     }, 1000)
6   }
7 }
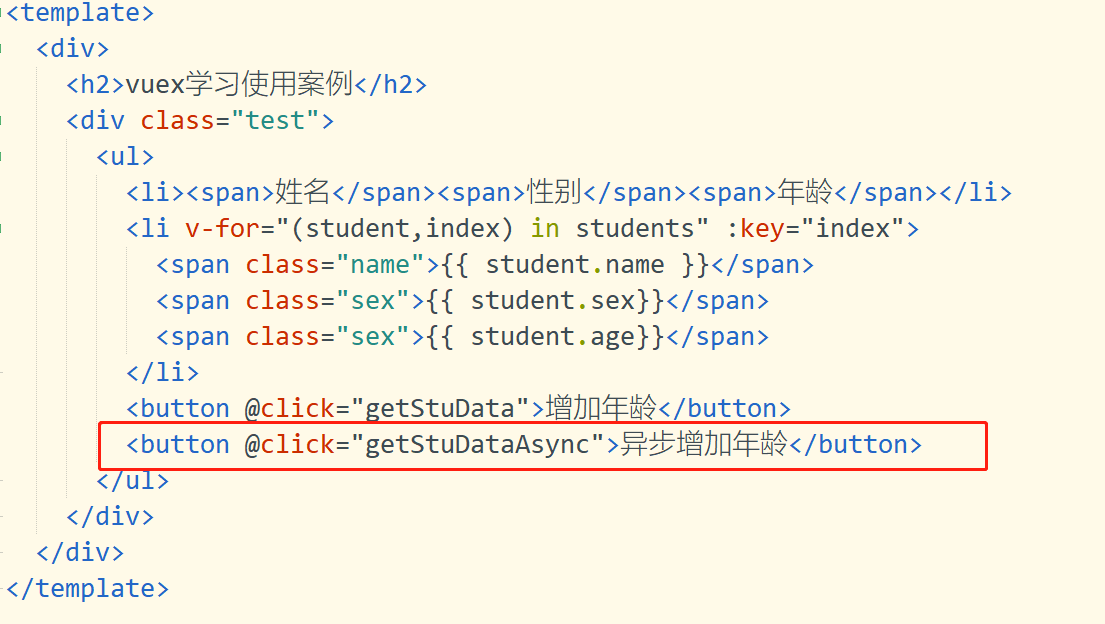
到index.vue中添加按钮,注册getStuDataAsync方法,并触发该方法,实现异步增加年龄。添加按钮,在html中如图4所示。

图4
注册方法,在js中如图5所示。

图5
注册getStuDataAsync方法时,需要dispatcha ctions 中的getStuDataAysnc()回调函数。
3.5、modules:
当存在多个state的数据时,使用store便显得臃肿和麻烦,所以便产生了modules(模块)。每个modules都有一套完整的store,即state、getters、mutations、actions。用法如下:
 1 const moduleA = {
 2   state: { ... },
 3   mutations: { ... },
 4   actions: { ... },
 5   getters: { ... }
 6 }
 7
 8 const moduleB = {
 9   state: { ... },
10   mutations: { ... },
11   actions: { ... }
12 }
13
14 const store = new Vuex.Store({
15   modules: {
16     a: moduleA,
17     b: moduleB
18   }
19 })
20
21 store.state.a // -> moduleA 的状态
22 store.state.b // -> moduleB 的状态
好了,vuex的入门差不多就到这里了,对文中的错误和疑惑希望大家指出来。对了,欢迎点赞留言。
