什么是RunLoop?
从字面意思看,
运行循环
NSRunLoop和CFRunLoopRef都代表着RunLoop对象
NSRunLoop是基于CFRunLoopRef的一层OC包装,所以要了解RunLoop内部结构,需要多研究CFRunLoopRef层面的API(Core Foundation层面)
线程与RunLoop:
每条线程都有唯一的一个与之对应的Runloop对象
主线程的RunLoop默认是开启的,子线程需要主动开启.
RunLoop在第一次获取的时候被创建,在线程结束时销毁.
获取RunLoop对象:
Foundation框架:
[NSRunLoop currentRunLoop]; // 获得当前线程的RunLoop对象
[NSRunLoop mainRunLoop]; // 获得主线程的RunLoop对象
Core Foundation框架:
CFRunLoopGetCurrent(); // 获得当前线程的RunLoop对象
CFRunLoopGetMain(); // 获得主线程的RunLoop对象
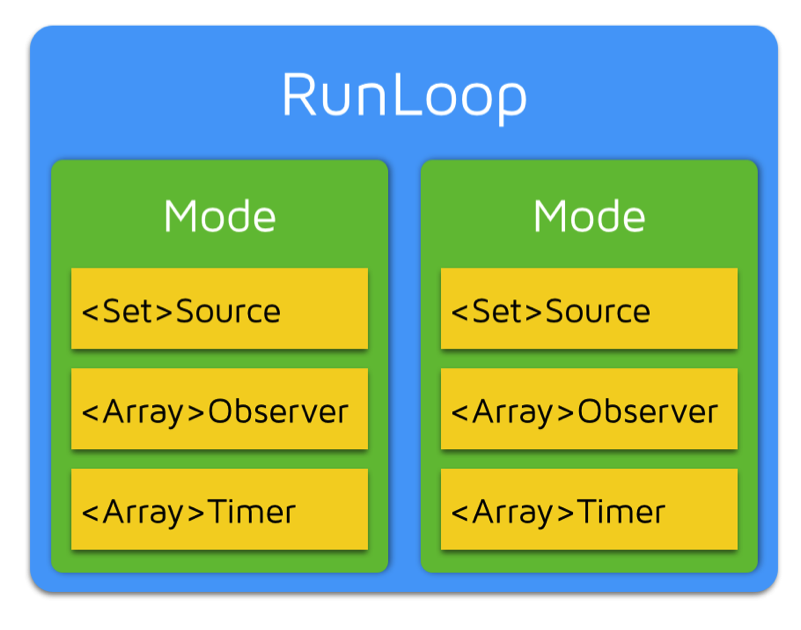
RunLoop 相关类:

CFRunLoopModeRef:
CFRunLoopModeRef代表RunLoop的运行模式
-(void)test
{
    NSTimer * time = [NSTimer timerWithTimeInterval:2.0 target:self selector:@selector(timer) userInfo:nil repeats:YES];

    [[NSRunLoop currentRunLoop]addTimer:time forMode:NSDefaultRunLoopMode];

}


-(void)test1
{

    //scheduledTimerWithTimeInterval 默认将NSTimer添加到RunLoop中,并且是默认模式
    NSTimer * time = [NSTimer scheduledTimerWithTimeInterval:2.0 target:self selector:@selector(timer) userInfo:nil repeats:YES];

    //将NSTimer添加到RunLoop中.NSRunLoopCommonModes包含:UITrackingRunLoopMode和kCFRunLoopDefaultMode , 但注意:runloop可以包含多种模式, 但一次只能执行一种模式
    [[NSRunLoop currentRunLoop]addTimer:time forMode:NSRunLoopCommonModes];

}


-(void)test2
{
    CADisplayLink * link = [CADisplayLink displayLinkWithTarget:self selector:@selector(timer)];

    link.frameInterval = 60;

    //CADisplayLink 需要主动添加到RunLoop中.
    [link addToRunLoop:[NSRunLoop mainRunLoop] forMode:NSRunLoopCommonModes];

}
注意:当设置了Runloop的模式后, 只能在对应的模式下,定时器才能起作用.
CFRunLoopObserverRef:
CFRunLoopObserverRef是观察者,能够监听RunLoop的状态改变

    //创建RunLoop观察者
    CFRunLoopObserverRef observer = CFRunLoopObserverCreateWithHandler(CFAllocatorGetDefault(), kCFRunLoopBeforeSources, YES, 0, ^(CFRunLoopObserverRef observer, CFRunLoopActivity activity) {

        NSLog(@"%zd" , activity);

    });

    //添加监听者
    CFRunLoopAddObserver(CFRunLoopGetCurrent(), observer, kCFRunLoopCommonModes);

    //由于是C语言创建出来的监听者, 需要release
    CFRelease(observer);
我么可以通过给RunLoop添加监听者, 去做一些拦截操作,.
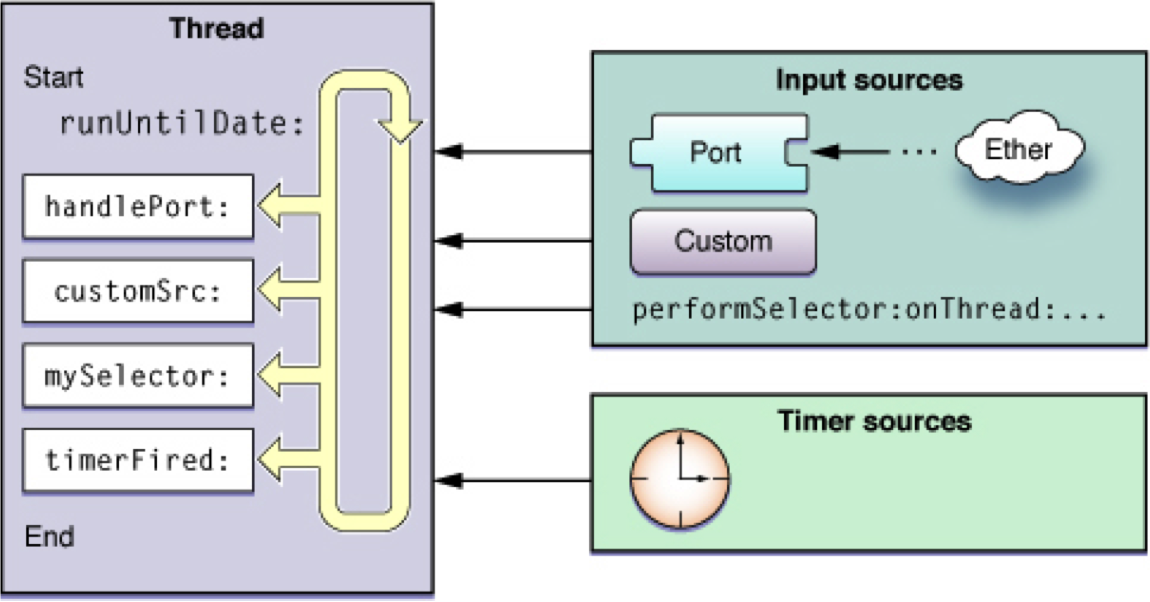
RunLoop处理逻辑-官方版:

将输入源或定时源添加到RunLoop后, runloop就不的循环处理事件源的一些操作, 若没有事件源输入, runloop就进入休眠状态.
RunLoop处理逻辑-官方版

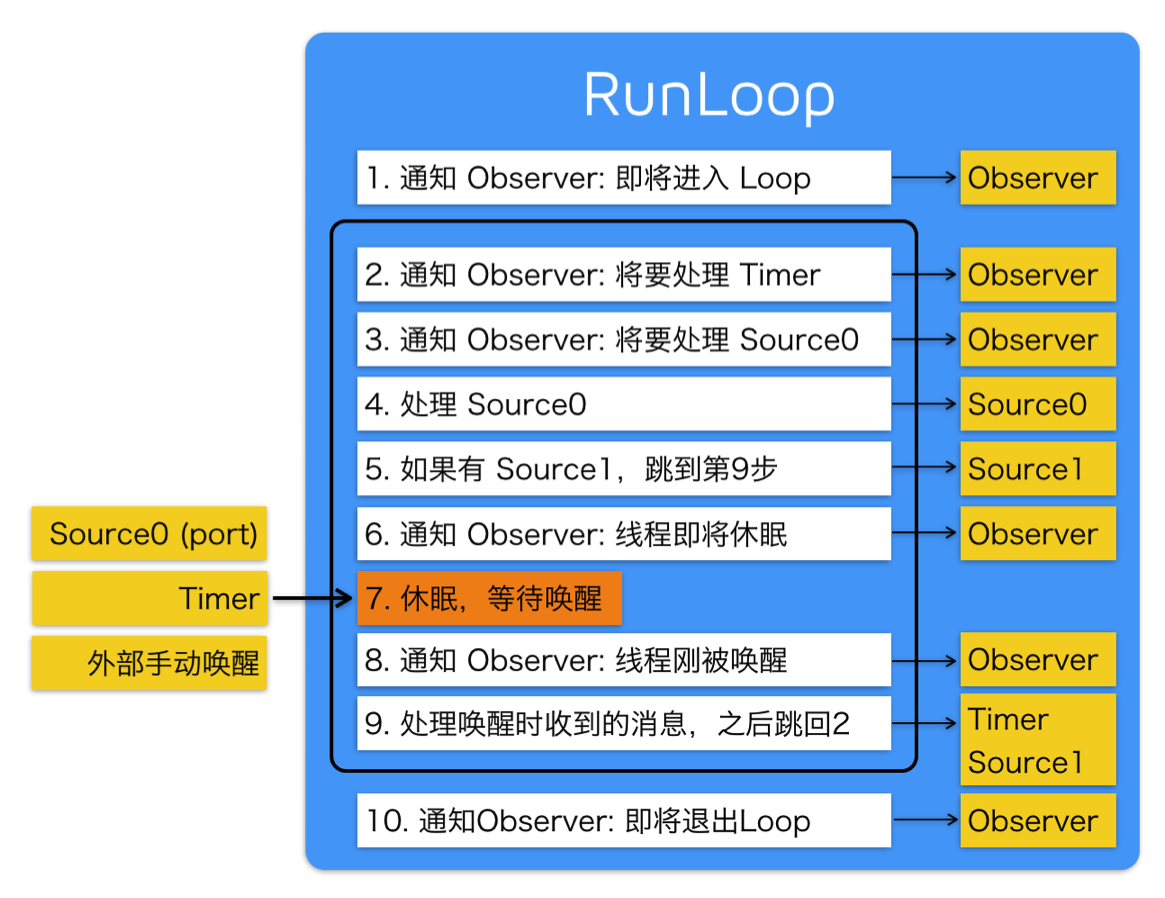
RunLoop处理逻辑-网友整理版

我关联了ImageView
-(void)touchesBegan:(NSSet<UITouch *> *)touches withEvent:(UIEvent *)event
{
    [self.imageView performSelector:@selector(setImage:) withObject:[UIImage imageNamed:@"test.png"] afterDelay:3.0 inModes:@[NSDefaultRunLoopMode]];

}
当滚动View时,Runloop处于UITrackingRunLoopMode 模式, 此时performSelector 这个scource 源是Runloop是不会执行的,虽然runloop可以有多种模式,但一次只能在一个模式下运行,执行退出当前模式,才能执行其他模式下的Scource.
方法1:(不推荐,消耗性能)
@interface ViewController ()
@property(nonatomic ,strong)NSThread * thread;

@end

@implementation ViewController

- (void)viewDidLoad {
    [super viewDidLoad];

    YWThread * thread = [[YWThread alloc]initWithTarget:self selector:@selector(run) object:nil];

    self.thread = thread;
    [thread start];
}


-(void)run
{
    while (1) {
          //如果没有这个死循环, Runloop创建后就关闭. 这个死循环让当前线程的Runloop不断的开启关闭.(这样也可以让一个线程不死, 一直接收处理Source)
        [[NSRunLoop currentRunLoop]run];
    }
    NSLog(@"-------------");
}
-(void)test1
{
    NSLog(@"-----test1-----");
}

-(void)touchesBegan:(NSSet<UITouch *> *)touches withEvent:(UIEvent *)event
{
    [self performSelector:@selector(test1) onThread:self.thread withObject:nil waitUntilDone:NO];
}
方法2: 直接给Runloop添加事件源

-(void)touchesBegan:(NSSet<UITouch *> *)touches withEvent:(UIEvent *)event
{

    YWThread * thread = [[YWThread alloc]initWithTarget:self selector:@selector(run) object:nil];

    [thread start];
}


-(void)run
{
    这样就可以让一个线程不死(runLoop一直循环,线程就不会被dealloc)
    [[NSRunLoop currentRunLoop]addPort:[NSPort port] forMode:NSDefaultRunLoopMode];
    [[NSRunLoop currentRunLoop]run];

    NSLog(@"---run-----");

}