Maven 本地资源库配置
作者:尹正杰
版权声明:原创作品,谢绝转载!否则将追究法律责任。
一.操作系统环境
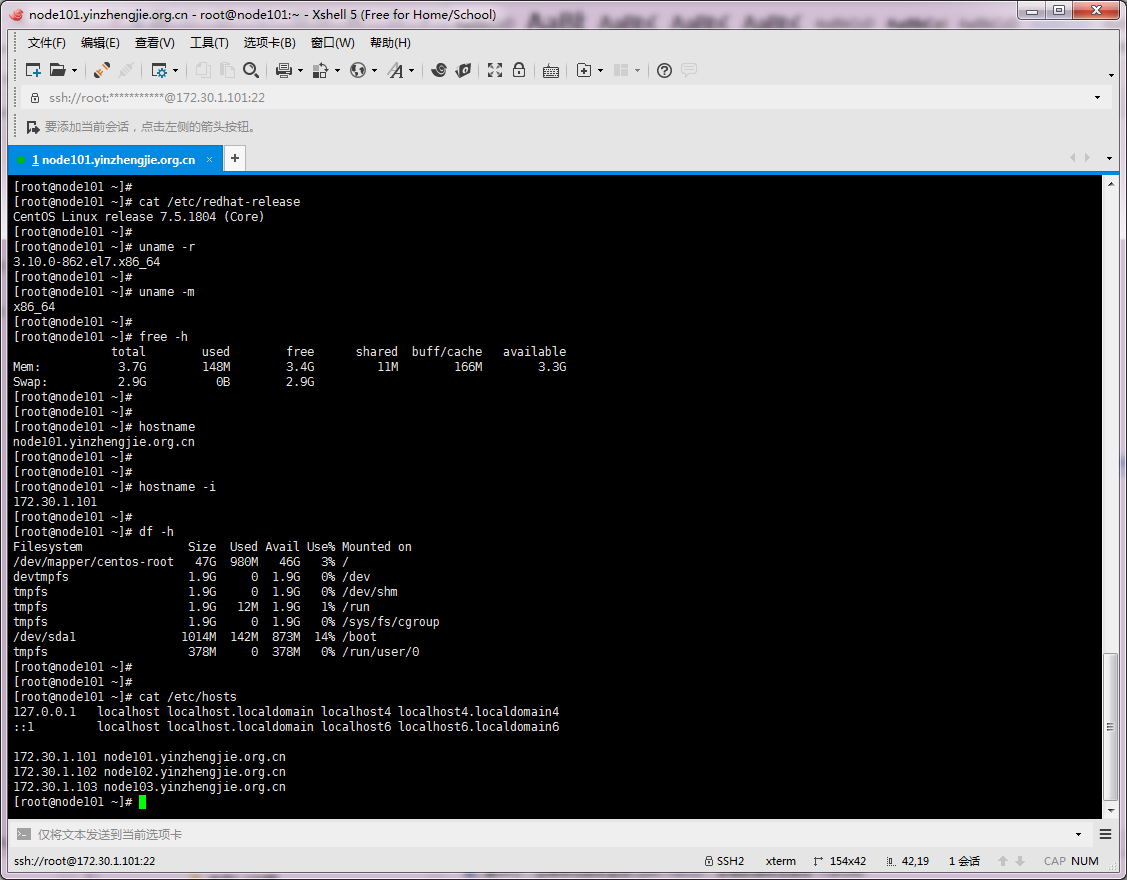
1>.查看操作系统环境(总共3台虚拟机)
2>.关闭防火墙并禁用开机自启动(“node102.yinzhengjie.org.cn”和“node103.yinzhengjie.org.cn”两个节点需要重复此操作)


[root@node101 ~]# systemctl status firewalld
● firewalld.service - firewalld - dynamic firewall daemon
   Loaded: loaded (/usr/lib/systemd/system/firewalld.service; enabled; vendor preset: enabled)
   Active: active (running) since Tue 2018-12-18 08:40:12 EST; 26min ago
     Docs: man:firewalld(1)
 Main PID: 689 (firewalld)
   CGroup: /system.slice/firewalld.service
           └─689 /usr/bin/python -Es /usr/sbin/firewalld --nofork --nopid

Dec 18 08:40:03 node101.yinzhengjie.org.cn systemd[1]: Starting firewalld - dynamic firewall daemon...
Dec 18 08:40:12 node101.yinzhengjie.org.cn systemd[1]: Started firewalld - dynamic firewall daemon.
[root@node101 ~]#
[root@node101 ~]#
[root@node101 ~]#
[root@node101 ~]# systemctl stop firewalld
[root@node101 ~]#
[root@node101 ~]#
[root@node101 ~]# systemctl disable firewalld
Removed symlink /etc/systemd/system/multi-user.target.wants/firewalld.service.
Removed symlink /etc/systemd/system/dbus-org.fedoraproject.FirewallD1.service.
[root@node101 ~]#
[root@node101 ~]#
[root@node101 ~]# systemctl status firewalld
● firewalld.service - firewalld - dynamic firewall daemon
   Loaded: loaded (/usr/lib/systemd/system/firewalld.service; disabled; vendor preset: enabled)
   Active: inactive (dead)
     Docs: man:firewalld(1)

Dec 18 08:40:03 node101.yinzhengjie.org.cn systemd[1]: Starting firewalld - dynamic firewall daemon...
Dec 18 08:40:12 node101.yinzhengjie.org.cn systemd[1]: Started firewalld - dynamic firewall daemon.
Dec 18 09:07:35 node101.yinzhengjie.org.cn systemd[1]: Stopping firewalld - dynamic firewall daemon...
Dec 18 09:07:36 node101.yinzhengjie.org.cn systemd[1]: Stopped firewalld - dynamic firewall daemon.
[root@node101 ~]#

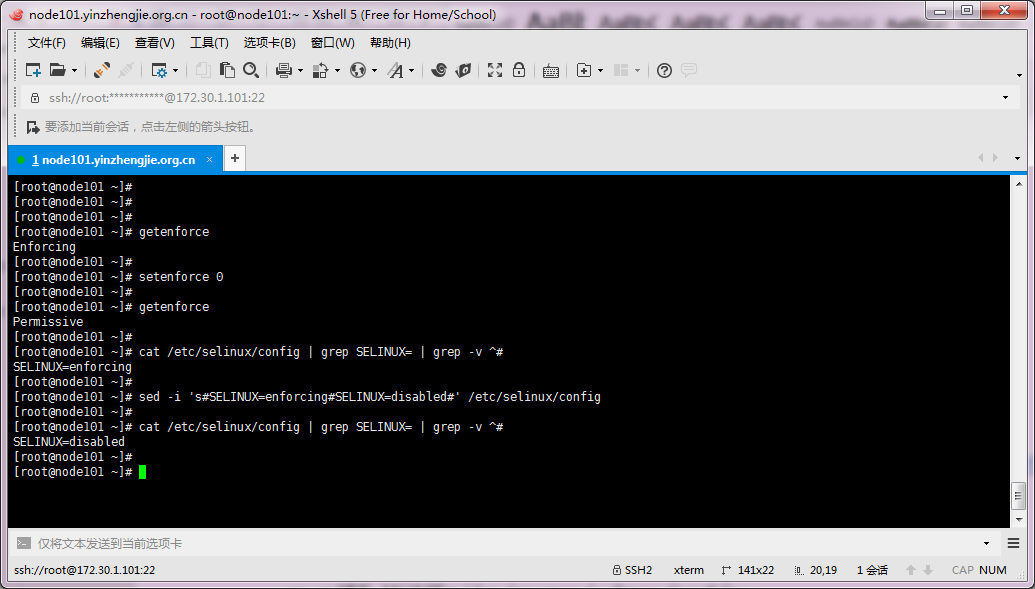
3>.关闭selinux并禁用其开机自启动(“node102.yinzhengjie.org.cn”和“node103.yinzhengjie.org.cn”两个节点需要重复此操作)
[root@node101 ~]# getenforce
Enforcing
[root@node101 ~]#
[root@node101 ~]# setenforce 0
[root@node101 ~]#
[root@node101 ~]# getenforce
Permissive
[root@node101 ~]#
[root@node101 ~]# cat /etc/selinux/config | grep SELINUX= | grep -v ^#
SELINUX=enforcing
[root@node101 ~]#
[root@node101 ~]# sed -i 's#SELINUX=enforcing#SELINUX=disabled#' /etc/selinux/config
[root@node101 ~]#
[root@node101 ~]# cat /etc/selinux/config | grep SELINUX= | grep -v ^#
SELINUX=disabled
[root@node101 ~]#
4>.编写集群管理脚本
[root@node101 ~]# ssh-keygen -t rsa -P '' -f ~/.ssh/id_rsa
Generating public/private rsa key pair.
Created directory '/root/.ssh'.
Your identification has been saved in /root/.ssh/id_rsa.
Your public key has been saved in /root/.ssh/id_rsa.pub.
The key fingerprint is:
SHA256:LzQFxaeYjEKQVSTx7RwZQaWkCYC8ry6dVkl4RzHJ6os root@node101.yinzhengjie.org.cn
The key's randomart image is:
+---[RSA 2048]----+
|..o====+*=o      |
|... .++* =. .    |
|  .o o+o=o.o     |
| .. = oo+o.      |
|  .+ +  S        |
|   .+  . o       |
| ..+ .  . .      |
|..E .    .       |
|oo               |
+----[SHA256]-----+
[root@node101 ~]#
[root@node101 ~]# ssh-copy-id root@node101.yinzhengjie.org.cn
/usr/bin/ssh-copy-id: INFO: Source of key(s) to be installed: "/root/.ssh/id_rsa.pub"
The authenticity of host 'node101.yinzhengjie.org.cn (172.30.1.101)' can't be established.
ECDSA key fingerprint is SHA256:aGk7Wv77uRVAElcihCH0Zu0sAPp6qEs2sSA1Zsj3o7g.
ECDSA key fingerprint is MD5:2b:74:b8:ad:f8:92:78:04:38:90:f1:28:e7:70:68:fb.
Are you sure you want to continue connecting (yes/no)? yes
/usr/bin/ssh-copy-id: INFO: attempting to log in with the new key(s), to filter out any that are already installed
/usr/bin/ssh-copy-id: INFO: 1 key(s) remain to be installed -- if you are prompted now it is to install the new keys
root@node101.yinzhengjie.org.cn's password:

Number of key(s) added: 1

Now try logging into the machine, with:   "ssh 'root@node101.yinzhengjie.org.cn'"
and check to make sure that only the key(s) you wanted were added.

[root@node101 ~]#
[root@node101 ~]# ssh node101.yinzhengjie.org.cn
Last login: Tue Dec 18 08:57:22 2018 from 172.30.1.1
[root@node101 ~]# who
root     pts/0        2018-12-18 08:57 (172.30.1.1)
root     pts/1        2018-12-18 09:13 (node101.yinzhengjie.org.cn)
[root@node101 ~]# exit
logout
Connection to node101.yinzhengjie.org.cn closed.
[root@node101 ~]#
[root@node101 ~]# ssh-copy-id root@node102.yinzhengjie.org.cn
/usr/bin/ssh-copy-id: INFO: Source of key(s) to be installed: "/root/.ssh/id_rsa.pub"
The authenticity of host 'node102.yinzhengjie.org.cn (172.30.1.102)' can't be established.
ECDSA key fingerprint is SHA256:aGk7Wv77uRVAElcihCH0Zu0sAPp6qEs2sSA1Zsj3o7g.
ECDSA key fingerprint is MD5:2b:74:b8:ad:f8:92:78:04:38:90:f1:28:e7:70:68:fb.
Are you sure you want to continue connecting (yes/no)? yes
/usr/bin/ssh-copy-id: INFO: attempting to log in with the new key(s), to filter out any that are already installed
/usr/bin/ssh-copy-id: INFO: 1 key(s) remain to be installed -- if you are prompted now it is to install the new keys
root@node102.yinzhengjie.org.cn's password:

Number of key(s) added: 1

Now try logging into the machine, with:   "ssh 'root@node102.yinzhengjie.org.cn'"
and check to make sure that only the key(s) you wanted were added.

[root@node101 ~]#
[root@node101 ~]# ssh node102.yinzhengjie.org.cn
Last login: Tue Dec 18 08:36:15 2018
[root@node102 ~]#
[root@node102 ~]# who
root     pts/0        2018-12-18 09:14 (172.30.1.101)
[root@node102 ~]#
[root@node102 ~]# exit
logout
Connection to node102.yinzhengjie.org.cn closed.
[root@node101 ~]#
[root@node101 ~]# ssh-copy-id root@node103.yinzhengjie.org.cn
/usr/bin/ssh-copy-id: INFO: Source of key(s) to be installed: "/root/.ssh/id_rsa.pub"
The authenticity of host 'node103.yinzhengjie.org.cn (172.30.1.103)' can't be established.
ECDSA key fingerprint is SHA256:aGk7Wv77uRVAElcihCH0Zu0sAPp6qEs2sSA1Zsj3o7g.
ECDSA key fingerprint is MD5:2b:74:b8:ad:f8:92:78:04:38:90:f1:28:e7:70:68:fb.
Are you sure you want to continue connecting (yes/no)? yes
/usr/bin/ssh-copy-id: INFO: attempting to log in with the new key(s), to filter out any that are already installed
/usr/bin/ssh-copy-id: INFO: 1 key(s) remain to be installed -- if you are prompted now it is to install the new keys
root@node103.yinzhengjie.org.cn's password:

Number of key(s) added: 1

Now try logging into the machine, with:   "ssh 'root@node103.yinzhengjie.org.cn'"
and check to make sure that only the key(s) you wanted were added.

[root@node101 ~]#
[root@node101 ~]# ssh node103.yinzhengjie.org.cn
Last login: Sat Dec 15 16:54:09 2018
[root@node103 ~]#
[root@node103 ~]# who
root     pts/0        2018-12-18 09:15 (172.30.1.101)
[root@node103 ~]#
[root@node103 ~]# exit
logout
Connection to node103.yinzhengjie.org.cn closed.
[root@node101 ~]#
[root@node101 ~]# vi /usr/local/bin/xcall.sh              #我们创建该脚本时,直接就把它放在默认的“PATH”环境变量中。因此编辑好后只要有执行权限就可以在任意路径调用它啦!
[root@node101 ~]#
[root@node101 ~]#
[root@node101 ~]# cat /usr/local/bin/xcall.sh
#!/bin/bash
#@author :yinzhengjie
#blog:http://www.cnblogs.com/yinzhengjie
#EMAIL:y1053419035@qq.com


#判断用户是否传参
if [ $# -lt 1 ];then
        echo "请输入参数"
        exit
fi

#获取用户输入的命令
cmd=$@

for (( i=101;i<=103;i++ ))
do
        #使终端变绿色
        tput setaf 2
        echo ============= node${i}.yinzhengjie.org.cn : $cmd ============
        #使终端变回原来的颜色,即白灰色
        tput setaf 7
        #远程执行命令
        ssh node${i}.yinzhengjie.org.cn  $cmd
        #判断命令是否执行成功
        if [ $? == 0 ];then
                echo "命令执行成功"
        fi
done
[root@node101 ~]#
[root@node101 ~]#
[root@node101 ~]# chmod +x /usr/local/bin/xcall.sh              #别忘记添加执行权限哟!
[root@node101 ~]#
[root@node101 ~]# xcall.sh cat /etc/redhat-release              #我们在这里可以测试一些咱们的脚本是否好使~
============= node101.yinzhengjie.org.cn : cat /etc/redhat-release ============
CentOS Linux release 7.2.1511 (Core)
命令执行成功
============= node102.yinzhengjie.org.cn : cat /etc/redhat-release ============
CentOS Linux release 7.2.1511 (Core)
命令执行成功
============= node103.yinzhengjie.org.cn : cat /etc/redhat-release ============
CentOS Linux release 7.2.1511 (Core)
命令执行成功
[root@node101 ~]#
[root@node101 ~]#
[root@node101 ~]# xcall.sh "yum -y install rsync"
============= node101.yinzhengjie.org.cn : yum -y install rsync ============
Loaded plugins: fastestmirror
Loading mirror speeds from cached hostfile
 * base: mirrors.huaweicloud.com
 * extras: mirrors.huaweicloud.com
 * updates: mirrors.163.com
Resolving Dependencies
--> Running transaction check
---> Package rsync.x86_64 0:3.1.2-4.el7 will be installed
--> Finished Dependency Resolution

Dependencies Resolved

================================================================================
 Package         Arch             Version                  Repository      Size
================================================================================
Installing:
 rsync           x86_64           3.1.2-4.el7              base           403 k

Transaction Summary
================================================================================
Install  1 Package

Total download size: 403 k
Installed size: 815 k
Downloading packages:
Running transaction check
Running transaction test
Transaction test succeeded
Running transaction
  Installing : rsync-3.1.2-4.el7.x86_64                                     1/1
  Verifying  : rsync-3.1.2-4.el7.x86_64                                     1/1

Installed:
  rsync.x86_64 0:3.1.2-4.el7

Complete!
命令执行成功
============= node102.yinzhengjie.org.cn : yum -y install rsync ============
Loaded plugins: fastestmirror
Repodata is over 2 weeks old. Install yum-cron? Or run: yum makecache fast
http://mirrors.njupt.edu.cn/centos/7.6.1810/os/x86_64/repodata/bc140c8149fc43a5248fccff0daeef38182e49f6fe75d9b46db1206dc25a6c1c-c7-x86_64-comps.xml.gz: [Errno 12] Timeout on http://10.10.254.10/cache/5/02/mirrors.njupt.edu.cn/033b2636ff3cf3103169fa739764fdd7/bc140c8149fc43a5248fccff0daeef38182e49f6fe75d9b46db1206dc25a6c1c-c7-x86_64-comps.xml.gz: (28, 'Connection timed out after 30682 milliseconds')
Trying other mirror.
http://mirrors.njupt.edu.cn/centos/7.6.1810/updates/x86_64/repodata/8e273c72093a2cfc3f3b2baccfb2b01f7f4bcdc1bb72d53e38074068a756f1c6-primary.sqlite.bz2: [Errno 12] Timeout on http://10.10.254.10/cache/4/02/mirrors.njupt.edu.cn/c35de49cce30395fb97f6c41a56fbad5/8e273c72093a2cfc3f3b2baccfb2b01f7f4bcdc1bb72d53e38074068a756f1c6-primary.sqlite.bz2: (28, 'Connection timed out after 30672 milliseconds')
Trying other mirror.
Determining fastest mirrors
 * base: mirrors.huaweicloud.com
 * extras: mirrors.huaweicloud.com
 * updates: mirrors.neusoft.edu.cn
Resolving Dependencies
--> Running transaction check
---> Package rsync.x86_64 0:3.1.2-4.el7 will be installed
--> Finished Dependency Resolution

Dependencies Resolved

================================================================================
 Package         Arch             Version                  Repository      Size
================================================================================
Installing:
 rsync           x86_64           3.1.2-4.el7              base           403 k

Transaction Summary
================================================================================
Install  1 Package

Total download size: 403 k
Installed size: 815 k
Downloading packages:
Running transaction check
Running transaction test
Transaction test succeeded
Running transaction
  Installing : rsync-3.1.2-4.el7.x86_64                                     1/1
  Verifying  : rsync-3.1.2-4.el7.x86_64                                     1/1

Installed:
  rsync.x86_64 0:3.1.2-4.el7

Complete!
命令执行成功
============= node103.yinzhengjie.org.cn : yum -y install rsync ============
Loaded plugins: fastestmirror
Repodata is over 2 weeks old. Install yum-cron? Or run: yum makecache fast
http://mirrors.njupt.edu.cn/centos/7.6.1810/os/x86_64/repodata/6614b3605d961a4aaec45d74ac4e5e713e517debb3ee454a1c91097955780697-primary.sqlite.bz2: [Errno 12] Timeout on http://10.10.254.10/cache/5/02/mirrors.njupt.edu.cn/fa6cd86bdbaedbbfedfbfa6d45952cd2/6614b3605d961a4aaec45d74ac4e5e713e517debb3ee454a1c91097955780697-primary.sqlite.bz2: (28, 'Connection timed out after 30867 milliseconds')
Trying other mirror.
Determining fastest mirrors
 * base: mirrors.huaweicloud.com
 * extras: mirrors.huaweicloud.com
 * updates: mirrors.cn99.com
Resolving Dependencies
--> Running transaction check
---> Package rsync.x86_64 0:3.1.2-4.el7 will be installed
--> Finished Dependency Resolution

Dependencies Resolved

================================================================================
 Package         Arch             Version                  Repository      Size
================================================================================
Installing:
 rsync           x86_64           3.1.2-4.el7              base           403 k

Transaction Summary
================================================================================
Install  1 Package

Total download size: 403 k
Installed size: 815 k
Downloading packages:
Running transaction check
Running transaction test
Transaction test succeeded
Running transaction
  Installing : rsync-3.1.2-4.el7.x86_64                                     1/1
  Verifying  : rsync-3.1.2-4.el7.x86_64                                     1/1

Installed:
  rsync.x86_64 0:3.1.2-4.el7

Complete!
命令执行成功
[root@node101 ~]#
[root@node101 ~]# vi /usr/local/bin/xrsync.sh             #编写同步脚本,注意:我们在编写脚本时,就把脚本放在Linux自带的“PATH”环境变量中。
[root@node101 ~]#
[root@node101 ~]# cat /usr/local/bin/xrsync.sh
#!/bin/bash
#@author :yinzhengjie
#blog:http://www.cnblogs.com/yinzhengjie
#EMAIL:y1053419035@qq.com

#判断用户是否传参
if [ $# -lt 1 ];then
    echo "请输入参数";
    exit
fi


#获取文件路径
file=$@

#获取子路径
filename=`basename $file`

#获取父路径
dirpath=`dirname $file`

#获取完整路径
cd $dirpath
fullpath=`pwd -P`

#同步文件到DataNode
for (( i=102;i<=103;i++ ))
do
    #使终端变绿色
    tput setaf 2
    echo =========== node${i}.yinzhengjie.org.cn : $file ===========
    #使终端变回原来的颜色,即白灰色
    tput setaf 7
    #远程执行命令
    rsync -lr $filename `whoami`@node${i}.yinzhengjie.org.cn:$fullpath
    #判断命令是否执行成功
    if [ $? == 0 ];then
        echo "命令执行成功"
    fi
done
[root@node101 ~]#
[root@node101 ~]#
[root@node101 ~]# chmod +x /usr/local/bin/xrsync.sh          #别忘记添加执行权限哟!
[root@node101 ~]#
[root@node101 ~]# xrsync.sh /etc/hosts
=========== node102.yinzhengjie.org.cn : /etc/hosts ===========
命令执行成功
=========== node103.yinzhengjie.org.cn : /etc/hosts ===========
命令执行成功
[root@node101 ~]#
[root@node101 ~]# xcall.sh cat /etc/hosts
============= node101.yinzhengjie.org.cn : cat /etc/hosts ============
127.0.0.1   localhost localhost.localdomain localhost4 localhost4.localdomain4
::1         localhost localhost.localdomain localhost6 localhost6.localdomain6

172.30.1.101 node101.yinzhengjie.org.cn
172.30.1.102 node102.yinzhengjie.org.cn
172.30.1.103 node103.yinzhengjie.org.cn
命令执行成功
============= node102.yinzhengjie.org.cn : cat /etc/hosts ============
127.0.0.1   localhost localhost.localdomain localhost4 localhost4.localdomain4
::1         localhost localhost.localdomain localhost6 localhost6.localdomain6

172.30.1.101 node101.yinzhengjie.org.cn
172.30.1.102 node102.yinzhengjie.org.cn
172.30.1.103 node103.yinzhengjie.org.cn
命令执行成功
============= node103.yinzhengjie.org.cn : cat /etc/hosts ============
127.0.0.1   localhost localhost.localdomain localhost4 localhost4.localdomain4
::1         localhost localhost.localdomain localhost6 localhost6.localdomain6

172.30.1.101 node101.yinzhengjie.org.cn
172.30.1.102 node102.yinzhengjie.org.cn
172.30.1.103 node103.yinzhengjie.org.cn
命令执行成功
[root@node101 ~]#
二.安装jdk并配置相应的环境变量
1>.JDK下载地址
Oracle官网JDK下载地址:https://www.oracle.com/technetwork/java/javase/downloads/jdk8-downloads-2133151.html。
2>.在"node101.yinzhengjie.org.cn"配置jdk的环境变量
[root@node101 ~]# yum -y install lrzsz
Loaded plugins: fastestmirror
Loading mirror speeds from cached hostfile
 * base: mirrors.aliyun.com
 * extras: mirrors.nju.edu.cn
 * updates: mirrors.nju.edu.cn
Resolving Dependencies
--> Running transaction check
---> Package lrzsz.x86_64 0:0.12.20-36.el7 will be installed
--> Finished Dependency Resolution

Dependencies Resolved

=============================================================================================================================================
 Package                        Arch                            Version                                  Repository                     Size
=============================================================================================================================================
Installing:
 lrzsz                          x86_64                          0.12.20-36.el7                           base                           78 k

Transaction Summary
=============================================================================================================================================
Install  1 Package

Total download size: 78 k
Installed size: 181 k
Downloading packages:
lrzsz-0.12.20-36.el7.x86_64.rpm                                                                                       |  78 kB  00:00:00
Running transaction check
Running transaction test
Transaction test succeeded
Running transaction
  Installing : lrzsz-0.12.20-36.el7.x86_64                                                                                               1/1
  Verifying  : lrzsz-0.12.20-36.el7.x86_64                                                                                               1/1

Installed:
  lrzsz.x86_64 0:0.12.20-36.el7

Complete!
[root@node101 ~]#
[root@node101 ~]# mkdir -pv /yinzhengjie/soft/
mkdir: created directory ‘/yinzhengjie’
mkdir: created directory ‘/yinzhengjie/soft/’
[root@node101 ~]#
[root@node101 ~]# ll
total 187260
-rw-r--r--. 1 root root 191753373 Dec 18 09:25 jdk-8u191-linux-x64.tar.gz
[root@node101 ~]#
[root@node101 ~]# tar -zxf jdk-8u191-linux-x64.tar.gz -C /yinzhengjie/soft/
[root@node101 ~]#
[root@node101 ~]# ln -s /yinzhengjie/soft/jdk1.8.0_191/ /yinzhengjie/soft/jdk
[root@node101 ~]#
[root@node101 ~]# tail -3 /etc/profile
#Add JDK Path by yinzhengjie
JAVA_HOME=/yinzhengjie/soft/jdk
PATH=$PATH:$JAVA_HOME/bin
[root@node101 ~]#
[root@node101 ~]# source /etc/profile
[root@node101 ~]#
[root@node101 ~]# java -version
java version "1.8.0_191"
Java(TM) SE Runtime Environment (build 1.8.0_191-b12)
Java HotSpot(TM) 64-Bit Server VM (build 25.191-b12, mixed mode)
[root@node101 ~]#
3>.分发"node101.yinzhengjie.org.cn"的配置到“node102.yinzhengjie.org.cn”和“node103.yinzhengjie.org.cn”主机上
[root@node101 ~]# xrsync.sh /etc/profile
=========== node102.yinzhengjie.org.cn : /etc/profile ===========
命令执行成功
=========== node103.yinzhengjie.org.cn : /etc/profile ===========
命令执行成功
[root@node101 ~]#
[root@node101 ~]#
[root@node101 ~]# xrsync.sh /yinzhengjie/
=========== node102.yinzhengjie.org.cn : /yinzhengjie/ ===========
命令执行成功
=========== node103.yinzhengjie.org.cn : /yinzhengjie/ ===========
命令执行成功
[root@node101 ~]#
[root@node101 ~]#
[root@node101 ~]# xcall.sh ln -s /yinzhengjie/soft/jdk/bin/jps /usr/local/bin/
============= node101.yinzhengjie.org.cn : ln -s /yinzhengjie/soft/jdk/bin/jps /usr/local/bin/ ============
命令执行成功
============= node102.yinzhengjie.org.cn : ln -s /yinzhengjie/soft/jdk/bin/jps /usr/local/bin/ ============
命令执行成功
============= node103.yinzhengjie.org.cn : ln -s /yinzhengjie/soft/jdk/bin/jps /usr/local/bin/ ============
命令执行成功
[root@node101 ~]#
[root@node101 ~]# xcall.sh jps
============= node101.yinzhengjie.org.cn : jps ============
9140 Jps
命令执行成功
============= node102.yinzhengjie.org.cn : jps ============
8745 Jps
命令执行成功
============= node103.yinzhengjie.org.cn : jps ============
8737 Jps
命令执行成功
[root@node101 ~]#
三.maven的安装配置
1>.安装maven
maven的官方下载地址:http://maven.apache.org/download.cgi。
2>.Eclipse中maven配置
详情请参考:Eclipse第三方安装包管理工具之Maven
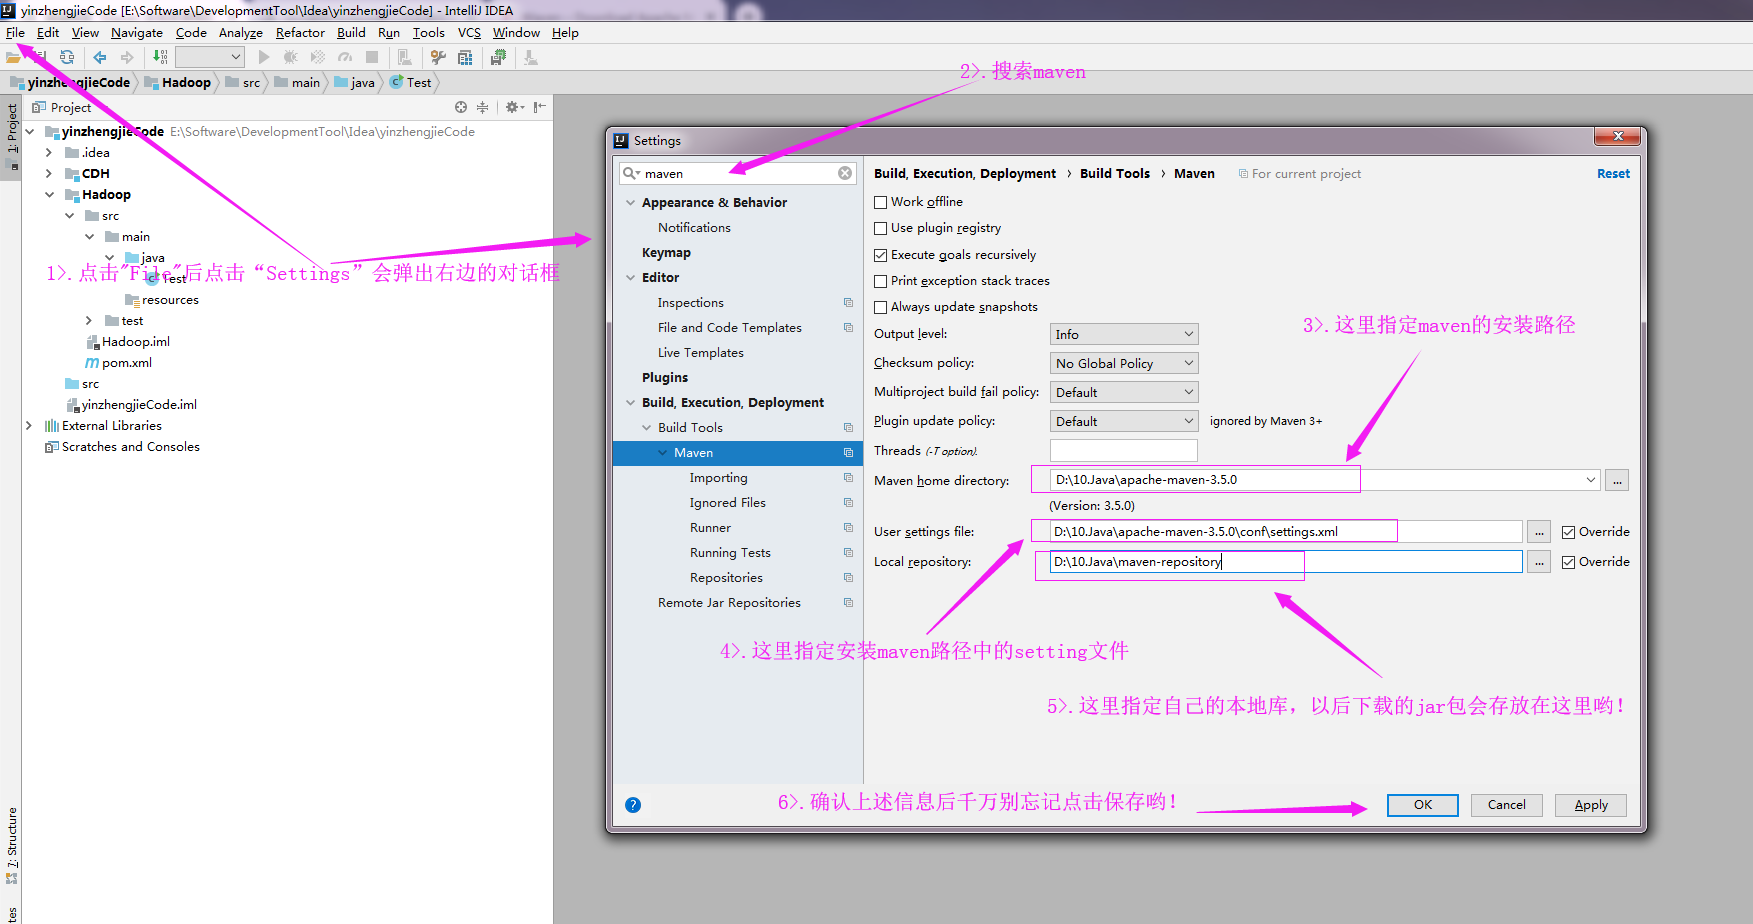
3>.Idea中maven配置
其实配置方法和maven的方式基本雷同。
四.maven本地资源库配置
1>.maven的Setting.xml文件说明
如下是settings.xml的配置,重点讲解几个地方,因为接下来我们要配置安装自己的maven私有库

<?xml version="1.0" encoding="UTF-8"?>
<settings   xmlns="http://maven.apache.org/POM/4.0.0"
    xmlns:xsi="http://www.w3.org/2001/XMLSchema-instance"
    xsi:schemaLocation="http://maven.apache.org/POM/4.0.0 http://maven.apache.org/xsd/settings-1.0.0.xsd">
    <!--本地仓库。该值表示构建系统本地仓库的路径。其默认值为${user.home}/.m2/repository。  -->
    <localRepository>${user.home}/.m2/repository </localRepository>
    <!--Maven是否需要和用户交互以获得输入。如果Maven需要和用户交互以获得输入,则设置成true,反之则应为false。默认为true。 -->
    <interactiveMode>true</interactiveMode>
    <!--Maven是否需要使用plugin-registry.xml文件来管理插件版本。  -->
    <!--如果设置为true,则在{user.home}/.m2下需要有一个plugin-registry.xml来对plugin的版本进行管理  -->
    <!--默认为false。 -->
    <usePluginRegistry>false</usePluginRegistry>
    <!--表示Maven是否需要在离线模式下运行。如果构建系统需要在离线模式下运行,则为true,默认为false。  -->
    <!--当由于网络设置原因或者安全因素,构建服务器不能连接远程仓库的时候,该配置就十分有用。  -->
    <offline>false</offline>

    <!--当插件的组织Id(groupId)没有显式提供时,供搜寻插件组织Id(groupId)的列表。  -->
    <!--该元素包含一个pluginGroup元素列表,每个子元素包含了一个组织Id(groupId)。  -->
    <!--当我们使用某个插件,并且没有在命令行为其提供组织Id(groupId)的时候,Maven就会使用该列表。  -->
    <!--默认情况下该列表包含了org.apache.maven.plugins。  -->
    <pluginGroups>

        <!--plugin的组织Id(groupId)  -->
        <pluginGroup>org.codehaus.mojo</pluginGroup>

    </pluginGroups>

    <!--用来配置不同的代理,多代理profiles可以应对笔记本或移动设备的工作环境:通过简单的设置profile id就可以很容易的更换整个代理配置。  -->
    <proxies>

        <!--代理元素包含配置代理时需要的信息 -->
        <proxy>

            <!--代理的唯一定义符,用来区分不同的代理元素。 -->
            <id>myproxy</id>

            <!--该代理是否是激活的那个。true则激活代理。当我们声明了一组代理,而某个时候只需要激活一个代理的时候,该元素就可以派上用处。  -->
            <active>true</active>

            <!--代理的协议。 协议://主机名:端口,分隔成离散的元素以方便配置。 -->
            <protocol>http://…</protocol>

            <!--代理的主机名。协议://主机名:端口,分隔成离散的元素以方便配置。   -->
            <host>proxy.somewhere.com</host>

            <!--代理的端口。协议://主机名:端口,分隔成离散的元素以方便配置。  -->
            <port>8080</port>

             <!--代理的用户名,用户名和密码表示代理服务器认证的登录名和密码。  -->
            <username>proxyuser</username>

            <!--代理的密码,用户名和密码表示代理服务器认证的登录名和密码。  -->
            <password>somepassword</password>

            <!--不该被代理的主机名列表。该列表的分隔符由代理服务器指定;例子中使用了竖线分隔符,使用逗号分隔也很常见。 -->
            <nonProxyHosts>*.google.com|ibiblio.org</nonProxyHosts>

        </proxy>

    </proxies>

    <!--配置服务端的一些设置。一些设置如安全证书不应该和pom.xml一起分发。这种类型的信息应该存在于构建服务器上的settings.xml文件中。 -->
    <servers>

        <!--服务器元素包含配置服务器时需要的信息  -->
        <server>

            <!--这是server的id(注意不是用户登陆的id),该id与distributionManagement中repository元素的id相匹配。 -->
            <id>server001</id>

            <!--鉴权用户名。鉴权用户名和鉴权密码表示服务器认证所需要的登录名和密码。  -->
            <username>my_login</username>

            <!--鉴权密码 。鉴权用户名和鉴权密码表示服务器认证所需要的登录名和密码。  -->
            <password>my_password</password>

            <!--鉴权时使用的私钥位置。和前两个元素类似,私钥位置和私钥密码指定了一个私钥的路径(默认是/home/hudson/.ssh/id_dsa)以及如果需要的话,一个密钥 -->
            <!--将来passphrase和password元素可能会被提取到外部,但目前它们必须在settings.xml文件以纯文本的形式声明。  -->
            <privateKey>${usr.home}/.ssh/id_dsa</privateKey>

            <!--鉴权时使用的私钥密码。 -->
            <passphrase>some_passphrase</passphrase>

            <!--文件被创建时的权限。如果在部署的时候会创建一个仓库文件或者目录,这时候就可以使用权限(permission)。-->
            <!--这两个元素合法的值是一个三位数字,其对应了unix文件系统的权限,如664,或者775。  -->
            <filePermissions>664</filePermissions>

            <!--目录被创建时的权限。  -->
            <directoryPermissions>775</directoryPermissions>

            <!--传输层额外的配置项  -->
            <configuration></configuration>

        </server>

    </servers>

    <!--为仓库列表配置的下载镜像列表。  -->
    <mirrors>

        <!--给定仓库的下载镜像。  -->
        <mirror>

            <!--该镜像的唯一标识符。id用来区分不同的mirror元素。  -->
            <id>planetmirror.com</id>

            <!--镜像名称  -->
            <name>PlanetMirror Australia</name>

            <!--该镜像的URL。构建系统会优先考虑使用该URL,而非使用默认的服务器URL。  -->
            <url>http://downloads.planetmirror.com/pub/maven2</url>

            <!--被镜像的服务器的id。例如,如果我们要设置了一个Maven中央仓库(http://repo1.maven.org/maven2)的镜像,-->
            <!--就需要将该元素设置成central。这必须和中央仓库的id central完全一致。 -->
            <mirrorOf>central</mirrorOf>

        </mirror>

    </mirrors>

    <!--根据环境参数来调整构建配置的列表。settings.xml中的profile元素是pom.xml中profile元素的裁剪版本。-->
    <!--它包含了id,activation, repositories, pluginRepositories和 properties元素。-->
    <!--这里的profile元素只包含这五个子元素是因为这里只关心构建系统这个整体(这正是settings.xml文件的角色定位),而非单独的项目对象模型设置。-->
    <!--如果一个settings中的profile被激活,它的值会覆盖任何其它定义在POM中或者profile.xml中的带有相同id的profile。  -->
    <profiles>

        <!--根据环境参数来调整的构件的配置 -->
        <profile>

            <!--该配置的唯一标识符。  -->
            <id>test</id>

            <!--自动触发profile的条件逻辑。Activation是profile的开启钥匙。-->
            <!--如POM中的profile一样,profile的力量来自于它能够在某些特定的环境中自动使用某些特定的值;这些环境通过activation元素指定。-->
            <!--activation元素并不是激活profile的唯一方式。settings.xml文件中的activeProfile元素可以包含profile的id。-->
            <!--profile也可以通过在命令行,使用-P标记和逗号分隔的列表来显式的激活(如,-P test)。 -->
            <activation>

                <!--profile默认是否激活的标识 -->
                <activeByDefault>false</activeByDefault>

                <!--activation有一个内建的java版本检测,如果检测到jdk版本与期待的一样,profile被激活。 -->
                <jdk>1.7</jdk>

                <!--当匹配的操作系统属性被检测到,profile被激活。os元素可以定义一些操作系统相关的属性。 -->
                <os>

                    <!--激活profile的操作系统的名字  -->
                    <name>Windows XP</name>

                    <!--激活profile的操作系统所属家族(如 'windows')   -->
                    <family>Windows</family>

                    <!--激活profile的操作系统体系结构   -->
                    <arch>x86</arch>

                    <!--激活profile的操作系统版本 -->
                    <version>5.1.2600</version>

                </os>

                <!--如果Maven检测到某一个属性(其值可以在POM中通过${名称}引用),其拥有对应的名称和值,Profile就会被激活。-->
                <!--如果值字段是空的,那么存在属性名称字段就会激活profile,否则按区分大小写方式匹配属性值字段 -->
                <property>

                    <!--激活profile的属性的名称 -->
                    <name>mavenVersion</name>

                    <!--激活profile的属性的值  -->
                    <value>2.0.3</value>

                </property>

                <!--提供一个文件名,通过检测该文件的存在或不存在来激活profile。missing检查文件是否存在,如果不存在则激活profile。-->
                <!--另一方面,exists则会检查文件是否存在,如果存在则激活profile。 -->
                <file>

                    <!--如果指定的文件存在,则激活profile。  -->
                    <exists>/usr/local/hudson/hudson-home/jobs/maven-guide-zh-to-production/workspace/</exists>

                    <!--如果指定的文件不存在,则激活profile。 -->
                    <missing>/usr/local/hudson/hudson-home/jobs/maven-guide-zh-to-production/workspace/</missing>

                </file>

            </activation>

             <!--对应profile的扩展属性列表。Maven属性和Ant中的属性一样,可以用来存放一些值。这些值可以在POM中的任何地方使用标记${X}来使用,这里X是指属性的名称。-->
            <!--属性有五种不同的形式,并且都能在settings.xml文件中访问。   -->
            <!--1. env.X: 在一个变量前加上"env."的前缀,会返回一个shell环境变量。例如,"env.PATH"指代了$path环境变量(在Windows上是%PATH%)。  -->
            <!--2. project.x:指代了POM中对应的元素值。      -->
            <!--3. settings.x: 指代了settings.xml中对应元素的值。   -->
            <!--4. Java System Properties: 所有可通过java.lang.System.getProperties()访问的属性都能在POM中使用该形式访问,   -->
            <!--   如/usr/lib/jvm/java-1.6.0-openjdk-1.6.0.0/jre。      -->
            <!--5. x: 在<properties/>元素中,或者外部文件中设置,以${someVar}的形式使用。  -->
            <properties>

                <!-- 如果这个profile被激活,那么属性${user.install}就可以被访问了 -->
                <user.install>usr/local/winner/jobs/maven-guide</user.install>

            </properties>

            <!--远程仓库列表,它是Maven用来填充构建系统本地仓库所使用的一组远程项目。  -->
            <repositories>

                <!--包含需要连接到远程仓库的信息  -->
                <repository>

                    <!--远程仓库唯一标识 -->
                    <id>codehausSnapshots</id>

                    <!--远程仓库名称  -->
                    <name>Codehaus Snapshots</name>

                    <!--如何处理远程仓库里发布版本的下载 -->
                    <releases>

                        <!--true或者false表示该仓库是否为下载某种类型构件(发布版,快照版)开启。   -->
                        <enabled>false</enabled>

                        <!--该元素指定更新发生的频率。Maven会比较本地POM和远程POM的时间戳。这里的选项是:-->
                        <!--always(一直),daily(默认,每日),interval:X(这里X是以分钟为单位的时间间隔),或者never(从不)。  -->
                        <updatePolicy>always</updatePolicy>

                        <!--当Maven验证构件校验文件失败时该怎么做:-->
                        <!--ignore(忽略),fail(失败),或者warn(警告)。 -->
                        <checksumPolicy>warn</checksumPolicy>

                    </releases>

                    <!--如何处理远程仓库里快照版本的下载。有了releases和snapshots这两组配置,POM就可以在每个单独的仓库中,为每种类型的构件采取不同的策略。-->
                    <!--例如,可能有人会决定只为开发目的开启对快照版本下载的支持。参见repositories/repository/releases元素 -->
                    <snapshots>

                        <enabled />
                        <updatePolicy />
                        <checksumPolicy />

                    </snapshots>

                    <!--远程仓库URL,按protocol://hostname/path形式  -->
                    <url>http://snapshots.maven.codehaus.org/maven2</url>

                    <!--用于定位和排序构件的仓库布局类型-可以是default(默认)或者legacy(遗留)。-->
                    <!--Maven 2为其仓库提供了一个默认的布局;然而,Maven 1.x有一种不同的布局。我们可以使用该元素指定布局是default(默认)还是legacy(遗留)。  -->
                    <layout>default</layout>

                </repository>

            </repositories>

            <!--发现插件的远程仓库列表。仓库是两种主要构件的家。第一种构件被用作其它构件的依赖。这是中央仓库中存储的大部分构件类型。另外一种构件类型是插件。-->
            <!--Maven插件是一种特殊类型的构件。由于这个原因,插件仓库独立于其它仓库。pluginRepositories元素的结构和repositories元素的结构类似。-->
            <!--每个pluginRepository元素指定一个Maven可以用来寻找新插件的远程地址。 -->
            <pluginRepositories>

                <!--包含需要连接到远程插件仓库的信息.参见profiles/profile/repositories/repository元素的说明 -->
                <pluginRepository>
                    <releases>
                        <enabled />
                        <updatePolicy />
                        <checksumPolicy />
                    </releases>

                    <snapshots>
                        <enabled />
                        <updatePolicy />
                        <checksumPolicy />
                    </snapshots>

                    <id />
                    <name />
                    <url />
                    <layout />
                </pluginRepository>

            </pluginRepositories>

            <!--手动激活profiles的列表,按照profile被应用的顺序定义activeProfile。 该元素包含了一组activeProfile元素,每个activeProfile都含有一个profile id。-->
            <!--任何在activeProfile中定义的profile id,不论环境设置如何,其对应的 profile都会被激活。-->
            <!--如果没有匹配的profile,则什么都不会发生。例如,env-test是一个activeProfile,则在pom.xml(或者profile.xml)中对应id的profile会被激活。-->
            <!--如果运行过程中找不到这样一个profile,Maven则会像往常一样运行。  -->
            <activeProfiles>

                <activeProfile>env-test</activeProfile>

            </activeProfiles>

        </profile>

    </profiles>

</settings>
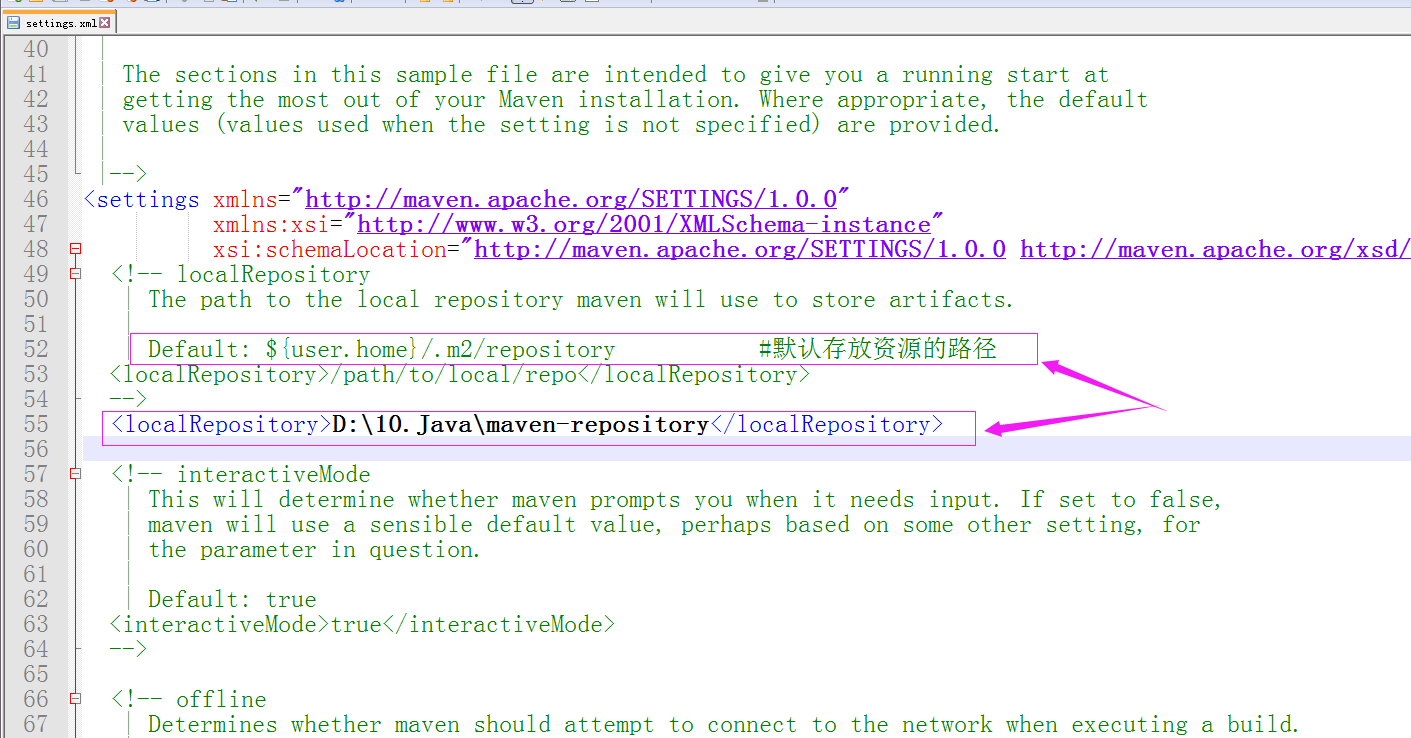
2>. Setting.xml之修改本地的仓库地址
3>.指定Maven的镜像地址(我们修改为阿里的或者我们自己建立的私有仓库)
