一、Python 2.7.x 和 3.x 版本的区别小结
- print函数
1、python2
1 import platform
2
3 print ‘Python’, platform.python_version()
4 print ‘Hello, World!’
5 print(“Hello,World!’)
6 print "text", ; print 'print more text on the same line'
输出结果:
1 Python 2.7.6
2 Hello, World!
3 Hello, World!
4 text print more text on the same line
2、python3
1 import platform
2
3 print('Python', platform.python_version())
4 print('Hello, World!')
5
6 print("some text,", end="")
7 print(' print more text on the same line')
结果输出:
1 Python 3.5.1
2 Hello, World!
3 some text, print more text on the same line
1 >>> print 'Hello,World!'
2   File "<stdin>", line 1
3     print 'Hello,World!'
4                        ^
5 SyntaxError: Missing parentheses in call to 'print'
注意:
在Python 2中使用额外的括号也是可以的。但反过来在Python 3中想以Python2的形式不带括号调用print函数时,会触发SyntaxError。
- 整数除法
1、python2
1 print '3 / 2 =', 3 / 2
2 print '3 // 2 =', 3 // 2
3 print '3 / 2.0 =', 3 / 2.0
4 print '3 // 2.0 =', 3 // 2.0
结果输出:
1 3 / 2 = 1
2 3 // 2 = 1
3 3 / 2.0 = 1.5
4 3 // 2.0 = 1.0
2、python3
1 print('3 / 2 =', 3 / 2)
2 print('3 // 2 =', 3 // 2)
3 print('3 / 2.0 =', 3 / 2.0)
4 print('3 // 2.0 =', 3 // 2.0)
结果输出:
1 3 / 2 = 1.5
2 3 // 2 = 1
3 3 / 2.0 = 1.5
4 3 // 2.0 = 1.0
- 触发异常
1、python2
Python 2支持新旧两种异常触发语法,而Python 3只接受带括号的的语法(不然会触发SyntaxError):
1 >>> raise IOError, "file error"
2 Traceback (most recent call last):
3   File "<stdin>", line 1, in <module>
4 IOError: file error
1 >>> raise IOError("file error")
2 Traceback (most recent call last):
3   File "<stdin>", line 1, in <module>
4 IOError: file error
2、python3
1 >>> raise IOError, "file error"
2   File "<stdin>", line 1
3     raise IOError, "file error"
4                  ^
5 SyntaxError: invalid syntax
1 >>> raise IOError("file error")
2 Traceback (most recent call last):
3   File "<stdin>", line 1, in <module>
4 OSError: file error
- 异常处理
1、python2
1 try:
2     let_us_cause_a_NameError
3 except NameError, err:
4     print err, '--> our error message'
结果输出:
1 name 'let_us_cause_a_NameError' is not defined --> our error message
2、python3
1 try:
2     let_us_cause_a_NameError
3 except NameError as err:
4     print(err, '--> our error message')
结果输出:
1 name 'let_us_cause_a_NameError' is not defined --> our error message
Python 3中的异常处理也发生了一点变化。在Python 3中必须使用“as”关键字。
-
input()解析用户的输入
Python 3改进了input()函数,这样该函数就会总是将用户的输入存储为str对象。在Python 2中,为了避免读取非字符串类型会发生的一些危险行为,不得不使用raw_input()代替input()。
1、python2
 1 >>> my_input = input('enter a number: ')
 2
 3 enter a number: 123
 4
 5 >>> type(my_input)
 6 <type 'int'>
 7
 8 >>> my_input = raw_input('enter a number: ')
 9
10 enter a number: 123
11
12 >>> type(my_input)
13 <type 'str'>
2、python3
1 >>> my_input = input('enter a number: ')
2 enter a number: 123
3 >>> type(my_input)
4 <class 'str'>
-
返回可迭代对象
1、python2
1 print range(3)
2 print type(range(3))
结果输出:
1 [0, 1, 2]
2 <type 'list'>
2、python3
1 print(range(3))
2 print(type(range(3)))
3 print(list(range(3)))
结果输出:
1 range(0, 3)
2 <class 'range'>
3 [0, 1, 2]
二、用户输入
1 #!/usr/bin/env python
2 # -*- coding: utf-8 -*-
3
4 # 将用户输入的内容赋值给 name 变量
5 name = raw_input("请输入用户名:")
6
7 # 打印输入的内容
8 print name
结果输出:
1 >>> name = raw_input("请输入用户名:")
2 请输入用户名:yinjia
3 >>> print name
4 yinjia
输入密码时,如果想要不可见,需要利用getpass 模块中的 getpass方法,即:
 1 #!/usr/bin/env python
 2 # -*- coding: utf-8 -*-
 3
 4 import getpass
 5
 6 # 将用户输入的内容赋值给 name 变量
 7 pwd = getpass.getpass("请输入密码:")
 8
 9 # 打印输入的内容
10 print pwd
结果输出:
1 >>> import getpass
2 >>> pwd = getpass.getpass("请输入密码:")
3 请输入密码:
4 >>> print pwd
5 123456
三、while循环
- 基本循环
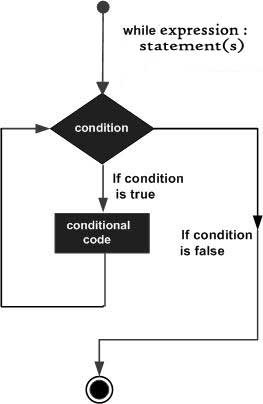
Python 编程中 while 语句用于循环执行程序,即在某条件下,循环执行某段程序,以处理需要重复处理的相同任务。其基本形式为:
while 判断条件:
    执行语句……
执行语句可以是单个语句或语句块。判断条件可以是任何表达式,任何非零、或非空(null)的值均为true。
当判断条件假false时,循环结束。
执行流程图如下:

1 #!/usr/bin/env python
2
3 count = 0
4 while (count < 9):
5    print 'The count is:', count
6    count = count + 1
7
8 print "Good bye!"
 结果输出:
 1 The count is: 0
 2 The count is: 1
 3 The count is: 2
 4 The count is: 3
 5 The count is: 4
 6 The count is: 5
 7 The count is: 6
 8 The count is: 7
 9 The count is: 8
10 Good bye!
- break
break用于退出所有循环
 1 #!/usr/bin/env python
 2
 3 sum = 0
 4 number = 0
 5
 6 while number < 20:
 7       number += 1
 8       sum += number
 9       if sum >= 100:
10             break
11 print("The number is", number)
12 print("The sum is", sum)
结果输出:
1 The number is 14
2 The sum is 105
- continue
continue用于退出当前循环,继续下一次循环。
 1 #!/usr/bin/env python
 2
 3 sum = 0
 4 number = 0
 5
 6 while number < 20:
 7     number += 1
 8     if number == 10 or number == 11:
 9           continue
10     sum += number
11 print("The sum is", sum)
结果输出:
1 The sum is 189