一. 拦截器
1. 简介
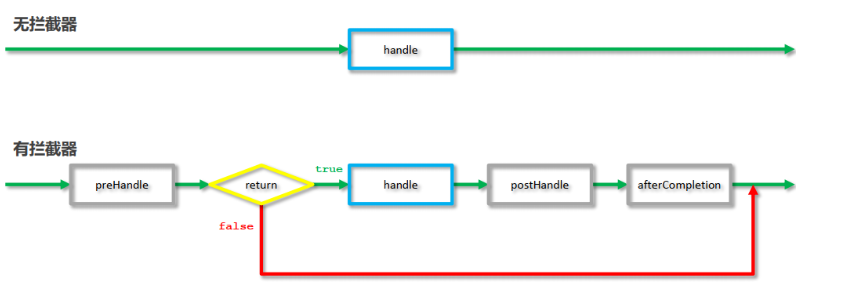
拦截器( Interceptor)是一种动态拦截方法调用的机制
作用:① 在指定的方法调用前后执行预先设定后的的代码 ②阻止原始方法的执行
核心原理: AOP思想
拦截器链:多个拦截器按照一定的顺序,对原始被调用功能进行增强
PS:拦截器 VS 过滤器

2. 实战开发-单拦截器
(1). 新建拦截器类 MyInterceptor1,实现 HandlerInterceptor接口,然后override三个方法,分别是:preHandle、postHandle、afterCompletion。
A. 前置处理方法preHandle
 //处理器运行之前执行
    @Override
    public boolean preHandle(HttpServletRequest request,
                             HttpServletResponse response,
                             Object handler) throws Exception {
        System.out.println("前置运行----a1");
        //返回值为false将拦截原始处理器的运行
        //如果配置多拦截器,返回值为false将终止当前拦截器后面配置的拦截器的运行
        return true;
    }
参数剖析:
response:响应对象。 handler:被调用的处理器对象,本质上是一个方法对象,对反射中的Method对象进行了再包装。
返回值
返回值为true,继续往后执行。
B. 后置处理方法postHandle
   //处理器运行之后执行
    @Override
    public void postHandle(HttpServletRequest request,
                           HttpServletResponse response,
                           Object handler,
                           ModelAndView modelAndView) throws Exception {
        System.out.println("后置运行----b1");
    }
参数剖析:
modelAndView:如果处理器执行完成具有返回结果,可以读取到对应数据与页面信息,并进行调整。
C. 完成处理方法afterCompletion
   //所有拦截器的后置执行全部结束后,执行该操作
    @Override
    public void afterCompletion(HttpServletRequest request,
                                HttpServletResponse response,
                                Object handler,
                                Exception ex) throws Exception {
        System.out.println("完成运行----c1");
    }
参数剖析:
ex:如果处理器执行过程中出现异常对象,可以针对异常情况进行单独处理。
补充拦截器执行流程:
分享全部代码:


//拦截器1
//自定义拦截器需要实现HandlerInterceptor接口
public class MyInterceptor1 implements HandlerInterceptor {


    //处理器运行之前执行
    @Override
    public boolean preHandle(HttpServletRequest request,
                             HttpServletResponse response,
                             Object handler) throws Exception {
        System.out.println("前置运行----a1");
        //返回值为false将拦截原始处理器的运行
        //如果配置多拦截器,返回值为false将终止当前拦截器后面配置的拦截器的运行
        return true;
    }

    //处理器运行之后执行
    @Override
    public void postHandle(HttpServletRequest request,
                           HttpServletResponse response,
                           Object handler,
                           ModelAndView modelAndView) throws Exception {
        System.out.println("后置运行----b1");
    }

    //所有拦截器的后置执行全部结束后,执行该操作
    @Override
    public void afterCompletion(HttpServletRequest request,
                                HttpServletResponse response,
                                Object handler,
                                Exception ex) throws Exception {
        System.out.println("完成运行----c1");
    }

    //三个方法的运行顺序为    preHandle -> postHandle -> afterCompletion
    //如果preHandle返回值为false,三个方法仅运行preHandle
}
(2). 开启拦截器配置
    <mvc:interceptors>
        <mvc:interceptor>
            <!--拦截所有/User/开头的所有请求-->
            <mvc:mapping path="/User/*"/>
            <!--指定具体拦截器-->
            <bean class="com.ypf.interceptor.MyInterceptor1"/>
        </mvc:interceptor>
    </mvc:interceptors>
剖析:
            <!--设置拦截器的拦截路径,支持*通配-->
            <!--/**         表示拦截所有映射-->
            <!--/*          表示拦截所有/开头的映射-->
            <!--/User/*     表示拦截所有/User/开头的映射-->
            <!--/User/add*  表示拦截所有/User/开头,且具体映射名称以add开头的映射-->
            <!--/User/*All  表示拦截所有/User/开头,且具体映射名称以All结尾的映射-->
(3). 测试方法
@Controller
@RequestMapping("User")
public class UserController {
    @RequestMapping("/showMsg")
    @ResponseBody
     //http://localhost:8888/04_Interceptor_ErrorHandle/User/showMsg
    public String showMsg() {
        System.out.println("showMsg is running");
        return  "ok";
    }

}
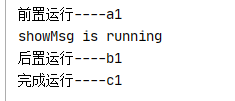
运行结果:
A. preHandle中返回:true
B. preHandle中返回:false

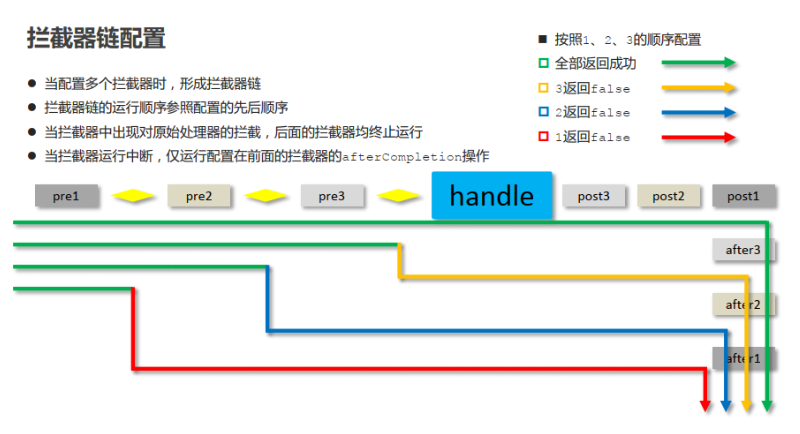
3. 实战开发-多拦截器
(1). 准备三个拦截器: MyInterceptor1、MyInterceptor2、MyInterceptor3。
//拦截器1
//自定义拦截器需要实现HandlerInterceptor接口
public class MyInterceptor1 implements HandlerInterceptor {


    //处理器运行之前执行
    @Override
    public boolean preHandle(HttpServletRequest request,
                             HttpServletResponse response,
                             Object handler) throws Exception {
        System.out.println("前置运行----a1");
        //返回值为false将拦截原始处理器的运行
        //如果配置多拦截器,返回值为false将终止当前拦截器后面配置的拦截器的运行
        return true;
    }

    //处理器运行之后执行
    @Override
    public void postHandle(HttpServletRequest request,
                           HttpServletResponse response,
                           Object handler,
                           ModelAndView modelAndView) throws Exception {
        System.out.println("后置运行----b1");
    }

    //所有拦截器的后置执行全部结束后,执行该操作
    @Override
    public void afterCompletion(HttpServletRequest request,
                                HttpServletResponse response,
                                Object handler,
                                Exception ex) throws Exception {
        System.out.println("完成运行----c1");
    }

    //三个方法的运行顺序为    preHandle -> postHandle -> afterCompletion
    //如果preHandle返回值为false,三个方法仅运行preHandle
}
//拦截器2
//自定义拦截器需要实现HandlerInterceptor接口
public class MyInterceptor2 implements HandlerInterceptor {


    //处理器运行之前执行
    @Override
    public boolean preHandle(HttpServletRequest request,
                             HttpServletResponse response,
                             Object handler) throws Exception {
        System.out.println("前置运行----a2");
        //返回值为false将拦截原始处理器的运行
        //如果配置多拦截器,返回值为false将终止当前拦截器后面配置的拦截器的运行
        return true;
    }

    //处理器运行之后执行
    @Override
    public void postHandle(HttpServletRequest request,
                           HttpServletResponse response,
                           Object handler,
                           ModelAndView modelAndView) throws Exception {
        System.out.println("后置运行----b2");
    }

    //所有拦截器的后置执行全部结束后,执行该操作
    @Override
    public void afterCompletion(HttpServletRequest request,
                                HttpServletResponse response,
                                Object handler,
                                Exception ex) throws Exception {
        System.out.println("完成运行----c2");
    }

    //三个方法的运行顺序为    preHandle -> postHandle -> afterCompletion
    //如果preHandle返回值为false,三个方法仅运行preHandle
}

//拦截器1
//自定义拦截器需要实现HandlerInterceptor接口
public class MyInterceptor3 implements HandlerInterceptor {


    //处理器运行之前执行
    @Override
    public boolean preHandle(HttpServletRequest request,
                             HttpServletResponse response,
                             Object handler) throws Exception {
        System.out.println("前置运行----a3");
        //返回值为false将拦截原始处理器的运行
        //如果配置多拦截器,返回值为false将终止当前拦截器后面配置的拦截器的运行
        return true;
    }

    //处理器运行之后执行
    @Override
    public void postHandle(HttpServletRequest request,
                           HttpServletResponse response,
                           Object handler,
                           ModelAndView modelAndView) throws Exception {
        System.out.println("后置运行----b3");
    }

    //所有拦截器的后置执行全部结束后,执行该操作
    @Override
    public void afterCompletion(HttpServletRequest request,
                                HttpServletResponse response,
                                Object handler,
                                Exception ex) throws Exception {
        System.out.println("完成运行----c3");
    }

    //三个方法的运行顺序为    preHandle -> postHandle -> afterCompletion
    //如果preHandle返回值为false,三个方法仅运行preHandle
}
(2). 配置多个拦截器
    <!--4.2 开启多个拦截器-->
    <mvc:interceptors>
        <!--开启具体的拦截器的使用,可以配置多个-->
        <mvc:interceptor>
            <!--设置拦截器的拦截路径,支持*通配-->
            <!--/**         表示拦截所有映射-->
            <!--/*          表示拦截所有/开头的映射-->
            <!--/User/*     表示拦截所有/User/开头的映射-->
            <!--/User/add*  表示拦截所有/User/开头,且具体映射名称以add开头的映射-->
            <!--/User/*All  表示拦截所有/User/开头,且具体映射名称以All结尾的映射-->
            <mvc:mapping path="/*"/>
            <mvc:mapping path="/**"/>
            <!--设置拦截排除的路径,/User/showMsg2 不走MyInterceptor1拦截器-->
            <mvc:exclude-mapping path="/User/showMsg2"/>
            <!--指定具体的拦截器类-->
            <bean class="com.ypf.interceptor.MyInterceptor1"/>
        </mvc:interceptor>
        <!--配置多个拦截器,配置顺序即为最终运行顺序-->
        <mvc:interceptor>
            <mvc:mapping path="/**"/>
            <bean class="com.ypf.interceptor.MyInterceptor2"/>
        </mvc:interceptor>
        <mvc:interceptor>
            <mvc:mapping path="/**"/>
            <bean class="com.ypf.interceptor.MyInterceptor3"/>
        </mvc:interceptor>
    </mvc:interceptors>
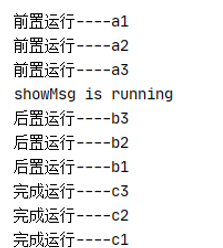
(3). 测试
A. 三个拦截器中的preHandle都返回true。
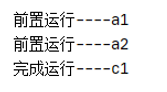
B. MyInterceptor3中的preHander中返回false。

C. MyInterceptor2中的preHander中返回false。
D. MyInterceptor1中的preHander中返回false。
二. 全局异常处理
1. 通用异常过滤器1 (非注解形式)
/**
 * 通用异常过滤器1 (非注解形式)
 * 异常类实现HandlerExceptionResolver接口
 * 注意:由于这个类实现了HandlerExceptionResolver接口,所以加上@Component后,springmvc就可以将他识别为异常处理器
 */

@Component
public class ExceptionResolver1 implements HandlerExceptionResolver {
    @Override
    public ModelAndView resolveException(HttpServletRequest httpServletRequest,
                                         HttpServletResponse httpServletResponse,
                                         Object o, Exception ex) {
        System.out.println("my exception is running ...."+ex);
        ModelAndView modelAndView = new ModelAndView();
        if( ex instanceof NullPointerException){
            modelAndView.addObject("msg","空指针异常");
        }else if ( ex instanceof  ArithmeticException){
            modelAndView.addObject("msg","算数运算异常");
        }else{
            modelAndView.addObject("msg","未知的异常");
        }
        modelAndView.setViewName("error.jsp");
        return modelAndView;
    }
}
注:
由于这个类实现了HandlerExceptionResolver接口,所以加上@Component后,springmvc就可以将他识别为异常处理器。不需要再做任何配置了。
2. 通用异常过滤器2(注解形式)
/**
 * 通用异常处理器2(注解的形式)
 * 加上@ControllerAdvice,使该类变为的通知类,声明后该类就会被加载成异常处理器,SpringMvc就会识别
 *
 * 测试的时候需要注释掉:ExceptionResolver1中的@Component,从而使ExceptionResolver2单独生效
 */
@Component
@ControllerAdvice
public class ExceptionResolver2 {

    //类中定义的方法携带@ExceptionHandler注解的会被作为异常处理器,后面添加实际处理的异常类型
    @ExceptionHandler(NullPointerException.class)
    @ResponseBody
    public String doNullException(Exception ex){
        return "空指针异常";
    }

    @ExceptionHandler(ArithmeticException.class)
    @ResponseBody
    public String doArithmeticException(Exception ex){
        return "ArithmeticException";
    }

    @ExceptionHandler(Exception.class)
    @ResponseBody
    public String doException(Exception ex){
        return "all error";
    }

}
注意:
加上@ControllerAdvice,使该类变为的通知类,声明后该类就会被加载成异常处理器,SpringMvc就会识别,不需要再做任何配置了。
以上两种异常处理器的测试类:
    @RequestMapping("save1")
    @ResponseBody
    //http://localhost:8888/04_Interceptor_ErrorHandle/ExceptionTest/save1
    public String save1(){
        //模拟业务层发起调用产生了异常
        int i = 1/0;

        return  "ok";
    }
3. 自定义异常
(1). 两个基础异常处理器类
//自定义异常继承RuntimeException,覆盖父类所有的构造方法
public class SystemException extends RuntimeException {
    public SystemException() {
    }

    public SystemException(String message) {
        super(message);
    }

    public SystemException(String message, Throwable cause) {
        super(message, cause);
    }

    public SystemException(Throwable cause) {
        super(cause);
    }

    public SystemException(String message, Throwable cause, boolean enableSuppression, boolean writableStackTrace) {
        super(message, cause, enableSuppression, writableStackTrace);
    }
}
//自定义异常继承RuntimeException,覆盖父类所有的构造方法
public class BusinessException extends RuntimeException {
    public BusinessException() {
    }

    public BusinessException(String message) {
        super(message);
    }

    public BusinessException(String message, Throwable cause) {
        super(message, cause);
    }

    public BusinessException(Throwable cause) {
        super(cause);
    }

    public BusinessException(String message, Throwable cause, boolean enableSuppression, boolean writableStackTrace) {
        super(message, cause, enableSuppression, writableStackTrace);
    }
}
(2). 一个主异常类
//异常处理器主类
//访问 /http://localhost:8888/04_Interceptor_ErrorHandle/ExceptionTest/save2?userName=ypf  进行测试
@Component
@ControllerAdvice
public class ProjectExceptionAdvice {

    @ExceptionHandler(BusinessException.class)
    public String doBusinessException(Exception ex, Model m){
        //使用参数Model将要保存的数据传递到页面上,功能等同于ModelAndView
        //业务异常出现的消息要发送给用户查看
        m.addAttribute("msg",ex.getMessage());
        return "error.jsp";
    }

    @ExceptionHandler(SystemException.class)
    public String doSystemException(Exception ex, Model m){
        //系统异常出现的消息不要发送给用户查看,发送统一的信息给用户看
        m.addAttribute("msg","服务器出现问题,请联系管理员!");
        //实际的问题现象应该传递给redis服务器,运维人员通过后台系统查看
        //实际的问题显现更应该传递给redis服务器,运维人员通过后台系统查看
        return "error.jsp";
    }

    @ExceptionHandler(Exception.class)
    public String doException(Exception ex, Model m){
        m.addAttribute("msg",ex.getMessage());
        //将ex对象保存起来
        return "error.jsp";
    }

}
(3). 测试方法
    @RequestMapping("save2")
    @ResponseBody
    //http://localhost:8888/04_Interceptor_ErrorHandle/ExceptionTest/save2?userName=ypf
    public String  save2(String userName){
        //模拟业务层发起调用产生了异常
        //对用户的非法操作进行判定,并包装成异常对象进行处理,便于统一管理
        if(userName.trim().length() < 8){
            throw new BusinessException("对不起,用户名长度不满足要求,请重新输入!");
        }else {
            throw  new SystemException("服务器连接失败,请尽快检查处理!");
        }

    }
三. RestFul风格编程
1. 相关注解介绍
(1). @RestController
通常加在控制器上,表示是rest风格的控制器。等价于: @ResponseBody 和 @Controller
(2). 请求类型的注解
A. @RequestMapping(value = "{id}",method = RequestMethod.GET) 等价 @GetMapping("{id}")
B. @RequestMapping(value = "{id}",method = RequestMethod.POST) 等价 @PostMapping("{id}")
C. @RequestMapping(value = "{id}",method = RequestMethod.PUT) 等价 @PutMapping("{id}")
D. @RequestMapping(value = "{id}",method = RequestMethod.DELETE) 等价 @DeleteMapping("{id}")
2. 代码实操
//设置rest风格的控制器
@RestController  //(等价与 @ResponseBody  和 @Controller)
//设置公共访问路径,配合下方访问路径使用
@RequestMapping("/RestTest/")
public class RestTestController {

    //rest风格访问路径完整书写方式
    @RequestMapping("/user/{id}")
    //使用@PathVariable注解获取路径上配置的具名变量,该配置可以使用多次
    //http://localhost:8888/05_FileLoad_RestFul/RestTest/user/12
    public Integer restLocation1(@PathVariable Integer id){
        System.out.println("restful is running ....");
        return id;
    }

    //接收GET请求配置方式
    @RequestMapping(value = "{id}",method = RequestMethod.GET)
    //接收GET请求简化配置方式
    // @GetMapping("{id}")
    //http://localhost:8888/05_FileLoad_RestFul/RestTest/12
    public Integer get(@PathVariable Integer id){
        System.out.println("restful is running ....get:"+id);
        return id;
    }

    //接收POST请求配置方式
    @RequestMapping(value = "{id}",method = RequestMethod.POST)
    //接收POST请求简化配置方式
    // @PostMapping("{id}")
    //http://localhost:8888/05_FileLoad_RestFul/RestTest/12
    public Integer post(@PathVariable Integer id){
        System.out.println("restful is running ....post:"+id);
        return id;
    }

    //接收PUT请求简化配置方式
    //@RequestMapping(value = "{id}",method = RequestMethod.PUT)
    //接收PUT请求简化配置方式
    @PutMapping("{id}")
    //http://localhost:8888/05_FileLoad_RestFul/RestTest/12
    public Integer put(@PathVariable Integer id){
        System.out.println("restful is running ....put:"+id);
        return id;
    }

    //接收DELETE请求简化配置方式
    //@RequestMapping(value = "{id}",method = RequestMethod.DELETE)
    //接收DELETE请求简化配置方式
     @DeleteMapping("{id}")
    //http://localhost:8888/05_FileLoad_RestFul/RestTest/12
    public Integer delete(@PathVariable Integer id){
        System.out.println("restful is running ....delete:"+id);
        return id;
    }

}
四. 文件上传
1. 导入坐标
    <dependency>
      <groupId>commons-fileupload</groupId>
      <artifactId>commons-fileupload</artifactId>
      <version>1.4</version>
    </dependency>
2. 核心配置
    <!--5.配置文件上传-->
    <!--(注意:这里的id必须叫:multipartResolver)-->
    <bean id="multipartResolver" class="org.springframework.web.multipart.commons.CommonsMultipartResolver">
        <property name="maxUploadSize" value="1024000000"/>
    </bean>
3. 前端代码
<form action="/05_FileLoad_RestFul/fileupload" method="post" enctype="multipart/form-data">
    <%--文件上传表单的name属性值一定要与controller处理器中方法的参数对应,否则无法实现文件上传--%>
    上传LOGO:<input type="file" name="file"/><br/>
    上传照片:<input type="file" name="file1"/><br/>
    上传任意文件:<input type="file" name="file2"/><br/>
    <input type="submit" value="上传"/>
</form>
4. 后台代码
//图片上传类
@Controller
public class FileUploadController {


    @RequestMapping(value = "/fileupload")
    //参数中定义MultipartFile参数,用于接收页面提交的type=file类型的表单,要求表单名称与参数名相同
    public String fileupload(MultipartFile file, MultipartFile file1, MultipartFile file2, HttpServletRequest request) throws IOException {
        System.out.println("file upload is running ..."+file);
//        MultipartFile参数中封装了上传的文件的相关信息
        System.out.println(file.getSize());
        System.out.println(file.getBytes().length);
        System.out.println(file.getContentType());
        System.out.println(file.getName());
        System.out.println(file.getOriginalFilename());
        System.out.println(file.isEmpty());
        //首先判断是否是空文件,也就是存储空间占用为0的文件
        if(!file.isEmpty()){
            //如果大小在范围要求内正常处理,否则抛出自定义异常告知用户(未实现)
            //获取原始上传的文件名,可以作为当前文件的真实名称保存到数据库中备用
            String fileName = file.getOriginalFilename();
            //设置保存的路径
            String realPath = request.getServletContext().getRealPath("/images");
            //保存文件的方法,指定保存的位置和文件名即可,通常文件名使用随机生成策略产生,避免文件名冲突问题
            file.transferTo(new File(realPath,file.getOriginalFilename()));
        }
        //测试一次性上传多个文件
        if(!file1.isEmpty()){
            String fileName = file1.getOriginalFilename();
            //可以根据需要,对不同种类的文件做不同的存储路径的区分,修改对应的保存位置即可
            String realPath = request.getServletContext().getRealPath("/images");
            file1.transferTo(new File(realPath,file1.getOriginalFilename()));
        }
        if(!file2.isEmpty()){
            String fileName = file2.getOriginalFilename();
            String realPath = request.getServletContext().getRealPath("/images");
            file2.transferTo(new File(realPath,file2.getOriginalFilename()));
        }
        return "index.jsp";
    }
}
!
- 作 者 : Yaopengfei(姚鹏飞)
- 博客地址 : http://www.cnblogs.com/yaopengfei/
- 声 明1 : 如有错误,欢迎讨论,请勿谩骂^_^。
- 声 明2 : 原创博客请在转载时保留原文链接或在文章开头加上本人博客地址,否则保留追究法律责任的权利。