fastDSF介绍
FastDFS是用c语言编写的一款开源的分布式文件系统,它是由淘宝资深架构师余庆编写并开源。FastDFS专为互联网量身定制,充分考虑了冗余备份、负载均衡、线性扩容等机制,并注重高可用、高性能等指标,使用FastDFS很容易搭建一套高性能的文件服务器集群提供文件上传、下载等服务。
为什么要使用fastDFS呢?
NFS、GFS都是通用的分布式文件系统,通用的分布式文件系统的优点的是开发体验好,但是系统复杂性高、性能一般,而专用的分布式文件系统虽然开发体验性差,但是系统复杂性低并且性能高。fastDFS非常适合存储图片等那些小文件,fastDFS不对文件进行分块,所以它就没有分块合并的开销,fastDFS网络通信采用socket,通信速度很快。

文件上传流程


- group1:组名:文件上传后所在的storage组名称,在文件上传成功后有storage服务器返回,需要客户端自行保存。
- /M00:虚拟磁盘路径:storage配置的虚拟路径,与磁盘选项store_path*对应。如果配置了store_path0则是M00,如果配置了store_path1则是M01,以此类推。
- /02/44:数据两级目录:storage服务器在每个虚拟磁盘路径下创建的两级目录,用于存储数据文件。
- wkgDr...78.sh:文件名,与文件上传时不同。是由存储服务器根据特定信息生成,文件名包含:源存储服务器IP地址、文件创建时间戳、文件大小、随机数和文件拓展名等信息。
文件下载流程

- 1.通过组名tracker能够很快的定位到客户端需要访问的存储服务器组是group1,并选择合适的存储服务器提供客户端访问。
- 2.存储服务器根据“文件存储虚拟磁盘路径”和“数据文件两级目录”可以很快定位到文件所在目录,并根据文件名找到客户端需要访问的文件。
fastDFS安装与配置(Centos)
参考:https://www.cnblogs.com/handsomeye/p/9451568.html
安装 gcc
gcc:yum install gcc-c++
安装 libevent
yum -y install libevent
安装 libfastcommon
wget https://github.com/happyfish100/libfastcommon/archive/V1.0.38.tar.gz
解压安装包:tar -zxvf V1.0.38.tar.gz
2、进入目录
cd libfastcommon-1.0.38
3、执行编译
./make.sh
4、安装
./make.sh install
安装FastDFS
1、获取fdfs安装包:
wget https://github.com/happyfish100/fastdfs/archive/V5.11.tar.gz
2、解压安装包:tar -zxvf V5.11.tar.gz
3、进入目录:cd fastdfs-5.11
4、执行编译:./make.sh
5、安装:./make.sh install
6、查看可执行命令:ls -la /usr/bin/fdfs*
配置Tracker服务
1、进入 /etc/fdfs 目录,有三个.sample后缀的文件(自动生成的fdfs模板配置文件),通过cp命令拷贝tracker.conf.sample,删除.sample后缀作为正式文件(可以不删除)

2、编辑tracker.conf:vi tracker.conf,修改相关参数
base_path=/home/mm/fastdfs/tracker  #tracker存储data和log的跟路径,必须提前创建好
port=23000                          #tracker默认23000
http.server_port=80                 #http端口,需要和nginx相同
3、启动tracker(支持start|stop|restart)
/usr/bin/fdfs_trackerd /etc/fdfs/tracker.conf start
4、查看tracker启动日志:进入刚刚指定的 base_path(/home/mm/fastdfs/tracker)中有个logs目录,查看tracker.log文件
5、查看端口情况:netstat -apn|grep fdfs
配置Storage服务(如果和Tracker服务器不在同一台服务器上)
安装 gcc (如果storage服务和tracker服务配置在同一台机器上就不需要安装)
安装 libevent(如果storage服务和tracker服务配置在同一台机器上就不需要安装)
安装 libfastcommon(如果storage服务和tracker服务配置在同一台机器上就不需要安装)
安装FastDFS(如果storage服务和tracker服务配置在同一台机器上就不需要安装)
1、进入/etc/fdfs目录,有cp命令拷贝storage.conf.sample,删除.sample后缀作为正式文件;(可以不用删除)
2、编辑storage.conf:vi storage.conf,修改相关参数:
base_path=/home/mm/fastdfs/storage   #storage存储data和log的跟路径,必须提前创建好
port=23000  #storge默认23000,同一个组的storage端口号必须一致
group_name=group1  #默认组名,根据实际情况修改
store_path_count=1  #存储路径个数,需要和store_path个数匹配
store_path0=/home/mm/fastdfs/storage  #如果为空,则使用base_path,
#store_path1=/xx/xx                   #如果有多个磁盘使用
tracker_server=10.122.149.211:22122 #配置该storage监听的tracker的ip和port
#tracker_server=10.122.149.212:22122 #如果有多个tracker服务器
3、启动storage(支持start|stop|restart):
/usr/bin/fdfs_storaged /etc/fdfs/storage.conf start
4、查看storage启动日志:进入刚刚指定的base_path(/home/mm/fastdfs/storage)中有个logs目录,查看storage.log文件

5、此时再查看tracker日志:发现已经开始选举,并且作为唯一的一个tracker,被选举为leader

6、查看端口情况:netstat -apn|grep fdfs
7、通过monitor来查看storage是否成功绑定
/usr/bin/fdfs_monitor /etc/fdfs/storage.conf

上传/下载文件测试
参考:https://github.com/happyfish100/fastdfs-client-java
依赖
        <dependency>
            <groupId>net.oschina.zcx7878</groupId>
            <artifactId>fastdfs-client-java</artifactId>
            <version>1.27.0.0</version>
        </dependency>
创建fastdfs-client.properties
fastdfs.connect_timeout_in_seconds = 5      #http连接超时时间
fastdfs.network_timeout_in_seconds = 30     #tracker和storage网络通讯超时时间
fastdfs.charset = UTF-8                     #字符编码
fastdfs.tracker_servers = 192.168.101.65:22122 #tracker服务器地址,多个地址使用,分割
测试
import org.csource.common.MyException;
import org.csource.fastdfs.*;
import org.junit.Test;
import org.junit.runner.RunWith;
import org.springframework.boot.test.context.SpringBootTest;
import org.springframework.test.context.junit4.SpringRunner;

import java.io.File;
import java.io.FileOutputStream;
import java.io.IOException;

/**
 * @author Administrator
 * @version 1.0
 **/
@SpringBootTest
@RunWith(SpringRunner.class)
public class TestFastDFS {

    //上传文件
    @Test
    public void testUpload(){

        try {
            //加载fastdfs-client.properties配置文件
            ClientGlobal.initByProperties("config/fastdfs-client.properties");
            //定义TrackerClient,用于请求TrackerServer
            TrackerClient trackerClient = new TrackerClient();
            //连接tracker
            TrackerServer trackerServer = trackerClient.getConnection();
            //获取Stroage
            StorageServer storeStorage = trackerClient.getStoreStorage(trackerServer);
            //创建stroageClient
            StorageClient1 storageClient1 = new StorageClient1(trackerServer,storeStorage);
            //向stroage服务器上传文件
            //本地文件的路径
            String filePath = "d:/logo.png";
            //上传成功后拿到文件Id
            String fileId = storageClient1.upload_file1(filePath, "png", null);
            System.out.println(fileId);
            //group1/M00/00/01/wKhlQVuhU3eADb4pAAAawU0ID2Q159.png

        } catch (Exception e) {
            e.printStackTrace();
        }

    }


    //下载文件
    @Test
    public void testDownload(){
        try {
            //加载fastdfs-client.properties配置文件
            ClientGlobal.initByProperties("config/fastdfs-client.properties");
            //定义TrackerClient,用于请求TrackerServer
            TrackerClient trackerClient = new TrackerClient();
            //连接tracker
            TrackerServer trackerServer = trackerClient.getConnection();
            //获取Stroage
            StorageServer storeStorage = trackerClient.getStoreStorage(trackerServer);
            //创建stroageClient
            StorageClient1 storageClient1 = new StorageClient1(trackerServer,storeStorage);
            //下载文件
            //文件id
            String fileId = "group1/M00/00/01/wKhlQVuhU3eADb4pAAAawU0ID2Q159.png";
            byte[] bytes = storageClient1.download_file1(fileId);
            //使用输出流保存文件
            FileOutputStream fileOutputStream = new FileOutputStream(new File("c:/logo.png"));
            fileOutputStream.write(bytes);
        } catch (IOException e) {
            e.printStackTrace();
        } catch (MyException e) {
            e.printStackTrace();
        }
    }
}
搭建图片虚拟服务器
在storage安装Nginx和fastdfs-nginx-module模块
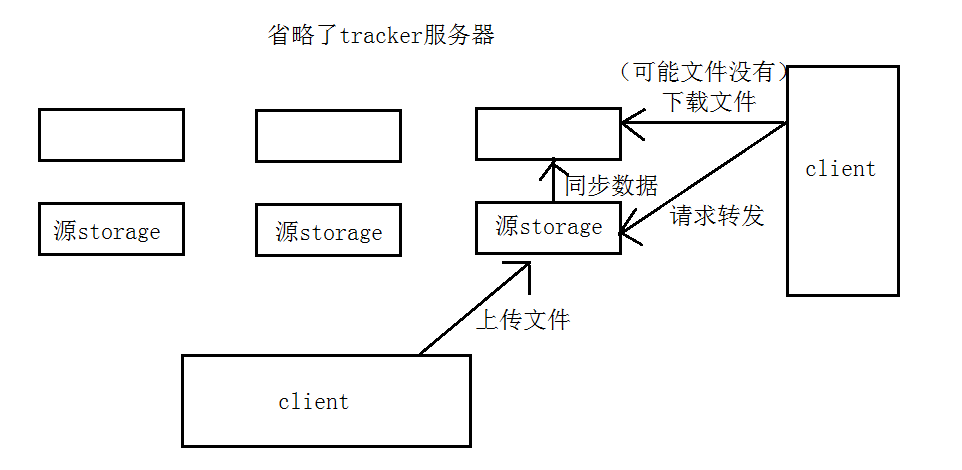
在storage server上安装nginx的目的是对外通过http 访问 storage server上的文件。使用nginx的模块FastDFS-nginx-module的作用是当通过http方式访问storage中的文件,如果当前storage本机没有要找的文件时向源 storage主机代理请求文件(上传文件时,我们是将文件上传到源storage服务器,此时同一组的其他storage服务器来同步源storage服务器文件)

nginx 代理
#storage群group1组
upstream storage_server_group1{
	server 192.168.101.5:80 weight=10;
	server 192.168.101.6:80 weight=10;
}
#storage群 group2组
upstream storage_server_group2{
	server 192.168.101.7:80 weight=10;
	server 192.168.101.8:80 weight=10;
}
server {
	listen 80;
	server_name ccc.test.com;
	location /group1{
		proxy_redirect off;
		proxy_set_header Host $host;
		proxy_set_header X-Real-IP $remote_addr;
		proxy_set_header X-Forwarded-For $proxy_add_x_forwarded_for;
		proxy_pass http://storage_server_group1;
	}
	location /group2{
		proxy_redirect off;
		proxy_set_header Host $host;
		proxy_set_header X-Real-IP $remote_addr;
		proxy_set_header X-Forwarded-For $proxy_add_x_forwarded_for;
		proxy_pass http://storage_server_group2;
	}
}
在Storage上安装nginx和fastdfs-nginx-module
1、 下载Nginx安装包
wget http://nginx.org/download/nginx-1.15.2.tar.gz
解压nginx:tar -zxvf nginx-1.15.2.tar.gz
2、下载fastdfs-nginx-module安装包
wget https://github.com/happyfish100/fastdfs-nginx-module/archive/V1.20.tar.gz
解压fastdfs-nginx-module:tar -xvf V1.20.tar.gz
fastdfs-nginx-module模块配置
1、修改fastdfs-nginx-module-1.20/src/config文件,将/usr/local/路径改为/usr/

2、将FastDFS-nginx-module/src下的mod_FastDFS.conf拷贝至/etc/fdfs/下
cp mod_FastDFS.conf /etc/fdfs/
3、并修改 mod_FastDFS.conf 的内容:vi /etc/fdfs/mod_FastDFS.conf
base_path=/home/mm/fastdfs
tracker_server=10.122.149.211:22122 #tracker的地址
url_have_group_name=true #url是否包含group名称
storage_server_port=23000 #需要和storage配置的相同
store_path_count=1  #存储路径个数,需要和store_path个数匹配
store_path0=/home/mm/fastdfs/storage #文件存储的位置
nginx 模块配置
1、加载fastdfs-nginx-module模块
./configure --prefix=/usr/local/nginx --add-module=/usr/local/src/fastdfs-nginx-module-1.20/src/
更多配置配置
./configure
--prefix=/usr/local/nginx
--pid-path=/var/run/nginx/nginx.pid
--lock-path=/var/lock/nginx.lock
--error-log-path=/var/log/nginx/error.log
--http-log-path=/var/log/nginx/access.log
--with-http_gzip_static_module
--http-client-body-temp-path=/var/temp/nginx/client
--http-proxy-temp-path=/var/temp/nginx/proxy
--http-fastcgi-temp-path=/var/temp/nginx/fastcgi
--http-uwsgi-temp-path=/var/temp/nginx/uwsgi
--http-scgi-temp-path=/var/temp/nginx/scgi
--add-module=/usr/local/FastDFS-nginx-module/src
2、编译安装:
make
make install
nginx配置
server {
	listen 80;
	server_name 192.168.101.65;
	location /group1/M00/{
		root /home/FastDFS/fdfs_storage/data;
		ngx_FastDFS_module;
	}
}
