消息总线: Spring Cloud Bus
在微服务架构的系统中, 我们通常会使用轻量级的消息代理来构建一个共用的消息主题让系统中所有微服务实例都连接上来, 由于该主题中产生的消息会被所有实例监听和消费, 所以我们称它为消息总线。 在总线上的各个实例都可以方便地广播一些需要让其他连接在该主题上的实例都知道的消息, 例如配置信息的变更或者其他一些管理操作等。
由于消息总线在微服务架构系统中被广泛使用,所以它同配置中心一样,几乎是微服务架构中的必备组件。Spring Cloud作为微服务架构综合性的解决方案,对此自然也有自己的实现,这就是Spring Cloud Bus。通过使用Spring Cloud Bus,可以非常容易的搭建起消息总线,同时实现了一些消息总线中的常用功能,比如,配合Spring Cloud Config实现微服务应用配置信息的动态更新等。
消息代理
消息代理(Message Broker)是一种消息验证、传输、路由的架构模式。它在应用程序之间起到通信调度并最小化应用之间的依赖作用,使得应用程序可以高效地解耦通信过程。消息代理是一个中间件产品,它的核心是一个消息的路由程序,用来实现接收和分发消息,并根据设定好的消息处理流程来转发给正确的应用。它包括独立的通信和消息传递协议,能够实现组织内部和组织间的网络通信。设计代理的目的就是为了能够从应用程序中传入消息,并执行一些特别的操作,下面这些是在企业应用中,我们经常需要使用消息代理的场景:
1、将消息路由到一个或多个目的地。
2、消息转化为其他的表现方式。
3、执行消息的聚焦、消息的分解,并将结果发送到它们的目的地,然后重新组合响应返回给消息用户。
4、调用Web服务来检索数据。
5、响应事件或错误。
6、使用发布-订阅模式来提供内容或基于主题的消息路由。
目前已经有非常多的开源产品可以供大家使用,比如:
1、ActiveMQ
2、Kafka
3、RabbitMQ
4、RocketMQ
5、...
当前版本的Spring Cloud Bus仅支持两款中间件产品:RabbitMQ和Kafka。在下面的章节中,我们将分别介绍如何使用两款消息中间件与Spring Cloud Bus配合实现消息总线。
RabbitMQ实现消息总线
RabbitMQ是实现了高级消息队列协议(AMQP)的开源消息代理软件,也称为面向消息的中间件。RabbitMQ服务器是用高性能、可伸缩而闻名的Erlang语言编写而成的,其集群和故障转移是构建在开放电信平台框架上的。
AMQP是Advanced Message Queuing Protocol的简称,它是一个面向消息中间件的开放式标准应用层协议。它定义了以下这些特性:
1、消息方向
2、消息队列
3、消息路由(包括点到点和发布-订阅模式)
4、可靠性
5、安全性
AMQP要求消息的提供者和客户端接收者的行为要实现对不同供应商可以用相同的方式(比如SMTP、HTTP、FTP等)进行互相操作。在以往的中间件标准中,主要还是建立在API级别,比如JMS,集中于通过不同的中间件实现来建立标准化的程序间的互操作性,而不是在多个中间件产品件实现互操作性。
AMQP与JMS不同,JMS定义了一个API和一组消息收发必须实现的行为,而AMQP是一个线路级协议。线路级协议描述的是通过网络发送的数据传输格式。因此,任何符合该数据格式的消息发送和接收工具都能互相兼容和进行操作,这样就能轻易实现跨技术平台的构建方案。
RabbitMQ以AMQP协议实现,所以它可以支持多种操作系统、多种编程语言,几乎可以覆盖所有主流的企业级技术平台。在微服务架构消息中间件的选型中,它是一个非常适合且优秀的选择。因此,在Spring Cloud Bus中包含了对Rabbit的自动化默认配置,在下面的章节中,我们将先从RabbitMQ的基础安装和使用开始,循序渐进地学习如何与Spring Cloud Bus进行整合实现消息总线。
基本概念
在开始具体实践之前, 我们先介绍一些关于RabbitMQ的基本概念, 为后续的讲解做 一些必要铺垫(如果对于RabbitMQ已经很熟悉的读者可以跳过本节, 直接从 “快速入门 ” 一 节开始阅读)。
1、Broker:可以理解为消息队列服务器的实体,它是一个中间件应用,负责接收消息生产者的消息,然后将消息发送至消息接收者或者其他的Broker。
2、Exchange:消息交换机,是消息第一个到达的地方,消息通过它指定的路由规则,分发到不同的消息队列中去。
3、Queue:消息队列,消息通过发送和路由之后最终到达的地方,到达Queue的消息即进入逻辑上等待消费的状态。每个消息都会被发送到一个或多个队列。
4、Binding:绑定,它的作用就是把Exchange和Queue按照路由规则绑定起来,也就是Exchange和Queue之间的虚拟连接。
5、Routing Key:路由关键字,Exchange根据这个关键字进行消息投递。
6、Virtual host:虚拟主机,它是对Broker的虚拟划分,将消费者、生产者和它们依赖的AMQP相关结构进行隔离,一般都是为了安全考虑。比如,我们可以在一个Broker中设置多个虚拟主机,对不同用户进行权限的分离。
7、Connection:连接,代表生产者、消费者、Broker之间进行通信的物理网络。
8、Channel:消息通道,用于连接生产者和消费者的逻辑结构。在客户端的每个连接里,可建立多个Channel,每个Channel代表一个会话任务,通过Channel可以隔离同一个连接中的不同交互内容。
9、Producer:消息生产者,制造消息并发送消息的程序。
10、Consumer:消息消费者,接收消息并处理消息的程序。
消息投递到队列的整个过程大致如下:
1、客户端连接到消息队列服务器,打开了一个Channel。
2、客户端声明一个Exchange,并设置相关属性。
3、客户端声明一个Queue,并设置相关属性。
4、客户端使用Routing Key,在Exchange和Queue之间建立好绑定关系。
5、客户端投递消息到Exchange。
6、Exchange接收到消息后,根据消息的Key和已经设置的Binding,进行消息路由,将消息投递到一个或多个Queue里。
Exchange也有几种类型。
1、Direct交换机:完全根据Key进行投递。比如,绑定时设置了Routing Key为abc,那么客户端交换
提交的消息,只有设置了Key为abc的才会被投递到队列。
2、Topic交换机:对Key进行模式匹配后进行投递,可以使用符号#匹配一个或多个词,符号*匹配正好一个词。比如,abc.#匹配abc.def.ghi,abc.*只匹配abc.def。
3、Fanout交换机:不需要任何Key,它采取广播的模式,一个消息进来时,投递到与该交换机绑定的所有队列。
RabbitMQ支持消息的持久化,也就是将数据写到磁盘上。为了数据安全考虑,大多数情况下都会选择持久化。消息队列化包括3个部分:
1、Exchange持久化,在声明时指定durable=>1。
2、Queue持久化,在声明时指定durable=>1。
3、消息持久化,在投递时指定delivery_mode=>2(1是非持久化)。
如果Exchange和Queue都是持久化的,那么它们之间的binding也是持久化的。如果Exchange和Queue两者之间有一个持久化的,一个非持久化的,就不允许建立绑定。
安装与使用
在Rabbit官网的下载页面https://www.rabbitmq.com/download.html中,我们可以获取到针对各种不同操作系统的安装包和说明文档。这里,我们将对几个常用的平台进行一一说明。
下面我们采用的是Erlang和RabbitMQ Server版本说明。
1、Erlang/QTP 19.1
2、RabbitMQ Server 3.6.5
在Windows系统安装
1、安装Erlang, 通过官方下载页面http://www.erlang.org/downloads 获取 exe安装包, 直接打开并完成安装。
2、安装RabbitMQ,通过官方下载页面https://www.rabbitmq.com/download. html获取exe安装包。
3、下载完成后, 直接运行安装程序。
4.、RabbitMQ Server安装完成之后,会自动注册为服务, 并以默认配置进行启动。
在Windows的 安装过程中, 有时候会碰到服务启动失败的情况, 通常都是由于用户名 为 中文, 导致默认的 db和log目录访问出现问题。 要解决该问题, 需要先卸载RabbitMQ Server, 然后设置环境 变量RABBITMQ—BASE 为 一 个不含中文的路径, 比如 E:\server\rabbitmq。 最后, 重新安装RabbitMQ即可。
在Mac OS X中安装
在Mac OS X中使用brew工具, 可以很容易地安装RabbitMQ 的服务端, 只需按如下命令操作即可:
1、将brew更新到最新版本, 执行 brew update命令。
2、安装Erlang, 执行brew install erlang命令。
3、安装RabbitMQServer, 执行brew install rabbitmq命令。
通过执行上面的命令,RabbitMQServer会被安装到 /usr/local/sbin, 并不会自动 加到用户的环境变量中去, 所以我们需要在.bash—profile或.profile 文件中增加下 面的内容:
PATH=$PATH:/usr/local/sbin
在Ubuntu中安装
在Ubuntu中,我们可以使用APT仓库来进行安装:
1、安装Erlang, 执行apt-get install erlang命令。
2.、执行下面的命令, 新增APT仓库到/etc/apt/sources.list.d:
echo'deb http://www.rabbi七mq.com/debian/ testing main'I
sudo tee /etc/apt/sources.list.d/rabbitmq.list
3、更新APT仓库的package list, 执行sudo apt-get update命令。
4、安装Rabbit Server, 执行sudo apt-get install rabbitmq-server命令。
Rabbit管理
我们可以直接通过访问配置文件进行管理, 也可以通过访问Web进行管理。 下面将介绍如何通过Web进行管理。
• 执行 rabbitmq-plugins enable rabbitmq management命令, 开启Web 管理插件, 这样就可以通过浏览器来进行管理了。
> rabbitmq-plugins enable rabbitmq_management
The following plugins have been enabled:
  mochiweb
  webmachine
  rabbitmq web dispatch
  amqp_client
  rabbitmq_management_agent
  rabbitmq—management

Applying plugin configura七ion to rabbit@PC-201602152056 ... started 6 plugins.
• 打开浏览器并访问http: //localhost: 15672/, 并使用默认用户guest登录, 密码也为guest。 可以看到如下图所示的管理页面:
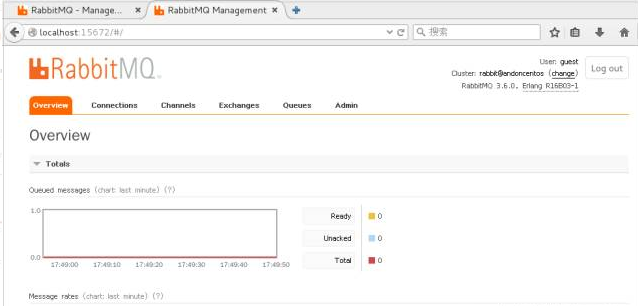
从图中我们可以看到之前章节中提到的一些基本概念, 比如 Connections、 Channels、 Exchanges、 Queues 等。第一次使用的读者, 可以点开各项看看都有些什么内容, 熟悉一下 RabbitMQ Server 的服务端。
• 单击 Admin 选项卡, 如下图所示, 可以尝试创建一个名为 springcloud 的用户。
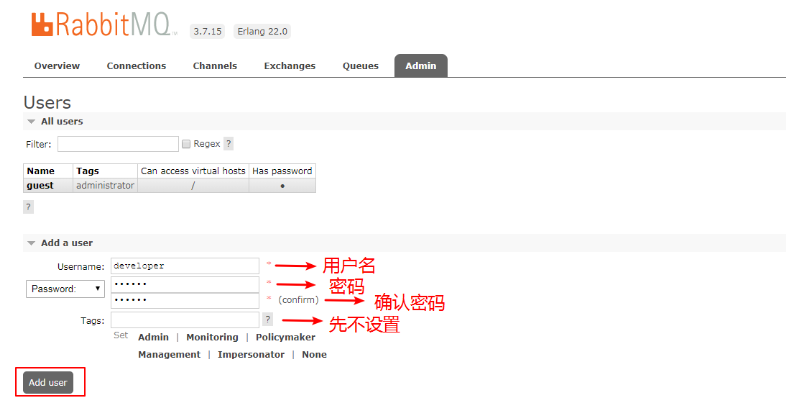
其中,Tags标签是RabbitMQ中的角色分类,共有下面几种。
1、none:不能访问management plugin。
2、management:用户可以通过AMQP做的任何事外加入下内容。
a、列出自己可以通过AMQP登入的virtual hosts。
b、查看自己的virtual hosts中的queues、exchanges和bindings。
c、查看和关闭自己的channels 和connections。
d、查看有关自己的vitrual hosts的“全局”统计信息,包含其他用户在这些virtual hosts
3、policymaker:management可以做的任何事外加如下内容。
a、查看、创建和删除自己的virtual hosts所属的policies和parameters。
4、monitoring:management可以做的任何事外加如下内容。
a、列出所有virtual hosts,包括它们不能登录的virtual hosts。
b、查看其他用户的connections和channels。
c、查看节点级别的数据,如clustering和memory的使用情况。
d、查看真正的关于所有virtual hosts的全局的统计信息。
5、administrator:policymaker和monitoring可以做的任何事外加如下内容。
a、创建和删除virtual hosts。
b、查看、创建和删除users。
c、查看、创建和删除permissions。
d、关闭其他用户的connections。
快速入门
接下来,我们通过在Spring Boot应用中整合RabbitMQ, 实现一个简单的发送、 接收 消息的例子来对RabbitMQ有一个直观的感受和理解。
在SpringBoot中整合RabbitMQ是一件非常容易的事,因为之前我们已经介绍过Starter POMs, 其中的AMQP模块就可以很好地支持RabbitMQ, 下面我们就来详细说说整合过程。
1、新建一个Spring Boot工程,命名为rabbitmq-hello。
2、在pom.xml中引入如下依赖内容,其中spring-boot-starter-amqp用于支持RabbitMQ。
<parent>
  <groupid>org.springframework.boot</groupid>
  <artifactid>spring-boot-starter-parent</artifactid>
  <version>l.3.7.RELEASE</version>
  <relativePath/> <!-- lookup parent from repository -->
</parent>
<dependencies>
  <dependency>
    <groupid>org.springframework.boot</groupid>
    <artifactid>spring-boot-starter-amqp</artifactid>
  </dependency>
  <dependency>
    <groupid>org.springframework.boot</groupid>
    <artifactid>spring-boot-starter-test</artifactid>
    <scope>test</scope>
  </dependency>
</dependencies>
3、在application.properties中配置关于RabbitMQ的连接和用户信息,这里我们使用之前安装时创建的springcloud。若没有自己的用户,可以回到上面的安装内容,在管理页面中创建用户。
spring.application.name=rabbitmq=hello

spring.rabbitmq.host=localhost
spring.rabbitmq.port=5672
spring.rabbitmq.username=springcloud
spring.rabbit.password=123456
4、创建消息生产者Sender。通过注入AmqpTemplate接口的实例来实现消息的发送,AmqpTemplate接口定义了一套针对AMQP协议的基础操作。在Spring Boot中会根据配置来注入具体实现。在该生产者中,我们会产生一个字符串,并发送名为hello的队列中。
@Component
public class Sender{
  @Autowired
  private AmqpTemplate rabbitTemplate;

  public void send(){
    String context = "hello"+ new Date();
    System.out.println("Sender:"+context);
    this.rabbitTemplate.convertAndSend("hello",context);

  }
}
5、创建消息消费者Receiver。通过@RabbitListener注解定义该类对hello队列的监听,并用@RabbitHandler注解来指定对消息的处理方法。所以,该消费者实现了对hello队列的消费,消费操作为输出消息的字符串内容。
@Component
@RabbitListener(queues="hello")
public class Receiver{

  @RabbitHandler
  public void process(String hello){
    System.out.println("Receiver:"+hello);

  }

}
6、创建RabbitMQ的配置类RabbitConfig,用来配置队列、交换器、路由等高级信息。这里我们以入门为主,先以最小化的配置来定义,以完成一个基本的生产和消费过程。
@Configuration
public class RabbitConfig{
   @Bean
  pulic Queue helloQueue(){
    return new Queue("hello");
  }

}
7、创建应用主类
@SpringBootApplication
public class HelloApplication{
  public static void main (String[] args){
    SpringApplication.run(HelloApplication.calss,args);
  }
}
8、创建单元测试类,用来调用消息生产。
@RunWith(SpringJUnit4ClassRunner.class)
@SpringApplicationConfiguration(calsses=HelloApplication.class)
public class HelloApplicationTests{
  @Autowired
  privates Sender sender;

  @Test
  public void hello() throws Exception{
    sender.send();
  }

}
完成程序编写之后, 下面开始尝试运行。首先确保 RabbitMQ Server 已经启动,然后进 行下面的操作。
1、启动应用主类,从控制台中,我们可看到如下内容,程序创建了一个访问127.0.0.1:5672中springcloud的连接。
o.s.a.r.c.CachingConnectionFactory : Created new connection: SimpleConnection@29836d32
[delegate=amqp://springcloud@l27.0.0.l:5672/J
同时,我们通过RabbitMQ的控制面板,可以看到Connections和Channels中包含当前连接的条目。

2、运行单元测试类,我们可以在控制台中看到下面的输出内容,消息被发送到了RabbitMQ Server的hello队列中。
Sender : hello Sun Sep 25 11:06:11 CST 2016
3、切换到应用主类的控制台,我们可以看到类似如下的输出,消费者对hello队列的监听程序执行了,并输出了接收到的消息信息。
Receiver : hello Sun Sep 25 11:06:11 CST 2016
通过上面的示例,我们在Spring Boot应用中引入spring-boot-starter-amqp模块,进行简单配置就完成了对RabbitMQ的消息生产和消费的开发内容。然而在实际应用中,还有很多内容没有演示,比如之前提到一些概念:交换机、路由关键字、绑定、虚拟主机等,这里不做更多的讲解,可自行查阅RabbitMQ的官方教程,其中有更全面的讲解。在这里,我们需要重点理解的是,在整个生产消费过程中,生产和消费是一个异步操作,这也是在分布式系统中要使用消息代理的重要原因,以此我们可以使用通信来解耦业务逻辑。在这个例子中,读者可以进一步做一些测试,比如,不运行消费者,先运行生产者,此时可以看到在RabbitMQ Server管理页面的Queues选项卡下多了一些待处理的消息,这时我们再启动消费者,它就会处理这些消息,所以通过生产消费者模式的异步操作,系统间调用就没有同步调用需要那么高的实时性要求,同时也更容易控制处理的吞吐量以保证系统的正常运行等。
在上一节中, 我们已经介绍了关于消息代理、 AMQP以及RabbitMQ的基础知识和使 用方法。 在下面的内容中, 我们开始具体介绍SpringCloud Bus的配置, 并以一个Spring Cloud Bus与SpringCloud Config结合的例子来实现配置内容的实时更新。
先回顾一下, 在上一章SpringCloud Config的介绍中, 我们留了一个悬念: 如何实现对配置信息的实时更新。 虽然我们已经能够通过 /refresh接口和 Git仓库的Web Hook 来实现 Git仓库中的内容修改触发应用程序的属性更新。 但是, 若所有触发操作均需要我 们手工去维护Web Hook中的应用配置的话, 随着系统的不断扩展, 会变得越来越难以维 护, 而消息代理中间件是解决该问题最为合适的方案。 是否还记得我们在介绍消息代理中 的特点时提到过这样一个功能: 消息代理中间件可以将消息路由到一个或多个目的地。 利用这个功能, 我们就能完美地解决该问题, 下面来说说SpringCloud Bus中的具体实现方 案。
整合Spring Cloud Bus
因为SpringCloud基于Spring Boot, 在上一节中我们已经体验了Spring Boot与 RabbitMQ的整 合, 所以在SpringCloud Bus中使用RabbitMQ也是非常容易配置的。
下面我们来具体动手尝试整个配置过程。
• 准备工作: 这里我们不创建新的应用, 但需要用到上一章中已经实现的 关于Spring Cloud Config的几个工程, 若读者对其还不了解, 建议先阅读第8章的内容。
• config-repo: 定义在Git仓库中的一个目录,其中存储了应用名为中space 的多环境配置文件, 配置文件中有一个 from参数。
• config-server-eureka: 配置了Git仓库, 并注册到了Eureka的服务端。
• config-client-eureka: 通过 Eureka发现ConfigServer的客户端, 应用名为 space, 用来访问配置服务器以获取配置信息。 该应用中提供了 一个 /from接口, 它会获取 config-repo/space-dev.properties中的 from属性并返回。
• 扩展config-client-eureka应用 。
. 修改pom.xml, 增加spring-cloud-stater-bus-amqp模块(注意springboot-starter-actuator模块也是必需的, 用来提供刷新端点)。
<dependency>
  <groupId>org.springframework.cloud</groupId>
  <artifactId>spring-cloud-starter-bus-amqp</artifactId>
</dependency>
• 在配置文件中增加关于RabbitMQ的连接和用户信息。
spring.rabbitmq.host=localhost
spring.rabbitmq.port=5672
spring.rabbitmq.usernarne=springcloud
spring.rabbitmq.password=l23456
• 启动 config-server-eureka, 再启动两个config-client-eureka(分别在 不同的端口上, 比如7002、 7003)。 我们可以在 config-client-eureka中的控制台中看到如下内容, 在启动时, 客户端程序多了 一个/bus/refresh请求。
o.s.b.a.e.mvc.EndpointHandlerMapping : Mapped
"{[/bus/refresh],methods=[POST]}" onto public void
org.springfrarnework.cloud.bus.endpoint.RefreshBusEndpoint.refresh(java.lang.String)
• 先访问两个config-client-eureka的/from 请求, 会返回当前configrepo/space-dev.properties中的from属性。
• 接着, 修改config-repo/space-dev.properties中的from属性值, 并发送POST请求到其中的一个/bus/refresh。
• 最后, 再分别访问启动的两个config-client-eureka的/from请求, 此时这 两个请求都会返回最新的 config-repo/space-dev.properties 中的 from属性。
到这里, 我们已经能够通过SpringCloud Bus来实时更新总线上的属性配置了 。
原理分析
上 一节中 , 我们通过使用Spring Cloud Bus与Spring Cloud Config的整合, 并以 RabbitMQ作为消息代理, 实现了应用配置的动态更新 。
整个方案的架构如下图所示, 其中包含了Git仓库、 ConfigServer以及几个微服务应用的实例 , 这些微服务应用的实例中都引入了Spring Cloud Bus, 所以它们都连接到了 RabbitMQ的消息总线上 。
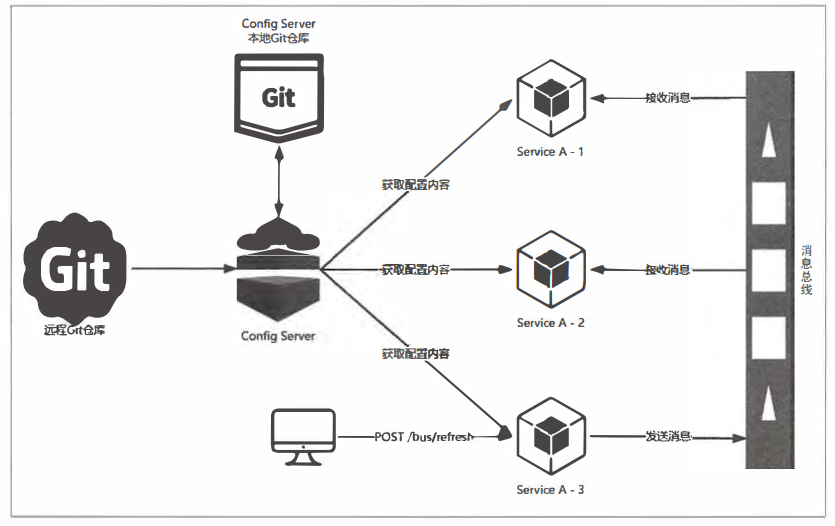
当我们将系统启动起来之后, 图中"Service A"的三个实例会请求ConfigServer以获取配置信息, ConfigServer根据应用配置的规则从Git仓库中获取配置信息并返回。
此时, 若我们需要修改"Service A"的属性。 首先, 通过Git管理工具去仓库中修改对应的属性值,但是这个修改并不会触发"Service A"实例的属性更新。我们向"Service A" 的实例3发送POST请求, 访问/bus/refresh接口。 此时,"Service A"的实例3就会将刷新请求发送到消息总线中, 该消息事件会被"Service A"的实例l和实例2从总线中获取到, 并重新从 ConfigServer中获取它们的配置信息, 从而实现配置信息的动态更新。
而从Git仓库中配置的修改到发起 /bus/refresh的POST请求这一步可以通过Git 仓库的Web Hook来自动触发。 由于所有连接到消息总线上的应用都会接收到更新请求, 所以在 Web Hook中就不需要维护所有节点内容来进行更新, 从而解决了上一章中仅通过 Web Hook来逐个进行刷新的问题。
指定刷新范围
在上面的例子中,我们通过向服务实例 请求SpringCloud Bus的/bus/refresh接口, 从而触发总线上其他服务实例的/refresh。 但是在 一些特殊场景下, 我们希望可以刷新 微服务中某个具体实例的配置。
Spring Cloud Bus 对这种场景也有很好的支待, /bus/refresh 接口提供了 一个 destination参数, 用来定位具体要刷新的应用程序。 比如 , 我 们可 以请 求 /bus/refresh?destination= customers:9000, 此时总线上的各应用实例会根据 destination属性的值来判断是否为自己的实例名, 若符合才进行配置刷新, 若不符合 就忽略该消息。
关于应用的实例名,我们在之前介绍SpringCloud Netfix的Eureka时有过详细的介绍, 它的默认命名按此规则生成: ${spring.cloud.client.hostname}:${spring. application.name}:${spring.application.instance—id:${server.port} }}, 想了解更多内容可查看第3章的相关介绍。
destination参数除了可以定位具体的实例之外, 还可以用来定位具体的服务。 定位服务的原理是通过使用 Spring的PathMatecher (路径匹配)来实现的 , 比如 /bus/refresh?destination= customers:**, 该请求会触发 customers服务的所有实例进行刷新。
架构优化
既然SpringCloud Bus的 /bus/refresh接口提供了针对服务和实例进行配置更新的参数, 那么我们的架构也可以相应做出 一些调整。 在之前的架构中, 服务的配置更新需要通过向具体服务中的某个实例发送请求, 再触发对整个服务集群的配置更新。 虽然能实现功能, 但是这样的结果是, 我们指定的应用实例会不同于集群中的其他应用实例, 这样会增加集群内部的复杂度, 不利于将来的运维工作。 比如, 需要对服务实例进行迁移, 那么 我们不得不修改Web Hook中的配置等。 所以要尽可能地让服务集群中的各个节点是对等 的。
因此, 我们将之前的架构做了 一些调整, 如下图所示。

我们主要做了以下这些改动:
1、在ConfigServer中也引入SpringCloud Bus, 将配置服务端也加入到消息总线中来。
2、/bus/refresh请求不再发送到具体服务实例上, 而是发送给Config Server,并通过destination参数来指定需要更新配置的服务或实例。
通过上面的改动,我们的服务实例不需要再承担触发配置更新的职责。 同时, 对于Git 的触发等配置都只需要针对ConfigServer即可, 从而简化了集群上的一些维护工作。
RabbitMQ配置
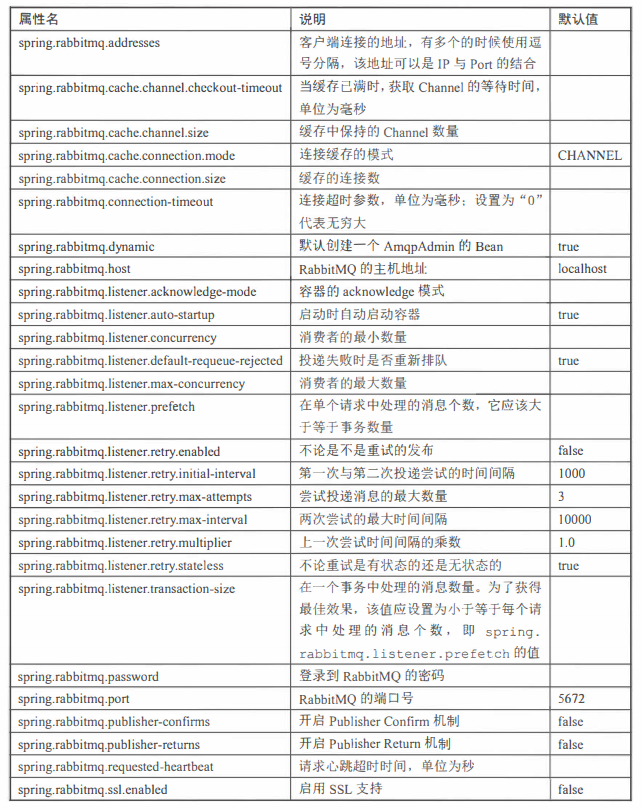
Spring Cloud Bus中的RabbitMQ整合使用了Spring Boot的ConnectionFactory, 所以在SpringCloud Bus中支持使用以spring.rabbit.mq为前缀的Spring Boot配置属 性, 具体的配置属性、 说明以及默认值如下表所示。

Kafka实现消息总线
Spring Cloud Bus除了支持RabbitMQ的自动化配置之外, 还支持现在被广泛应用的 Kafka。在本节中,我们将搭建一个Kafka的本地环境,并通过它来尝试使用Spring Cloud Bus 对Kafka的支持, 实现消息总线的功能。
Kafka简介
Kafka是一个由Linkedln开发的分布式消息系统, 它于2011年年初开源, 现在由著名的Apache基金会维护与开发 。 Kafka使用Scala实现, 被用作Linkedln的活动流和运营数据处理的管道, 现在也被诸多互联网企业广泛地用作数据流管道和消息系统 。
Kafka是基于消息发布-订阅模式实现的消息系统, 其主要设计目标如下所述。
• 消息持久化: 以时间复杂度为 0(1)的方式提供消息持久化能力, 即使对TB 级以上 的数据也能保证常数时间复杂度的访问性能。
• 高吞吐:在廉价的商用机器上也能支持单机每秒10万条以上的吞吐量。
• 分布式 : 支待消息分区以及分布式消费, 并保证分区 内的消息顺序。
• 跨平台 : 支待不同技术平台的客户端(如Java、PHP、Python 等)。
• 实时性: 支待实时数据处理和离线数据处理 。
• 伸缩性: 支持水平扩展。
Kafka中涉及的 一些基本概念 , 如下所示。
• Broker(代理):Kafka集群包含一 个或多个服务器 , 这些服务器被称为Broker。
• Topic(主题):逻辑上同RabbitMQ的Queue队列相似,每条发布到Kafka集群的消息都必 须有一 个Topico (物理上不同Topic的消息分开存储 ,逻辑上一个Topic的消息虽然 保存于一 个或多个Broker上 , 但用户只需指定消息的Topic即可生产或消费数据而 不必关心数据存于何处。 )
• Partition:Partition是物理概念上的分区,为了提供系统吞吐率,在物理上每个Topic 会分成一个或多个Partition, 每个Partition对应一 个文件夹(存储对应分区的消息 内容和索引文件)。
• Producer:消息生产 者, 负责生产消息并发送到KafkaBroker。
• Consumer:消息消费者, 向KafkaBroker读取消息并处理的客户端。
• Consumer Group:每个Consumer属于一 个特定的组(可为每个Consumer指定属于 一个组,若不指定则属于默认组),组可以用来实现一条消息被组内多个成员消费等 功能。
快速入门
在对Kafka有了 一些基本了解之后,下面我们来尝试搭建一 个Kafka服务端, 并体验 一下基于Kafka的消息生产与消费。
环境安装
首先,我们需要从官网上下载安装介质。下载地址为http://kafka.apache.org/ downloads.html。 本例中采用的版本为Kafka-0.10.0.1。 在解压Kafka的安装包之后, 可以看到其目录结构如下所示:
kafka
  +-bin
  +-windows
  +-config
  +-libs
  +-logs
  +-site-docs
由于Kafka的设计中依赖了 ZooKeeper, 所以我们在bin和config目录中除了看到 Kafka相关的内容之外,还有ZooKeeper相关的内容。 其中bin目录中存放了Kafka 和 Zoo Keeper的命令行工具, bin根目录下存放的是适用于Linux/UNIX的shell, 而 bin/windows下存放的 则是适用于Windows下的bat。我们可以根据实际的系统来设置环境变量,以方便后续的使用和操作。而config目录,则用来存放关于Kafka与ZooKeeper 的配置信息 。
启动测试
下面我们来尝试启动ZooKeeper和Kafka来进行消息的生产和消费。 示例中所有的命令均以配置了Kafka的环境变量为例 。
• 启动ZooKeeper,执行命令 zookeeper-server-startconfig/zookeeper. properties, 该命令需要指定ZooKeeper的配置文件位置才能正确启动,Kafka 的压缩包中包含了其默认配置,开发与测试环境基本不需要修改,所以这里不做详 细介绍,对于线上的调优需求,请读者自行查看官方文档进行操作。
[2016-09-28 08:05:34,849] INFO Reading configuration from: config\zookeeper.
properties (org.apache.zookeeper.server.quorum.QuorumPeerConfig)
[2016-09-28 08:05:34,850] INFO autopurge.snapRetainCount set to 3 (org.apache.
zookeeper.server.DatadirCleanupManager)
[2016-09-28 08:05:34,851] INFO autopurge.purgeinterval set to O (org.apache.
zookeeper.server.DatadirCleanupManager)
[2016-09-28 08:05:34,851] INFO Purge task is not scheduled. (org.apache.zookeeper.
server.DatadirCleanupManager)
[2016-09-28 08:05:34,852] WARN Either no config or no quorum defined in config,
running in standalone mode (org. apache. zookeeper. server. quorum. QuorumPeerMain)
[2016-09-28 08:05:34,868] INFO Reading configuration from: config\zookeeper.
properties (org.apache.zookeeper.server.quorum.QuorumPeerConfig)
[2016-09-28 08:05:34,869] INFO Starting server (org.apache.zookeeper.server.
ZooKeeperServerMain)
[2016-09-28 08:05:34,940] INFO binding to port 0.0.0.0/0.0.0.0:2181 (org.apache.
zookeeper.server.NIOServerCnxnFactory)
从控制台信息中我们可以看到, ZooKeeper 从指定的 config/zookeeper. properties配置文件中读取信息并绑定2181端口启动服务。 有时候启动失败, 可查看 一下端口是否被占用,可以杀掉占用进程或通过修改config/zookeeper.properties 配置文件中的clientPort内容以绑定其他端口号来启动ZooKeeper。
• 启动Kafka, 执行命令 kafka-server-start config/server.properties, 该命令也需要指定Kafka配置文件的正确位置,如上命令中指向了解压目录包含的默认配置。 若在测试时,使用外部集中环境的ZooKeeper的话, 我们可以在该配置文件中通过zookeeper.connect参数来设置ZooKeeper的地址和端口,它默认会连接本地2181端口的ZooKeeper地址,并用逗号分隔。比如zookeeper.connect=127.0.0.1:3000,127.0.0.1:3001,127.0.0.1:3002。除此之外,该配置文件中还提供了关于服务端连接、日志等配置参数,具体的线上配置可根据实际情况进行调整。
• 创建Topic, 执行命令kafka-topics --create --zookeeper localhost: 2181 --replication-factor 1 --partitions 1 --topic test。 通过该命令, 创建了一个名为test的Topic,该 Topic包含一个分区和一个Replica。在创建完成后, 可以使用kafka-topics --list --zookeeper localhost:2181命令来查 看当前的Topic。
另外,如果不适用kafka-topics命令来手动创建,直接使用下面的内容进行消息创建时也会自动创建Topics。
• 创建消息生产者, 执行命令 kafka-console-producer --broker-list localhost:9092 --topic test。 kafka-console-producer 命令可以启动Kafka基于命令行的消息生产客户端,启动后可以直接在控制台中输入消息来发送, 控制台中的每一行数据都会被视为一条消息来发送。 我们可以尝试输入几行消 息, 由于此时并没有消费者,所以这些输入的消息都会被阻塞在名为test的Topics 中,直到有消费者将其消费掉。
• 创建消息消费者, 执行命令kafka-console-consumer --zookeeper localhost:2181 --topic test --from-beginning。 kafka-consoleconsumer命令启动的是Kafka基于命令行的消息消费客户端,启动之后, 马上可以在控制台中看到输出了之前我们在消息生产客户端中发送的消息 。 我们可以再次 打开之前的消息生产客户端来发送消息, 并观察消费者这边对消息的输出来体验 Kafka对消息的基础处理。
整合Spring Cloud Bus
在介绍Kafka之前,我们已经通过引入spring-cloud-starter-bus-amqp模块, 完成了使用RabbitMQ来实现消息总线。若我们要使用Kafka来实现消息总线 时, 只需把 spring-cloud-starter-bus-amqp替换成spring-cloud-starter-bus- kafka 模块,在pom.xml 的dependency节点中进行修改, 具体如下:
<dependency>
  <groupId>org.springframework.cloud</groupId>
  <artifactId>spring-cloud-starter-bus-kafka</artifactId>
</dependency>
如果在启动 Kafka 时均采用了默认配置, 那么我们不需要再做任何其他配置就能在本地实现从 RabbitMQ 到 Kafka 的切换。可以尝试把刚刚搭建的 ZooKeeper 、 Kafka 启动起来, 并将修改为 spring-cloud-starter-bus-kafka 模块的 config-server 和 config-client 启动起来。
在 config-server 启动时, 我们可以在控制台中看到如下输出:
2016-09-28 22:11:29.627 INFO 15144 --- [ main]
o.s.c.s.b.k.KafkaMessageChannelBinder : Using kafka topic for outbound:
springCloudBus
2016-09-28 22:11:29.642 INFO 15144 --- [-localhost:2181]
org.IOitec.zkclient.ZkEventThread : Starting ZkClient event thread.
016-09-28 22:11:30.290 INFO 15144 --- [ main]
o.s.i.kafka.support.ProducerFactoryBean : Using producer properties =>
{bootstrap.servers=localhost:9092, linger.ms=O, acks=l, compression.type=none,
batch.size=l6384)
2016-09-28 22:11:30.298 INFO 15144 --- [ main]
o.a.k.clients.producer.ProducerConfig : ProducerConfig values:
2016-09-28 22: 11: 30. 322 INFO 15144 --- [ main)
o.s.c.s.b.k.KafkaMessageChannelBinder$1 : Adding
{message-handler:outbound.springCloudBus} as a subscriber to the'springCloudBusOutput'
channel
2016-09-28 22: 11: 30. 322 INFO 15144 --- [ main)
o.s.integration.channel.DirectChannel : Channel
'config-server:7001.springCloudBusOutput' has 1 subscriber(s).
2016-09-28 22:11:30.322 INFO 15144 --- [ main)
o.s.c.s.b.k.KafkaMessageChannelBinder$1 : started outbound.springCloudBus
2016-09-28 22: 11: 31. 465 INFO 15144 --- [ main]
s.i.k.i.KafkaMessageDrivenChannelAdapter : started
org.springframework.integra七ion.kafka.inbound.KafkaMessageDrivenChannelAdapter@4178
cb34
2016-09-28 22: 11: 31. 467 INFO 15144 --- [ main]
o.s.c.s.b.k.KafkaMessageChanne1Binder$7 : Adding
{message-handler:inbound.springCloudBus.anonymous.8b9e6c7b-6a50-48c5-b981-8282aOd5a
30b) as a subscriber to the 'bridge.springCloudBus' channel
2016-09-28 22:11:31.467 INFO 15144 --- [ main]
o.s.c.s.b.k.KafkaMessageChanne1Binder$7 : started
inbound.springCloudBus.anonymous.8b9e6c7b-6a50-48c5-b981-8282a0d5a30b
从控制台的输出内容我们可以看到, config-server 连接到了 Kafka 中, 并使用了 名为 springCloudBus 的 Topic。
此时, 我们可以使用 kafka-topics --list --zookeeper localhost:2181 命令来查看当前 Kafka 中的 Topic。 若已成功启动了 config-server 并配置正确, 可以 在 Kafka 中看到已经多了 一个名为 springCloudBus 的 Topic。
我们再启动配置了spring-cloud-starter-bus- kafka 模块的config-client, 可以看到控制台中输出了如下内容:
2016-09-28 22:43:55.067 INFO 6136 --- [ main]
o.s.c.s.b.k.KafkaMessageChannelBinder : Using kafka topic for outbound:
springCloudBus
2016-09-28 22:43:55.078 INFO 6136 --- [-localhost:2181]
org.IOitec.zkclient.ZkEventThread : Starting ZkClient event thread.
2016-09-28 22:50:38.584 INFO 828 --- [ main]
o.s.i.kafka.support.ProducerFactoryBean : Using producer properties =>
{bootstrap.servers=localhost:9092, linger.ms=O, acks=l, compression.type=none,
batch.size=l6384}
2016-09-28 22:50:38.592 INFO 828 --- [ main]
o.a.k.clients.producer.ProducerConfig : ProducerConfig values:
2016-09-28 22:50:38.615 INFO 828 --- [ main]
o.s.c.s.b.k.KafkaMessageChannelBinder$1 : Adding
{message-handler: outbound. springCloudBus} as a subscriber to the 'springCloudBusOutput'
channel
2016-09-28 22:50:38.616 INFO 828 --- [ main]
o.s.integration.channel.DirectChannel : Channel
'space:7002.springCloudBusOutput' has 1 subscriber(s).
2016-09-28 22:50:38.616 INFO 828 --- [ main]
o.s.c.s.b.k.KafkaMessageChannelBinder$1 : started outbound.springCloudBus
2016-09-28 22:50:39.162 INFO 828 --- [ main)
s.i.k.i.KafkaMessageDrivenChannelAdapter : started
org.springframework.integration.kafka.inbound.KafkaMessageDrivenChannelAdapter@60cf
855e
2016-09-28 22:50:39.162 INFO 828 --- [ main)
o.s.c.s.b.k.KafkaMessageChanne1Binder$7 : Adding
{message-handler:inbound.springClouc!Bus.anonymous.f8fc9c0c-ccd3-46dd-9537-07198f4ee
216) as a subscriber to the 'bridge.springClouc!Bus' channel
2016-09-28 22:50:39.163 INFO 828 --- [ main)
o.s.c.s.b.k.KafkaMessageChanne1Binder$7 : started
inbound.springClouc!Bus.anonymous.f8fc9c0c-ccd3-46dd-9537-07198f4ee216
可以看到, config-client 启动时输出了类似的内容, 它们都订阅了名为 springCloudBus 的 Topic 。 从这里我们也可以知道, 在消息总线上的节点, 从结构上来说, 不论是 config-server 还是 config-client, 它们都是对等的。
在启动了 config-server 和 config-client 之后,为了更明显地观察消息总线刷新配置的效果, 我们可以在本地启动多个不同端口的 config-client。 此时, 我们的 config-server 以及多个 config-client 都已经连接到了由 Kafka 实现的消息总线 上。 我们可以先访问各个 config-client 上 的/from 请求, 查看它获取到的配置内容。 然后, 修改 Git 中对应的参数内容, 再访问各个 config-client 上的/from 请求, 可以看到配置内容并没有改变。最后,我们向config-server发送POST请求:/bus/refresh,此时再去访问各个config-client上的/from请求,就能获得最新的配置信息,各客户端上的配置都已经加载为最新的Git配置内容。
从 config-client的控制台中, 我们可以看到如下内容:
2016-09-29 08:20:34.361 INFO 21256 --- [ kafka-binder-1]
o.s.cloud.bus.event.RefreshListener:Received remote refresh request.Keys
refreshed [from)
RefreshListener监听类记录了收到远程刷新请求,并刷新了from属性的日志,在下一节中,我们将根据消息内容与日志输出信息作为线索来探索Spring Cloud Bus的工作机制。
Kafka配置
在上面的例子中, 由于Kafka、 ZooKeeper 均运行于本地, 在自动化配置的支持下, 我们没有在测试程序中通过配置信息来指定Kafka和ZooKeeper 的配置信息, 就完成了本地消息总线的试验。 但是在实际应用中,Kafka和 ZooKeeper 一般都会独立部署, 所以在应用中需要为Kafka和ZooKeeper 配置一些连接信息等。Kafka的整合与Rab bitMQ不同, 在 Spring Boot 1.3.7中并没有直接提供Starter模块, 而是采用了Spring Cloud Stream的Kafka 模块,所以对于Kafka的配置均采用了spring.cloud.stream.kafka前缀,具体的配 置内容我们可以参考第10章的 “绑定器配置 ”一节中关于Kafka配置的内容。
深入理解
在整合Kafka实现了消息总线 之后, 我们不妨继续使用Kafka提供的控制台消费者来看看,当执行/bus/refresh时, 消息消费者都获得了什么。 通过前文我们从控制台中获 得的信息可以知道,Spring Cloud Bus使用了名为 springCloudBus的Topic, 所以我们可以使用命令kafka-console-consumer --zookeeper localhost: 2181 --topic springCloudBus, 启动对springCloudBus的 消费者控制台来进行观察。
启动消费者控制台之后,我们向config-server发送POST请求: /bus/refresh, 此时在控制台中可以看到类似如下的内容:
content Type "application/json"
{
//消息事件类型:刷新配置的事件
"type": "RefreshRemoteApplicationEvent",
//消息的时间戳
"timestamp": 1475073160814,
//消息的来源服务实例
"originService": "config-server: 7001",
//消息的目标服务实例
"destinationService": "*: * *",
"id": "bbfbf495-39d8-4ff9-93d6-174873ff7299"
}

contentType "application/json"
{
//响应消息已经正确接收的告知消息事件
“type": "AckRemoteApplicationEvent",
"timestamp": 1475073160821,
"originService": "config-server: 7001",
"destinationService": "*: **",
"id": "lf794774-10d6-4140-a80d-470983c6c0ff",
"ackid": "bbfbf495-39d8-4ff9-93d6-174873ff7299",
"ackDestinationService": "*: **",
"event": "org.springframework.cloud.bus.event.RefreshRemoteApplicationEvent"
}

contentType "application/json"
{
"type": "AckRemoteApplicationEvent",
"timestamp": 1475075467554,
"originService": "space: 7002",
"destinationService": "*: **",
"id": "756015le-f60c-4 9cd-8167-b69le84 6ad08",
"ackid": "21502725-28f5-4dl 9-a98a-f8114fa4 fldc",
"ackDestinationService": "*:**",
"event": "org.springframework.cloud.bus.event.RefreshRemoteApplicationEvent"
}
...
• destinationService:消息的目标服务实例。 上面示例中的* : **代表了总线上 的所有服务实例。 如果想要指定服务或是实例, 在之前介绍RabbitMQ实现消息总线时已经提过, 只需要通过使用destination参数来定位具体要刷新的应用实例即可, 比如发起/bus/refresh?destination=space请求, 就可以得到 如下的刷新事件消息,其中destinationService为space:**, 表示总线上所有space服务的实例。
content Type "application/json"
{
"type": "RefreshRemoteApplicationEvent",
"timestamp": 1475131215007,
"originService": "config-server: 7001",
"destinationService": "space:**",
//消息唯一标识
"id": "667fe948-e9b2-447f-be22-3c8acf647ead"
}
上面的消息内容是RefreshRemoteApplicationEvent和AckRemoteApplicationEvent 类型共有的, 下面几个属性是AckRemoteApplicationEvent所特有的,分别表示如下 含义。
• ackid:Ack消息对应的消息来源。我们可以看到第一条AckRemoteApplicationEvent的 ackid对应了 RefreshRemoteApplicationEvent的id, 说明这条 Ack是告知该 RefreshRemoteApplicationEvent事件的消息已经被收到。
• ackDestinationService:Ack 消息的目标服务实例。 可以看到这里使用的是 * : **, 所以消息总线上所有的实例都会收到该Ack消息。
• event:Ack 消息的来源事件。 可以看到上例中的两个 Ack均来源于刷新 配置的 RefreshRemoteApplicationEvent 事件, 我们在测试的时候由于启动了两个 config-client, 所以有两个实例接收到了配置刷新事件, 同时它们都会返回一 个 Ack消息 。 由于ackDestinationService为* : **, 所以两个 config-client 都会收到对RefreshRemoteApplicationEvent事件的Ack消息。
源码分析
通过上面的分析, 我们已经得到了两个非常重要的线索RefreshRemoteApplicationEvent和AckRemoteApplicationEvent。 我们不妨顺着这两个事件类 来详细看看Spring Cloud Bus的源码, 以帮助我们理解它的运行机制。
顺着RefreshRemoteApplicationEvent和AckRemoteApplicalionEvent, 我们可以整理出如下的事件关系类图。
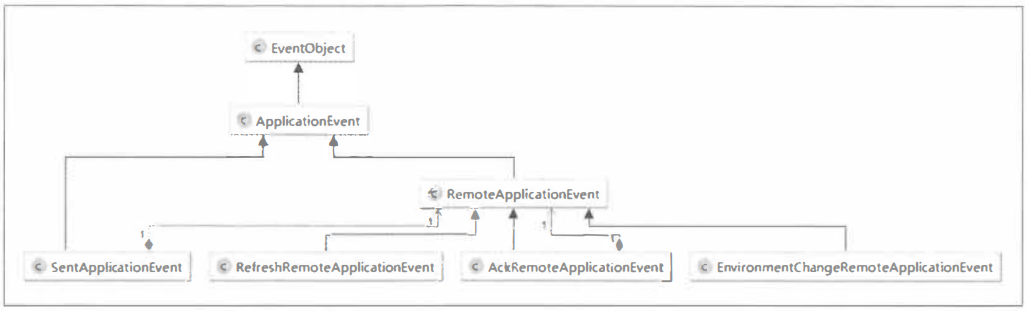
可以看到其中RefreshRemoteApplicationEvent 和AckRemoteApplicationEvent 这些 我们已经接触过的事件都继承了 RemoteApplicationEvet抽象类, 而 RemoteApplicationEvent继承自SpringFramework的ApplicationEvent, 可以断定, SpringCloud Bus也采用了 Spring的事件驱动模型。
事件驱动模型
如果读者对Spring的事件驱动模型已经非常了解, 那么可以跳过这 一小节, 直接看后面的分析。 如果你还不清楚它的原理, 建议先通过本小节 的内容来理解其基本原理, 以帮助阅读和理解后续的源码分析内容。
Spring的事件驱动模型中包含了三个基本概念:事件、事件监听者和事件发布者,如下图所示。
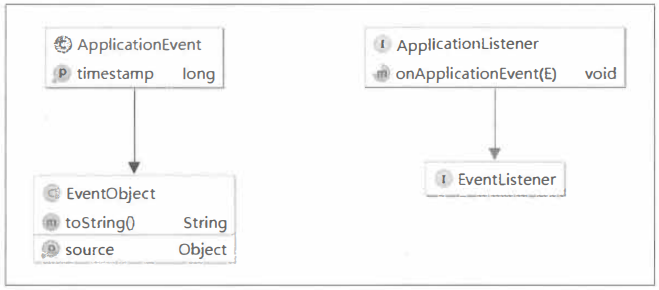
1、事件:Spring 中定义了事件的抽象类ApplicationEvent,它继承自JDK的EventObject类。从图中我们可以看到,事件包含了两个成员变量:timestamp,该字段用于存储事件发生的时间戳,以及父类中的source,该字段表示源事件对象。当我们需要自定义事件的时候,只需要继承ApplicationEvent,比如RemoteApplicationEvent、RefreshRemoteApplication等,可以在自定义的Event中增加一些事件的属性来给事件监听者处理。
那么, 事件与监听者是如何关联起来的呢?如下图:
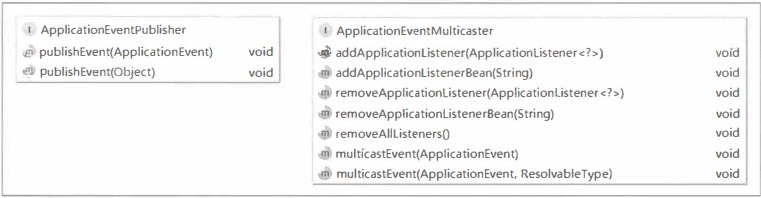
2、事件发布者: Spring中定义了ApplicationEventPublisher和ApplicationEventMulticaster两个接口用来发布事件。其中ApplicationEventPublisher 接口定义了发布事件的函数publishEvent(ApplicationEvent event)和 publishEvent(Object event); 而ApplicationEventMulticaster接口 中定义了对ApplicationListener的维护操作(比如新增、 移除等)以及将 ApplicationEvent多播给可用ApplicationListener的操作。
ApplicationEventPulisher的publicshEvent实现在AbstractApplication-Context中,具体如下:
protected void publishEvent(Object event,ResolvableType eventType){
  Assert.notNull(event,"Event must not be null");
  ...
  if(this.earlyApplicationEvent !=null){
    this.earlyApplicationEvents.add(applicationEvent);
  }else{
    getApplicationEventMulticaster().multicastEvent(applicationEvent,eventType);
  }
  ...
}
可以看到, 它最终会调用 ApplicationEventMulticaster的multicastEvent来 具体实现发布事件给监听者的操作。 而ApplicationEventMulticaster在Spring的 默认实现位于SimpleApplicationEventMulticaster中, 具体如下:
public void multicastEvent(final ApplicationEvent event, ResolvableType eventType) {
  ResolvableType type = (eventType != null? eventType :resolveDefaultEventType(event));
  for (final Applicationlistener<?>listener : getApplicationListeners(event, type)) {
    Executor executor = getTaskExecutor();
    if (executor != null) {
      executor.execute(new Runnable() {
        @Override
        public void run() {
        invokeListener(listener, event);
        }
      });
    }else{
      invokeListener(listener,event);

    }
  }
}

protected void invokeListener{ApplicationListener listener, Applica七ionEvent event) {
  ErrorHandler errorHandler = getErrorHandler();
  if {errorHandler != null) {
    try {
      listener.onApplicationEvent(event);
    }catch(Throwable err){
      errorHandler.handleError(err);
    }
  }else{
    try{
      listener.onApplicationEvent(event);
    }catch(ClassCastException ex){
      LogFactory.getLog(getClass()).debug("Non-marching event type for listener:"+listener,ex);

    }
  }
}
SimpleApplicationEventMulticaster 通过遍历维护的 ApplicationonListener 集合来找到对应 ApplicationEvent 的监听器,然后调用监听器的 onApplicationEvent 函数来对具体事件做出处理操作。
事件定义
在对 Spring 的事件模型有了 一定的理解之后, 下面我们来详细介绍 Spring Cloud Bus 中的事件定义。 首先, 从 RemoteApplicationEvent抽象类开始:
@SuppressWarnings("serial")
@JsonTypeinfo(use = JsonTypeinfo.Id.NAME, property= "type")
@JsonignoreProperties("source")
public abstract class RemoteApplicationEvent extends ApplicationEvent {
  private static final Object TRANSIENT_SOURCE = new Object();
  private final String originService;
  private final String destinationService;
  private final String id;
  protected RemoteApplicationEvent() {
    // for serialization libs like jackson
    this (TRANSIENT_SOURCE, null, null);
  }

  protected RemoteApplicationEvent(Object source, String originService, String destinationService) {
    super(source);
    this.originService= originService;
    if (destinationService == null) {
      destinationService= "*";
    }
    if (!destinationService.contains(":")){
      //All instance of the destination unless apecifically requested
      destinationService = destinationService + ":**";
    }
    this.destinationService = destinationService;
    this.id = UUID.randomUUID().toString();
  }

  protected RemotedApplicationEvent(Object source , String originService){
    this(source,originService,null);
  }
  ...
}
先来看看 RernoteApplicationEvent 类上修饰的注解。
• @JsonTypeInfo(use = JsonTypeInfo. Id.NAME, property = "type"):Jackson 对多态类型的处理注解, 当进行序列化时,会使用子类的名称作为 type 属性的值, 比如之前示例中的type": "RefreshRernoteApplicationEvent"。
• @JsonignoreProperties ("source"):序列化的时候忽略 source 属性, source是 ApplicationEvent 的父类 EventObject 的属性, 用来定义事件的发生源。
再来看看它的属性: originService、 destinationService、 id, 这些内容都 可以在 RemoteApplicationEvent 的子类事件消息中找到, 比如:
{
  "type": "RefreshRemoteApplicationEvent",
  "timestamp": 1475073160814,
  "originService": "config-server:7001",
  "destinationService": "*: **",
  "id": "bbfbf495-39d8-4ff9-93d6-l74873ff7299"
}
{
  "type": "AckRemoteApplicationEvent",
  "timestamp": 1475075467554,
  "originService": "space: 7002",
  "destinationService": "*: **",
  "id": "7560151e-f60c-49cd-8167-b691e846ad08",
  "ackid": "21502725-28f5-4dl9-a98a-f8114fa4fldc",
  "ackDestinationService": "*: **",
  "event": "org.springframework.cloud.bus.event.RefreshRemoteApplicationEvent"
}
下面, 我们再来分别看看 RemoteApplicationEvent 的几个具体实现的事件类。
• RefreshRemoteApplicationEvent 事件类, 该事件用于远程刷新应用的配置 信息。 它的实现非常简单, 只是继承了 RemoteApplicationEvent, 并没有增加其他内容。从之前的示例中我们也能看到,消息中的内容与 RemoteApplicationEvent 中包含的属性完全一致。
@SuppressWarnings("serial")
public class RefreshRemoteApplicationEvent extends RemoteApplicationEvent {
  @SuppressWarnings("unused")
  private RefreshRemoteApplicationEvent () {
    //for serializers
  }
  public RefreshRemoteApplicationEvent(Object source,String originService,String destinationService){
    super(source,originService,destinationService);

  }
}
• AckRemoteApplicationEvent 事件类,该事件用于告知某个事件消息已经被接收, 通过该消息我们可以监控各个事件消息的响应。 从其成员属性中, 我们可以找到之前示例中所总结的, 比 RefreshRemoteApplicationEvent 事件的消息多 出的几个属性: ackid、 ackDestinationService 以及 event。 其中 event 成员变量通过泛型限定了必须为 RemoteApplicationEvent 的子类对象, 该定义符合这样的逻辑: Ack 消息肯定有一个事件源头, 而每 一个事件都必须继承 RemoteApplicationEvent 抽象类,所以 AckRemoteApplicationEvent 的事件源头肯定是一个RemoteApplicationEvent 的子类, 比如示例中的 Ack 消息源头就是RemoteApplicationEvent的子类事件:RefreshRemoteApplicationEvent。
@SuppressWarnings("serial")
public class AckRemoteApplicationEvent extends RemoteApplicationEvent {
  private final String ackid;
  private final String ackDestinationService;
  private final Class<? extends RemoteApplicationEvent> event;

  @SuppressWarnings ("unused")
  private AckRemoteApplicationEvent () {
    super();
    this.ackDestinationService = null;
    this.ackId = null;
    this.event = null;
  }

  public AckRemoteApplicationEvent(Object source, String originService, String destinationService, String ackDestinationService, String ackid, Class type) {
    super(source, originService, destinationService);
    this.ackDestinationService = ackDestinationService;
    this.ackid = ackid;
    this.event = type;
  }
  ...
}
• EnvironrnentChangeRernoteApplicationEvent 事件类, 该事件用于动态更新消息总线上每个节点的 Spring 环境属性。可以看到,该类中定义了 一个 Map 类型的成员变量,而接收消息的节点就是根据该 Map 对象中的属性来覆盖本地的 Spring 环境属性。
@SuppressWarnings("serial")
public class EnvironmentChangeRemoteApplicationEvent extends RemoteApplicationEvent {
  private final Map<String, String> values;
  @SuppressWarnings ("unused")
  private EnvironmentChangeRemoteApplicationEvent() {
    // for serializers
    values = null;
  }

  public EnvironrnentChangeRemoteApplicationEvent(Object source, String originService, String destinationService, Map<string, string=""> values) {
    super(source, originService, destinationService);
    this.values = values;
  }
  ...
}
• SentApplicationEvent 事件类,该类的结构和内容与 RemoteApplicationEvent 非常相似, 不同的是: 该类不是抽象类,并且多一个成员 Class<? extends RemoteApplicationEvent> type 。 SentApplicationEvent 事件较为特殊, 它主要用于发送信号来表示一个远程的事件已经在系统中被发送到某些地方了, 从它的继承关系中, 我们可以知道它本身并不是一个远程的事件(不是继承自 RemoteApplicationEvent), 所以它不会被发送到消息总线上去, 而是在本地产生(通常是由于响应了某个远程的事件)。由于该事件的 id 属性能够匹配消费者 AckRemoteApplicationEvent 消息中 的ackid, 所以应用程序可以通过监听这个事件来监控远程事件消息的消费情况。
@SuppressWarnings("serial")
@JsonTypeinfo(use = JsonTypeinfo.Id.NAME, property = "type")
@JsonIgnoreProperties("source")
public class SentApplicationEvent extends ApplicationEvent {
  private static final Object TRANSIENT SOURCE = new Object();
  private final String originService;
  private final String destinationService;
  private final String id;
  private Class<? extends RemoteApplicationEvent> type;

  protected SentApplicationEvent () {
    // for serialization libs like jackson
    this(TRANSIENT_SOURCE, null, null, null, RemoteApplicationEvent.class);
  }

  public SentApplicationEvent(Object source, String originService, String destinationService, String id, Class type} {
    super(source}; this.originService = originService;
    this.type= type;
    if (destinationService == null} {
      destinationService = "*";
    }
    if (! destinationService. contains (": ")) {
      // All instances of the destination unless specifically requested
      destinationService = destinationService + ":**";
    }
    this.destinationService= destinationService;
    this.id= id;
  }
  ...
}
事件监听器
在了解了 Spring Cloud Bus 中的事件类之后, 我们来看看另外一个重要元素: 事件监听器。 通过整理源码, 可以得到下面的类图关系。
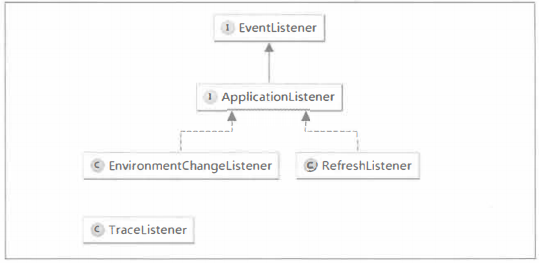
其中, RefreshListener 和 EnvironmentChangeListener 都继承了 Spring 事件模型中的监听器接口 ApplicationListener 。 我们先来看看 RefreshListener:
public class RefreshListener implements ApplicationListener<RefreshRemoteApplicationEvent> {

  private static Log log= LogFactory.getLog(RefreshListener.class);
  private ContextRefresher contextRefresher;

  public RefreshListener(ContextRefresher contextRefresher) {
    this.contextRefresher = contextRefresher;
  }

  @Override
  public void onApplicationEvent(RefreshRemoteApplicationEvent event) {
    Set keys = contextRefresher.refresh();
    log.info("Received remote refresh request. Keys refreshed " + keys);
  }
}
从泛型中我们可以看到该监听器就是针对我们之前所介绍的 RefreshRemoteApplicationEvent 事件的, 其中 onApplicationEvent 函数中调用了 ContextRefresher中的refresh ()函数进行配置属性的刷新。
public class ContextRefresher {
  ...
  private ConfigurableApplicationContext context;
  ...
  public synchronized Set<String> refresh() {
    Map<String, Object> before = extract{
      this.context.getEnvironment() .getPropertySources());
      addConfigFilesToEnvironment();
      Set<String> keys = changes(before,extract (this.context.getEnvironment() .getPropertySources())) .keySet();
      this.context.publishEvent(new EnvironmentChangeEvent(keys));
      this.scope.refreshAll();
      return keys;
  }
  ...
}
再来看看 EnvironrnentChangeListener 监听器。
public class EnvironmentChangeListener implements ApplicationListener<EnvironmentChangeRemoteApplicationEvent> {

  private static Log log= LogFactory.getLog(EnvironmentChangeListener.class);
  @Autowired
  private EnvironmentManager env;

  @Override
  public void onApplicationEvent(EnvironmentChangeRemoteApplicationEvent event) {
    Map<string, string=""> values = event.getValues();
    log.info("Received remote environment change request. Keys/values to update " + values);
    for (Map.Entry<string, string=""> entry : values.entrySet()) {
      env. setProperty (entry. getKey () , entry. getValue ()) ;
    }
  }
}
它是针对 EnvironmentChangeRemoteApplicationEvent 事件的监听类, 在处理类中, 可以看到它从 EnvironmentChangeRemoteApplicationEvent 中获取了之前提到的事件中定义的 Map 对象,然后通过遍历来更新 EnvironmentManager 中的属性内容。
事件跟踪
除了上面介绍的 RefreshListener 和 EnvironmentChangeLstener 监听器外, 还有一个与它们都有点不同的 TraceListener 监听器。
public class TraceListener {
  private static Log log= LogFactory.getLog(TraceListener.class);
  private TraceRepository repository;
  public TraceListener(TraceRepository repository) {
    this.repository= repository;
  }

  @EventListener
  public void onAck(AckRemoteApplicationEvent event) {
    this.repository.add(getReceivedTrace(event));
  }

  @EventListener
  public void onSend(SentApplicationEvent event) {
    this.repository.add(getSentTrace(event));
  }

  protected Map<string, object=""> getSentTrace(SentApplicationEvent event) {
    ...
  }

  protected Map<string, object=""> getReceivedTrace (AckRemoteApplicationEvent event) {
    ...
  }
}
从之前整理的类图和源码中, 我们都可以看到该监听器并没有实现 ApplicationListener接口, 但可以看到这里使用了 @EventListener 注解。 该注解是从 Spring 4.2 开 始提供的新功能,通过它可以自动地将函数注册为一个 ApplicationListener 的实现。所以在该类中, 实际上等价于实现了两个监听器, 一个监听 AckRemoteApplicationEvent 事件, 一个监听 SentApplicationEvent 事件。
在这两个监听处理函数中调用了类似的方法: this.repository.add(getReceivedTrace (event));,其中 TraceRepository 是对 Trace 跟踪信息的操作接口,而它的默认实现是 spring-boot-actuator 模块的 InMemoryTraceRepository, 具体如下:
public class InMemoryTraceRepository implements TraceRepository {
  private int capacity = 100;
  private boolean reverse = true;
  private final List<Trace> traces = new LinkedList<Trace> ();

  public void setReverse(boolean reverse) {
    synchronized (this.traces) {
      this.reverse= reverse;
    }
  }

  public void setCapacity(int capacity) {
    synchronized (this.traces) {
      this.capacity= capacity;
    }
  }

  @Override public List findAll() {
    synchronized (this.traces) {
      return Collections. urunodifiableList(new ArrayList {this. traces)) ;
    }
  }

  @Override
  public void add(Map<string, object=""> map) {
    Trace trace = new Trace(new Date(), map);
    synchronized (this.traces) {
      while (this.traces.size() >= this.capacity) {
        this. traces.remove(this.reverse ? this.capacity - 1 : 0);
      }
      if(this.reverse){
        this.traces.add(0,trace);
      }else{
        this.traces.add(trace);
      }
    }
  }
}
可以看到, 默认的 Trace 跟踪信息存储并没有用到特别的数据库或消息系统, 而是采用了内存存储的方式。 如上代码所示, 通过LinkedList集合和 capacity 属性的定义,在 add(Map<string, object="">map) 函数中进行循环存储,所以默认的 Trace 跟踪实现只能存储和查询最近的100条跟踪信息。
那么跟踪事件都记录了哪些内容呢?我们继续看 TraceListener中getSentTrace 和 getReceivedTrace 的具体实现:
public class TraceListener {
  ...
  protected Map<String, Object> getSentTrace(SentApplicationEvent event) {
    Map<String, Object> map = new LinkedHashMap<String, Object>();
    map. put ("signal", "spring. cloud. bus. sent") ;
    map.put("type", event.getType().getSimpleName());
    map.put("id", event.getId());
    map .put ("origin", event .getOriginService ());
    map.put("destination", event.getDestinationService());
    if (log. isDebugEnabled ()) {
      log. debug (map) ;
    }
  }

  protected Map<string, object=""> getReceivedTrace (AckRemoteApplicationEvent event) {
    Map<string, object=""> map = new LinkedHashMap<string, object="">();
    map.put("signal", "spring.cloud.bus.ack");
    map.put("event", event. getEvent () . getSimpleName ()) ;
    map.put("id", event.getAckid());
    map.put("origin", event.getOriginService());
    map.put("destination", event. getAckDestinationService ()) ;
    if (log.isDebugEnabled()) (
      log.debug(map);
    }
    return map;
  }
}
可以看到, 这两个函数会收集关于发送和接收到的 Ack 事件信息, 并且两个函数获得的内容就是事件定义相关的一些属性, 看到这里大家是否感觉似曾相识?是的, 这些信息与之前我们通过 Kafka 的控制台工具获取的消息内容非常类似。既然Spring Cloud Bus已经 提供了 Trace 跟踪信息的监听和记录, 我们不妨尝试使用 一下。 要开启该功能非常简单, 只需在配置文件中将下面的属性设置为 true 即可:
spring.cloud.bus.trace.enabled=true
通过请求配置主机的/trace 接口, 比如 http://localhost:7002/trace, 可以 获得如下信息,
[
  {
    "timestamp": 1475129670494,
    "info": {
      "signal": "spring.cloud.bus.ack",
      "event": "RefreshRemoteApplicationEvent",
      "id": "84ecdf83-a904-4lbc-a34d-62680ccf35d7",
      "origin": "config-server: 7001",
      "destination": "*:**"
    }
  },
  {
    "timestamp": 1475129670475,
    "info": {
      "signal" : "spring.cloud.bus.sent",
      "type": "RefreshRemoteApplicationEvent",
      "id": "84ecdf83-a904-4lbc-a34d-62680ccf35d7",
      "origin": "config-server:7001",
      "destination": "*:**"
    }
  },
  {
    "timestamp": 1475129670473,
    "info": {
      "signal" : "spring.cloud.bus.ack",
      "event": "RefreshRemoteApplicationEvent",
      "id": "84ecdf83-a904-4lbc-a34d-62680ccf35d7",
      "origin": "space: 7002",
      "destination": "*·**"
    }
  }
]
与我们分析的内容一样,该请求返回了最近的 Send 和 Ack 消息内容。
如果希望针对 AckRemoteApplicationEvent 或是 SentApplicationEvent做一 些特殊处理, 我们也可以通过@EventListener注解在应用程序中编写自己的处理逻辑,或者重写TraceRepository来改造跟踪的存储等。
原则上每一个消息总线上的应用都可以用来跟踪Ack消息,但是大多数情况下我们把这个任务交给更核心的服务(比如特定的监控服务),这样在该服务中我们就能在Ack消息中实现更复杂的逻辑进行预警和善后工作。
事件发布
通过上面的分析, 我们已经了解了 Spring Cloud Bus 中事件以及监听器的定义, 下面 来看看这些事件是如何发布给监听器进行处理的。
在org.springframework.cloud.bus包下,我们可以找到关于Spring Cloud Bus启动时加载的一些基础类和接口,包括自动化配置类BusAutoConfiguration、属性定义类BusProperties等。我们可以从Spring Cloud Bus的自动化配置类中看看它在启动的时候都加载了什么内容。
@Configuration
@ConditionalOnBusEnabled
@EnableBinding(SpringCloudBusClient.class)
@EnableConfigurationProperties(BusProperties.class)
public class BusAutoConfiguration implements ApplicationEventPublisherAware {
  public static final String BUS_PATH_MATCHER_NAME = "busPathMatcher";

  @Autowired
  @Output(SpringClouc!BusClient.OOTPUT)
  //该接口定义了发送消息的抽象方法
  private MessageChannel cloudBusOutboundChannel;

  @Autowired
  //该对象中提供了下面两个重要函数,用来判断事件的来源服务是否为自己,以及判断目标是否为自己,以此作为依据是否要响应消息进行事件的处理
  private ServiceMatcher serviceMatcher;

  @Autowired
  private ChannelBindingServiceProperties bindings;

  @Autowired
  private BusProperties bus;

  private ApplicationEventPublisher applicationEventPublisher;
  ...
}
我们先来看看在该自动化配置类中, 都定义了哪些成员。
• MessageChannel cloudBusOutboundChannel:该接口定义了发送消息的抽象方法。
• ServiceMatcher serviceMatcher:该对象中提供了下面两个重要函数, 用来判断事件的来源服务是否为自己, 以及判断目标是否为自己, 以此作为依据是否要响应消息进行事件的处理。
public boolean isFromSelf(RemoteApplicationEvent event) {
  String originService = event.getOriginService();
  String serviceid = getServiceid();
  return this.matcher.match(originService, serviceid);
}

public boolean isForSelf(RemoteApplicationEvent event) {
  String destinationService = event.getDestinationService();
  return (destinationService == null|| destinationService. trim().isEmpty () ||
    this.matcher.match(destinationService, getServiceid()));
}
• ChannelBindingServiceProperties bindings:定义了消息服务的绑定属性。
• BusProperties bus:该对象定义了Spring Cloud Bus的属性, 具体如下所示
@ConfigurationProperties("spring.cloud.bus")
public class BusProperties{
  private Env env = new Env();
  private Refresh refresh= new Refresh();
  private Ack ack = new Ack();
  private Trace trace = new Trace();
  private String destination = "springCloudBus";
  private boolean enabled= true;
  ...
}
从中可以看到,Spring Cloud Bus 的属性前缀使用了spirng.cloud.bus。destination和enable属性分别定义了默认的队列(Queue)或主题(Topic)是否连接到消息总线,所以我们可以通过spring.cloud.bus.destination来修改消息总线使用的队列或主题名称,以及使用spring.cloud.bus.enabled属性来设置应用是否要连接到消息总线上。
另外,在该配置类中为Env、Refresh、Ack、Trace 4种已经实现的事件分别创建了配置对象,这些配置类都是BusProperties的内部类。从下面的源码中,我们可以看到对于这4种事件,Env、Refresh、Ack均是默认开启的,只有Trace事件需要通过修改配置来开启,就如之前我们介绍“事件跟踪”的时候配置spring.cloud.bus.trace.enabled=true属性那样。
public static class Env {
  private boolean enabled= true;
  ...
}

public static class Refresh {
  private boolean enabled= true;
  ...
}

public static class Ack {
  private boolean enabled= true;
  private String destinationService;
  ...
}

public static class Trace {
  private boolean enabled= false;
  ...
}
• ApplicationEventPublisher:Spring事件模型中用来发布事件的接口, 也就是我们之前介绍的事件以及监听的桥梁。
除了定义的这些成员变量之外, 还能看到这里定义了两个监听方法acceptLocal和 acceptRemote。
其中,acceptLocal方法如下所示,它通过@EventListener(classes=RemoteApplicationEvent.class)注解修饰。如之前介绍,该注解可将函数理解为RemoteApplication事件的监听器,但是在其实现中并非所有的RemoteApplicationEvent事件都会处理。根据if中条件,可以看到在该监听处理中,只对事件来源是自己且事件类型不是AckRemoteApplicationEvent的内容进行后续的处理,而后续的处理就是通过消息管道将该事件发送出去。所以,该监听器的功能就是监听本地事件来进行消息的发送。
@EventListener(classes = RemoteApplicationEvent.class)
public void acceptLocal(RemoteApplicationEvent event) {
  if (this.serviceMatcher.isFromSelf(event)
    && ! (event instanceof AckRemoteApplicationEvent)){
    this.cloudBusOutboundChannel.send(MessageBuilder.withPayload(event).build());
  }
}
再来看看acceptRemote方法。 该方法中使用了@StreamListener注解修饰, 该注解的作用是将该函数注册为消息代理上数据流的事件监听器, 注解中的属性值 SpringCloudBusClient. INPUT指定了监听的通道名。 同时, 回头看该函数所在类的 定义,使用 了@EnableBinding注解, 该注解用来实现与消息代理的连接,注解中的属性值SpringCloudBusClient.class声明了输入和输出通道的定义(这部分内容源自 Spring Cloud Stream, 在下一章中, 我们会对这些内容做详细介绍,这里我们只需理解它用来绑定消息代理的输入与输出, 以实现向消息总线上发送和接收消息即可)。
@StreamListener(SpringCloudBusClient.INPUT)
public void acceptRemote(RemoteApplicationEvent event) {
  if (event instanceof AckRemoteApplicationEvent) {
    if (this.bus.getTrace() .isEnabled() && !this.serviceMatcher.isFromSelf(event)
      && this.applicationEventPublisher != null) {
      this.applicationEventPublisher.publishEvent(event);
    }
    // If it's an ACK we are finished processing at this point
    return;
  }
  if (this.serviceMatcher.isForSelf(event) &&this.applicationEventPublisher != null) {
    if (!this.serviceMatcher.isFromSelf(event)) {
      this.applicationEventPublisher.publishEvent(event);
    }
    if (this.bus.getAck().isEnabled ()) {
      AckRemoteApplicationEvent ack = new AckRemoteApplicationEvent(this, this.serviceMatcher.getServiceid(),
        this.bus.getAck().getDestinationService(),event.getDestinationService(), event.getid(), event.getClass());
        this.cloudBusOutboundChannel.send(MessageBuilder.withPayload(ack) .build());
        this.applicationEventPublisher.publishEvent(ack);
    }
  }
  if(this.bus. get Trace () . isEnabled () & & this.applicationEventPublisher != null) {
    //We are set to register sent events so publish it for local consumption,
    // irrespective of the origin
    this.applicationEventPublisher.publishEvent(new SentApplicationEvent(this,
      event.getOriginService(),
      event.getDestinationService(),
      event.getId(), event.getClass()));
  }
}
通过上面的分析,我们已经可以知道 Spring Cloud Bus 通过 acceptRemote 方法来监听消息代理的输入通道, 并根据事件类型和配置内容来确定是否要发布事件给我们之前分析的几个事件监听器来对事件做具体的处理;而 acceptLocal 方法用来监听本地的事件, 针对事件来源是自己,并且事件类型不是 AckRemoteApplicationEvent的内容通过消息代理的输出通道发送到总线上去。
控制端点
在介绍了 Spring Cloud Bus 中实现的事件模型之后, 我们已经知道每个节点是如何响应消息总线上的事件了。 那么这些发送到消息总线上用来触发各个节点的事件处理的动作是如何实现的呢?回想一下之前在实现配置属性刷新时, 我们在修改了 Git 仓库上的配置信息之后,往总线上的某个节点发送了一个请求/bus/refresh 来触发总线上的所有节点 进行配置刷新;我们在连接到消息总线的应用启动时, 也能在控制台中看到类似下面的输 出:
2016-09-30 11:05:13.037 INFO 18720 --- [ main]
o.s.b.a.e.mvc.EndpointHandlerMapping : Mapped "{ [/bus/refresh],methods= [POST]}"
onto public void
org.springframework.cloud.bus.endpoint.RefreshBusEndpoint.refresh(java.lang.String)
2016-09-30 11:05:13.045 INFO 18720 --- [ main]
o.s.b.a.e.mvc.EndpointHandlerMapping : Mapped "{ [/bus/env),methods= [POST)}" onto
public void
org.springframework.cloud.bus.endpoint.EnvironmentBusEndpoint.env(java.util.Map<jav
a.lang.String, java.lang.String>,java.lang.String)
从上面的日志信息中可以看到,在 org.springframework.cloud.bus. endpoint 包下的 RefreshBusEndpoint 和 EnvironmentBusEndpoint 分别创建了两个控制端 点: /bus/refresh 和/bus/env。 通过整理 org.springframework.cloud.bus. endpoint 包下的内容, 我们可以得到如下类图:
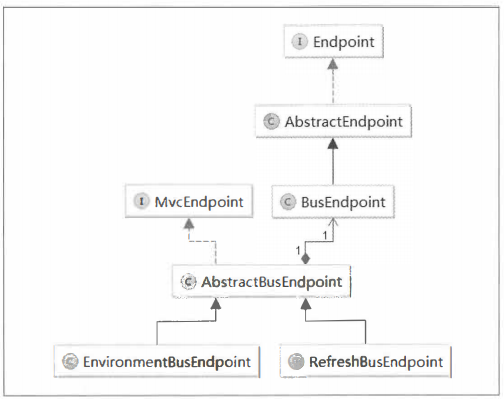
从图中可以发现,SpringCloud Bus中的Endpoint也是通过spring-boot-actuator 模块来实现的 。下面,简单介绍一下spring-boot-actuator模块中的几个重要元素。
1、Endpoint:该接口中定义了监控端点需要暴露的一些有用信息,比如,id、是否开启标识、是否开启敏感信息标识等。
2、AbstractEndPoint:该抽象类是对Endpoint的基础实现,在该抽象类中引入了Environment接口对象,从而对接口暴露信息的控制可以通过配置文件的方式来控制。
3、MvcEndpoint接口:该接口定义了Endponit接口在MVC层的策略。在这里可以通过使用SpringMVC的@RequestMapping注解来定义端点暴露的接口地址。
下面我们来看看SpringCloudBus是如何扩展Endpoint的。
• BusEndpoint:该类继承自AbstractEndPoint。从类上的注解@ConfigurationProperties配置可以知道,Spring Cloud Bus实现的端点配置属性需要以 endpoints.bus开头,通过该类的构造函数(配合AbstractEndpoint中的构造函数),我们可以知道默认id为bus, 并且端点默认敏感标识为true:
@ConfigurationProperties(prefix = "endpoints.bus", ignoreUnknownFields = false)
public class BusEndpoint extends AbstractEndpoint<Collection<String>> {
  public BusEndpoint() {
    super ("bus");
  }

  @Override
  public Collection invoke() {
    return Collections.emptyList();
  }
}

public abstract class AbstractEndpoint implements Endpoint, EnvironmentAware {
  ...
  public AbstractEndpoint(String id) {
    this (id, true);
  }
  public AbstractEndpoint(String id, boolean sensitive) {
    this.id= id;
    this.sensitiveDefault = sensitive;
  }
  ...
}
• AbstractBusEndpoint类是实现Spring Cloud Bus中端点的重要基类,它实现了 MvcEndpoint接口来暴露MVC层的接口, 同时关联了BusEndpoint对象。 通过下面的源码, 我们可以看到,getPath、isSensitive和getEndpointType 都是委托给BusEndpoint来获取的, 从而实现通过Environment配置接口。
public class AbstractBusEndpoint implements MvcEndpoint {

  private ApplicationEventPublisher context;
  private BusEndpoint delegate;
  private String appid;
  public AbstractBusEndpoint(ApplicationEventPublisher context, String appid,
    BusEndpoint busEndpoint) {
    this.context= context;
    this.appid = appid;
    this.delegate= busEndpoint;
  }
  protected String getInstanceId () {
    return this.appid;
  }

  protected void publish(ApplicationEvent event) {
    context.publishEvent(event);
  }

  @Override
  public String getpath() {
    return "/" + this.delegate.getid();
  }

  @Override
  public boolean isSensitive() {
    return this .delegate. isSensitive ();
  }

  @Override
  @SuppressWarnings("rawtypes")
  public Class getEndpointType() {
    return this.delegate.getClass();
  }
}
• 实现配置刷新的端点 RefreshBusEndpoint类。通过下面的源码,我们可以看到,在该类中定义了refresh 的 POST 请求,由于在BusEndpoint默认构造时 id 为bus, 而 AbstractBusEndpoint 中 getPath 函数通过 BusEndpoint中的 id拼接而成, 所以对于 RefreshBusEndpoint 中 refresh 请求的完整路径为/bus/refresh 。 同时, 该请求通过@RequestParam 注解还定义了一个可选的参数 destination, 正如在之前的示例中介绍的, 该参数用于指定刷新的服务实例。在请求处理部分直接调用了父类中 的publish函 数将 RefreshRemote-ApplicationEvent 事件发布出来, 实现在总线上发布消息的功能。
public class RefreshBusEndpoint extends AbstractBusEndpoint{

  public RefreshBusEndpoint(ApplicationEventPublisher context,String id,BusEndpoint delegate){
    super(context,id,delegate);
  }

  @RequestMapping(value="refresh",method=RequestMethod.POST)
  @ResponseBody
  public void refresh(@RequestParam(value="destination",required=false) String destination){
    publish(new RefreshRemoteApplicationEvent(this,getInstanceId(),destination));
  }

}
public class EnvironmentBusEndpoint extends AbstractBuspoint{

  pulic EnvironmentBusEndpooint(ApplicationEventPublisher context,String id ,BusEndpoint delegate){
    super(context,id,delegate);

  }

  @RequestMapping(value="env",method=RequestMethod.POST)
  @ResponseBody
  public void env(@RequestParam Map<String,String> params,
            @RequestPatam(value="destination",required=false) String destination){
    pulish(new EnvironmentChangeRemoteApplicationEvent(this,getInstanceId(),destination,params));

  }

}
其他消息代理的支持
由于目前版本的 Spring Cloud Bus 只实现了 RabbitMQ 和 Kafka 的封装,虽然大部分情况下, 这两个产品的特性已经涵盖我们大部分的业务场景, 但是由于一些特殊需求或是遗留系统等其他因素, 有些团队不得不使用其他的消息代理, 这个时候我们就需要扩展消息代理的支持。 实际上, 通过之前对源码的分析, 我们可以看到, Spring Cloud Bus 在绑定具体消息代理的输入与输出通道时均使用了抽象接口的方式, 所以真正的实现来自于spring-cloud-starter-bus-amqp 和 spring-cloud-starter-bus-kafka 的依赖。
我们可以查看 spring-cloud-starter-bus-amqp 和 spring-cloud-starter-bus-kafka的依赖,可以看到它们分别依赖了spring-cloud-starter-stream-rabbit和spring-cloud-starter-stream-kafka。真正实现这些消息代理进行交互操作的是Spring Cloud Stream。所以,本章中使用的所有Spring Cloud Bus的消息通信基础实际上都是由Spring Cloud Stream。一定程度上,可以将Spring Cloud Bus理解为是一个使用了Spring Cloud Stream构建的上层应用。由于Spring Cloud Stream为了让开发者屏蔽各个消息代理之间的差异,将来能够方便地切换不同的消息代理而不影响业务程序,所以在业务程序与消息代理之间定义了一层抽象,成为绑定器(Binder)。我们在整合RabbitMQ和Kafka的时候就是分别引入了它们各自的绑定器实现,可以回想一下之前的实现内容,不论使用RabbitMQ还是Kafka实现,在程序上其实没有任何变化,变化的只是对绑定器的配置。所以,当我们要在其他消息代理上使用Spring Cloud Bus消息总线时,只需要去实现一套指定消息代理的绑定器即可。