本人小白一枚,想着把学习时的东西以博客的方式记录下来,文章中有不正确的地方请大佬多多指点!!共同学习
前期准备
安装python3、selenium、下载对应版本的webdriver;安装所需的第三方库,不多赘述,最基础的东西,不会的自行跳转^0^
项目介绍
功能简述
- 对webdriver常用方法进行二次封装,使用起来更方便,同时会有log记录
- log日志会同时打印在控制台和写入log文件中
- 测试完成后,会自动发送邮件,邮件信息conf.ini可配置
- 采用PO模式编写,元素信息维护在对应页面中
- 支持chrome,Firefox,IE浏览器
- 支持web和wap模式切换,和-headless模式运行
项目结构
目录结构如图所示
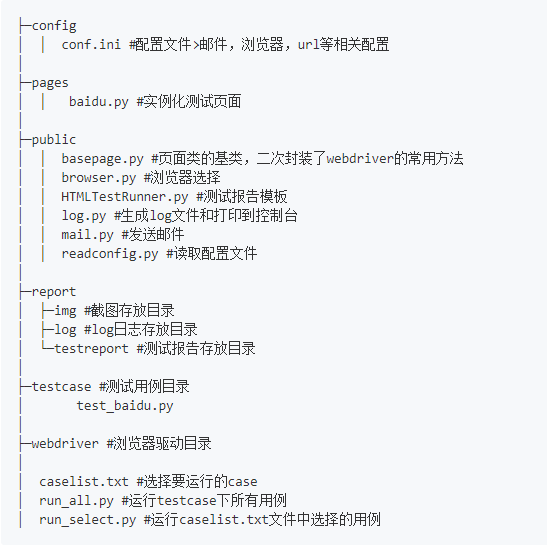
该框架采用PO模式编写,PO提供了一种业务流程与页面元素操作分离的模式,这使得测试代码变得更加清晰。页面对象与用例分离,使得我们更好的复用对象,可复用的页面方法代码会变得更加优化,更加有效的命名方式使得我们更加清晰的知道方法所操作的UI元素。当某些页面的元素发生改变时,只需要对应的页面类即可,后面会有详细介绍^
1 log输出模块
使用python的logging模块分别输出日志到文件和控制台,其实现方法供参考
    def __printconsole(self, level, message):
        # 创建一个logger
        logger = logging.getLogger()
        logger.setLevel(logging.DEBUG)
        # 创建一个handler,用于写入日志文件
        fh = logging.FileHandler(self.logname, 'a', encoding='utf-8')
        fh.setLevel(logging.DEBUG)
        # 再创建一个handler,用于输出到控制台
        ch = logging.StreamHandler()
        ch.setLevel(logging.DEBUG)
        # 定义handler的输出格式
        formatter = logging.Formatter('%(asctime)s - %(name)s - %(levelname)s - %(message)s')
        fh.setFormatter(formatter)
        ch.setFormatter(formatter)
        # 给logger添加handler
        logger.addHandler(fh)
        logger.addHandler(ch)
        # 记录一条日志
        if level == 'info':
            logger.info(message)
        elif level == 'debug':
            logger.debug(message)
        elif level == 'warning':
            logger.warning(message)
        elif level == 'error':
            logger.error(message)
        logger.removeHandler(ch)
        logger.removeHandler(fh)
        # 关闭打开的文件
        fh.close()

    def debug(self, message):
        self.__printconsole('debug', message)

    def info(self, message):
        self.__printconsole('info', message)

    def warning(self, message):
        self.__printconsole('warning', message)

    def error(self, message):
        self.__printconsole('error', message)
2 读取配置文件
配置文件我选择的时.ini格式的,其实可以写成一个python文件或者txt文件,对应的读取方法都大同小异。
我的conf.ini文件如下
[browserType]
;browserName = Firefox
browserName = Chrome
#browserName = IE

[testServer]
URL = https://www.baidu.com

[pattern]
options = Web
is_visible = T

[Mail]
mail_subject = 邮件主题
mail_server = smtp.xxxx.com
mail_from = xxxx@xxx.com
mail_to = xxxxx@xx.com,xxxxx@xxx.com
mail_from_pwd = xxxxxx
读取的方法也很简单,网上也有很多教程,贴出来仅供参考
class ReadConfig:
    """
    专门读取配置文件的,.ini文件格式
    """

    def __init__(self, filename=conf_path):
        with open(filename, 'r', encoding='UTF-8') as f:
            data = f.read()
            if data[:3] == codecs.BOM_UTF8:
                data = data[3:]
                files = codecs.open(filename, "w")
                files.write(data)
                files.close()

        self.cf = configparser.ConfigParser()
        self.cf.read(filename, encoding='UTF-8')

    def getValue(self, env, name):
        """读取配置文件中的值"""
        return self.cf.get(env, name)
3 选择浏览器
这部分要做到的是根据配置文件选择要使用的浏览器,以及相应的运行模式,先上代码*
    def open_browser(self, driver):
        read = ReadConfig()
        browser = read.getValue("browserType", "browserName")
        options = read.getValue("pattern", "options")
        url = read.getValue("testServer", "URL")
        is_visible = read.getValue("pattern", "is_visible")

        if options.lower() == 'web':
            if browser == "Firefox":
                if is_visible == 'F':
                    options = webdriver.FirefoxOptions()
                    options.add_argument('-headless')
                    # options.add_argument('--disable-gpu')
                    driver = webdriver.Firefox(executable_path=firefox_driver, options=options)
                else:
                    driver = webdriver.Firefox(executable_path=firefox_driver)
                    log.info("启动{}浏览器".format(browser))

            elif browser == "Chrome":
                if is_visible == 'F':
                    option = webdriver.ChromeOptions()
                    option.add_argument('headless')
                    driver = webdriver.Chrome(chrome_driver, chrome_options=option)
                else:
                    driver = webdriver.Chrome(chrome_driver)
                    log.info("启动{}浏览器".format(browser))

        elif options.lower() == 'wap':
            mobileEmulation = {"deviceName": "iPhone 6"}
            options = webdriver.ChromeOptions()
            options.add_experimental_option('mobileEmulation', mobileEmulation)
            options.add_argument('--disable-search-geolocation-disclosure')
            driver = webdriver.Chrome(chrome_options=options)
通过读取配置文件获取相应的信息,选择相应的浏览器,支持web和wap两种模式,如果你想运行时,隐藏浏览器窗口可以使用浏览器的headless模式,代码中 if is_visible == 'F' 时,执行的就行浏览器的headless模式,浏览器在后台运行,不影响测试效果。
4 二次封装selenium方法
二次封装selenium中的常用方法可以让我们更方便的使用,也可以定制化我们的需求,比如加上日志输出,执行耗时等等
class BasePage:
    """测试基类"""

    def __init__(self, driver):
        self.driver = driver

    def get_img(self, rq=time.strftime('%Y%m%d%H%M', time.localtime(time.time()))):
        """截图"""
        path = os.path.join(os.path.abspath('..'), 'report', 'img')
        # path = os.path.join(getcwd.get_cwd(), 'screenshots/')  # 拼接截图保存路径
        # rq = time.strftime('%Y%m%d%H%M', time.localtime(time.time()))  # 按格式获取当前时间
        screen_name = path + rq + '.png'  # 拼接截图文件名
        # noinspection PyBroadException
        try:
            self.driver.get_screenshot_as_file(screen_name)
            log.info("截图保存成功{}".format(screen_name))
        except BaseException as e:
            log.error("截图失败{}".format(e))

    def find_element(self, selector):
        """定位元素"""
        by = selector[0]
        value = selector[1]
        element = None
        if by in ['id', 'name', 'class', 'tag', 'link', 'plink', 'css', 'xpath']:
            # noinspection PyBroadException
            try:
                if by == 'id':
                    element = self.driver.find_element_by_id(value)
                elif by == 'name':
                    element = self.driver.find_element_by_name(value)
                elif by == 'class':
                    element = self.driver.find_element_by_class_name(value)
                elif by == 'tag':
                    element = self.driver.find_element_by_tag_name(value)
                elif by == 'link':
                    element = self.driver.find_element_by_link_text(value)
                elif by == 'plink':
                    element = self.driver.find_element_by_partial_link_text(value)
                elif by == 'css':
                    element = self.driver.find_element_by_css_selector(value)
                elif by == 'xpath':
                    element = self.driver.find_element_by_xpath(value)
                else:
                    log.error('没有找到元素')
                log.info('元素定位成功。定位方式:%s,使用的值%s:' % (by, value))
                return element
            except NoSuchElementException as e:
                log.error("报错信息:{}".format(e))
                self.get_img()  # 调用截图
        else:
            log.error('输入的元素定位方式错误,参考[id, name, class, tag, link, plink, css,xpath]')

    def type(self, selector, value):
        """输入内容"""
        element = self.find_element(selector)
        element.clear()
        log.info('清空输入内容')
        # noinspection PyBroadException
        try:
            element.send_keys(value)
            log.info('输入的内容:%s' % value)
        except BaseException as e:
            log.error('内容输入报错{}'.format(e))
            self.get_img()

    def click(self, selector):
        """点击元素"""
        element = self.find_element(selector)
        # noinspection PyBroadException
        try:
            element.click()
            log.info('点击元素成功')
        except BaseException as e:
            display = self.isdisplayed(element)
            if display is True:
                self.my_sleep(3)
                element.click()
                log.info('点击元素成功')
            else:
                self.get_img()
                log.error('点击元素报错{}'.format(e))
这里只贴出一部分的常用的方法的封装示例,可以根据自己的需求DIY
5 用例筛选
当你的用例写到一定量时,如果你验证一部分用例,每次全部执行一遍太耗时了,所以加个用例筛选功能,自己选择要执行的用例文件,不想执行的直接注释掉
user/test01case
#user/test02case
#user/test03case
#user/test04case
#user/test05case
#shop/test_shop_list
#shop/test_my_shop
#shop/test_new_shop
然后再写一个方法去逐行读取这个文件,如果行首没有#号,就把这个用例添加到suite中执行即可,具体实现:
class AllTest:  # 定义一个类AllTest
    def __init__(self):  # 初始化一些参数和数据
        global report_name
        report_path = os.path.join(root_path, 'report', 'testreport')
        now = time.strftime('%Y-%m-%d_%H_%M_%S')
        report_name = os.path.join(report_path, 'TestResult{}.html'.format(now))
        self.caseListFile = os.path.join('.\', "caselist.txt")  # 配置执行哪些测试文件的配置文件路径
        self.caseFile = os.path.join('.\', "testcase")  # 真正的测试断言文件路径
        self.caseList = []
        log.info('report_name' + report_name)  # 将resultPath的值输入到日志,方便定位查看问题
        log.info('caseListFile' + self.caseListFile)  # 同理
        log.info('caseList' + str(self.caseList))  # 同理

    def set_case_list(self):
        """
        读取caselist.txt文件中的用例名称,并添加到caselist元素组
        :return:
        """
        fb = open(self.caseListFile)
        for value in fb.readlines():
            data = str(value)
            if data != '' and not data.startswith("#"):  # 如果data非空且不以#开头
                self.caseList.append(data.replace("
", ""))  # 读取每行数据会将换行转换为
,去掉每行数据中的

        fb.close()

    def set_case_suite(self):
        """

        :return:
        """
        self.set_case_list()  # 通过set_case_list()拿到caselist元素组
        test_suite = unittest.TestSuite()
        suite_module = []
        for case in self.caseList:  # 从caselist元素组中循环取出case
            case_name = case.split("/")[-1]  # 通过split函数来将aaa/bbb分割字符串,-1取后面,0取前面
            # 批量加载用例,第一个参数为用例存放路径,第一个参数为路径文件名
            discover = unittest.defaultTestLoader.discover(self.caseFile, pattern=case_name + '.py', top_level_dir=None)
            suite_module.append(discover)  # 将discover存入suite_module元素组
        if len(suite_module) > 0:  # 判断suite_module元素组是否存在元素
            for suite in suite_module:  # 如果存在,循环取出元素组内容,命名为suite
                for test_name in suite:  # 从discover中取出test_name,使用addTest添加到测试集
                    test_suite.addTest(test_name)
        else:
            log.error('suite_module中没有测试集')
            return None
        return test_suite  # 返回测试集

    def run(self):
        """
        run test
        :return:
        """
        try:
            suit = self.set_case_suite()  # 调用set_case_suite获取test_suite
            if suit is not None:  # 判断test_suite是否为空
                # bf(suite).report(description='用例名称xx', filename=now, log_path=report_path)
                with open(report_name, 'wb') as f:  # encoding='UTF-8'
                    # 调用HTMLTestRunner
                    runner = HTMLTestRunner.HTMLTestRunner(stream=f, title='Test Report',
                                                           description='Test Description')
                    runner.run(suit)
            else:
                log.error('没有case')
        except Exception as e:
            log.error('{}'.format(e))
当然,如果你不想使用这中方式也可以全部执行……
源码地址:https://gitee.com/fh1105/selenium_PO 需要的自行clone
第一次写博客记录学习,不好的地方请指出来,谢谢!