1.CSS选择器
| 选择器名称 | 选择器说明 | 使用方法 | 优选级 |
| 行间样式 | 直接在对应的行间样式写对应的style | 0 | |
| 最优先级属性 | 属性后面加入!important | 最高 | |
| id选择器 | 选择对应的id,一个id对应一个标签 | css文件对应#id{} | 1 |
| class选择器 | 选择对应的class,一个class对应多个标签 | css文件对应.class{} | 2 |
| 标签选择器 | 选择对应的标签,对应的标签选择对应 用来标准化元素 |
css文件对应 标签{} | 3 |
| 通配符选择器 | *。所有的标签都是对应相应的类型 多用来设置padding,margin等。 |
css文件对应*{} | 4 |
| 属性选择器 | 选择对应的属性,比如有属性叫id | css文件对应[对应的属性] [id="test"] |
2 和class并级 |
| 特殊选择器 | 【属性都可以相互嵌套使用】 | ||
| 父子选择器 | 在标签后面加上对应的标签 | css文件加入div strong em{} .class #id{} 只要是父子关系就行,间接的关系也变 |
权重计算 |
| 直接子元素选择器 | 标签的直接属性改变 | 在css后面直接加入 div>em{} | 权重计算 |
| 并列选择器 | 多个限制条件一起 | css文件对应div.demo#id | 权重计算 |
| 返祖选择器 | 多个标签属性共用一个代码块 | div,.demo,#id{} | |
| 伪类选择器 | 添加不通情况下执行的效果 | a:hover{}当鼠标移上去就会变栋不同的效果 |
Section div ul li a em[浏览器自右向左的顺序读取]
2.CSS的权重以及其计算问题
| 选择器名称 | CSS权重 |
| !important | Infinity |
| 行间样式 | 1000 |
| id | 100 |
| class|属性|伪类 | 10 |
| 标签|伪元素 | 1 |
| 通配符 | 0 |
权重说明:进制为256进制
权重用法,只要写在一排顺序的,权重值相加,权重越大的优先级越高。一样的代码后面会覆盖前面。
3.CSS属性
| 属性值 | 属性说明 | 默认值 | 备注 |
| font-size | 字体大小 | 16px | 一般设置为12px等,设置的为字体的高 |
| font-weight | 字体权重 | normal | 和<strong></strong>一样 <strong>里面自带bold属性 |
| font-style | 字体属性 | italic | 和<em></em>一样 <em>里面自带italic属性 |
| font-family | 字体 | arial | arial互联网通用字体,是乔布斯发明的 |
| color | 字体颜色 | 黑色 | 没有font-color,只有color 颜色书写方法: 1.英文名称 2.颜色代码(#ff4400) 分别是红绿蓝,16进制,两位代表一个颜色 3.颜色函数 rgb(255,255,255) |
| border | 盒子 | border是由四个不同的边框组成,每个边框可以单独设置 border可以自己直接带多个属性,也可以单一设置。 后面新设置的属性覆盖前面的 画三角形,透明颜色transparent |

 1 <!DOCTYPE html PUBLIC "-//W3C//DTD HTML 4.01//EN"
 2 "http://www.w3.org/TR/html4/strict.dtd">
 3
 4 <html xmlns="http://www.w3.org/1999/xhtml" lang="en">
 5     <head>
 6         <meta http-equiv="Content-Type" content="text/html; charset=UTF-8" />
 7         <title></title>
 8     </head>
 9     <body>
10         <div style=" 10px;
11             height: 10px;
12             background-color: brown;
13             border: 10px cornflowerblue solid;
14             border-left-color: cadetblue;
15             border-bottom-right-radius: 10px;">
16
17         </div>
18     </body>
19 </html>
在线查询相关属性手册: http://css.doyoe.com/
4.企业级开发注意事项
【文字处理】
字体对其方式:text-align:center
文本行高:line-height:20px
文字居中:垂直居中:line-height的值等于容器的值
首行缩进:text-indent:2em;缩进两个文本的单位
del属性一般不适用,可以用text-decoration:line-through;来替代。
链接自定义:text-decoration:underline;color:rgb(0,0,238);鼠标移入的时候,会出现光标选择效果corsor:pointer;
【单位说明】
绝对单位:cm,m,h
相对单位:px(相对屏幕来说,一个像素只能显示一个颜色);em=1 * font-size,相对于字体的大小来说
【元素说明】
1.行级(内联)元素:内容决定元素所占位置,不可以通过CSS改变宽高;
span,strong,em,a,del
2.块级元素:独占一行,可以通过CSS改变宽高。
div,p,ul,li,ol,form,address
3.行级块元素:内容决定大小,可以改宽高。
img
控制属性书否为行级元素还是块级元素,display:inline(行级元素)/block(块级元素)/inline-block(行级块元素)
实际应用:淘宝四张连续的图片
只要有inline的元素,都带有文字属性。如果img元素用回车代替,则中间会有空格,只需要删除在一行展示即可(还可以用到盒子模型)
【代码压缩】
每个程序写完了之后,都会压缩代码,压缩代码的步骤:1.标签缩写成一个。2.删除空格,删除回车。
【开发顺序】
一般为先写功能,再写界面,因此可以先写好css效果,后面再html中直接拿来使用
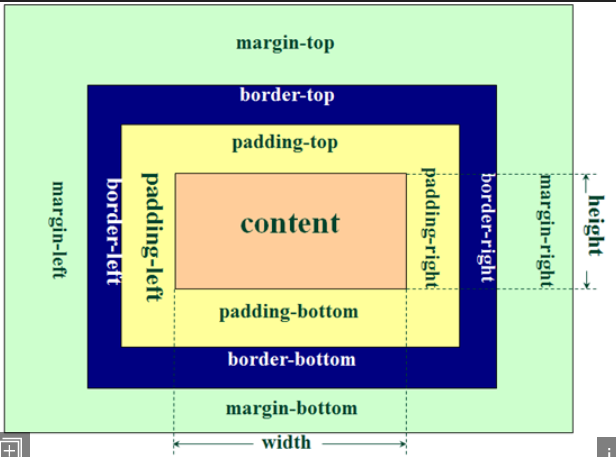
5.盒子模型
盒子的三大部分:

盒子壁:border
内边距:padding
外边距:margin(body的默认margin为8px)
盒子内容:width+height
【盒子模型的计算】
不用到margin,其余的部分相加
【定位】让特定的元素在特定的位置展示
层模型:每一个absolute都是新的层;z-index:谁在谁上面。
position
1.absolute:绝对定位。脱离原来位置进行定位。还需要设置 left,top,right,bottom值(只和position配套使用)
注意事项:相对于最近的有定位的父级的进行定位。如果没有的话,相对于文档进行定位。
2.opacity:透明度(覆盖住也可以选择,可以用来看覆盖效果)
relative:相对定位。保留原来的位置进行定位。
注意事项:相对于原来的位置进行定位。
使用说明:relative当作参照物,absolute作为操作。
3.fixed:固定定位。
【做居中】:1.left:50%;top:50%;2.将中心定在左上角,半个身位。

 1 <!DOCTYPE html PUBLIC "-//W3C//DTD HTML 4.01//EN"
 2 "http://www.w3.org/TR/html4/strict.dtd">
 3
 4 <html xmlns="http://www.w3.org/1999/xhtml" lang="en">
 5
 6     <head>
 7         <meta http-equiv="Content-Type" content="text/html; charset=UTF-8" />
 8         <link rel="stylesheet" type="text/css" href="../css/4.radius.css" />
 9         <title></title>
10     </head>
11
12     <body>
13         <div id="main">
14             <div id="a"></div><div id="b"></div><div id="c"></div><div id="d"></div><div id="e"></div>
15         </div>
16
17     </body>
18
19 </html>

 1 *{
 2     margin: 0px;
 3     padding: 0px;
 4 }
 5
 6 /*不可设置为行级元素*/
 7 div{
 8     display: inline-block;
 9
10 }
11
12 #main{
13     position: absolute;
14     width: 114px;
15     height: 76px;
16     top: 50%;
17     left: 50%;
18     margin-left: -57px;
19     margin-top: -38px;
20 }
21 #a,#b,#c,#d,#e {
22     width: 30px;
23     height: 30px;
24     border:3px solid;
25     border-radius: 50%;
26     margin: 1px;
27 }
28
29 #a{
30     z-index: 1;
31     border-color: #008000;
32 }
33 #b{
34     z-index: 1;
35     border-color: #00FFFF;
36 }
37 #c{
38     border-color: crimson;
39 }
40
41 #d {
42     z-index: 2;
43     position: absolute;
44     left: 18px;
45     top: 18px;
46     border-color:darkmagenta
47 }
48
49 #e {
50     position: absolute;
51     right: 18px;
52     top: 18px;
53 }
关于margin的bug
【margin塌陷】
问题描述: 当两个div嵌套的时候,子div的margin-left会随着设置的改变而改变,而margin-top,子和父元素都取较大的一个数。
解决办法:1.给父级元素的border添加一根线,添加就可以生效(能解决问题,但是不理想)。
2.bfc(block format context)块级上下文:作用是改变盒子显示的规则
| 触发bfc属性的方法 | 说明 |
| position:absolute | 选择位置 |
| display:inline-block | 选择是行级元素还是块级元素,或者是行级块元素 |
| float:left/right | 浮动属性 |
| overflow:hidden | 溢出盒子的部分要隐藏展示 |
【margin合并】
问题描述,两个div的margin-bottom和margin-top会重合共用,而不是相互顶开。
解决办法:将其中的一个div或者都放入带有块级上下文的div中。(但是一般这样添加html结构对结构的影响很大,一般不推荐使用,这个bug也不推荐解决)

 1 <!DOCTYPE html PUBLIC "-//W3C//DTD HTML 4.01//EN"
 2 "http://www.w3.org/TR/html4/strict.dtd">
 3
 4 <html xmlns="http://www.w3.org/1999/xhtml" lang="en">
 5
 6     <head>
 7         <meta http-equiv="Content-Type" content="text/html; charset=UTF-8" />
 8         <link rel="stylesheet" type="text/css" href="../css/margin.css" />
 9         <title></title>
10     </head>
11
12     <body>
13         <!--<div class="a">
14             <div class="b">
15             </div>
16         </div>-->
17         <span id="a">
18             123
19         </span>
20         <span id="b">
21             234
22         </span>
23         <div class="c">1</div>
24         <div class="e">
25             <div class="d">2</div>
26         </div>
27     </body>
28
29 </html>

 1 *{
 2     padding: 0px;
 3     margin: 0px;
 4 }
 5
 6 .a{
 7     margin-left: 50px;
 8     margin-top: 50px;
 9     width: 100px;
10     height: 100px;
11     background-color: cornflowerblue;
12     border-top: 10px solid #FF1493;
13 }
14
15 .b{
16     margin-left: 50px;
17     margin-top: 150px;
18     width: 50px;
19     height: 50px;
20     background-color: coral;
21 }
22
23 #a{
24     background-color: cadetblue;
25     margin-left: 100px;
26 }
27
28 #b{
29     background-color: darkorchid;
30     margin-left: 100px;
31 }
32
33 .c{
34     background-color: lightsalmon;
35     margin-bottom: 100px;
36 }
37
38 .d{
39     background-color: skyblue;
40     margin-top: 100px;
41 }
42
43 .e{
44     overflow: hidden;
45 }
Float属性:
1.浮动元素会给子元素排序,可以顺序和逆序。
2.浮动元素产生了浮动流,块级元素看不到他们(会覆盖),产生了bfc元素和文本类元素属性(inline)以及文本都能看到浮动元素。
问题:
父级元素的border包不住带有浮动流的子元素。boder会被挤到最上面去。
解决办法:再div里面添加<p></p>元素,因为受浮动流得影响,会跟在子<div>得后面,所以需要用到clear:both;来清除浮动值。然后设置border-top,就可以达到对应效果。

 1 <!DOCTYPE html PUBLIC "-//W3C//DTD HTML 4.01//EN"
 2 "http://www.w3.org/TR/html4/strict.dtd">
 3
 4 <html xmlns="http://www.w3.org/1999/xhtml" lang="en">
 5     <head>
 6         <meta http-equiv="Content-Type" content="text/html; charset=UTF-8" />
 7         <link rel="stylesheet" href="../css/float.css" />
 8         <title></title>
 9     </head>
10     <body>
11         <div class="main">
12             <div class="content">1</div>
13             <div class="content">2</div>
14             <div class="content">3</div>
15             <p></p>
16         </div>
17
18     </body>
19 </html>

 1 * {
 2     padding: 0px;
 3     margin: 0px;
 4 }
 5
 6 .main {
 7     border: 1px solid darkgoldenrod;
 8 }
 9
10 .content {
11     /*添加浮动元素*/
12     float: left;
13     width: 100px;
14     height: 100px;
15     color: crimson;
16     background-color: #FF7F50;
17 }
18 p{
19     border-top: 0 solid black;
20     clear: both;
21
22 }
