一、安装ansible
环境是centos7.0
主管服务器ip:192.168.175.134,只需安装ansible在本机即可,其余服务器无需安装,ansible通讯是用ssh
首先更换yum源
cd /etc/yum.repos.d/

cp CentOS-Base.repo CentOS-Base.repo.bak

wget -O /etc/yum.repos.d/CentOS-Base.repo http://mirrors.aliyun.com/repo/Centos-7.repo
#  没有wget就执行yum install -y wget

yum makecache

yum install -y ansible  #  开始安装ansible
查看文档
ansible -h
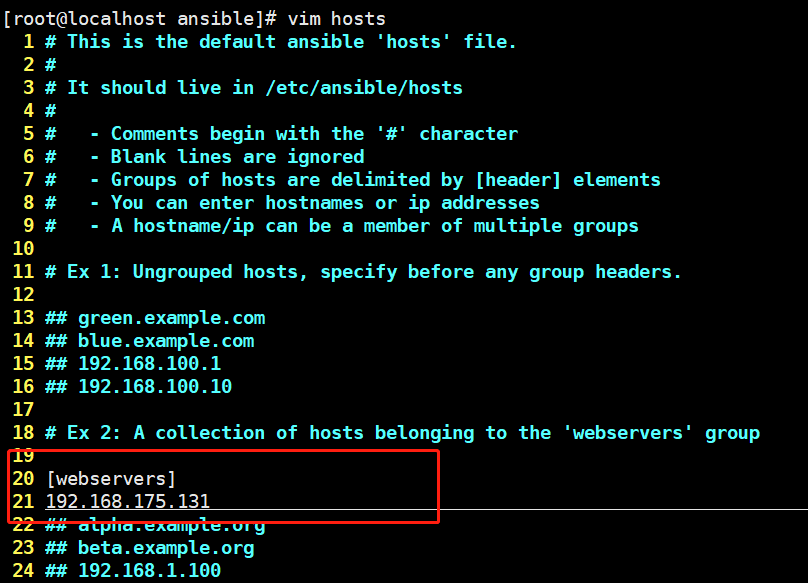
更改主机列表文件
被管测试服务器ip:192.168.175.131,添加到本机ansible的hosts文件中
cd /etc/ansible/

ls
#  ansible.cfg  hosts  roles

添加服务器域名或者ip,此处为本地虚拟机ip。
二、测试
尝试用ansible去ping一下被管理的虚拟机,报错

解决方案,首先用ssh连接一下被管服务器
ssh root@192.168.175.131

# 然后根据提示输入yes,再输入密码
再次用ansible去ping一下被管理的虚拟机
[root@localhost ansible]# ansible 192.168.175.131 -m ping -k
SSH password:
192.168.175.131 | SUCCESS => {
    "changed": false,
    "ping": "pong"
}
成功
免密登陆
ssh-keygen
# 然后一路回车即可

ssh-copy-id root@192.168.175.131
# 按照提示输入远程密码

ssh root@192.168.175.131
# 此时已经无需密码,直接登入
二、被管机组管理
被管测试服务器:135,136,137
首先去配置各个服务器的免密登录
被管机列表文件,将其分为三组
 21 [web]
 20 192.168.175.[135:136]
 21 [db]
 22 192.168.175.136
 23 192.168.175.137
 24 [cache]
 25 192.168.175.137

 26 ## [webservers]
 27 ## alpha.example.org
 28 ## beta.example.org
 29 ## 192.168.1.100
 30 ## 192.168.1.110
查看分组服务器列表命令
[root@localhost ansible]# ansible web --list-hosts
  hosts (2):
    192.168.175.135
    192.168.175.136
ping所有主机
[root@localhost ansible]# ansible all -m ping
192.168.175.137 | SUCCESS => {
    "changed": false,
    "ping": "pong"
}
192.168.175.135 | SUCCESS => {
    "changed": false,
    "ping": "pong"
}
192.168.175.136 | SUCCESS => {
    "changed": false,
    "ping": "pong"
}
ping多个分组
[root@localhost ansible]# ansible web,db -m ping
192.168.175.135 | SUCCESS => {
    "changed": false,
    "ping": "pong"
}
192.168.175.136 | SUCCESS => {
    "changed": false,
    "ping": "pong"
}
192.168.175.137 | SUCCESS => {
    "changed": false,
    "ping": "pong"
}
ping多分组共有的服务器(注意单引号不要敲成双引号)
[root@localhost ansible]# ansible 'web:&db' -m ping
192.168.175.136 | SUCCESS => {
    "changed": false,
    "ping": "pong"
}
ping一个分组中而不在另一个分组的服务器
[root@localhost ansible]# ansible 'web:!db' -m ping
192.168.175.135 | SUCCESS => {
    "changed": false,
    "ping": "pong"
}
ping多个分组的服务器
[root@localhost ansible]# ansible 'web:db' -m ping
192.168.175.135 | SUCCESS => {
    "changed": false,
    "ping": "pong"
}
192.168.175.136 | SUCCESS => {
    "changed": false,
    "ping": "pong"
}
192.168.175.137 | SUCCESS => {
    "changed": false,
    "ping": "pong"
}
三、初使用
首先在135服务器家目录创建一个a.sh文件
#!/bin/bash      #这里是指定解释器
mkdir /alex
chmod +x a.sh # 加权限
下面主控机134使用shell模块执行135服务器上的a.sh文件
ansible 192.168.175.135 -m shell -a "bash a.sh"

# 或者
ansible 192.168.175.135 -m shell -a "/root/a.sh"
# 结果
[root@localhost /]# ansible 192.168.175.135 -m shell -a "bash a.sh"
192.168.175.135 | SUCCESS | rc=0 >>
也可以在135主机创建a.py,内容如下
[root@localhost ~]# cat a.py
#!/bin/env python
#coding:utf-8
print("helloworld")
主控机执行,结果
[root@localhost /]# ansible 192.168.175.135 -m shell -a "/root/a.py"
192.168.175.135 | SUCCESS | rc=0 >>
helloworld
那么问题来了,我想一次性让一个组的服务器都执行,那岂不是每台服务器都要有这个sh文件
于是需要用到ansible另一个模块,script。操作db分组的主机执行主控机本机的a.sh文件,此时a.sh在主控机,不再使用被控机的文件
[root@localhost ~]# ansible db -m script -a "/root/a.sh"
192.168.175.136 | SUCCESS => {
    "changed": true,
    "rc": 0,
    "stderr": "Shared connection to 192.168.175.136 closed.
",
    "stdout": "",
    "stdout_lines": []
}
192.168.175.137 | SUCCESS => {
    "changed": true,
    "rc": 0,
    "stderr": "Shared connection to 192.168.175.137 closed.
",
    "stdout": "",
    "stdout_lines": []
}
creates选项,如果有某个文件就跳过本次执行,creates后面跟文件路径,判断被控机上是否有某个文件,此时的第二个文件路径为本地的文件,而不是被控机上的文件,这与shell和command两个模块不同,shell模块使用creates和removes判断后是执行被控机上的脚本文件
[root@localhost ~]# ansible web -m script -a "creates=/tmp /root/a.sh"
192.168.175.136 | SKIPPED
192.168.175.135 | SKIPPED
removes选项,如果没有某个文件,就跳过本次执行
[root@localhost ~]# ansible db -m script -a "removes=/root/a.sh /root/a.sh"
192.168.175.137 | SKIPPED
192.168.175.136 | SKIPPED
持续更新中。。