0x00 介绍 tabulate
tabulate 是一个使用 C++ 17 编写的库,它可以制作表格。使用它,把表格对齐、格式化和着色,不在话下!你甚至可以使用 tabulate,将你的表格导出为 Markdown 代码。下图是一个使用 tabulate 制作的表格输出在命令行的样例:

当然,除了表格,你还可以玩出花样。看见下面这个马里奥了吗?这也是用 tabulate 制作的!源码在 这里。

0x10 准备
首先你需要安装 CMake。
创建一个文件夹(下文用 X 代替),作为你使用 tabulate 的地方。再将 include 这个文件夹下载到 X 里。然后在 X 里创建 main.cpp 以及一个 CMakeLists.txt。
注意:需要下载
include整个文件夹而不是仅仅下载tabulate文件夹你可以点击 这里 下载 tabulate 项目,然后将
include文件夹复制到 X 中。
将下面的代码复制进 CMakeLists.txt :
cmake_minimum_required(VERSION 3.8)

# 这里的 tabulateDemo 可以换为你喜欢的名字
project(tabulateDemo)

set(CMAKE_CXX_STANDARD 17)
set(CMAKE_CXX_STANDARD_REQUIRED True)

include_directories(include)

add_executable(main main.cpp)
最后 X 文件夹的结构应该是这样的:
.
├── CMakeLists.txt
├── include
│   └── tabulate
└── main.cpp
请认真核对好 X 的结构!
可前往 ChungZH/tabulatedemo 核对文件结构。
0x20 小试身手
将下面这段代码复制进 main.cpp 中:
#include "tabulate/table.hpp"
using namespace std;
using namespace tabulate;
int main()
{
    Table hellogithub; // 创建一个叫做 hellogithub 的 Table 对象

    hellogithub.add_row({"HelloGitHub"});
    hellogithub.add_row({"hellogithub.com"});
    hellogithub[1][0].format()
        .font_style({FontStyle::underline});
    hellogithub.add_row({"github.com/521xueweihan/HelloGitHub"});
    hellogithub[2][0].format()
        .font_style({FontStyle::underline});
    hellogithub.add_row({"xueweihan NB!!!"});

    cout << hellogithub << endl;
    return 0;
}
-
如果你使用的是 Linux/MacOS 系统,请在终端进入 X 文件夹并输入以下命令:
mkdir build cd build cmake .. make ./main -
如果你使用的是 Windows 系统和 MinGW,请检查是否安装
mingw32-make.exe,并在终端中进入 X 文件夹,输入:mkdir build cd build cmake .. mingw32-make ./main.exe -
如果你使用 Windows 以及 MSVC,在终端中输入:
mkdir build
cd build
cmake ..
然后使用 Visual Studio 打开 build 文件夹下的 tabulateDemo.sln 来运行。
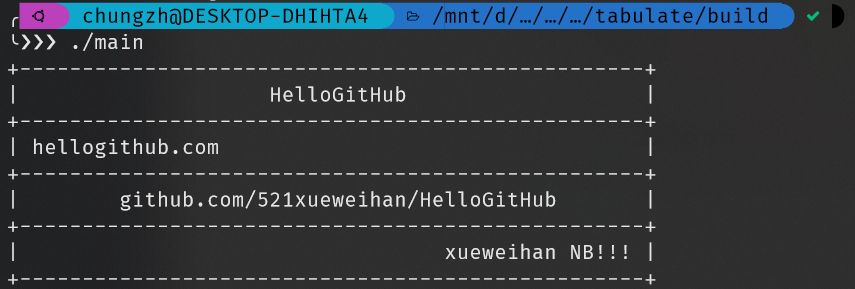
如果没有问题,那么你应该会在终端里看到:

0x30 格式化表格
请先认真分析 0x20 小试身手 章节中的代码并尝试着修改一下它!
0x31 Word Wrapping
为了防止表格中的内容过长导致不整齐,你可以指定表格每一列的宽度,tabulate 就会自动帮你换行。语法如下:
// 将表格第 0 行第 0 列的宽度设为20
table[0][0].format().width(20);
除了自动换行,你也可以在内容中使用
来手动设置换行。
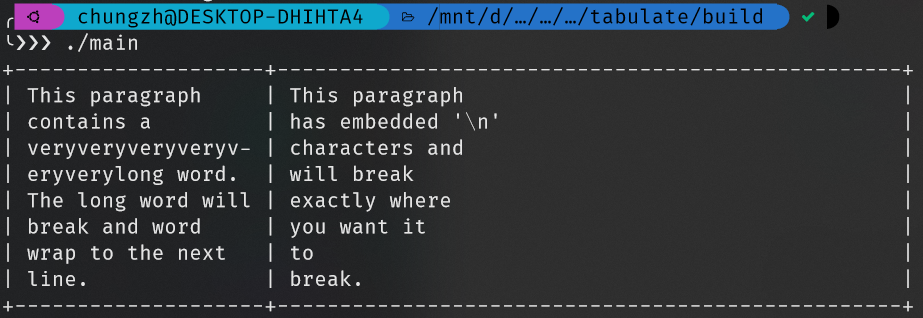
这是一个 Word Wrapping 的例子:
#include "tabulate/table.hpp"
using namespace std;
using namespace tabulate;
int main()
{
    Table table;

    table.add_row({"This paragraph contains a veryveryveryveryveryverylong word. The long word will break and word wrap to the next line.",
                    "This paragraph
has embedded '\n'
characters and
 will break
 exactly where
 you want it
 to
 break."});

    table[0][0].format().width(20); // 设置第 0 行第 0 列的宽度为 20
    table[0][1].format().width(50); // 设置第 0 行第 1 列的宽度为 50

    cout << table << endl;
    return 0;
}
    return 0;
}
-
第 0 行第 0 列的文字是不是很长?但是设置了它的宽度后,就不用担心了。tabulate 将会帮你自动换行。如果不设置的话,表格就会变得很不整齐,你也可以尝试一下。
-
第 0 行第 1 列的内容里运用了
-
值得注意的是,tabulate 会自动删除每一行内容两边的空白字符。
0x32 字体对齐
tabulate 支持三种对齐设置:左、中和右。默认情况下,全部内容都会靠左对齐。
要手动设置对齐方式,可以使用 .format().font_align(方向)。
举一个例子:
#include "tabulate/table.hpp"
using namespace std;
using namespace tabulate;
int main()
{
    Table hellogithub;

    hellogithub.add_row({"HelloGitHub"});
    hellogithub[0][0].format()
        .font_align(FontAlign::center); // 设置居中对齐
    hellogithub.add_row({"hellogithub.com"});
    hellogithub[1][0].format()
        .font_align(FontAlign::left); // 设置靠左对齐
    hellogithub.add_row({"github.com/521xueweihan/HelloGitHub"});
    hellogithub[2][0].format()
        .font_align(FontAlign::center); // 设置居中对齐
    hellogithub.add_row({"xueweihan NB!!!"});
    hellogithub[3][0].format()
        .font_align(FontAlign::right); // 设置靠右对齐

    hellogithub[0][0].format().width(50);
    cout << hellogithub << endl;
    return 0;
}
0x33 字体样式
tabulate 支持以下八种字体样式:
-
粗体
bold -
深色
dark -
斜体
italic -
下划线
underline -
闪烁
blink -
翻转
reverse -
隐藏
concealed -
删除线
crossed
某些样式可能会因为终端的原因而无法显示。
如:粗体、深色、斜体、闪烁等样式,请慎用。
要使用这些样式,可以调用 .format().font_style({...})。样式也可以叠加使用。

0x34 颜色
你可以对表格的字体、边框、角以及列分隔符号设置它们的前景或背景颜色。
tabulate 支持 8 种颜色:
-
灰色
gray -
红色
red -
绿色
green -
黄色
yellow -
蓝色
blue -
洋红色
magenta -
青色
cyan -
白色
white
可以通过 .format().<element>_color(颜色) 的方式定义前景色或通过 .format().<element>_background_color(颜色) 的方式定义背景色。
#include "tabulate/table.hpp"
using namespace tabulate;
using namespace std;
int main()
{
    Table colors;

    colors.add_row({"Font Color is Red", "Font Color is Blue", "Font Color is Green"});
    colors.add_row({"Everything is Red", "Everything is Blue", "Everything is Green"});
    colors.add_row({"Font Background is Red", "Font Background is Blue", "Font Background is Green"});

    colors[0][0].format()
        .font_color(Color::red)
        .font_style({FontStyle::bold});
    colors[0][1].format()
        .font_color(Color::blue)
        .font_style({FontStyle::bold});
    colors[0][2].format()
        .font_color(Color::green)
        .font_style({FontStyle::bold});

    colors[1][0].format()
        .border_left_color(Color::red)
        .border_left_background_color(Color::red)
        .font_background_color(Color::red)
        .font_color(Color::red);

    colors[1][1].format()
        .border_left_color(Color::blue)
        .border_left_background_color(Color::blue)
        .font_background_color(Color::blue)
        .font_color(Color::blue);

    colors[1][2].format()
        .border_left_color(Color::green)
        .border_left_background_color(Color::green)
        .font_background_color(Color::green)
        .font_color(Color::green)
        .border_right_color(Color::green)
        .border_right_background_color(Color::green);

    colors[2][0].format()
        .font_background_color(Color::red)
        .font_style({FontStyle::bold});
    colors[2][1].format()
        .font_background_color(Color::blue)
        .font_style({FontStyle::bold});
    colors[2][2].format()
        .font_background_color(Color::green)
        .font_style({FontStyle::bold});

    cout << colors << endl;
    return 0;
}

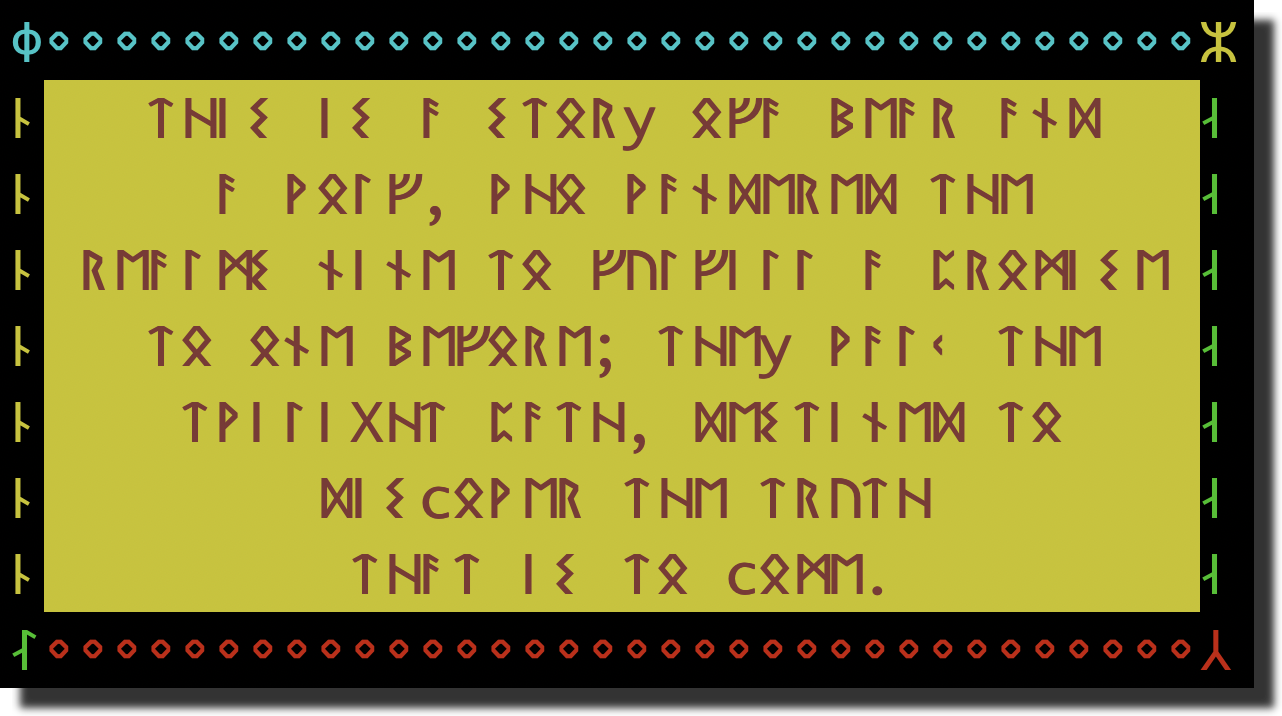
0x35 边框、角
你可以对表格的边框和角的文本、颜色或背景颜色进行自定义。
你可以使用 .corner(..)、.corner_color(..) 和 corner_background_color(..) 来对所有的角设置一个共同的样式。你也可以使用 .border(..) 、.border_color(..) 和 .border_background_color(..) 来对所有的边框设置一个共同的样式。
这是一个单独设定所有边框和角的示例:
#include <tabulate/table.hpp>
using namespace tabulate;

int main()
{
  Table table;

  table.add_row({"ᛏᚺᛁᛊ ᛁᛊ ᚨ ᛊᛏᛟᚱy ᛟᚠᚨ ᛒᛖᚨᚱ ᚨᚾᛞ
"
                 "ᚨ ᚹᛟᛚᚠ, ᚹᚺᛟ ᚹᚨᚾᛞᛖᚱᛖᛞ ᛏᚺᛖ
"
                 "ᚱᛖᚨᛚᛗᛊ ᚾᛁᚾᛖ ᛏᛟ ᚠᚢᛚᚠᛁᛚᛚ ᚨ ᛈᚱᛟᛗᛁᛊᛖ
"
                 "ᛏᛟ ᛟᚾᛖ ᛒᛖᚠᛟᚱᛖ; ᛏᚺᛖy ᚹᚨᛚᚲ ᛏᚺᛖ
"
                 "ᛏᚹᛁᛚᛁᚷᚺᛏ ᛈᚨᛏᚺ, ᛞᛖᛊᛏᛁᚾᛖᛞ ᛏᛟ
"
                 "ᛞᛁᛊcᛟᚹᛖᚱ ᛏᚺᛖ ᛏᚱᚢᛏᚺ
ᛏᚺᚨᛏ ᛁᛊ ᛏᛟ cᛟᛗᛖ."});

  table.format()
      .multi_byte_characters(true)
      // Font styling
      .font_style({FontStyle::bold, FontStyle::dark})
      .font_align(FontAlign::center)
      .font_color(Color::red)
      .font_background_color(Color::yellow)
      // Corners
      .corner_top_left("ᛰ")
      .corner_top_right("ᛯ")
      .corner_bottom_left("ᛮ")
      .corner_bottom_right("ᛸ")
      .corner_top_left_color(Color::cyan)
      .corner_top_right_color(Color::yellow)
      .corner_bottom_left_color(Color::green)
      .corner_bottom_right_color(Color::red)
      // Borders
      .border_top("ᛜ")
      .border_bottom("ᛜ")
      .border_left("ᚿ")
      .border_right("ᛆ")
      .border_left_color(Color::yellow)
      .border_right_color(Color::green)
      .border_top_color(Color::cyan)
      .border_bottom_color(Color::red);
  std::cout << table << std::endl;
  return 0;
}
0x36 基于范围的迭代
一个一个设置表格的样式是不是很麻烦?tabulate 提供了迭代器,支持对表、行和列的迭代,更方便地格式化表格。
#include <tabulate/table.hpp>
using namespace tabulate;

int main() {
  Table table;

  table.add_row({"Company", "Contact", "Country"});
  table.add_row({"Alfreds Futterkiste", "Maria Anders", "Germany"});
  table.add_row({"Centro comercial Moctezuma", "Francisco Chang", "Mexico"});
  table.add_row({"Ernst Handel", "Roland Mendel", "Austria"});
  table.add_row({"Island Trading", "Helen Bennett", "UK"});
  table.add_row({"Laughing Bacchus Winecellars", "Yoshi Tannamuri", "Canada"});
  table.add_row({"Magazzini Alimentari Riuniti", "Giovanni Rovelli", "Italy"});

  // 设置每一行的宽度
  table.column(0).format().width(40);
  table.column(1).format().width(30);
  table.column(2).format().width(30);

  // 遍历第一行中的单元格
  for (auto& cell : table[0]) {
    cell.format()
      .font_style({FontStyle::underline})
      .font_align(FontAlign::center);
  }

  // 遍历第一列中的单元格
  for (auto& cell : table.column(0)) {
    if (cell.get_text() != "Company") {
      cell.format()
        .font_align(FontAlign::right);
    }
  }

  // 遍历表格中的行
  size_t index = 0;
  for (auto& row : table) {
    row.format()
      .font_style({FontStyle::bold});

    // 轮流把整行的背景设为蓝色
    if (index > 0 && index % 2 == 0) {
      for (auto& cell : row) {
        cell.format()
          .font_background_color(Color::blue);
      }
    }
    index += 1;
  }

  std::cout << table << std::endl;
}

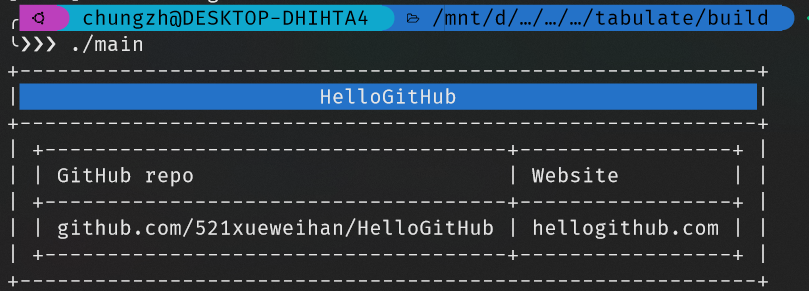
0x37 嵌套表格
在 tabulate 中嵌套表格很容易,因为 Table.add_row(...) 这个函数可以接受 std::string 类型和 tabulate::Table。下面是一个嵌套表格的例子:
#include "tabulate/table.hpp"
using namespace tabulate;
using namespace std;
int main() {
  Table hellogithub;
  hellogithub.add_row({"HelloGitHub"});
  hellogithub[0][0]
      .format()
      .font_background_color(Color::blue)
      .font_align(FontAlign::center);

  Table hglink;
  hglink.add_row({"GitHub repo", "Website"});
  hglink.add_row({"github.com/521xueweihan/HelloGitHub", "hellogithub.com"});

  hellogithub.add_row({hglink}); // 嵌套!
  cout << hellogithub << endl;
  return 0;
}
0x40 导出
0x41 Markdown
可以使用 MarkdownExporter 来将一个表格导出为 GFM 风格的 Markdown。
#include "tabulate/markdown_exporter.hpp"  // 注意这个头文件
#include "tabulate/table.hpp"
using namespace tabulate;
using namespace std;
int main() {
  Table hellogithub;
  hellogithub.add_row({"HelloGitHub"});
  hellogithub[0][0].format().font_style({FontStyle::bold}); // 加粗样式,在 Markdown 中可以表现出来
  hellogithub.add_row({"GitHub repo: github.com/521xueweihan/HelloGitHub"});
  hellogithub.add_row({"Website: hellogithub.com"});

  // 导出为 Markdown
  MarkdownExporter exporter;
  auto markdown = exporter.dump(hellogithub);

  cout << hellogithub << endl << endl;
  cout << "Markdown Source:

" << markdown << endl;
  return 0;
}

导出效果如下:
| HelloGitHub |
|---|
| GitHub repo: github.com/521xueweihan/HelloGitHub |
| Website: hellogithub.com |
注意:Markdown 不能指定每一个单元格的对齐样式,只能指定一列的对齐样式,像这样
hg.column(1).format().font_align(FontAlign::center);。
0x50 尾声
如果想要更详细地了解 tabulate 的用法,请查看官方文档 https://github.com/p-ranav/tabulate 。
本文是作者的第一次关于此类型文章的尝试,如有不足之处,请指正,谢谢!
再见!

关注公众号加入交流群