1.事件及监听器原理
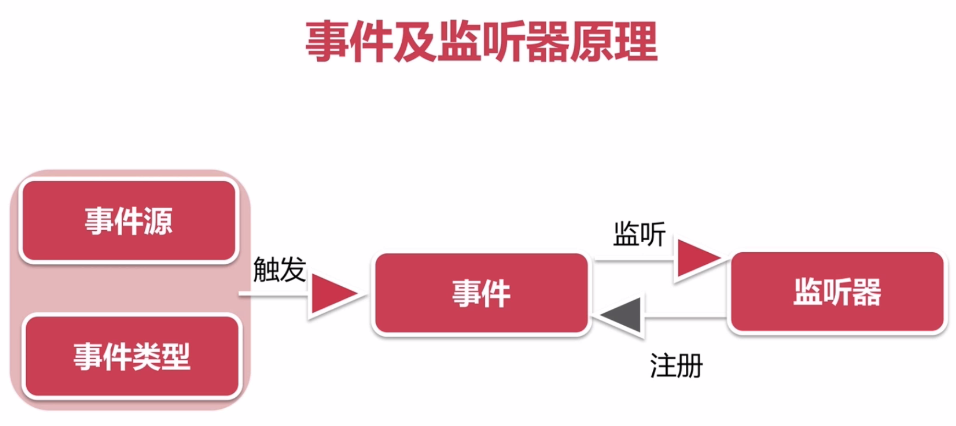
当流程引擎启动的时候,我们定义的监听器,就已经注册在一个事件类型上面。
注册的方式有多种,它可以注册在所有的事件类型上面、也可以注册在指定的几个事件类型上面,这样引擎启动的时候就已经完成了监听器与事件的注册。
那么在流程运行的过程中,会有这样一个环节:
首先我们有一个事件源与一个事件类型的关系,比如说,我创建一个流程引擎,这个事件源就是流程引擎对象。类型就是 把它创建了。也就是说流程引擎创建过程,
触发出我们的事件,这个事件对象,也就是流程引擎被创建。当这个事件被分发出来的时候,或者发布出来的时候,也就会被监听器监听这个事件。
当然,我们可以在一个事件上注册多个监听器,当事件发生的时候,监听器会一次执行自己的方法,这样就可以让一个事件在发生变化的时候,监听器直接或者间接的感受到它的变化。
综上,这个过程中,我们需要:
首先有一个事件对象
在这个事件对象上绑定或注册监听器和事件类型
监听器会触发的方法。
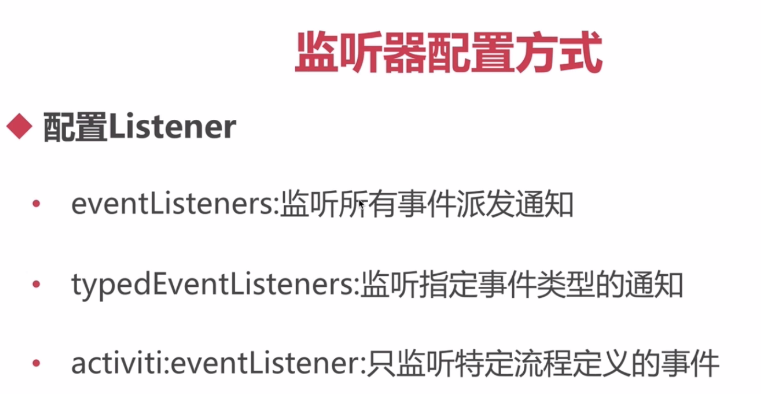
监听器配置方式:
Activiti的事件监听(与监听原理图相对应):
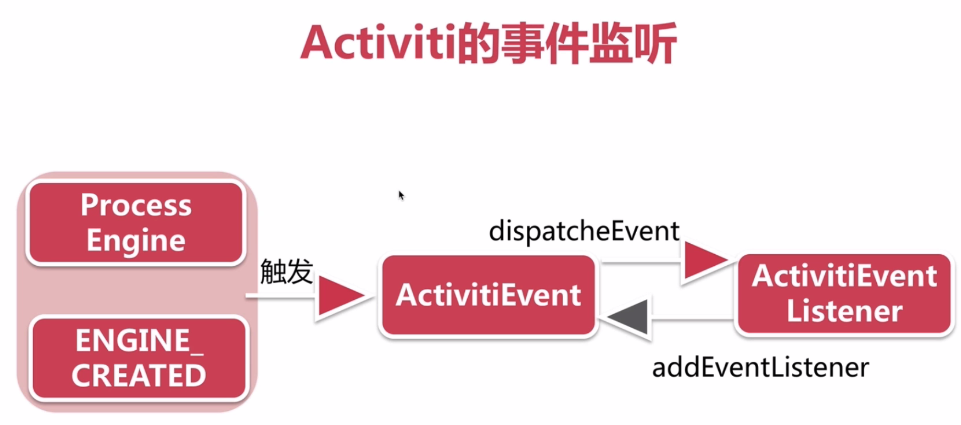
Activiti的事件监听:
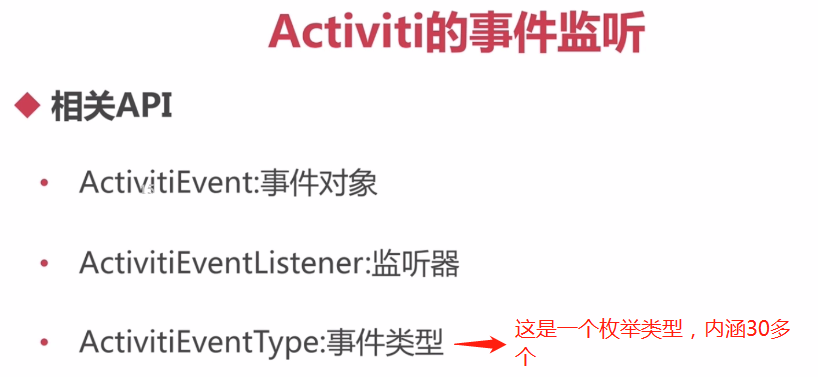
在实现监听器的过程中,大多监听器都会对事件类型做一个判断。监听器只去判断几个事件类型,类型不符的直接忽略。
(ps:事件类型里还支持自定义类型。)
创建一个监听器ProcessEventListener:
public class ProcessEventListener implements ActivitiEventListener {
    private static final Logger LOGGER =  LoggerFactory.getLogger(ProcessEventListener.class);

    //简单的完成一下监听器的效果
    @Override
    public void onEvent(ActivitiEvent event) {
        ActivitiEventType eventType = event.getType();
        if (ActivitiEventType.PROCESS_STARTED.equals(eventType)){
            LOGGER.info("流程启动 {} 	 {}",eventType,event.getProcessInstanceId());
        }else if (ActivitiEventType.PROCESS_COMPLETED.equals(eventType)){
            LOGGER.info("流程结束 {} 	 {}",eventType,event.getProcessInstanceId());
        }
    }

    @Override
    public boolean isFailOnException() {
        return false;
    }
}
注册监听配置文件:
activiti_eventListener.cfg.xml
<?xml version="1.0" encoding="UTF-8"?>
<beans xmlns="http://www.springframework.org/schema/beans"
       xmlns:xsi="http://www.w3.org/2001/XMLSchema-instance"
       xsi:schemaLocation="http://www.springframework.org/schema/beans http://www.springframework.org/schema/beans/spring-beans.xsd">


    <bean id="processEngineConfiguration"
          class="org.activiti.engine.impl.cfg.StandaloneInMemProcessEngineConfiguration">
        <!-- 给引擎设置自定义的commandInvoker -->
        <!--<property name="commandInvoker" ref="commandInvoker" />-->
       <property name="eventListeners">
           <list>
               <!-- 配置上监听器 -->
               <bean class="com.yy.avtiviti.helloworld.event.ProcessEventListener"/>
           </list>
       </property>
    </bean>
    <bean id="commandInvoker" class="com.yy.avtiviti.helloworld.intercept.MDCCommandInvoker"/>

</beans>
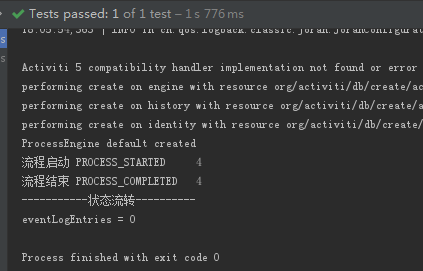
测试类:
public class configEventListenerTest {
    private static final Logger LOGGER =  LoggerFactory.getLogger(configTest.class);

    @Rule
    public ActivitiRule activitiRule = new ActivitiRule("activiti_eventListener.cfg.xml");//传入自定义的mdc配置文件

    @Test
    @Deployment(resources = {"my-process.bpmn20.xml"})//流程定义文件
    public void test() {
        ProcessInstance processInstance = activitiRule.getRuntimeService().startProcessInstanceByKey("my-process");
        Task task = activitiRule.getTaskService().createTaskQuery().singleResult();
        activitiRule.getTaskService().complete(task.getId());
        //想遍历EventLog数据,需要用到新的service(ManagementService)

        //状态流转
        LOGGER.info("-----------状态流转----------");
        List<EventLogEntry> eventLogEntries = activitiRule
                .getManagementService()
                .getEventLogEntriesByProcessInstanceId(
                        processInstance.getProcessDefinitionId());
        for (EventLogEntry eventLogEntry : eventLogEntries) {
            LOGGER.info("eventLog.type = {},eventLog.data = {}",eventLogEntry.getType(),new String(eventLogEntry.getData()));
        }
        LOGGER.info("eventLogEntries = {}",eventLogEntries.size());
    }
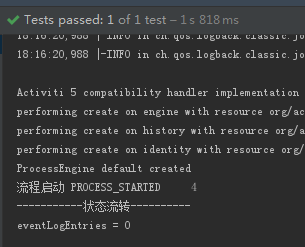
测试结果如下:
第二种注册监听的配置方法,只用改配置文件:
<?xml version="1.0" encoding="UTF-8"?> <beans xmlns="http://www.springframework.org/schema/beans" xmlns:xsi="http://www.w3.org/2001/XMLSchema-instance" xsi:schemaLocation="http://www.springframework.org/schema/beans http://www.springframework.org/schema/beans/spring-beans.xsd"> <bean id="processEngineConfiguration" class="org.activiti.engine.impl.cfg.StandaloneInMemProcessEngineConfiguration"> <!-- 给引擎设置自定义的commandInvoker --> <!--<property name="commandInvoker" ref="commandInvoker" />--> <!--<property name="eventListeners"> <list> <!– 配置上监听器 –> <bean class="com.yy.avtiviti.helloworld.event.ProcessEventListener"/> </list> </property>--> <property name="typedEventListeners"> <map> <!-- 只监听流程启动这个事件 --> <entry key="PROCESS_STARTED"> <list> <bean class="com.yy.avtiviti.helloworld.event.ProcessEventListener"/> </list> </entry> </map> </property> </bean> <bean id="commandInvoker" class="com.yy.avtiviti.helloworld.intercept.MDCCommandInvoker"/> </beans>
测试结果如下图,与预期相符,只监听了流程的启动。