前面基本了解了指令的相关内容:
1 如何自定义指令
2 指令的复用
本篇看一下指令之间如何交互。学习内容来自《慕课网 指令3》
背景介绍
这例子是视频中的例子,有一个动感超人,有三种能力,力量strength,速度speed,发光light。
这三种能力作为三种属性,定义动感超人作为一个标签,只要添加对应的属性就能拥有该能力。
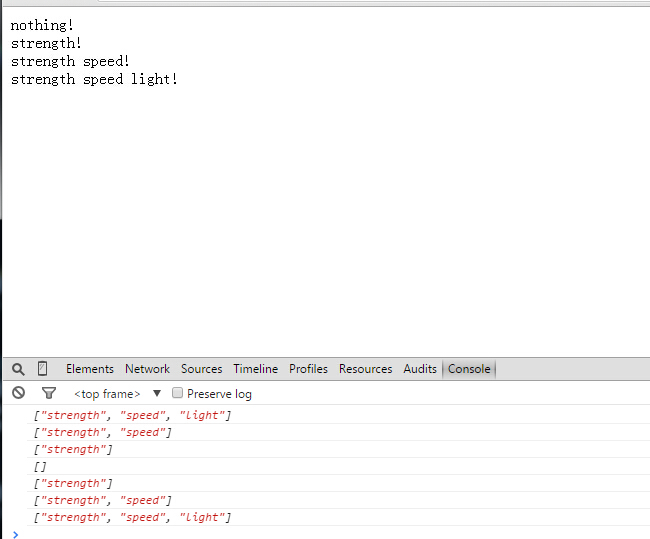
为了便于结果的展示,为标签添加鼠标的响应事件,当鼠标移动到对应的标签上就会触发一个方法,打印出具备的能力。
程序分析
html部分的代码如下:
        <div>
            <superman>nothing!</superman>
            <superman strength >strength!</superman>
            <superman strength speed >strength speed!</superman>
            <superman strength speed light >strength speed light!</superman>
        </div>
下面看看如何实现,首先依然是创建一个模块:
var myAppModule = angular.module("myApp",[]);
在该模块的基础上,创建标签superman,与前面类似。
myAppModule.directive("superman",function(){
                return{
                    scope:{},
                    restrict:'AE',
                    transclude:true,
                    template:"<div><div ng-transclude></div></div>",
                    controller:function($scope){
                        $scope.abilities = [];
                        this.addStrength = function(){
                            $scope.abilities.push("strength");
                        };
                        this.addSpeed = function(){
                            $scope.abilities.push("speed");
                        };
                        this.addLight = function(){
                            $scope.abilities.push("light");
                        };
                    },
                    link:function(scope,element,attr){
                        element.bind("mouseenter",function(){
                            console.log(scope.abilities);
                        });
                    }
                }
            });
这里不同的是,在方法内部有一个controller属性,这个并不是ng-controller这种控制器,而是指令对外开放的一个接口,里面声明的方法,在外部可以作为公开的方法使用,其他的指令可以通过依赖,使用这些方法。
接下来再创建三个能力对应的指令
            myAppModule.directive("strength",function(){
                return{
                    require:'^superman',
                    link:function(scope,element,attr,supermanCtrl){
                        supermanCtrl.addStrength();
                    }
                }
            });
            myAppModule.directive("speed",function(){
                return{
                    require:'^superman',
                    link:function(scope,element,attr,supermanCtrl){
                        supermanCtrl.addSpeed();
                    }
                }
            });
            myAppModule.directive("light",function(){
                return{
                    require:'^superman',
                    link:function(scope,element,attr,supermanCtrl){
                        supermanCtrl.addLight();
                    }
                }
            });
三个指令的代码都差不多,其中require指定了依赖的指令。
link中多了一个参数supermanCtrl,这个参数猜想是superman中的controller,所以命名采用superman+Ctrl的方式。
【由于不懂内部原理,这里仅仅是猜想,但是实验证明,如果改变这个参数的名字,会报错。】
声明了这三个指令,就可以把这三个指令当做super的属性来使用,当注明该属性时,就会触发内部的link内的方法,调用superman中公开的方法。
总结起来,指令的交互过程:
1 首先创建一个基本的指令,在controller属性后,添加对外公开的方法。
2 创建其他交互的指令,在require属性后,添加对应的指令依赖关系;在link中调用公开的方法
全部程序代码:
<!doctype html>
<html ng-app="myApp">
    <head>
         <meta http-equiv="Content-Type" content="text/html; charset=utf-8" />
         <script src="http://apps.bdimg.com/libs/angular.js/1.2.16/angular.min.js"></script>
    </head>
    <body>

        <div>
            <superman>nothing!</superman>
            <superman strength >strength!</superman>
            <superman strength speed >strength speed!</superman>
            <superman strength speed light >strength speed light!</superman>
        </div>
        <script type="text/javascript">
            var myAppModule = angular.module("myApp",[]);

            myAppModule.directive("superman",function(){
                return{
                    scope:{},
                    restrict:'AE',
                    transclude:true,
                    template:"<div><div ng-transclude></div></div>",
                    controller:function($scope){
                        $scope.abilities = [];
                        this.addStrength = function(){
                            $scope.abilities.push("strength");
                        };
                        this.addSpeed = function(){
                            $scope.abilities.push("speed");
                        };
                        this.addLight = function(){
                            $scope.abilities.push("light");
                        };
                    },
                    link:function(scope,element,attr){
                        element.bind("mouseenter",function(){
                            console.log(scope.abilities);
                        });
                    }
                }
            });
            myAppModule.directive("strength",function(){
                return{
                    require:'^superman',
                    link:function(scope,element,attr,supermanCtrl){
                        supermanCtrl.addStrength();
                    }
                }
            });
            myAppModule.directive("speed",function(){
                return{
                    require:'^superman',
                    link:function(scope,element,attr,supermanCtrl){
                        supermanCtrl.addSpeed();
                    }
                }
            });
            myAppModule.directive("light",function(){
                return{
                    require:'^superman',
                    link:function(scope,element,attr,supermanCtrl){
                        supermanCtrl.addLight();
                    }
                }
            });
        </script>
    </body>
</html>
运行结果:
