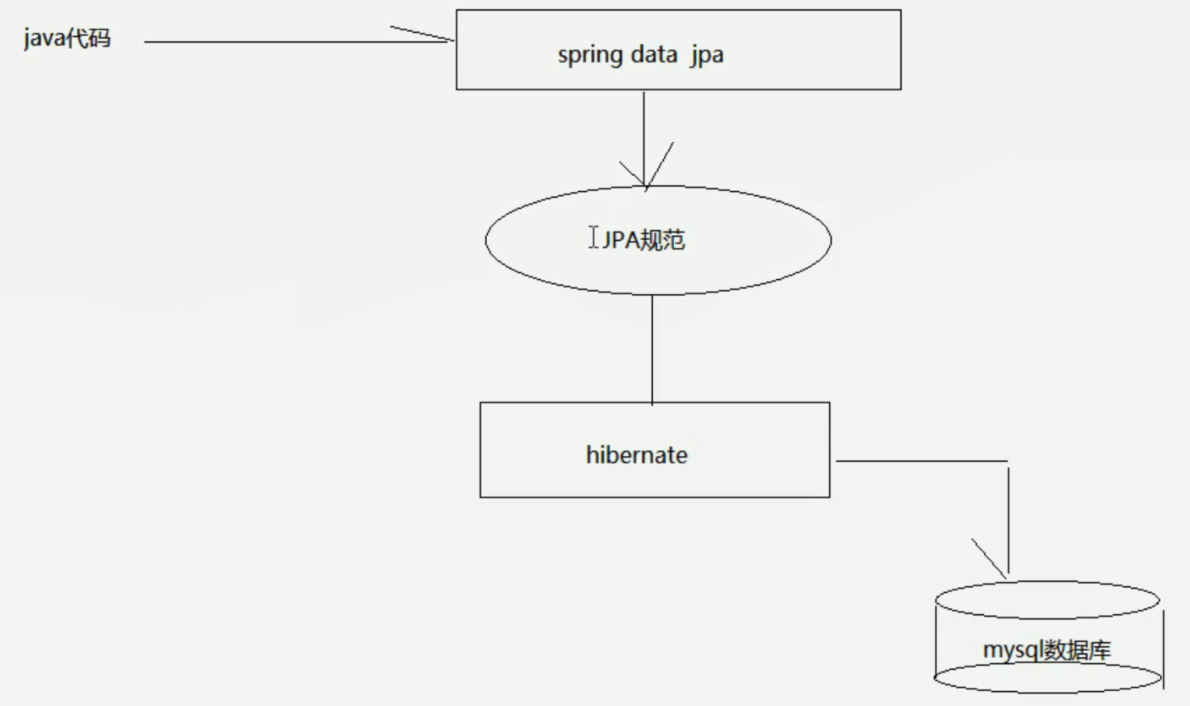
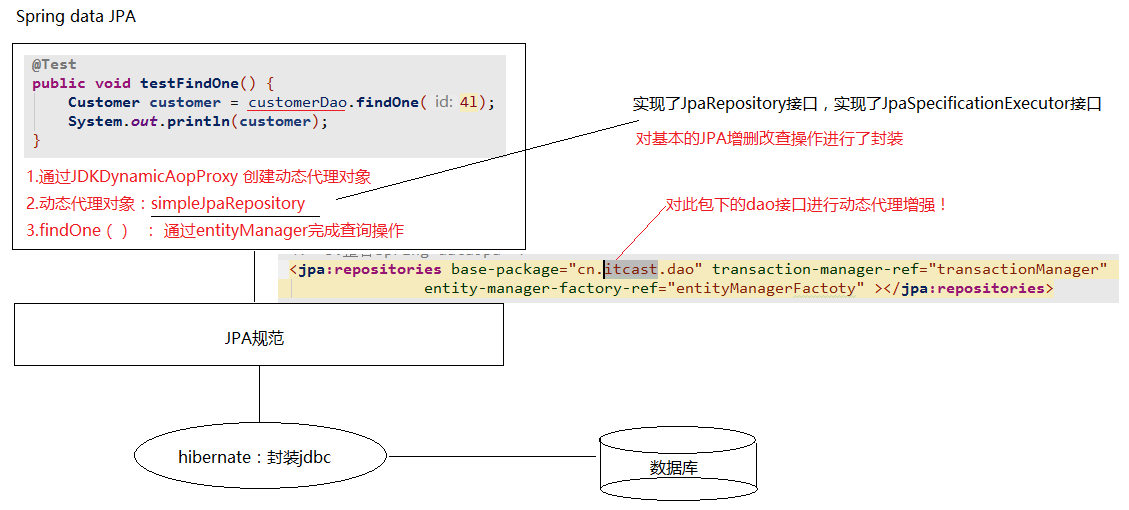
SpringDataJpaSpring Data JPA
让我们解脱了DA0层的操作,基本上所有CRUD都可以依赖于它来实现,在实际的工作工程中,推荐使用Spring Data JPA+ORM(如:hibernate)完成操作,这样在切换不同的ORM框架时提供了极大的方便,同时也使数据库层操作更加简单,方便解耦。
把JPA规范的代码封装起来,真正进行查询的还是hibernate或mybatis >>(封装了jdbc操作),然后进行查询或操作数据库。
SpringDataJpa入门操作(搭建环境)
创建工程,导入坐标


  1 <?xml version="1.0" encoding="UTF-8"?>
  2 <project xmlns="http://maven.apache.org/POM/4.0.0"
  3          xmlns:xsi="http://www.w3.org/2001/XMLSchema-instance"
  4          xsi:schemaLocation="http://maven.apache.org/POM/4.0.0 http://maven.apache.org/xsd/maven-4.0.0.xsd">
  5     <modelVersion>4.0.0</modelVersion>
  6
  7     <groupId>cn.itcast</groupId>
  8     <artifactId>jpa-day02</artifactId>
  9     <version>1.0-SNAPSHOT</version>
 10
 11     <properties>
 12         <spring.version>5.0.2.RELEASE</spring.version>
 13         <hibernate.version>5.0.7.Final</hibernate.version>
 14         <s1f4j.version>1.6.6</s1f4j.version>
 15         <log4j.version>1.2.12</log4j.version>
 16         <c3pe.version>0.9.1.2</c3pe.version>
 17         <mysql.version>5.1.6</mysql.version>
 18     </properties>
 19
 20     <dependencies>
 21         <!--junit单元测试-->
 22         <dependency>
 23             <groupId>junit</groupId>
 24             <artifactId>junit</artifactId>
 25             <version>4.9</version>
 26             <scope>test</scope>
 27         </dependency>
 28         <!--spring beg-->
 29         <dependency>
 30             <groupId>org.aspectj</groupId>
 31             <artifactId>aspectjweaver</artifactId>
 32             <version>1.6.8</version>
 33         </dependency>
 34         <dependency>
 35             <groupId>org.springframework</groupId>
 36             <artifactId>spring-aop</artifactId>
 37             <version>${spring.version}</version>
 38         </dependency>
 39         <dependency>
 40             <groupId>org.springframework</groupId>
 41             <artifactId>spring-context</artifactId>
 42             <version>${spring.version}</version>
 43         </dependency>
 44         <dependency>
 45             <groupId>org.springframework</groupId>
 46             <artifactId>spring-context-support</artifactId>
 47             <version>${spring.version}</version>
 48         </dependency>
 49         <!--spring对ORm框架的支持包-->
 50         <dependency>
 51             <groupId>org.springframework</groupId>
 52             <artifactId>spring-orm</artifactId>
 53             <version>${spring.version}</version>
 54         </dependency>
 55         <dependency>
 56             <groupId>org.springframework</groupId>
 57             <artifactId>spring-beans</artifactId>
 58             <version>${spring.version}</version>
 59         </dependency>
 60         <dependency>
 61             <groupId>org.springframework</groupId>
 62             <artifactId>spring-core</artifactId>
 63             <version>${spring.version}</version>
 64         </dependency>
 65
 66         <!--spring end-->
 67
 68         <!--hibernate beg-->
 69         <dependency>
 70             <groupId>org.hibernate</groupId>
 71             <artifactId>hibernate-core</artifactId>
 72             <version>${hibernate.version}</version>
 73         </dependency>
 74         <dependency>
 75             <groupId>org.hibernate</groupId>
 76             <artifactId>hibernate-entitymanager</artifactId>
 77             <version>${hibernate.version}</version>
 78         </dependency>
 79         <dependency>
 80             <groupId>org.hibernate</groupId>
 81             <artifactId>hibernate-validator</artifactId>
 82             <version>5.2.1.Final</version>
 83         </dependency>
 84
 85         <!--hibernate end-->
 86
 87         <!--c3p0 beg-->
 88         <dependency>
 89             <groupId>c3p0</groupId>
 90             <artifactId>c3p0</artifactId>
 91             <version>0.9.1.2</version>
 92         </dependency>
 93
 94         <!--log end-->
 95         <dependency>
 96             <groupId>log4j</groupId>
 97             <artifactId>log4j</artifactId>
 98             <version>1.2.17</version>
 99         </dependency>
100         <dependency>
101             <groupId>org.slf4j</groupId>
102             <artifactId>slf4j-api</artifactId>
103             <version>1.7.25</version>
104         </dependency>
105         <dependency>
106             <groupId>org.slf4j</groupId>
107             <artifactId>slf4j-log4j12</artifactId>
108             <version>1.6.6</version>
109         </dependency>
110         <!--log end-->
111
112         <dependency>
113             <groupId>mysq1</groupId>
114             <artifactId>mysql-connector-java</artifactId>
115             <version>5.1.6</version>
116         </dependency>
117         <!-- spring data jpa 的坐标 -->
118         <dependency>
119             <groupId>org.springframework.data</groupId>
120             <artifactId>spring-data-jpa</artifactId>
121             <version>1.9.0.RELEASE</version>
122         </dependency>
123         <dependency>
124             <groupId>org.springframework</groupId>
125             <artifactId>spring-test</artifactId>
126             <version>4.2.4.RELEASE</version>
127         </dependency>
128
129         <!--el beg 使用spring data jpa必须引入-->
130         <dependency>
131             <groupId>javax.el</groupId>
132             <artifactId>javax.el-api</artifactId>
133             <version>2.2.4</version>
134         </dependency>
135         <dependency>
136             <groupId>org.glassfish.web</groupId>
137             <artifactId>javax.el</artifactId>
138             <version>2.2.4</version>
139         </dependency>
140         <dependency>
141             <groupId>org.projectlombok</groupId>
142             <artifactId>lombok</artifactId>
143             <version>1.16.22</version>
144         </dependency>
145     </dependencies>
146 </project>
配置Spring的配置文件
 1 <!--创建entityManagerFactory对象交给Spring容器管理-->
 2     <bean id="entityManagerFactory" class="org.springframework.orm.jpa.LocalContainerEntityManagerFactoryBean">   (权限定位类名)
 3         <property name="dataSource" ref="dataSource"/>     (依赖注入)
 4         <property name="packagesToScan " value="cn.itcast.domain"/>   (配置的扫描的包,实体类所在的包)
 5         <property name="persistenceProvider">  (JPA的实现厂家)
 6             <bean class="org.hibernate.jpa.HibernatePersistenceProvider"/>
 7         </property>
 8
 9         <!--jpa的供应商适配器-->
10         <property name="jpaVendorAdapter">
11             <bean class="org.springframework.orm.jpa.vendor.HibernateJpaVendorAdapter">
12                 <!--配置是否自动创建数据库表-->
13                 <property name="generateDdl" value="false"/>
14                 <!--指定数据库类型-->
15                 <property name="database" value="MYSQL"/>
16                 <!--数据库方言:支持的特有语法(不同数据库有不同的语法)-->
17                 <property name="databasePlatform" value="org.hibernate.dialect.MySQLDialect"/>
18                 <!--是否显示sql-->
19                 <property name="showSql" value="true"/>
20             </bean>
21         </property>
22
23         <!--jpa的方言 :高级特性(配置了谁就拥有了谁的高级特性)-->
24         <property name="jpaDialect">
25             <bean class="org.springframework.orm.jpa.vendor.HibernateJpaDialect"></bean>
26         </property>
27     </bean>
28     <!--2.创建数据库连接池-->
29     <bean id="dataSource" class="com.mchange.v2.c3p0.ComboPooledDataSource">
30         <property name="user" value="root"></property>
31         <property name="password" value="123456"></property>
32         <property name="jdbcUrl" value="jdbc:mysq1:///jpa"></property>
33         <property name="driverClass" value="com.mysql.jdbc.Driver"></property>
34     </bean>
35 (以下的不需要特别记忆)>>>
36     <!--3.整合spring dataJpa-->
37     <jpa:repositories base-package="cn.itcast.dao" transaction-manager-ref="transactionManager"
38                       entity-manager-factory-ref="entityManagerFactory"></jpa:repositories>
39     <!--4.配置事务管理器-->
40     <bean id="transactionManager" class="org.springframework.orm.jpa.JpaTransactionManager">
41         <property name="entityManagerFactory" ref="entityManagerFactory"></property>
42     </bean>
43     <!--5.声明式事务-->
44     <!--6.配置 包扫描-->
45     <context:component-scan base-package="cn.itcast"></context:component-scan>
46 </beans>
编写符合SpringDataJpa规范的dao层接口
 1 package cn.itcast.dao;
 2
 3 import cn.itcast.domain.Customer;
 4
 5 import org.springframework.data.jpa.repository.JpaRepository;
 6 import org.springframework.data.jpa.repository.JpaSpecificationExecutor;
 7 /**
 8  * 符合springDataJpa的dao层接口规范
 9  * JpaRepository<操作的实体类类型,实体类中主键属性的类型) >>>封装了基本的CRUD操作
10  * JpaSpecificationExecutor<操作的实体类类型>   >>>封装了复杂查询()
11  */
12 public interface CustomerDao extends JpaRepository<Customer, Long>, JpaSpecificationExecutor<Customer> {}
完成客户的增删改查操作
根据id查询
- findOne
em.find() 立即加载
- getOne
@Transactional:保证getOne正常运行
em.getReference() 延迟加载 >>返回的是一个客户的动态代理对象,什么时候用、什么时候查询
1 @Test
2     public void testFindOne() {
3         Customer customer = customerDao.findOne(3l);
4         System.out.println(customer);
5     }
保存和更新(sava)
- 如果没有id主键属性:>> 保存
1 @Test
2     public void testSave() {
3         Customer customer = new Customer();
4         customer.setCustname("黑马程序员");
5         customer.setCustaddress("北京");
6         customer.setCustindustry("IT教育");
7         customerDao.save(customer);
8     }
- 存在id主键属性: >> 根据id查询数据,更新数据
1 @Test
2     public void testUpdate() {
3         Customer customer = new Customer();
4         customer.setCustid(1l);
5         customer.setCustname("播客");
6         customer.setCustindustry("黑马程序员很厉害");
7         customerDao.save(customer);
8     }
根据id删除(delete)
1 @Test
2     public void testDelete() {
3         Customer customer = new Customer();
4         customerDao.delete(1l);
5     }
查询所有客户(findAll)
1 @Test
2     public void findAll(){
3         List<Customer> list = customerDao.findAll();
4         for (Customer customer : list) {
5             System.out.println(customer);
6         }
SpringDataJpa的运行过程和原理剖析
1. 通过JdkDynamicAopProxy的 invoke 方法创建了一个动态代理对象
2. simpleJpaRepository当中封装了 JPA的操作(借助JPA的api完成数据库的CRUD)
3. 通过 hibernate完成数据库操作(封装了jdbc)
复杂查询
-
借助接口中的定义好的方法完成查询
findone(id):根据id查询
测试统计查询:查询客户的总数量
1 @Test
2     public void testdount() {
3         long count = customerDao.count();//查询全部的客户数量System.out.println(count);
4         System.out.println(count);
5     }
测试:判断id为3的客户是否存在
- 可以查询以下id为3的客户
如果值为空,代表不存在,如果不为空,代表存在
- 判断数据库中id为3的客户的数量
如果数量为0,代表不存在(false),如果大于0,代表存在(true)
1 @Test
2     public void testExists() {
3         boolean exists = customerDao.exists(3l);
4         System.out.println(exists);
5     }
-
jpql的查询方式♦♦
jpql:jpa query language( jpq查询语言 )
特点:语法或关键字和sql语句类似
查询的是类和类中的属性
需要将JPQL语句配置到接口方法上
1 .特有的查询:需要在dao接口上配置方法
2. 在新添加的方法上,使用注解的形式配置jpql查询语句
3. 注解:@Query
案例:根据客户名称查询名称 >> 使用Jpql的形式查询
CustomerDao
1 public interface CustomerDao extends JpaRepository<Customer, Long>, JpaSpecificationExecutor<Customer> {
2     /**
3      * 案例:根据客户名称查询名称
4      *      使用Jpql的形式查询
5      *      jpql: from Customer where custName = ?
6      */
7     @Query(value = "from Customer where custname = ?")
8     public Customer findJpql(String custname);
9 }
JpqlTest
1 @Test
2     public void testFindJpql(){
3         Customer customer = customerDao.findJpql("传智");
4         System.out.println(customer);
5     }
案例:根据客户名称和客户id查询客户 >> 使用Jpql的形式查询
- 对于多个占位符参数: 赋值的时候,默认的情况下,占位符的位置需要和方法参数中的位置保持一致 [ custName >> String name custId >> Long id ]
@Query(value="from Customer where custName=? and custId=?")
public Customer findCustNameAndId (String name , Long id );
- 也可以指定占位符参数的位置 : ?索引的方式,指定此占位的取值来源
@Query (value=" from Customer where custName = ?2 and custId = ?1 ")
public Customer findCustNameAndId ( Long id , String name );
CustomerDao
1 @Query(value = "from Customer where custname = ? and custid = ?")
2     public Customer findCustNameAndId(String custname, long id);
JpqlTest
1 @Test
2     public void testCustNameAndId(){
3         Customer customer = customerDao.findCustNameAndId("黑马",2l);
4         System.out.println(customer);
5     }
使用jpql完成更新操作案例:根据id更新更新2号客户的名称,将名称改为“黑马程序员”
CustomerDao
1 @Query(value = " update Customer set custname = ?2 where custid = ?1 ") //代表的是进行查询
2     @Modifying //当前执行的是一个更新操作
3     //更新不需要返回值 选择void
4     public void UpdateCustomer( long custid,String custname);
JpqlTest
1 @Test
2     @Transactional //添加对事务的支持
3     @Rollback(value = false) //设置是否自动回滚
4     public void testUpdateCustomer(){
5         customerDao.UpdateCustomer(2l,"黑马程序员");
6     }
执行结束后,默认回滚事务,可以通过@Rollback 设置是否自动回滚 >> false | true
-
SQL查询方式.
1 .特有的查询:需要在dao接口上配置方法
2. 在新添加的方法上,使用注解的形式配置sql查询语句
3. 注解:@Query
value: jsql | sql
nativeQuery : fals(使用jpql查询) l true(使用本地查询:sql查询)
CustomerDao
1 @Query(value = "select * from cst_customer",nativeQuery = true)
2     public List<Object[]>findSql();
JpqlTest
1 @Test
2     public void testfindSql(){
3         List<Object[]> list = customerDao.findSql();
4         for (Object[] obj : list) {
5             System.out.println(Arrays.toString(obj));//每一个里面都还是object数组,所以需要借助Arrays.toString()方法打印数组
6         }
-
方法命名规则查询
>> 1: findBy +属性名(首字母大写)
public Customer findByCustname(String custname);
1 @Test
2     public void testNaming(){
3         Customer customer = customerDao.findByCustname("传智");
4         System.out.println(customer);
5     }
>> 2: findBy + 属性名(首字母大写)+ “查询方式”
public List<Customer> findByCustnameLike(String custname);
1 @Test
2     public void testfindByCustnameLike(){
3         List<Customer> list = customerDao.findByCustnameLike("黑马%");
4         for (Customer customer : list) {
5             System.out.println(customer);
6         } }
>> 3: findBy + 属性名(首字母大写)+ “查询方式” + “多条件的连接符(and | or)” + 属性名 + “查询方式”
使用客户名称模糊匹配和客户所属行业精准匹配的查询
public List<Customer> findByCustnameLikeAndCustindustry(String custname, String custindustry); //结果可能是一个或多个,所以选择List<Customer>
1 @Test
2     public void testFindByCustnameLikeAndCustindustry(){
3         List<Customer> list = customerDao.findByCustnameLikeAndCustindustry("黑马%","it教育");
4         for (Customer customer : list) {
5             System.out.println(customer);
6         } }
Specifications动态查询
- root :查询的根对象(查询的任何属性都可以从根对象中获取)
- cirteriaQuery:顶层查询对象,自定义查询方式(了解,一般不用)
- cirteriaBuilder:查询的构造器,封装了很多查询条件
public Predicate toPredicate(Root<Customer> root , CriteriaQuery<?> query , CriteriaBuilder cb) { } //封装查询条件
查询客户名为 “传智” 的客户
 1 @Test
 2     public void testSpec() {
       实现Specification接口( 提供泛型 :查询的对象属性)
 3         Specification<Customer> spec = new Specification<Customer>() {
       实现toPredicate方法(构造查询条件)
 4             public Predicate toPredicate(Root<Customer> root, CriteriaQuery<?> query, CriteriaBuilder cb) {
 5                 //1.获取比较的属性
 6                 Path<Object> custname = root.get("custname");
 7                 //2.构造查询条件
 8                 Predicate predicate = cb.equal(custname, "传智"); //进行精准的匹配(custname:比较的属性 , “传智”:比较的属性取值)
 9                 return predicate;
10             }};
11         Customer customer = customerDao.findOne(spec);
12         System.out.println(customer);
13     }
查询客户名为 “黑马2” 并且行业为 "it教育" 的的客户
 1 @Test
 2     public void testSpec1() {
 3         Specification<Customer> spec = new Specification<Customer>() {
 4             public Predicate toPredicate(Root<Customer> root, CriteriaQuery<?> query, CriteriaBuilder cb) {
 5                 //1.获取比较的属性
 6                 Path<Object> custname = root.get("custname");
 7                 Path<Object> custindustry = root.get("custindustry");
 8                 //2.构造查询条件
 9                 Predicate p1 = cb.equal(custname, "黑马2");
10                 Predicate p2 = cb.equal(custindustry, "it教育");
           and(与关系):满足条件1并且满足条件2    or(或关系):满足条件1或满足条件2
11                 Predicate and = cb.and(p1, p2);
12                 return and;
13             }
14         };
15         Customer customer = customerDao.findOne(spec);
16         System.out.println(customer);
17     }
案例:完成根据客户名称的模糊匹配,返回客户列表 >>客户名称以 “传智播客” 开头
默认: equal:直接得到 path对象(属性),然后进行比较即可
gt(大于),lt(小于),ge(大于等于),le(小于等于),like:得到path对象,根据path指定比较的参数类型,再去进行比较
指定参数类型:path.as(类型的字节码对象)
 1 @Test
 2     public void testSpec2() {
 3         Specification<Customer> spec = new Specification<Customer>() {
 4             public Predicate toPredicate(Root<Customer> root, CriteriaQuery<?> query, CriteriaBuilder cb) {
 5                 Path<Object> custname = root.get("custname");  //查询属性:客户名
 6                 Predicate predicate = cb.like(custname.as(String.class), "传智播客%"); //查询方式:模糊匹配
 7                 return predicate;
 8             }
 9         };
10         List<Customer> list = customerDao.findAll(spec);
11         for (Customer customer : list) {
12             System.out.println(customer);
13         } }
添加排序 >>创建排序对象,需要调用构造方法实例化sort对象
第一个参数:排序的顺序(倒序,正序)
- Sort.Direction.DESC:倒序
- Sort.Direction.ASC:升序
第二个参数:排序的属性名称
1   Sort sort = new Sort(Sort.Direction.DESC, "custid");
2   List<Customer> list = customerDao.findAll(spec, sort);
分页查询
- 不带参数的分页查询
创建PageRequest的过程中,需要调用他的构造方法传入两个参数
第一个参数:当前查询的页数(从e开始)
第二个参数:每页查询的数量
 1 @Test
 2     public void testSpec3() {
 3         Specification spec = null; //不带参数
 4         Pageable pageable = new PageRequest(0, 2);
 5         //分页查询
 6         Page<Customer> page = customerDao.findAll(null, pageable);
 7         System.out.println(page.getContent());//得到数据集合列表
 8         System.out.println(page.getTotalElements());//得到总条数
 9         System.out.println(page.getTotalPages());//得到总页数
10     }
- 带参数分页查询
 1 @Test
 2     public void testSpec4() {
 3         Specification spec = new Specification() {
 4             public Predicate toPredicate(Root root, CriteriaQuery criteriaQuery, CriteriaBuilder criteriaBuilder) {
 5                 Path custname = root.get("custname");
 6                 Predicate predicate = criteriaBuilder.equal(custname, "传智播客");
 7                 return predicate;
 8             }};
 9         Pageable pageable = new PageRequest(0, 2);
10         //分页查询
11         Page<Customer> page = customerDao.findAll(spec, pageable);
12         System.out.println(page.getContent());//得到数据集合列表
13         System.out.println(page.getTotalElements());//得到总条数
14         System.out.println(page.getTotalPages());//得到总页数
15     }