一,mvc做的事情
1,将url映射到java类或者java的方法。
2,封装用户提交的数据
3,处理请求--调用相关的业务处理--封装想相应的数据
4,将相应数据进行渲染,jsp或者html
二,spring mvc是一个轻量级的,基于请求响应的mvc框架。
三,为什么要学mvc
1,性能比struts2好,开发效率高,性能不高
2,简单,便捷,开发简单
3,天生和spring无缝集成,核心功能(ioc和aop)
4,使用约定优于配置
5,能够进行简单的junit测试
6,支持restful风格
7,异常处理
8,本地化
9,数据验证,类型转换等
10,有拦截器
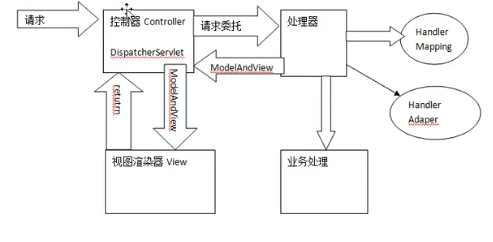
springMVC 工作流程
页面请求----》控制器(Controller DispatcherServlet)----》请求委托-----》处理器(XXController 实际类) ---->业务处理
(HandlerMapping 、 HandlerAdaper 结合后将url映射到处理器)
处理器 ----> 返回ModelAndView ----> 控制器 -----> 传递ModelAndView到 -----> 视图渲染器
视图渲染器 ----> 返回 -----> 控制器 -----> 响应页面
使用步骤
导入jar
配置web.xml文件
在web-inf下添加springmvc配置文件 [DispatcherServletName]-servlet.xml文件 例如 springmvc-servlet.xml
头文件
<?xml version="1.0" encoding="UTF-8"?>
<beans xmlns="http://www.springframework.org/schema/beans"
    xmlns:mvc="http://www.springframework.org/schema/mvc"
    xmlns:context="http://www.springframework.org/schema/context"
    xmlns:xsi="http://www.w3.org/2001/XMLSchema-instance"
    xsi:schemaLocation="
        http://www.springframework.org/schema/beans
        https://www.springframework.org/schema/beans/spring-beans.xsd
        http://www.springframework.org/schema/context
        http://www.springframework.org/schema/context/spring-context.xsd
        http://www.springframework.org/schema/mvc
        https://www.springframework.org/schema/mvc/spring-mvc.xsd">


    <!-- <mvc:annotation-driven/> -->

</beans>
web.xml
<?xml version="1.0" encoding="UTF-8"?>
<web-app xmlns:xsi="http://www.w3.org/2001/XMLSchema-instance" xmlns="http://java.sun.com/xml/ns/javaee"
xsi:schemaLocation="http://java.sun.com/xml/ns/javaee http://java.sun.com/xml/ns/javaee/web-app_2_5.xsd" id="WebApp_ID" version="2.5">
  <display-name>spring-mvc_hello</display-name>
  <servlet>
      <servlet-name>springmvc</servlet-name>
      <servlet-class>org.springframework.web.servlet.DispatcherServlet</servlet-class>
      <load-on-startup>1</load-on-startup>
  </servlet>
  <servlet-mapping>
      <servlet-name>springmvc</servlet-name>
      <url-pattern>*.do</url-pattern>
  </servlet-mapping>

  <welcome-file-list>
    <welcome-file>index.html</welcome-file>
    <welcome-file>index.htm</welcome-file>
    <welcome-file>index.jsp</welcome-file>
    <welcome-file>default.html</welcome-file>
    <welcome-file>default.htm</welcome-file>
    <welcome-file>default.jsp</welcome-file>
  </welcome-file-list>


</web-app>
springmvc-servlet.xml
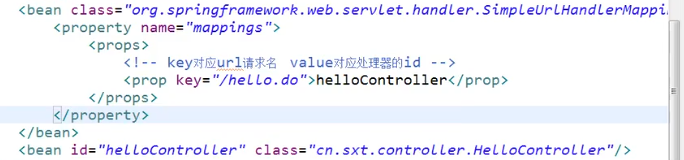
<?xml version="1.0" encoding="UTF-8"?>
<beans xmlns="http://www.springframework.org/schema/beans"
    xmlns:mvc="http://www.springframework.org/schema/mvc"
    xmlns:xsi="http://www.w3.org/2001/XMLSchema-instance"
    xsi:schemaLocation="
        http://www.springframework.org/schema/beans
        https://www.springframework.org/schema/beans/spring-beans.xsd
        http://www.springframework.org/schema/context
        http://www.springframework.org/schema/context/spring-context.xsd
        http://www.springframework.org/schema/mvc
        https://www.springframework.org/schema/mvc/spring-mvc.xsd">

    <!-- 配置handler-mappering -->
    <bean class="org.springframework.web.servlet.handler.BeanNameUrlHandlerMapping"></bean>
    <!-- 配置handler-Adapter -->
    <bean class="org.springframework.web.servlet.mvc.SimpleControllerHandlerAdapter"></bean>
    <!-- 配置渲染器 -->
    <bean id="viewResolver" class="org.springframework.web.servlet.view.UrlBasedViewResolver">
        <property name="viewClass" value="org.springframework.web.servlet.view.JstlView"/>
        <!-- 渲染名称 试图的前缀 -->
        <property name="prefix" value="/WEB-INF/jsp/"/>
        <!-- 渲染名称 试图的后缀 -->
        <property name="suffix" value=".jsp"/>
    </bean>
    <!-- 配置请求 和 处理器 -->
    <bean name="/hello.do" class="cn.zys.controller.HelloController"></bean>
    <!-- <mvc:annotation-driven/> -->

</beans>
HelloController.java
package cn.zys.controller;

import javax.servlet.http.HttpServletRequest;
import javax.servlet.http.HttpServletResponse;

import org.springframework.web.servlet.ModelAndView;
import org.springframework.web.servlet.mvc.Controller;

public class HelloController implements Controller{

    @Override
    public ModelAndView handleRequest(HttpServletRequest arg0, HttpServletResponse arg1) throws Exception {
        // TODO Auto-generated method stub
        ModelAndView mv =new ModelAndView();
        mv.addObject("msg", "hello spring");
        mv.setViewName("hello");
        return mv;
    }

}
测试地址: http://127.0.0.1:8080/spring-mvc_hello/hello.do
注解springmvc开发----------------------------------------------------------------------------------------------
导入jar
commons-logging-1.1.1.jar
jstl.jar
spring-aop-5.1.9.RELEASE.jar
spring-beans-5.1.9.RELEASE.jar
spring-context-5.1.9.RELEASE.jar
spring-core-5.1.9.RELEASE.jar
spring-expression-5.1.9.RELEASE.jar
spring-web-5.1.9.RELEASE.jar
spring-webmvc-5.1.9.RELEASE.jar
web.xml配置
<?xml version="1.0" encoding="UTF-8"?>
<web-app xmlns:xsi="http://www.w3.org/2001/XMLSchema-instance" xmlns="http://xmlns.jcp.org/xml/ns/javaee" xsi:schemaLocation="http://xmlns.jcp.org/xml/ns/javaee http://xmlns.jcp.org/xml/ns/javaee/web-app_3_1.xsd" id="WebApp_ID" version="3.1">
  <display-name>spring-mvc_zhujie</display-name>

  <servlet>
      <servlet-name>springmvc</servlet-name>
      <servlet-class>org.springframework.web.servlet.DispatcherServlet</servlet-class>

      <init-param>
          <param-name>contextConfigLocation</param-name>
          <param-value>classpath:mvc.xml</param-value>
      </init-param>

      <load-on-startup>1</load-on-startup>
  </servlet>
  <servlet-mapping>
      <servlet-name>springmvc</servlet-name>
      <url-pattern>*.do</url-pattern>
  </servlet-mapping>

  <welcome-file-list>
    <welcome-file>index.html</welcome-file>
    <welcome-file>index.htm</welcome-file>
    <welcome-file>index.jsp</welcome-file>
    <welcome-file>default.html</welcome-file>
    <welcome-file>default.htm</welcome-file>
    <welcome-file>default.jsp</welcome-file>
  </welcome-file-list>
</web-app>
HelloController.java
package cn.zys.controller;

import javax.servlet.http.HttpServletRequest;
import javax.servlet.http.HttpServletResponse;

import org.springframework.stereotype.Controller;
import org.springframework.web.bind.annotation.RequestMapping;
import org.springframework.web.servlet.ModelAndView;

@Controller

public class HelloController {
    @RequestMapping("/hello")
    public ModelAndView hello(HttpServletRequest req,HttpServletResponse resp){
        ModelAndView vm = new ModelAndView();
        //封装要显示在试图上的数据
        vm.addObject("msg","hello spring");
        //封装视图数据名称
        vm.setViewName("hello");
        return vm;
    }
}
mvc.xml
<?xml version="1.0" encoding="UTF-8"?>
<beans xmlns="http://www.springframework.org/schema/beans"
    xmlns:mvc="http://www.springframework.org/schema/mvc"
    xmlns:context="http://www.springframework.org/schema/context"
    xmlns:xsi="http://www.w3.org/2001/XMLSchema-instance"
    xsi:schemaLocation="
        http://www.springframework.org/schema/beans
        https://www.springframework.org/schema/beans/spring-beans.xsd
        http://www.springframework.org/schema/context
        http://www.springframework.org/schema/context/spring-context.xsd
        http://www.springframework.org/schema/mvc
        https://www.springframework.org/schema/mvc/spring-mvc.xsd">

    <!-- 配置渲染器 -->
    <bean id="viewResolver" class="org.springframework.web.servlet.view.UrlBasedViewResolver">
        <property name="viewClass" value="org.springframework.web.servlet.view.JstlView"/>
        <!-- 渲染名称 视图的前缀 -->
        <property name="prefix" value="/WEB-INF/jsp/"/>
        <!-- 渲染名称 视图的后缀 -->
        <property name="suffix" value=".jsp"/>
    </bean>
     <!-- spring扫描的包 -->
    <context:component-scan base-package="cn.zys.controller"></context:component-scan>

    <!-- <mvc:annotation-driven/> -->

</beans>
测试地址 http://127.0.0.1:8080/spring-mvc_zhujie/hello.do
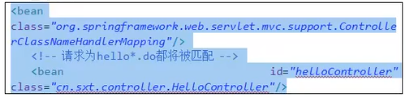
Controller 几种配置
1,为url分配bean
2,为url匹配bean