第一次写技术性博文,以前都只是写一些生活感想,记录一些生活发生的事情。
博主大三学生一枚,目前学习JS一年多,还处于学习阶段,有什么说的不好的希望大牛指点下,由于第一次写博文,排版什么的有待改进,希望大家谅解。
这是我学习H5 canvas以来写的第一个游戏,第一次接触H5游戏呢,是看了一位大哥码农终结者的博客(http://www.cnblogs.com/chaogex/)(基础要求有点高,等以后一定要研究透彻),正好实验室老师准备喊我写H5的游戏游戏,看了很多canvas的API和大神vajoy(http://www.cnblogs.com/vajoy/)写的canvas教程,打好canvas的基础以后又看了HTML5研究小组第二期技术讲座《手把手制作HTML5游戏》的视频,下了源代码学习了很长一段时间,那段时间一直反反复复的写这个游戏,慢慢领悟很多游戏的概念,然后就有种成竹在胸的感觉(别逗了,我还什么都不懂),当然这种成就感是非常重要的,动力来源于此。这就是我游戏开发到现在将近3个星期的学习经历,分享给大家,希望对大家有用。

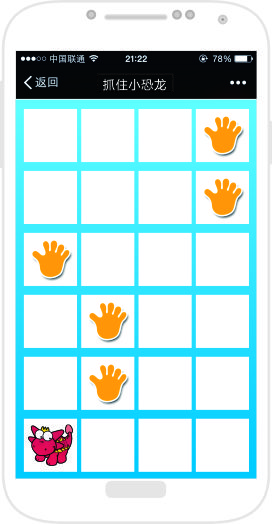
游戏做出来是这个效果,玩过黑白钢琴的人应该知道,这和那个游戏差不多。
一。图片渲染
写过游戏的人都知道大多数游戏都是以背景加精灵的方式开展的,这里渲染图片是经常要用的,本人自己封装了一个图片渲染的方法,希望大家给点意见。
/**
 * author yh
 * @param imgCount 图片数组 必须有id和src
 * @param callback 回调函数
 * @returns 每个精灵的canvas和context
 */
function getImg(imgCount,callback){
    var total = imgCount.length,
        load = 0,
        img = {},
        w = 0,
        h = 0;

    for(var i = 0;i < total;i++){
        var id = imgCount[i].id;
        var imgs = new Image();
        imgs.src = imgCount[i].src;

        //设置canvas的width和height
        if(imgCount[i].width && imgCount[i].height){
            w = imgCount[i].width;
            h = imgCount[i].height;
        }else{
            w = imgs.width;
            h = imgs.height;
        }

        img["cvs"+id] = document.createElement("canvas");
        img["cvs"+id].width = w;
        img["cvs"+id].height = h;
        img["ct"+id] = img["cvs"+id].getContext("2d");
        img["ct"+id].drawImage(imgs,0,0,imgs.width,imgs.height,0,0,w,h);

        imgs.onload = function(){
            load++;
       delete imgs;
       imgs = undefined;

        };
    };

    if(typeof callback == "function"){
        var me = this;
        function check(){
            if(load >= total)
                callback.call(me,arguments);
            else
                setTimeout(check,300);
        }
        check();
    };
    return img;
}
因为考虑到性能的问题,所以每次加载一个图片都创建一个canvas来画这张图片,当然我们并不需要显示这个canvas,只为以后每次画图的时候可以直接用getImageData和putImageData方法来直接取canvas中的data就可以得到图片,而不用每次都去画图,等下会为大家展示画图的过程,这个方法的调用是这样的:
var global = getImg([
                  {id:"bg",src:"img/bg.png",game.width,height:game.height},
                  {id:"over",src:"img/over.jpg",game.width,height:game.height},
                  {id:"di1",src:"img/1.png",w-20,height:h-20},
                  {id:"di2",src:"img/2.png",w-20,height:h-20},
                  {id:"di3",src:"img/3.png",w-20,height:h-20},
                  {id:"di4",src:"img/4.png",w-20,height:h-20},
                  {id:"di5",src:"img/5.png",w-20,height:h-20},
                  {id:"di6",src:"img/6.png",w-20,height:h-20},
                  {id:"di7",src:"img/7.png",w-20,height:h-20},
                  {id:"di8",src:"img/8.png",w-20,height:h-20},
                  {id:"di9",src:"img/9.png",w-20,height:h-20},
                {id:"hand",src:"img/hand.png",w-20,height:h-20},
              ],callback);
定义一个变量来存取getImg的返回对象,下面是画图的方法:
/**
 * 根据id来获取global中的canvas和context,进行get和put ImageDa
 * target放所有canvas的对象,上面的global
 * context为目标画布的上下文
 * x y 为初始坐标
 * id 为精灵的id
 */
function draw(target,context,x,y,id){
    var canvas = target["cvs" + id],
        ct = target["ct" + id],
        data = ct.getImageData(0,0,canvas.width,canvas.height);

    context.putImageData(data,x,y);
}
这个方法封装得不是很好,因为很多时候呢我们都需要精灵的动画,就是要随时改变截取图片的x和y,这里封装的只是这个游戏中用到的方法,因为这个游戏中无精灵动画。
二。游戏类
当图片渲染完以后呢我们需要定义一个game类,在这里写代码,为了提高性能,用的原型方法,这样每次加载JS文件的时候只加载一份,不浪费资源。
因为本人没有github(还没用过这么高端的东西),只能在这里贴代码了。
function Game(option){
    //对象扩展
    for(var attr in option)
        this[attr]  = option[attr];
}
Game.prototype = {
    canvas:null,
    ct:null,
    999,
    height:999,
    x:0,
    y:0,
    n:4,
    m:6,
    FPS:30,
    sleep:0,
    arr:[],
    dinoArr:[],
    click:0,
    init : function(){
        this.canvas = document.createElement("canvas");
        this.canvas.width = this.width;
        this.canvas.height = this.height;
        document.body.appendChild(this.canvas);

        this.ct = this.canvas.getContext("2d");
        this.sleep = (1000/this.FPS)|0;
        this.time = Date.now();
        this.moused = false;
    },
    update:function(){
        this.initDraw();
        this.move();
    },
    initDraw : function(){
        this.drawImg(global,this.ct,0,0,"bg");
        var y = 0;
        for(var i = 0;i<this.m;i++){
             var x = 0;
             var ran = ((Math.random()*4)|0);

            for(var j = 0;j<this.n;j++){
                this.ct.fillStyle = "#fff";
                this.ct.fillRect(x,y,97,97);

                if(j == ran && i != this.m-1){
                    this.drawImg(global,this.ct,x+10,y+10,"hand");
                    this.arr.push(j);
                }else if(j == ran && i == this.m-1){
                    this.drawImg(global,this.ct,x+10,y+10,"di6");
                }
                x += 100;
            }
            y += 100;
        }
        this.listener(this.arr);
    },

    drawImg : function(target,context,x,y,id){
        var canvas = target["cvs" + id];
        var    ctx = target["ct" + id];
        var data = ctx.getImageData(0,0,canvas.width,canvas.height);

        context.putImageData(data,x,y);
    }
}
上面这些代码呢完成了初始化,我们先把每个效果实现以后再进行动画,下面我们会设置鼠标事件,还有主循环,这是个很重要的东西,一般一个游戏只有一个主循环。
listener : function(arr,reloadImg){
        this.arr = arr;

        //获取边界
        var me = this,
            index = this.arr.pop();

        this.dinoArr.push(index);
        this.reloadImg = reloadImg;
        if(this.reloadImg){
            console.log(this.dinoArr)
            var dinoIndex = this.dinoArr.shift();
            this.y = 500 + 10;
            this.x = dinoIndex*100 + 10;
        }

        var targetX = index*100 + 50,
            targetY = 450;

        //添加鼠标事件,判断范围
        this.canvas.onmouseup = function(event){
            var    cx =  event.clientX - me.canvas.offsetLeft - targetX,
                cy = event.clientY - me.canvas.offsetTop - targetY;

            if(-50<=cx&& cx <= 50 && -50<= cy && cy<= 50){
                me.moused = true;
            }
        };
    },
    move : function(){
        var me = this;
        this.mainLoop = setInterval(function(){
            me.loop();
        },this.sleep);
    },
    loop : function(){
        var time = document.getElementById("time");
        Time = (Date.now() - this.time)/1000;
        time.innerHTML = Time;
        document.getElementById("grade").innerHTML = this.click;
        if(this.moused){
            this.moused = false;
            this.click++;
            this.reload();
        }
        if(Time >= 20){
            this.drawImg(global,this.ct,0,0,"over");
            clearInterval();
            alert("你一共抓了"+this.click+"只恐龙");
        }
    },
    reload:function(){
        var data = this.ct.getImageData(0,0,this.width,this.height);
        this.ct.clearRect(0,0,this.width,this.height);
        this.reDraw();
        this.ct.putImageData(data,0,100);
        this.reDino();
    },
    reDino:function(){
        var random = (Math.random()*9+1)|0,
            id = null;
        switch(random){
            case 1:id = "di1";break;
            case 2:id = "di2";break;
            case 3:id = "di3";break;
            case 4:id = "di4";break;
            case 5:id = "di5";break;
            case 6:id = "di6";break;
            case 7:id = "di7";break;
            case 8:id = "di8";break;
            case 9:id = "di9";break;
        }
        this.drawImg(global,this.ct,this.x,this.y,id);
    },
    reDraw:function(){
        this.drawImg(global,this.ct,0,0,"bg");
        var y = 0;
        var x = 0;
        var ran = ((Math.random()*4)|0);

        for(var j = 0;j<this.n;j++){
            this.ct.fillStyle = "#fff";
            this.ct.fillRect(x,y,97,97);

            if(j == ran){
                this.drawImg(global,this.ct,x+10,y+10,"hand");
                this.arr.unshift(j);
            }
            x += 100;
        }

        this.reloadImg = true;
        this.listener(this.arr,this.reloadImg);
    }
每次点击以后我们会得到一份当前context的getImageData,然后设置为putImageData(data,0,100),然后在第一行重新渲染一次,再把数组中的值更新,这样就可以看起来是个动画。比较水平有限,大牛看看就当玩玩,如果水平和我差不多的话可以学习下,以后我们也能成为大牛,也会分享更多更好的东西。
最近呢还在研究司徒正美的《JS框架设计》,这本书给我第一感觉就是思想高度太高,第一次看就把我看郁闷了,看了第一章什么都没看懂,然后我又从头到尾依次把不懂得新概念百度了一遍,历经2天终于把第一章搞完,慢慢的越来越喜欢这本书,写了一个自己框架的种子模块,打算等自己的框架出来以后再去找工作,到时候应该会更轻松一些。