昨日内容回顾


外键的变种三种关系:
 多对一:
    左表的多 对右表一 成立
    左边的一 对右表多 不成立

    foreign key(从表的id) refreences 主表的(id)

 多对多

    建立第三张表(foreign key)

 一对一
    foreign key+unique

单表查询:
(1)
    where
    group by: 分组,通过某个字段 select age,count(1) from user group by age having avg(age)>25;
    having
    order by
    limit 1,2

多表查询:
    内连接:select * from t1 inner join t2 ; 笛卡尔积
            select * from t1 inner join t2 on t2.tid = t1.id;
    左连接:select * from t1 left join t2 on t2.tid = t1.id;
    右连接
    全连接

    #select name from department where id in
    (select dep_id from employee where age > 25);

    select * from employee inner join department
    on employee.dep_id = department.id where age > 25;

子查询
#查询平均年龄在25岁以上的部门名
select * from department
    where id in
      (select dep_id from employee group by dep_id having avg(age) > 25);

查询每个部门最新入职的那位员工
select employee.id,employee.name from employee inner join
(select post,max(hire_date) as new_date from employee group by post) as A
on employee.post=A.post
where employee.hire_date = A.new_date;
取第一名,limit 0,1
取第二名,limit 1,1
取第三名,limit 2,1
一、子查询
1:子查询是将一个查询语句嵌套在另一个查询语句中。
2:内层查询语句的查询结果,可以为外层查询语句提供查询条件。
3:子查询中可以包含:IN、NOT IN、ANY、ALL、EXISTS 和 NOT EXISTS等关键字
4:还可以包含比较运算符:= 、 !=、> 、<等
例子:
(1)带in关键字的子查询
1. 查询平均年龄在25岁以上的部门名
步骤分解:
先找出平均年龄大于25岁的的员工部门id
mysql> select dep_id from employee group by dep_id having avg(age) > 25;
+--------+
| dep_id |
+--------+
|    201 |
|    202 |
+--------+
2 rows in set (0.00 sec)
根据部门id,到部门表department中查询。就可以找到部门名,需要用到上面的查询结果。
使用where id in (...) 可以得到多条结果。
select id,name from department
    where id in
        (select dep_id from employee group by dep_id having avg(age) > 25);

#返回结果:
+------+--------------+
| id   | name         |
+------+--------------+
|  201 | 人力资源     |
|  202 | 销售         |
+------+--------------+
2. 查看技术部员工姓名
步骤分解:
先到部门表中查询技术部的id
mysql> select id from department where name='技术';
+------+
| id   |
+------+
|  200 |
+------+
1 row in set (0.00 sec)
根据技术部id,到员工表查询对应的员工姓名
select name from employee
    where dep_id in
        (select id from department where name='技术');

#返回结果:
+--------+
| name   |
+--------+
| egon   |
| nvshen |
+--------+
3. 查看不足1人的部门名
步骤分解:
先从员工表中查询所有的部门id
mysql> select dep_id from employee group by dep_id;
+--------+
| dep_id |
+--------+
|    200 |
|    201 |
|    202 |
|    204 |
+--------+
4 rows in set (0.00 sec)
使用where id not in (...) 查询不包含上面的id,就可以得到没有员工的部门
select name from department
    where id not in
        (select dep_id from employee group by dep_id);

#返回结果:
+--------+
| name   |
+--------+
| 运营   |
+--------+
(2)带比较运算符的子查询
#比较运算符:=、!=、>、>=、<、<=、<>
#查询大于所有人平均年龄的员工名与年龄
mysql> select name,age from employee where age > (select avg(age) from employee);
+---------+------+
| name    | age  |
+---------+------+
| alex    |   48 |
| wupeiqi |   38 |
+---------+------+

#查询大于部门内平均年龄的员工名、年龄
思路:
      (1)先对员工表(employee)中的人员分组(group by),查询出dep_id以及平均年龄。
       (2)将查出的结果作为临时表,再对根据临时表的dep_id和employee的dep_id作为筛选条件将employee表和临时表进行内连接。
       (3)最后再将employee员工的年龄是大于平均年龄的员工名字和年龄筛选。


mysql> select t1.name,t1.age from employee as t1
             inner join
            (select dep_id,avg(age) as avg_age from employee group by dep_id) as t2
            on t1.dep_id = t2.dep_id
            where t1.age > t2.avg_age;

#返回结果
+------+------+
| name | age  |
+------+------+
| alex |   48 |
+------+------+
(3)带EXISTS关键字的子查询
#EXISTS关字键字表示存在。在使用EXISTS关键字时,内层查询语句不返回查询的记录。而是返回一个真假值。True或False
#当返回True时,外层查询语句将进行查询;当返回值为False时,外层查询语句不进行查询
#department表中存在dept_id=203,Ture
mysql> select * from employee  where exists (select id from department where id=200);
+----+----------+--------+------+--------+
| id | name     | sex    | age  | dep_id |
+----+----------+--------+------+--------+
|  1 | egon     | male   |   18 |    200 |
|  2 | alex     | female |   48 |    201 |
|  3 | wupeiqi  | male   |   38 |    201 |
|  4 | yuanhao  | female |   28 |    202 |
|  5 | nvshen   | male   |   18 |    200 |
|  6 | xiaomage | female |   18 |    204 |
+----+----------+--------+------+--------+
#department表中存在dept_id=205,False
mysql> select * from employee  where exists (select id from department where id=204);
Empty set (0.00 sec)
小练习:
查询每个部门最新入职的那位员工
#删除已存在的表
mysql> drop table employee;
Query OK, 0 rows affected (0.19 sec)

#创建表
create table employee(
id int not null unique auto_increment,
name varchar(20) not null,
sex enum('male','female') not null default 'male', #大部分是男的
age int(3) unsigned not null default 28,
hire_date date not null,
post varchar(50),
post_comment varchar(100),
salary double(15,2),
office int, #一个部门一个房间
depart_id int
);

#查看表结构
mysql> desc employee;
+--------------+-----------------------+------+-----+---------+----------------+
| Field        | Type                  | Null | Key | Default | Extra          |
+--------------+-----------------------+------+-----+---------+----------------+
| id           | int(11)               | NO   | PRI | NULL    | auto_increment |
| name         | varchar(20)           | NO   |     | NULL    |                |
| sex          | enum('male','female') | NO   |     | male    |                |
| age          | int(3) unsigned       | NO   |     | 28      |                |
| hire_date    | date                  | NO   |     | NULL    |                |
| post         | varchar(50)           | YES  |     | NULL    |                |
| post_comment | varchar(100)          | YES  |     | NULL    |                |
| salary       | double(15,2)          | YES  |     | NULL    |                |
| office       | int(11)               | YES  |     | NULL    |                |
| depart_id    | int(11)               | YES  |     | NULL    |                |
+--------------+-----------------------+------+-----+---------+----------------+

#插入记录
#三个部门:教学,销售,运营
insert into employee(name,sex,age,hire_date,post,salary,office,depart_id) values
('egon','male',18,'20170301','老男孩驻沙河办事处外交大使',7300.33,401,1), #以下是教学部
('alex','male',78,'20150302','teacher',1000000.31,401,1),
('wupeiqi','male',81,'20130305','teacher',8300,401,1),
('yuanhao','male',73,'20140701','teacher',3500,401,1),
('liwenzhou','male',28,'20121101','teacher',2100,401,1),
('jingliyang','female',18,'20110211','teacher',9000,401,1),
('jinxin','male',18,'19000301','teacher',30000,401,1),
('成龙','male',48,'20101111','teacher',10000,401,1),

('歪歪','female',48,'20150311','sale',3000.13,402,2),#以下是销售部门
('丫丫','female',38,'20101101','sale',2000.35,402,2),
('丁丁','female',18,'20110312','sale',1000.37,402,2),
('星星','female',18,'20160513','sale',3000.29,402,2),
('格格','female',28,'20170127','sale',4000.33,402,2),

('张野','male',28,'20160311','operation',10000.13,403,3), #以下是运营部门
('程咬金','male',18,'19970312','operation',20000,403,3),
('程咬银','female',18,'20130311','operation',19000,403,3),
('程咬铜','male',18,'20150411','operation',18000,403,3),
('程咬铁','female',18,'20140512','operation',17000,403,3)
;
小练习题答案
#最新入职,使用max(hire_date) 就可以获取。
#先查询每个部门最新入职的部门名和日期
mysql> select post,max(hire_date) as new_date from employee group by post;
+-----------------------------------------+------------+
| post                                    | new_date   |
+-----------------------------------------+------------+
| operation                               | 2016-03-11 |
| sale                                    | 2017-01-27 |
| teacher                                 | 2015-03-02 |
| 老男孩驻沙河办事处外交大使              | 2017-03-01 |
+-----------------------------------------+------------+
4 rows in set (0.00 sec)
#根据上一个结果,使用子查询得到员工姓名
select t1.post,t1.name,t1.hire_date from employee as t1
inner join
(select post,max(hire_date) as new_date from employee group by post) as t2
on t1.post=t2.post;

#返回结果
+-----------------------------------------+------------+------------+
| post                                    | name       | hire_date  |
+-----------------------------------------+------------+------------+
| 老男孩驻沙河办事处外交大使              | egon       | 2017-03-01 |
| teacher                                 | alex       | 2015-03-02 |
| teacher                                 | wupeiqi    | 2013-03-05 |
| teacher                                 | yuanhao    | 2014-07-01 |
| teacher                                 | liwenzhou  | 2012-11-01 |
| teacher                                 | jingliyang | 2011-02-11 |
| teacher                                 | jinxin     | 1900-03-01 |
| teacher                                 | 成龙       | 2010-11-11 |
| sale                                    | 歪歪       | 2015-03-11 |
| sale                                    | 丫丫       | 2010-11-01 |
| sale                                    | 丁丁       | 2011-03-12 |
| sale                                    | 星星       | 2016-05-13 |
| sale                                    | 格格       | 2017-01-27 |
| operation                               | 张野       | 2016-03-11 |
| operation                               | 程咬金     | 1997-03-12 |
| operation                               | 程咬银     | 2013-03-11 |
| operation                               | 程咬铜     | 2015-04-11 |
| operation                               | 程咬铁     | 2014-05-12 |
+-----------------------------------------+------------+------------+

#最后取出2个临时表中,最新入职日期相等的结果
select t1.post,t1.name,t1.hire_date from employee as t1
inner join
(select post,max(hire_date) as new_date from employee group by post) as t2
on t1.post=t2.post
where t1.hire_date=t2.new_date;

#返回结果
+-----------------------------------------+--------+------------+
| post                                    | name   | hire_date  |
+-----------------------------------------+--------+------------+
| 老男孩驻沙河办事处外交大使              | egon   | 2017-03-01 |
| teacher                                 | alex   | 2015-03-02 |
| sale                                    | 格格   | 2017-01-27 |
| operation                               | 张野   | 2016-03-11 |
+-----------------------------------------+--------+------------+
4 rows in set (0.00 sec)
一、MySQl创建用户和授权
权限管理
我们知道我们的最高权限管理者是root用户,它拥有着最高的权限操作。包括select、update、delete、update、grant等操作。那么一般情况在公司之后DBA工程师会创建一个用户和密码,让你去连接数据库的操作,并给当前的用户设置某个操作的权限(或者所有权限)。那么这时就需要我们来简单了解一下:
- 如何创建用户和密码
- 给当前的用户授权
- 移除当前用户的权限
如果你想创建一个新的用户,则需要以下操作:
1.必须使用root进入到mysql数据库下
mysql -u root

mysql> use mysql
Database changed
2.对新用户增删改
(1). 创建用户
1.创建用户:
# 指定ip:192.118.1.1的mjj用户登录
create user 'mjj'@'192.118.1.1' identified by '123';
# 指定ip:192.118.1.开头的mjj用户登录
create user 'mjj'@'192.118.1.%' identified by '123';
# 指定任何ip的mjj用户登录
create user 'mjj'@'%' identified by '123';
(2). 删除用户
#语法:
drop user '用户名'@'IP地址';

#举例:删除192.118.1.1的mjj用户登录
mysql> drop user 'mjj'@'192.118.1.1';
Query OK, 0 rows affected (0.00 sec)
注意:删除用户不能直接对mysql.user表直接进行操作。
delete from mysql.user where User='mjj';
必须使用drop user删除才行。
(3). 修改用户
#格式:
rename user '用户名'@'IP地址' to '新用户名'@'IP地址';

#举例:修改192.118.1.开头的mjj用户的信息
mysql> rename user 'mjj'@'192.118.1.%' to 'msc'@'192.168.10.%';
Query OK, 0 rows affected (0.00 sec)
(4). 修改密码
#格式:
SET PASSWORD FOR '用户名'@'IP地址' = PASSWORD('新密码');

#举例:修改msc的密码
mysql> SET PASSWORD FOR 'msc'@'192.168.10.%' = PASSWORD('123');
Query OK, 0 rows affected, 1 warning (0.00 sec)
3.对当前的用户授权管理
(1). 查看权限
#语法:
show grants for '用户'@'IP地址'

#举例:查询msc用户
mysql> show grants for 'msc'@'192.168.10.%';
+--------------------------------------------+
| Grants for msc@192.168.10.%                |
+--------------------------------------------+
| GRANT USAGE ON *.* TO 'msc'@'192.168.10.%' |
+--------------------------------------------+
1 row in set (0.00 sec)
(2). 授权
#语法:
1.授权指定权限
grant 权限1,权限2,权限3 on 数据库名.表名 to "用户"@'IP地址';

#举例:给msc用户授权查询,插入,更新 权限。
mysql> grant select ,insert,update on db1.employee to "msc"@'192.168.10.%';
Query OK, 0 rows affected (0.00 sec)


2.授权所有权限
grant all privileges  on 数据库名.表名 to "用户"@'IP地址';

#举例:给msc用户所有权限
mysql> grant all privileges on db1.employee to "msc"@'192.168.10.%';
Query OK, 0 rows affected (0.00 sec)
注意:不能对同一个用户,多次授权不同的权限。否则会有多条授权规则,最终以最严格的权限为准。
(3). 取消权限
#语法:
#取消指定权限
revoke 权限1 on 数据库名.表名 from "用户"@'IP地址';

#举例:取消msc用户的查询权限
mysql> revoke select on db1.employee from "msc"@'192.168.10.%';
Query OK, 0 rows affected (0.00 sec)

#取消所有权限
revoke all privileges on 数据库名.表名 from "用户"@'IP地址';

#举例:取消msc用户employee表所有权限
mysql> revoke all privileges on db1.employee from "msc"@'192.168.10.%';
Query OK, 0 rows affected (0.00 sec)

#举例:取消msc用户所有数据库所有表的权限
mysql> revoke all privileges on *.* from "msc"@'192.168.10.%';
Query OK, 0 rows affected (0.00 sec)
ps:在公司中,一般情况下是DBA工程师来做这些授权工作。给你一个用户名和密码,你来连接就可以了。
4.MySql备份命令行操作
备份1:数据表结构+数据
#注意:在是mysql>外面执行
C:Usersxiao>mysqldump -u root -p db1 > db1.sql
Enter password:

#从上面可以看出,当前执行命令的路径为C:Usersxiao,进入此目录,就可以看到db1.sql文件了。
备份2:数据表结构
C:Usersxiao>mysqldump -u root -p -d db1 > db2.sql
Enter password:

#进入C:Usersxiao目录,就可以看到文件db2.sql
恢复:导入现有的数据到某个数据库
#进入数据库
C:Usersxiao>mysql -u root -p
Enter password:

#1.先创建一个新的数据库
mysql> create database db10;
#退出
mysql> exit;
Bye

#2.将已有的数据库文件导入到db10数据库中
C:Usersxiao>mysqldump -u root -p -d db10 < db1.sql
Enter password:
-- MySQL dump 10.13  Distrib 5.7.22, for Win64 (x86_64)
...
-- Dump completed on 2018-06-14 17:46:50

出现completed 就表示导入完成
二、掌握Navicat的基本使用
本节重点:
-
掌握Navicat的基本使用
# PS:在生产环境中操作MySQL数据库还是推荐使用命令行工具mysql,但在我们自己开发测试时,可以使用可视化工具Navicat,以图形界面的形式操作MySQL数据库
官网下载:https://www.navicat.com/en/products/navicat-for-mysql
链接:https://pan.baidu.com/s/1vQI__mrJhTjGz0fAdY_pUA 密码:frjg
官网的要钱,百度网盘是破解版的,只支持64位
32位系统,请访问链接:https://pan.baidu.com/s/1bpo5mqj
下面主要演示64位版本的。
1.安装软件
解压navicat11.1.12_premium_cs_x64.rar文件。先执行navicat111_premium_cs_x64.exe文件

后面的步骤,直接下一步,下一步,就可以了。
选择桌面图标,右键属性-->快捷方式-->打开文件位置,就能打开安装路径。
默认的安装路径为C:Program FilesPremiumSoftNavicat Premium
将压缩包里面的navicat.exe复制到此路径,选择覆盖!这样就完成了破解。注意不要更新!!!
2.连接MySQL
双击桌面图标,点击连接-->MySQL
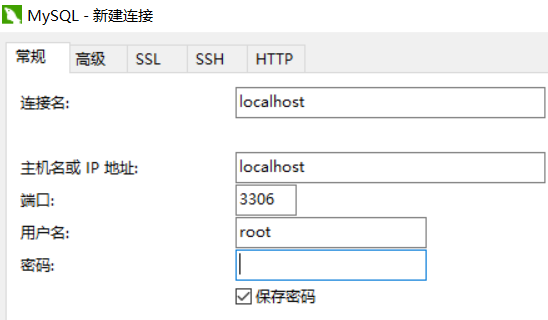
选项说明:
连接名:名字可以随便写
主机或IP地址:如果mysql在本机上,直接写localhost即可。如果是远程的,请填写IP地址。
端口:mysql默认端口为3306,如果服务器有更改过,请填写对应的端口号。
用户名:授权的用户
密码:认证密码,由于密码为空,这里就不用填写了。
点击下面的连接测试,测试ok之后,点击确定
双击localhost,就可以看到此用户能访问的数据库

3.新建数据库
右键-->新建数据库

输入数据库名,字符集选择utf-8

这样数据库就创建好了

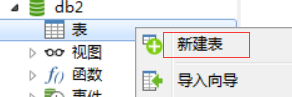
4.新建表
双击db2,选择新建表
输入字段名id-->选择数据类型int-->选择主键-->勾选自动递增-->勾选无符号

新增第二个字典name
点击添加栏位-->输入字段名name-->选择varchar-->长度为20
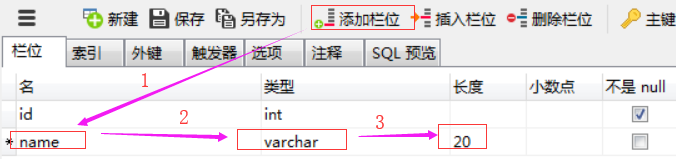
最后点击上面的保存按钮,输入表名t1

5.插入数据
双击t1表,就打开表了

添加数据张三

点击下面的 √,一条数据就插入好了

点击左边的 + ,可以继续添加数据
添加3条数据

6. 新建查询
点击上方的查询

点击下面的新建查询

输入sql语句,点击运行,结果就出来了!

注意:
批量加注释:ctrl+?键
批量去注释:ctrl+shift+?键
7. 备份库/表
备份库
选中数据库db2-->右键转储SQL文件-->结构和数据

先选择保存位置,这里选择的是桌面,点击保存

提示已经完成了,点击关闭按钮。千万不要点击开始,否则它会重新导出一次!

桌面就有一个db2.sql文件
备份表
选择要备份的表-->右键转储SQL文件-->结构和数据
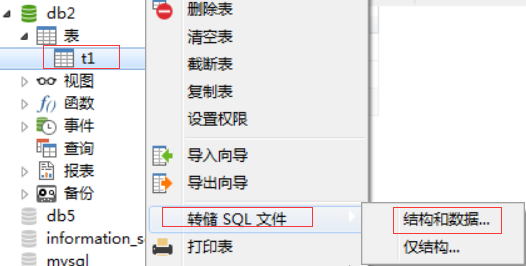
保存位置为桌面,点击保存

点击关闭按钮,桌面会有一个t1.sql文件

需要掌握基本的操作,就是上面列举上面那些。
三、pymysql模块的使用
本节重点:
-
pymysql的下载和使用
-
execute()之sql注入
-
增、删、改:conn.commit()
-
查:fetchone、fetchmany、fetchall
一、pymysql的下载和使用
之前我们都是通过MySQL自带的命令行客户端工具mysql来操作数据库,那如何在python程序中操作数据库呢?这就用到了pymysql模块,该模块本质就是一个套接字客户端软件,使用前需要事先安装。
(1)pymysql模块的下载
pip3 install pymysql
(2)pymysql的使用
准备基础数据
#创建数据库db2,如果已存在,请忽略
CREATE DATABASE db2 DEFAULT CHARACTER SET utf8 COLLATE utf8_general_ci;

#创建用户表
CREATE TABLE `userinfo` (
  `id` int(10) unsigned NOT NULL AUTO_INCREMENT COMMENT 'id',
  `username` varchar(20) NOT NULL COMMENT '用户名',
  `password` varchar(32) NOT NULL COMMENT '密码',
  PRIMARY KEY (`id`)
) ENGINE=InnoDB DEFAULT CHARSET=utf8 COMMENT='用户表';

#插入一条数据
INSERT INTO `db2`.`userinfo` (`id`, `username`, `password`) VALUES ('1', 'qiwei', '123');
实现:使用Python实现用户登录,如果用户存在则登录成功(假设该用户已在数据库中)
#导入模块
import pymysql

user = input('请输入用户名:')
pwd = input('请输入密码:')

# 1.连接
conn = pymysql.connect(host='127.0.0.1', port=3306, user='root', password='', db='db2', charset='utf8')

# 2.创建游标
cursor = conn.cursor()

# 注意%s需要加引号
sql = "select * from userinfo where username='%s' and password='%s'" % (user, pwd)
print('sql语句:',sql)

# 3.执行sql语句
cursor.execute(sql)

result = cursor.execute(sql)  # 执行sql语句,返回sql查询成功的记录数目
print('返回记录数:',result)

# 关闭连接,游标和连接都要关闭
cursor.close()
conn.close()

if result:
    print('登陆成功')
else:
    print('登录失败')
使用pycharm执行py文件,效果如下:
先来一个错误的

再来一个正确的

查看connect源代码
def __init__(self, host=None, user=None, password="",
                 database=None, port=0, unix_socket=None,
                 charset='', sql_mode=None,
                 read_default_file=None, conv=None, use_unicode=None,
                 client_flag=0, cursorclass=Cursor, init_command=None,
                 connect_timeout=10, ssl=None, read_default_group=None,
                 compress=None, named_pipe=None, no_delay=None,
                 autocommit=False, db=None, passwd=None, local_infile=False,
                 max_allowed_packet=16*1024*1024, defer_connect=False,
                 auth_plugin_map={}, read_timeout=None, write_timeout=None,
                 bind_address=None, binary_prefix=False):
有几个参数是必须的host、port、user、password、db
charset最好也要加上,否则无法识别中文!
二、execute()之sql注入
1、sql注入之:用户存在,绕过密码
格式:
存在的用户名' -- 任意字符
或者
存在的用户名' #任意字符
注意:存在的用户名后面,必须有一个单引号。--后面必须有一个空格
代码依然保持不变,输入一个已存在的用户。
测试#

测试--

结果提示登录成功
将sql复制到navicat软件中执行,发现是有结果的。因为 --空格 表示注释。

2、sql注入之:用户不存在,绕过用户与密码
格式:
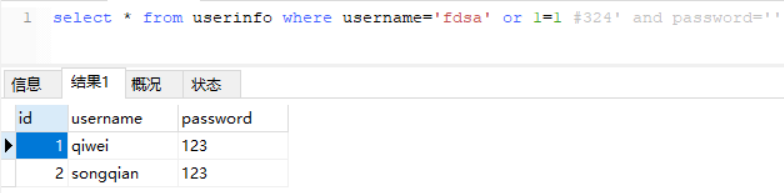
任意用户名' or 1=1 -- 任意字符
或者
任意用户名' or 1=1 #任意字符
注意:
1.任意用户名后面必须有一个单引号,
2.必须有or关键字
3.必须保证等式成立,可以是2=2
4.--后面必须有空格
5.关键字or和等式之间,必须要有空格
先测试--

再测试#

将sql复制到navicat软件中执行,发现是有结果的

因为1=1等式成立,直接忽略用户名判断,所以返回表中的所有数据
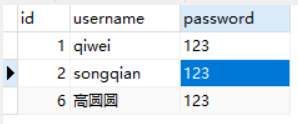
用户表再增加一条数据,再次执行同样的sql。它就是返回表中的所有数据。
解决方法:
# 原来是我们对sql进行字符串拼接
# sql="select * from userinfo where name='%s' and password='%s'" %(username,pwd)
# print(sql)
# result=cursor.execute(sql)

#改写为(execute帮我们做字符串拼接,我们无需且一定不能再为%s加引号了)
sql="select * from userinfo where name=%s and password=%s" #!!!注意%s需要去掉引号,因为pymysql会自动为我们加上
result=cursor.execute(sql,[user,pwd]) #pymysql模块自动帮我们解决sql注入的问题,只要我们按照pymysql的规矩来。
查看execute源代码
    def execute(self, query, args=None):
        """Execute a query

        :param str query: Query to execute.

        :param args: parameters used with query. (optional)
        :type args: tuple, list or dict

        :return: Number of affected rows
        :rtype: int

        If args is a list or tuple, %s can be used as a placeholder in the query.
        If args is a dict, %(name)s can be used as a placeholder in the query.
        """
:type args: tuple, list or dict
看上面这句,类型可以是元组,列表,字典。下面分别演示!
元组
#导入模块
import pymysql

user = input('请输入用户名:')
pwd = input('请输入密码:')

# 1.连接
conn = pymysql.connect(host='127.0.0.1', port=3306, user='root', password='', db='db2', charset='utf8')

# 2.创建游标
cursor = conn.cursor()

# 注意%s 表示占位符
sql = "select * from userinfo where username = %s and password = %s"
print('sql语句:',sql)

# 3.执行sql语句,返回sql查询成功的记录数
result = cursor.execute(sql,(user,pwd))
print('返回记录数:',result)

# 关闭连接,游标和连接都要关闭
cursor.close()
conn.close()

#判断结果
if result:
    print('登陆成功')
else:
    print('登录失败')
列表
#导入模块
import pymysql

user = input('请输入用户名:')
pwd = input('请输入密码:')

# 1.连接
conn = pymysql.connect(host='127.0.0.1', port=3306, user='root', password='', db='db2', charset='utf8')

# 2.创建游标
cursor = conn.cursor()

# 注意%s 表示占位符
sql = "select * from userinfo where username = %s and password = %s"
print('sql语句:',sql)

# 3.执行sql语句,返回sql查询成功的记录数
result = cursor.execute(sql,[user,pwd])
print('返回记录数:',result)

# 关闭连接,游标和连接都要关闭
cursor.close()
conn.close()

#判断结果
if result:
    print('登陆成功')
else:
    print('登录失败')
字典
#导入模块
import pymysql

user = input('请输入用户名:')
pwd = input('请输入密码:')

# 1.连接
conn = pymysql.connect(host='127.0.0.1', port=3306, user='root', password='', db='db2', charset='utf8')

# 2.创建游标
cursor = conn.cursor()

# 注意%(username)s 里面的username是字典的key,必须一一对应才行,否则报错!
sql = "select * from userinfo where username = %(username)s and password = %(password)s"
print('sql语句:',sql)

# 3.执行sql语句,返回sql查询成功的记录数
result = cursor.execute(sql,{'username':user,'password':pwd})
print('返回记录数:',result)

# 关闭连接,游标和连接都要关闭
cursor.close()
conn.close()

#判断结果
if result:
    print('登陆成功')
else:
    print('登录失败')
再次使用sql注入方式登录,就会登录失败

三、增、删、改:conn.commit()
commit()方法:在数据库里增、删、改的时候,必须要进行提交,否则插入的数据不生效。
增加
插入一条数据
#!/usr/bin/env python
# -*- coding: utf-8 -*-
#导入模块
import pymysql

user = input('请输入用户名:')
pwd = input('请输入密码:')

# 1.连接
conn = pymysql.connect(host='127.0.0.1', port=3306, user='root', password='', db='db2', charset='utf8')

# 2.创建游标
cursor = conn.cursor()

sql = "insert into userinfo(username,password) values (%s,%s)"
print('sql语句:',sql)

# 3.执行sql语句,返回sql查询成功的记录数
#插入一条数据
result = cursor.execute(sql,(user,pwd))
print('返回记录数:',result)

#一定记得commit
conn.commit()

# 关闭连接,游标和连接都要关闭
cursor.close()
conn.close()

#判断结果
if result:
    print('ok')
else:
    print('error')
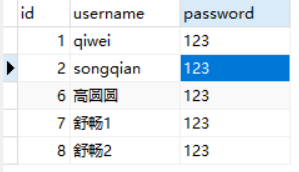
执行效果如下:

查看表记录
同时插入多条数据
#导入模块
import pymysql

user = input('请输入用户名:')
pwd = input('请输入密码:')

# 1.连接
conn = pymysql.connect(host='127.0.0.1', port=3306, user='root', password='', db='db2', charset='utf8')

# 2.创建游标
cursor = conn.cursor()

sql = "insert into userinfo(username,password) values (%s,%s)"
print('sql语句:',sql)

# 3.执行sql语句,返回sql查询成功的记录数
#同时插入多条数据
result = cursor.executemany(sql,[(user+'1',pwd),(user+'2',pwd)])
print('返回记录数:',result)

#一定记得commit
conn.commit()

# 关闭连接,游标和连接都要关闭
cursor.close()
conn.close()

#判断结果
if result:
    print('ok')
else:
    print('error')
执行效果如下:

查看表记录
改
#!/usr/bin/env python
# -*- coding: utf-8 -*-
#导入模块
import pymysql

user = input('请输入用户名:')
pwd = input('请输入密码:')

# 1.连接
conn = pymysql.connect(host='127.0.0.1', port=3306, user='root', password='', db='db2', charset='utf8')

# 2.创建游标
cursor = conn.cursor()

sql = "update userinfo set username = %s  where id = '8'"
print('sql语句:',sql)

# 3.执行sql语句,返回sql查询成功的记录数
#修改一条数据
result = cursor.execute(sql,user)
print('返回记录数:',result)

#一定记得commit
conn.commit()

# 关闭连接,游标和连接都要关闭
cursor.close()
conn.close()

#判断结果
if result:
    print('ok')
else:
    print('error')
执行效果如下:

查看表记录
删
#!/usr/bin/env python
# -*- coding: utf-8 -*-
#导入模块
import pymysql

#删除不需要执行这2个input了
# user = input('请输入用户名:')
# pwd = input('请输入密码:')

# 1.连接
conn = pymysql.connect(host='127.0.0.1', port=3306, user='root', password='', db='db2', charset='utf8')

# 2.创建游标
cursor = conn.cursor()

sql = "delete from userinfo  where id = '2'"
print('sql语句:',sql)

# 3.执行sql语句,返回sql查询成功的记录数
#删除一条数据
result = cursor.execute(sql)
print('返回记录数:',result)

#一定记得commit
conn.commit()

# 关闭连接,游标和连接都要关闭
cursor.close()
conn.close()

#判断结果
if result:
    print('ok')
else:
    print('error')
input不需要执行了,直接注释掉即可
执行效果如下:

查看表记录
四、查:fetchone、fetchmany、fetchall
fetchone():获取下一行数据,第一次为首行;
fetchall():获取所有行数据源
fetchmany(4):获取4行数据
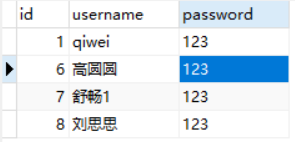
查看一下表内容:
mysql> select * from userinfo;
+----+-----------+----------+
| id | username  | password |
+----+-----------+----------+
|  1 | qiwei     | 123      |
|  6 | 高圆圆    | 123      |
|  7 | 舒畅1     | 123      |
|  8 | 刘思思    | 123      |
+----+-----------+----------+
4 rows in set (0.00 sec)
使用fetchone():
#导入模块
import pymysql

# 1.连接
conn = pymysql.connect(host='localhost', port=3306, user='root', password='', db='db2', charset='utf8')

# 2.创建游标
cursor = conn.cursor()

sql = 'select * from userinfo'
cursor.execute(sql)

# 查询第一行的数据
row = cursor.fetchone()
print(row) # (1, 'qiwei', '123')

# 查询第二行数据
row = cursor.fetchone()
print(row) # (6, '高圆圆', '123')

# 4.关闭游标
cursor.close()

# 5.关闭连接
conn.close()
使用fetchall():
#导入模块
import pymysql

# 1.连接
conn = pymysql.connect(host='localhost', port=3306, user='root', password='', db='db2', charset='utf8')

# 2.创建游标
cursor = conn.cursor()

sql = 'select * from userinfo'
cursor.execute(sql)

# 获取所有的数据
rows = cursor.fetchall()
print(rows)

# 4.关闭游标
cursor.close()

# 5.关闭连接
conn.close()
运行结果如下:

默认情况下,我们获取到的返回值是元组,只能看到每行的数据,却不知道每一列代表的是什么,这个时候可以使用以下方式来返回字典,每一行的数据都会生成一个字典:
cursor = conn.cursor(cursor=pymysql.cursors.DictCursor) #在实例化的时候,将属性cursor设置为pymysql.cursors.DictCursor
再次运行,结果如下:
[{'id': 1, 'username': 'qiwei', 'password': '123'}, {'id': 6, 'username': '高圆圆', 'password': '123'}, {'id': 7, 'username': '舒畅1', 'password': '123'}, {'id': 8, 'username': '刘思思', 'password': '123'}]
在fetchone示例中,在获取行数据的时候,可以理解开始的时候,有一个行指针指着第一行的上方,获取一行,它就向下移动一行,所以当行指针到最后一行的时候,就不能再获取到行的内容,所以我们可以使用如下方法来移动行指针:
cursor.scroll(1,mode='relative')  # 相对当前位置移动
cursor.scroll(2,mode='absolute') # 相对绝对位置移动
第一个值为移动的行数,整数为向下移动,负数为向上移动,mode指定了是相对当前位置移动,还是相对于首行移动
举例:
#导入模块
import pymysql

# 1.连接
conn = pymysql.connect(host='localhost', port=3306, user='root', password='', db='db2', charset='utf8')

# 2.创建游标
cursor = conn.cursor(cursor=pymysql.cursors.DictCursor)

sql = 'select * from userinfo'
cursor.execute(sql)

# 查询第一行的数据
row = cursor.fetchone()
print(row) # {'password': '123', 'username': 'qiwei', 'id': 1}

# 查询第二行数据
row = cursor.fetchone()
print(row) # {'username': '高圆圆', 'password': '123', 'id': 6}

cursor.scroll(-1,mode='relative') #设置之后,光标相对于当前位置往前移动了一行,所以打印的结果为第二行的数据
row = cursor.fetchone()
print(row)  # {'id': 6, 'username': '高圆圆', 'password': '123'}

cursor.scroll(0,mode='absolute') #设置之后,光标相对于首行没有任何变化,所以打印的结果为第一行数据
row = cursor.fetchone()
print(row)  # {'id': 1, 'username': 'qiwei', 'password': '123'}

# 4.关闭游标
cursor.close()

# 5.关闭连接
conn.close()
执行结果为:

fetchmany():
#导入模块
import pymysql

# 1.连接
conn = pymysql.connect(host='localhost', port=3306, user='root', password='', db='db2', charset='utf8')

# 2.创建游标
cursor = conn.cursor(cursor=pymysql.cursors.DictCursor)

sql = 'select * from userinfo'
cursor.execute(sql)

# 获取2条数据
rows = cursor.fetchmany(2)
print(rows)

# 4.关闭游标
cursor.close()

# 5.关闭连接
conn.close()
执行结果为:
[{'id': 1, 'username': 'qiwei', 'password': '123'}, {'id': 6, 'username': '高圆圆', 'password': '123'}]