一、基于注解和xml配置
1.概述
我们需要理解基于IOC配置和xml配置实现的功能都是一样的,都是为了降低程序的耦合性,只是配置的方式不同罢了。在实际开发过程中我们根据公司习惯和个人习惯决定具体用那种方式实现,因此两种方式都需要掌握。
2.环境搭建
前面我们已经搭建好环境,因此我们在原来的基础进行修改即可。
3.使用@Component 注解配置管理的资源
我们在持久层实现类和业务层实现类中添加注释,代码如下:
package com.xhbjava.dao.impl;

import java.util.List;

import org.apache.commons.dbutils.QueryRunner;
import org.apache.commons.dbutils.handlers.BeanHandler;
import org.apache.commons.dbutils.handlers.BeanListHandler;
import org.springframework.stereotype.Component;

import com.xhbjava.dao.IAccountDao;
import com.xhbjava.pojo.Account;

/**
 * 用户持久层接口实现类
 *
 * @author mr.wang
 *
 */
@Component("accountDao")
public class AccountDaoImpl implements IAccountDao {


@Autowired
private QueryRunner runner;

    @Override
    public void saveAccount(Account account) {
        try {
            runner.update("insert into account(name,money)values(?,?)", account.getName(), account.getMmoney());
        } catch (Exception e) {
            throw new RuntimeException(e);
        }
    }

    @Override
    public void updateAccount(Account account) {
        try {
            runner.update("update account set name=?,money=? where id=?", account.getName(), account.getMmoney(),
                    account.getId());
        } catch (Exception e) {
            throw new RuntimeException(e);
        }

    }

    @Override
    public void deleteAccount(Integer accountId) {
        try {
            runner.update("delete from  account  where id=?", accountId);
        } catch (Exception e) {
            throw new RuntimeException(e);
        }
    }

    @Override
    public Account findById(Integer accountId) {
        try {
            return runner.query("select * from  account  where id=?", new BeanHandler<Account>(Account.class),
                    accountId);
        } catch (Exception e) {
            throw new RuntimeException(e);
        }
    }

    @Override
    public List<Account> findAll() {
        try {
            return runner.query("select * from  account", new BeanListHandler<Account>(Account.class));
        } catch (Exception e) {
            throw new RuntimeException(e);
        }
    }

}
package com.xhbjava.service.impl;

import java.util.List;

import org.springframework.stereotype.Component;

import com.xhbjava.dao.IAccountDao;
import com.xhbjava.pojo.Account;
import com.xhbjava.service.IAccountService;

/**
 * 账户业务层接口实现类
 *
 * @author mr.wang
 *
 */
@Component("accountService")
public class AccountServiceImpl implements IAccountService {
   @Autowired
    private IAccountDao accountDao;
    @Override
    public void saveAccount(Account account) {
        accountDao.saveAccount(account);
    }

    @Override
    public void updateAccount(Account account) {
        accountDao.updateAccount(account);
    }

    @Override
    public void deleteAccount(Integer accountId) {
        accountDao.deleteAccount(accountId);
    }

    @Override
    public Account findById(Integer accountId) {
        return accountDao.findById(accountId);
    }

    @Override
    public List<Account> findAll() {
        return accountDao.findAll();
    }

}
4.修改bean.xml
<?xml version="1.0" encoding="UTF-8"?> <beans xmlns="http://www.springframework.org/schema/beans" xmlns:context="http://www.springframework.org/schema/context" xmlns:xsi="http://www.w3.org/2001/XMLSchema-instance" xsi:schemaLocation="http://www.springframework.org/schema/beans http://www.springframework.org/schema/beans/spring-beans.xsd http://www.springframework.org/schema/context http://www.springframework.org/schema/context/spring-context.xsd"> <!-- 注意:基于注解整合时,导入约束时需要多导入一个 context 名称空间下的约束。 --> <!-- 配置Spring创建容器时需要扫码的包 --> <context:component-scan base-package="com.xhbjava"></context:component-scan> <!-- 配置 QueryRunner --> <bean id="runner" class="org.apache.commons.dbutils.QueryRunner" scope="prototype"> <constructor-arg name="ds" ref="dataSource" /> </bean> <!-- 配置数据源 --> <bean id="dataSource" class="com.mchange.v2.c3p0.ComboPooledDataSource"> <property name="driverClass" value="com.mysql.jdbc.Driver"></property> <property name="jdbcUrl" value="jdbc:mysql://localhost:3306/ssm?useSSL=true&serverTimezone=UTC&characterEncoding=UTF-8" /> <property name="user" value="root"></property> <property name="password" value="root"></property> </bean> </beans>
5.测试
@Test
    public void testDelete() {
        //1.获取容易
        ApplicationContext ac = new ClassPathXmlApplicationContext("bean.xml");
        //2.得到业务层对象
        IAccountService as = ac.getBean("accountService",IAccountService.class);
        //3.执行方法
        as.deleteAccount(5);
    }
二、常用注解介绍
1.创建对象
相当于:<bean id="" class="">
- @Component
作用:把资源让 spring 来管理。相当于在 xml 中配置一个 bean。
属性:value:指定 bean 的 id。如果不指定 value 属性,默认 bean 的 id 是当前类的类名。首字母小写。
- @Controller @Service @Repository
这三个注解都是针对一个的衍生注解,他们的作用及属性都是一模一样的,他们的作用和@Component相同。只不过这三个注解作用更加明确语义化:
@Controller :一般用于表现等注解;
@Service:一般用于业务层注解;
@Repository:一般用于持久层注解。
如果注解中有且只有一个属性要赋值时且名称是 value ,value 在赋值是可以不写。
2.用于注入数据
相当于:<property name="" ref="">或<property name="" value="">
- @Autowired
自动按照类型注入。当使用注解注入属性时,set方法可以省略。它只能注入其他 bean 类型。当有多个
类型匹配时,使用要注入的对象变量名称作为 bean 的 id,在 spring 容器查找,找到了也可以注入成功。找不到
就报错。 - @Qualifier
在自动按照类型注入的基础之上,再按照 Bean 的 id 注入。它在给字段注入时不能独立使用,必须和@Autowire 一起使用;但是给方法参数注入时,可以独立使用。
属性:value:指定 bean 的 id。
- @Resource
直接按照 Bean 的 id 注入。它也只能注入其他 bean 类型。
属性:name:指定 bean 的 id。
- @Value
注入基本数据类型和 String 类型数据的。
属性:value:用于指定值。
3.用于改变作用范围
相当于:<bean id="" class="" scope="">
- @Scope
指定 bean 的作用范围。
属性:value:指定范围的值。取值:singleton prototype request session globalsession
4.和生命周期相关
相当于:<bean id="" class="" init-method="" destroy-method="" />
- @PostConstruct
用于指定初始化方法。
- @PreDestroy
用于指定销毁方法。
三、XML和注解如何选择
基于注解的 spring IoC 配置中,bean 对象的特点和基于 XML 配置是一模一样的。它们优缺对比如下:
XML优点:修改时,不用改源码。不涉及重新编译和部署。
注解优点:配置简单,维护方便(我们找到类,就相当于找到了对应的配置)。
Spring 管理 Bean 方式的比较如下图所示:

四、Spring 纯注解配置
1.概述
为了简化开发和配置方便,我们尝试摆脱写bean.xml这种方式,我们所有的配置用注解来实现。
我们之前简化了xml的配置,<context:component-scan base-package="com.xhbjava"></context:component-scan>如果这一步配置也能用注解,那么离完全注解配置又近了一步。
另外我们配置数据源的也需要注解来实现。
<!-- 配置 QueryRunner --> <bean id="runner" class="org.apache.commons.dbutils.QueryRunner" scope="prototype"> <constructor-arg name="ds" ref="dataSource" /> </bean> <!-- 配置数据源 --> <bean id="dataSource" class="com.mchange.v2.c3p0.ComboPooledDataSource"> <property name="driverClass" value="com.mysql.jdbc.Driver"></property> <property name="jdbcUrl" value="jdbc:mysql://localhost:3306/ssm?useSSL=true&serverTimezone=UTC&characterEncoding=UTF-8" /> <property name="user" value="root"></property> <property name="password" value="root"></property> </bean>
2.新注解说明
@Configuration注解:
用于指定当前类是一个 spring 配置类,当创建容器时会从该类上加载注解。获取容器时需要使用
AnnotationApplicationContext(有@Configuration 注解的类.class)。
属性:value:用于指定配置类的字节码。
该注解可以指定类替换配置文件。
@ComponentScan注解:
用于指定 spring 在初始化容器时要扫描的包。作用和在 spring 的 xml 配置文件中的:<context:component-scan base-package="com.xhbjava"/>是一样的。
属性:basePackages:用于指定要扫描的包。和该注解中的 value 属性作用一样。
具体类代码如下:
package com.xhbjava.config;

import org.springframework.context.annotation.ComponentScan;
import org.springframework.context.annotation.Configuration;

/**
 * spring 的配置类,相当于 bean.xml 文件
 * @author mr.wang
 *
 */
@Configuration
@ComponentScan("com.xhbjava")
public class SpringConfiguration {

}
现在我们还需解决数据源配置问题。我们学习下面的注解进行问题解决。
@Bean注解:
该注解只能写在方法上,表明使用此方法创建一个对象,并且放入 spring 容器。
属性:name:给当前@Bean 注解方法创建的对象指定一个名称(即 bean 的 id)。
我们用此注解解决数据源配置问题,代码示例如下:
package com.xhbjava.config;
/**
 * 连接数据库的配置类
 * @author mr.wang
 *
 */

import javax.sql.DataSource;

import org.apache.commons.dbutils.QueryRunner;
import org.springframework.context.annotation.Bean;

import com.mchange.v2.c3p0.ComboPooledDataSource;

public class JdbcConfig {
    /**
     * 创建一个数据源,并存入Spring容器
     *
     * @return
     */
    @Bean(name = "dataSource")
    public DataSource createDateSource() {
        try {
            ComboPooledDataSource ds = new ComboPooledDataSource();
            ds.setUser("root");
            ds.setPassword("root");
            ds.setDriverClass("com.mysql.jdbc.Driver");
            ds.setJdbcUrl(
                    "jdbc:mysql://localhost:3306/ssm?useSSL=true&serverTimezone=UTC&characterEncoding=UTF-8");
            return ds;
        } catch (Exception e) {
            throw new RuntimeException(e);
        }

    }

    @Bean(name = "runner")
    public QueryRunner createQueryRunner(DataSource dataSource) {
        return new QueryRunner(dataSource);
    }

}
我们已经把数据源和 QueryRunner 从配置文件中移除了,此时可以删除 bean.xml 了。我们摆脱了配置文件,但是我们关于数据库连接的账号密码等都写到类里去了,我们需要解决这个问题。
@PropertySource注解:
该注解用于加载.properties 文件中的配置。例如我们配置数据源时,可以把连接数据库的信息写到properties 配置文件中,就可以使用此注解指定 properties 配置文件的位置。
属性:value[]:用于指定 properties 文件位置。如果是在类路径下,需要写上 classpath:
代码示例如下:
package com.xhbjava.config;
/**
 * 连接数据库的配置类
 * @author mr.wang
 *
 */

import javax.sql.DataSource;

import org.apache.commons.dbutils.QueryRunner;
import org.springframework.beans.factory.annotation.Value;
import org.springframework.context.annotation.Bean;
import org.springframework.context.annotation.PropertySource;

import com.mchange.v2.c3p0.ComboPooledDataSource;

@PropertySource("classpath:jdbc.properties")
public class JdbcConfig {
    @Value("${jdbc.driver}")
    private String driver;
    @Value("${jdbc.url}")
    private String url;
    @Value("${jdbc.username}")
    private String username;
    @Value("${jdbc.password}")
    private String password;

    /**
     * 创建一个数据源,并存入 spring 容器中
     *
     * @return
     */
    @Bean(name = "dataSource")
    public DataSource createDataSource() {
        try {
            ComboPooledDataSource ds = new ComboPooledDataSource();
            ds.setDriverClass(driver);
            ds.setJdbcUrl(url);
            ds.setUser(username);
            ds.setPassword(password);
            return ds;
        } catch (Exception e) {
            throw new RuntimeException(e);
        }
    }

    @Bean(name = "runner")
    public QueryRunner createQueryRunner(DataSource dataSource) {
        return new QueryRunner(dataSource);
    }

}
我们对SpringConfiguration 和JdbcConfig都已经完成配置,但是这个两个类如何建立关系呢?我们看下一个注解。
@Import注解:
用于导入其他配置类,在引入其他配置类时,可以不用再写@Configuration 注解,当然写上也没事。
属性:value[]:用于指定其他配置类的字节码。
示例代码如下:
package com.xhbjava.config;

import org.springframework.context.annotation.ComponentScan;
import org.springframework.context.annotation.Configuration;
import org.springframework.context.annotation.Import;

/**
 * spring 的配置类,相当于 bean.xml 文件
 * @author mr.wang
 *
 */
@Configuration
@ComponentScan("com.xhbjava")
@Import({ JdbcConfig.class})
public class SpringConfiguration {

}
package com.xhbjava.config;
/**
 * 连接数据库的配置类
 * @author mr.wang
 *
 */

import javax.sql.DataSource;

import org.apache.commons.dbutils.QueryRunner;
import org.springframework.beans.factory.annotation.Value;
import org.springframework.context.annotation.Bean;
import org.springframework.context.annotation.Configuration;
import org.springframework.context.annotation.PropertySource;

import com.mchange.v2.c3p0.ComboPooledDataSource;
@Configuration
@PropertySource("classpath:jdbc.properties")
public class JdbcConfig {
    @Value("${jdbc.driver}")
    private String driver;
    @Value("${jdbc.url}")
    private String url;
    @Value("${jdbc.username}")
    private String username;
    @Value("${jdbc.password}")
    private String password;

    /**
     * 创建一个数据源,并存入 spring 容器中
     *
     * @return
     */
    @Bean(name = "dataSource")
    public DataSource createDataSource() {
        try {
            ComboPooledDataSource ds = new ComboPooledDataSource();
            ds.setDriverClass(driver);
            ds.setJdbcUrl(url);
            ds.setUser(username);
            ds.setPassword(password);
            return ds;
        } catch (Exception e) {
            throw new RuntimeException(e);
        }
    }

    @Bean(name = "runner")
    public QueryRunner createQueryRunner(DataSource dataSource) {
        return new QueryRunner(dataSource);
    }

}
3.测试
我们通过注解获取容器,代码示例如下:
ApplicationContext ac =
new AnnotationConfigApplicationContext(SpringConfiguration.class);
测试代码:
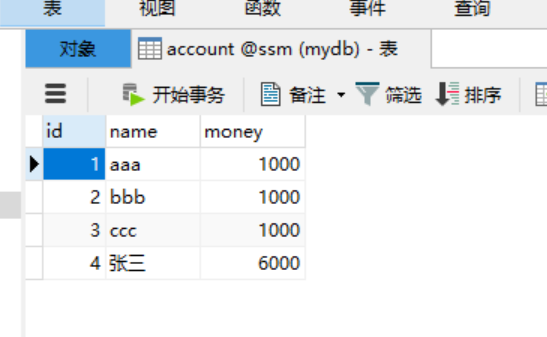
package com.xhbjava.test;

import org.junit.Test;
import org.springframework.context.ApplicationContext;
import org.springframework.context.support.ClassPathXmlApplicationContext;

import com.xhbjava.pojo.Account;
import com.xhbjava.service.IAccountService;

public class testSpring {
    @Test
    public void testDelete() {
        //1.获取容易
        ApplicationContext ac = new ClassPathXmlApplicationContext("bean.xml");
        //2.得到业务层对象
        IAccountService as = ac.getBean("accountService",IAccountService.class);
        Account account = new Account();
        account.setId(4);
        account.setName("张三");
        account.setMmoney(6000f);
        //3.执行方法
        as.updateAccount(account);

    }

}
五、Spring整合Junit
1、概述
我们在之前测试类编写中都需要重复如下代码:
ApplicationContext ac = new ClassPathXmlApplicationContext("bean.xml");
IAccountService as = ac.getBean("accountService",IAccountService.class);
该代码用于获取容器,不写的话会报空指针错误。
2、解决问题思路
针对上述问题,如果程序能自动帮我们创建容器我们就无须手动创建了,问题也就解决了。我们都了解junit 单元测试的原理但是junit 是无法实现的,因为它自己都无法知晓我们是否使用了 spring 框架,更不用说帮我们创建 spring 容器了。不过junit 给我们暴露了一个注解,可以让我们替换掉它的运行器。这时,我们需要依靠 spring 框架,因为它提供了一个运行器,可以读取配置文件(或注解)来创建容器。我们只需要告诉它配置文件在哪里就可以了。
3、配置步骤
第一步在maven依赖中引入 junit 的必备 jar 包,见之前的maven配置文件。
第二步使用@RunWith 注解替换原有运行器。代码示例如下:
@RunWith(SpringJUnit4ClassRunner.class)
public class AccountServiceTest {
}
第三步使用@ContextConfiguration 指定 spring 配置文件的位置。代码示例如下:
@ContextConfiguration 注解:
locations 属性:用于指定配置文件的位置。如果是类路径下,需要用 classpath:表明
classes 属性:用于指定注解的类。当不使用 xml 配置时,需要用此属性指定注解类的位置。
@RunWith(SpringJUnit4ClassRunner.class)
@ContextConfiguration(locations= {"classpath:bean.xml"})
public class AccountServiceTest {
}
第四步使用@Autowired 给测试类中的变量注入数据。完整代码示例如下:
package com.xhbjava.test;

import org.junit.Test;
import org.junit.runner.RunWith;
import org.springframework.beans.factory.annotation.Autowired;
import org.springframework.test.context.ContextConfiguration;
import org.springframework.test.context.junit4.SpringJUnit4ClassRunner;

import com.xhbjava.pojo.Account;
import com.xhbjava.service.IAccountService;
@RunWith(SpringJUnit4ClassRunner.class)
@ContextConfiguration(locations= {"classpath:bean.xml"})
public class testSpring {
    @Autowired
    private IAccountService as ;
    @Test
    public void testDelete() {
        Account account = new Account();
        account.setId(4);
        account.setName("张三");
        account.setMmoney(6500f);
        as.updateAccount(account);

    }

}