1、Struts2拦截器的体系结构
Struts2拦截器最大的特点是其透明性,即用户感觉不到它的存在,但我们在使用Struts2框架时,拦截器时时刻刻都在帮助我们处理很多事情。
包括:
文件上传
表单校验
自动将预定义好的表单参数值封装给Action使用等
说明:
每一个Action请求都包装在一系列的拦截器内部。拦截器可以动态拦截Action。拦截器所提供的机制可以保证在执行一个Action的前后执行拦截器中的代码,也可以在一个Action执行前阻止其执行。
2、Struts2内建拦截器
Struts2内建了大量的拦截器,这些拦截器以name-class形式配置在struts-default.xml中。
name是拦截器的名称,即以后使用该拦截器的唯一标识
class则指定了该拦截器的实现类
如果我们定义的package继承了Struts2的默认struts-default包,则可以自行使用下面定义的拦截器。
<package name="hello" namespace="/" extends="struts-default">
        <action name="HelloWorld" class="com.pxy.struts2.action.HelloWorld">
            <result name="success">/HelloWorld.jsp</result>
        </action>
</package>
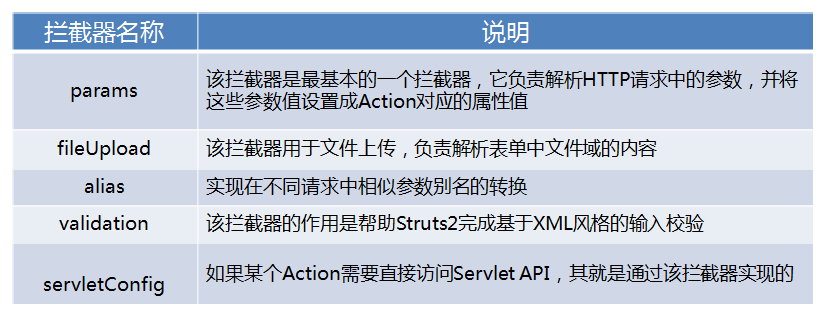
常见的struts2内建拦截器介绍见下表

在处理与系统逻辑相关的通用功能时,需要通过自定义拦截器来实现。
如权限控制,日志记录
一、自定义基于类范围的拦截器
创建自定义拦截器步骤如下:
1、创建类SimpleAction,继承于ActionSupport,定义operator方法,用于获取当前系统时间
public class SimpleAction extends ActionSupport{
     public String operator(){
          System.out.println("开始执行SimpleAction类的operator()时间为:"+DateTimeUtils.getStringDate(new Date()));
          return  "operator";
     }
}
2、创建拦截器类SimpleInterceptor,继承于AbstracInterceptor,该类用于对SimpleAction类进行拦截
public class SimpleInterceptor extends AbstractInterceptor{
         public String intercept(ActionInvocation  invocation) throws Exception {
              //打印出在执行SimpleAction类之前执行拦截器的时间
              System.out.println("在执行SimpleAction之前开始执行SimpleInterceptor的intercept()的时间为:"+DateTimeUtils.getStringDate(new Date()));

              //调用下一个拦截器,如果没有拦截器就调用匹配的Action
              String  result=invocation.invoke();  //该result是方法的返回值 本例中result=operator
              //打印出在执行SimpleAction类之后执行拦截器的时间
              System.out.println("在执行SimpleAction之后开始执行SimpleInterceptor的intercept()的时间为:"+DateTimeUtils.getStringDate(new Date()));
              return result;
           }
    }
3、在struts.xml文件中,配置SimpleAction和SimpleIntercept的相关信息
<interceptors>
    <!-- 自定义拦截器 -->
    <interceptor name="simple"class="包名.SimpleInterceptor"/>
</interceptors>
    <!-- 需要拦截的Action -->
<action name="simple_*"  class="包名.SimpleAction" method="{1}">
    <result name="{1}">/success.jsp</result>
    <interceptor-ref name="simple"/>  <!-- 将拦截器别名为Simple的拦截器注给SimpleAction -->
    <interceptor-ref name="defaultStack"/> <!-- 配置默认拦截器 -->
</action>
注意:如果为Action指定一个拦截器,则系统默认的拦截器就会失效,导致Struts2的很多功能无法使用。所以Action在指定了一个拦截器后,还需要将默认的拦截器注册给Action。Struts2默认拦截器的别名为defaultStack。
4、浏览器输入:http://localhost:8080/项目名/simple_operator.action
二、方法拦截器
在上面的类拦截器中,我们可以在SimpleAction再定义一个方法query()方法,然后访问:http://localhost:8080/项目名/simple_query.action,即可对query方法拦截。
更细粒度的控制方法拦截,则需要进行如下的配置:
<interceptors>
        <interceptor name="simple" class="包名.SimpleInterceptor" />
</interceptors>
<action name="simple_*" class="包名.SimpleAction" method="{1}">
  <interceptor-ref name="simple">
   <!--includeMethods参数用于指明哪些方法需要拦截
       如果拦截多个方法,则每个方法之间通过逗号“,”分隔
    -->
     <param name="includeMethods">query</param>
    </interceptor-ref>
    <interceptor-ref name="defaultStack" />
</action>
并且拦截器类要继承MethodFilterInterceptor类,而不是继承AbstractInterceptor类,否则每个访问到的方法都会被自动拦截,达不到控制的目的。
public class SimpleInterceptor extends MethodFilterInterceptor{

    @Override
    protected String doIntercept(ActionInvocation invocation) throws Exception {
        System.out.println("进入拦截器");
        //调用下一个拦截器
        String result = invocation.invoke();

        System.out.println("调用完拦截器"+"--result的值:"+result);

        return result;
    }
}
常见的登录拦截操作如下:
@Override
public String intercept(ActionInvocation invocation) throws Exception {
  HttpSession session = ServletActionContext.getRequest().getSession();
   Object account = session.getAttribute("account");
   if(account != null){
       return invocation.invoke();
   }
   HttpServletRequest request = ServletActionContext.getRequest();
   request.setAttribute("err", "请登录后操作!");
   return "login";
}