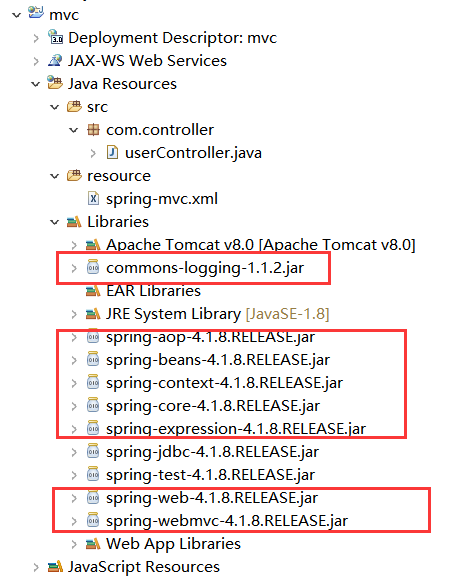
1、下载Jar文件,添加到项目 lib文件夹中。
使用eclipse新建 Web 项目。下载导入相关的 jar 和 Tomcat。我的java版本是JDK1.8 对应的 Tomcat 版本是 8.0.
下载jar文件可以参考 https://blog.csdn.net/yuexianchang/article/details/53583327,
我用的spring版本是 4.1.8,
下面截图中划红线的是必须导入的 jar文件。

2、对配置文件进行添加配置项
我们使用eclipse新建 Web 项目之后,在 /WEB-INF/ 下面有个 Web.xml 文件。首先对他进行配置。配置如下:
<?xml version="1.0" encoding="UTF-8"?>
<web-app xmlns:xsi="http://www.w3.org/2001/XMLSchema-instance"
    xmlns="http://java.sun.com/xml/ns/javaee"
    xsi:schemaLocation="http://java.sun.com/xml/ns/javaee
    http://java.sun.com/xml/ns/javaee/web-app_3_0.xsd" id="WebApp_ID" version="3.0">

  <!-- 配置SpringMVC控制器 -->
  <servlet>
      <servlet-name>webmvc</servlet-name>
      <servlet-class>org.springframework.web.servlet.DispatcherServlet</servlet-class>
   <!-- 启动项目的时候要加载的配置文件
           param-name必须为contextConfigLocation,param-value名字随便起。
             默认加载必须规范:
             * 文件命名:servlet-name-servlet.xml====springmvc-servlet.xml
             * 路径规范:必须在WEB-INF目录下面
    -->
      <init-param>
        <param-name>contextConfigLocation</param-name>
        <param-value>classpath:spring-mvc.xml</param-value>
    </init-param>
    <load-on-startup>1</load-on-startup>
  </servlet>
  <!--
          拦截过滤项   servlet-name要和 上面的 servlet-name 保持一致
          / 表示过滤所有的/的路径,映射到SpringMVC控制器
      -->
  <servlet-mapping>
    <servlet-name>webmvc</servlet-name>
    <url-pattern>/</url-pattern>
   </servlet-mapping>
   <!-- 配置过滤器, characterEncodingFilter字符编码过滤器,一般我们使用UTF-8-->
   <filter>
        <filter-name>encodingFilter</filter-name>
        <filter-class>org.springframework.web.filter.CharacterEncodingFilter</filter-class>
        <init-param>
            <param-name>encoding</param-name>
            <param-value>UTF-8</param-value>
        </init-param>
   </filter>
   <filter-mapping>
           <filter-name>encodingFilter</filter-name>
           <url-pattern>/*</url-pattern>
   </filter-mapping>
</web-app>
注意:
1、<servlet-class> 和 <param-name> 名字是固定的。
2、 <param-value> 加载 spring mvc的配置文件,不进行配置的话默认在 Web-INF下,规范如上!
3、配置 spring-mvc文件
新建 spring-mvc.xml 文件,按照实际配置的路径进行创建。
因为上面配置的路径实在 classpath下面,新建 resource 文件夹。在里面添加 spring-mvc.xml 文件进行配置。配置如下:
<?xml version="1.0" encoding="UTF-8"?>
<beans xmlns="http://www.springframework.org/schema/beans"
    xmlns:xsi="http://www.w3.org/2001/XMLSchema-instance" xmlns:p="http://www.springframework.org/schema/p"
    xmlns:mvc="http://www.springframework.org/schema/mvc" xmlns:context="http://www.springframework.org/schema/context"
    xmlns:util="http://www.springframework.org/schema/util"
    xsi:schemaLocation="http://www.springframework.org/schema/beans http://www.springframework.org/schema/beans/spring-beans-4.3.xsd
            http://www.springframework.org/schema/context http://www.springframework.org/schema/context/spring-context-4.3.xsd
            http://www.springframework.org/schema/mvc http://www.springframework.org/schema/mvc/spring-mvc-4.3.xsd
            http://www.springframework.org/schema/util http://www.springframework.org/schema/util/spring-util-4.3.xsd">
    <!-- 使用注解方式完成映射 -->

    <!-- 让扫描spring扫描这个包下所有的类,让标注spring注解的类生效 -->
    <context:component-scan base-package="com.controller" />

     <!-- DispatcherServlet不处理静态资源,交给服务器默认的servlet处理 -->
    <mvc:default-servlet-handler />

    <!--启用annotation-->
    <!--会自动注册DefaultAnnotationHandlerMapping与AnnotationMethodHandlerAdapter 两个bean-->
    <mvc:annotation-driven/>
    <mvc:annotation-driven />

    <!-- 视图解析器 如果不需要返回页面也可以不配置视图解析器-->
    <bean
        class="org.springframework.web.servlet.view.InternalResourceViewResolver">
        <property name="prefix" value="/WEB-INF/view/" />
        <property name="suffix" value=".jsp"></property>
    </bean>
</beans>
4、创建 Controller 类,进行测试
在 src 文件夹下新建 com.Controller 文件夹。在里面新建 userController,代码如下:

 1 package com.controller;
 2
 3 import javax.servlet.http.HttpServletRequest;
 4 import javax.servlet.http.HttpServletResponse;
 5
 6 import org.springframework.stereotype.Controller;
 7 import org.springframework.web.bind.annotation.RequestMapping;
 8
 9 @Controller
10 public class userController {
11
12     @RequestMapping("/user/list")
13     public String list(HttpServletRequest request,HttpServletResponse response) {
14         return "/user/list";
15     }
16 }
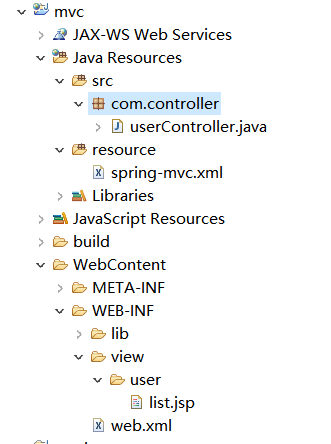
在 /WEB-INF 下面新建 view 文件夹,然后再新建 user 文件夹,在user 文件夹中添加 list.jsp 文件,
运行 Tomcat ,在地址栏里输入 http://localhost:8080/mvc/user/list ,成功跳转到 list.jsp 页面。项目目录如下:

代码点击下载
