1、init 容器
init 模板
apiVersion: v1
kind: Pod
metadata:
  name: initctest
spec:
  containers:
  - name: busybox
    image: hub.wufujie.com/library/busybox:v1
    command: ['sh','-c','echo The app is running! && sleep 3600']
  initContainers:
  - name: init-myservice
    image: hub.wufujie.com/library/busybox:v1
    command: ['sh','-c','until nslookup myservice;do echo waiting for myservice;sleep 2;done;']
  - name: init-mydb
    image: hub.wufujie.com/library/busybox:v1
    command: ['sh','-c','until nslookup mydb;do echo waiting for mydb;sleep 2;done;']
service
apiVersion: v1
kind: Service
metadata:
  name: myservice
spec:
  ports:
  - protocol: TCP
    port: 80
    targetPort: 9375
apiVersion: v1
kind: Service
metadata:
  name: mydb
spec:
  ports:
    - protocol: TCP
      port: 80
      targetPort: 9377
2、检测探针——就绪检测
readiness-httpget-pod.yml
apiVersion: v1
kind: Pod
metadata:
  name: readiness-httpget-pod
  namespace: default
spec:
  containers:
  - name: readiness-httpget-container
    image: hub.wufujie.com/library/httpd:v1
    imagePullPolicy: IfNotPresent
    readinessProbe:
      httpGet:
        port: 80
        path: /index1.html
      initialDelaySeconds: 1
      periodSeconds: 3
此刻创建 pod
kubectl create -f readiness-httpget-pod.yml

因为容器的路径下没有 index1.html 这个文件,所有 pod 一直处在 ready 状态
我们进入容器,在网页根目录下创建一个 index1.html 的文件
[root@master ~]# kubectl exec -it readiness-httpget-pod -- /bin/bash
root@readiness-httpget-pod:/usr/local/apache2# cd htdocs/
root@readiness-httpget-pod:/usr/local/apache2/htdocs# echo "hello world!" > index1.html
root@readiness-httpget-pod:/usr/local/apache2/htdocs# exit
exit
此刻查看 pod 状态,发现 pod 已经 ready

3、探针检测——存活检测
livenessProbe-exec.yml
apiVersion: v1
kind: Pod
metadata:
  name: liveness-exec-pod
  namespace: default
spec:
  containers:
  - name: liveness-exec-container
    image: hub.wufujie.com/library/busybox:v1
    imagePullPolicy: IfNotPresent
    command: ["/bin/sh","-c","touch /tmp/live;sleep 60;rm -rf /tmp/live;sleep 3600"]
    livenessProbe:
      exec:
        command: ["test","-e","/tmp/live"]
      initialDelaySeconds: 1
      periodSeconds: 3
command 命令的意思是:1、创建 /tmp/live 文件;2、休眠 60 秒;3、删除文件 /tmp/live;4、休眠 3600 秒
下一个 command 检测 /tmp/live 这个文件是否存在
initailDelaySeconds: 1的意思是容器初始化 1 秒后,才开始检测 /tmp/live 文件
periodSeconds: 3的意思是,检测的循环周期是 3 秒
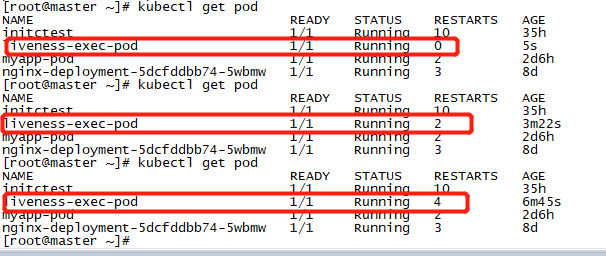
从下图可以看到,如果检测不到文件,pod 会重启
livenessProbe-httpget.yml
通过 http 能够访问网页,来检测是否存活
apiVersion: v1
kind: Pod
metadata:
  name: liveness-httpget-pod
  namespace: default
spec:
  containers:
  - name: liveness-httpget-container
    image: hub.wufujie.com/library/httpd:v1
    imagePullPolicy: IfNotPresent
    ports:
    - name: http
      containerPort: 80
    livenessProbe:
      httpGet:
        port: http
        path: /index.html
      initialDelaySeconds: 1
      periodSeconds: 3
      timeoutSeconds: 10
查看状态,已经在 running 了

我们进去容器,把 index.html 改成 index1.html,再看看
已经看到已经重启一次了

livenessProbe-tcp.yml
检查 tcp 连接,80端口是否再通信
apiVersion: v1
kind: Pod
metadata:
  name: probe-tcp
spec:
  containers:
  - name: nginx
    image: hub.wufujie.com/library/httpd:v1
    livenessProbe:
      initialDelaySeconds: 5
      timeoutSeconds: 1
      tcpSocket:
        port: 80
4、启动退出动作
在容器启动的时候执行命令
在容器停止前执行命令
apiVersion: v1
kind: Pod
metadata:
  name: lifecycle-demo
spec:
  containers:
  - name: lifecycle-demo-container
    image: nginx
    lifecycle:
      postStart:
        exec:
          command: ["/bin/sh", "-c", "echo Hello from the postStart handler >/usr/share/message"]
      preStop:
        exec:
          command: ["/bin/sh", "-c", "echo Hello from the poststop handler >/usr/share/message"]