实验要求
1,实现python容器的部署,并完成以下python程序所需环境的配置以及运行
2,在python容器中运行简单的helloworld程序
3,在python容器中实现简单的数据库操作
4,在pathon容器中实现简单openCV程序
实验环境
ubuntu18.04
Docker Engine - Community19.03.8
python3.7
mysql5.7
实验步骤
一,构建python容器
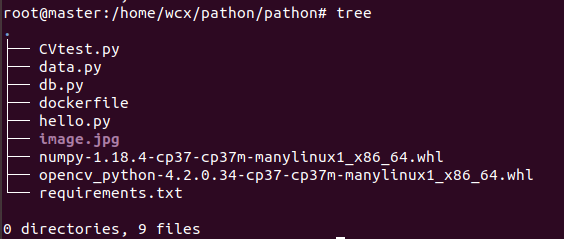
工程挂载目录
dockerfile
FROM python:3.7
WORKDIR /usr/local/pathon/
COPY requirements.txt ./
COPY opencv_python-4.2.0.34-cp37-cp37m-manylinux1_x86_64.whl ./
COPY numpy-1.18.4-cp37-cp37m-manylinux1_x86_64.whl ./
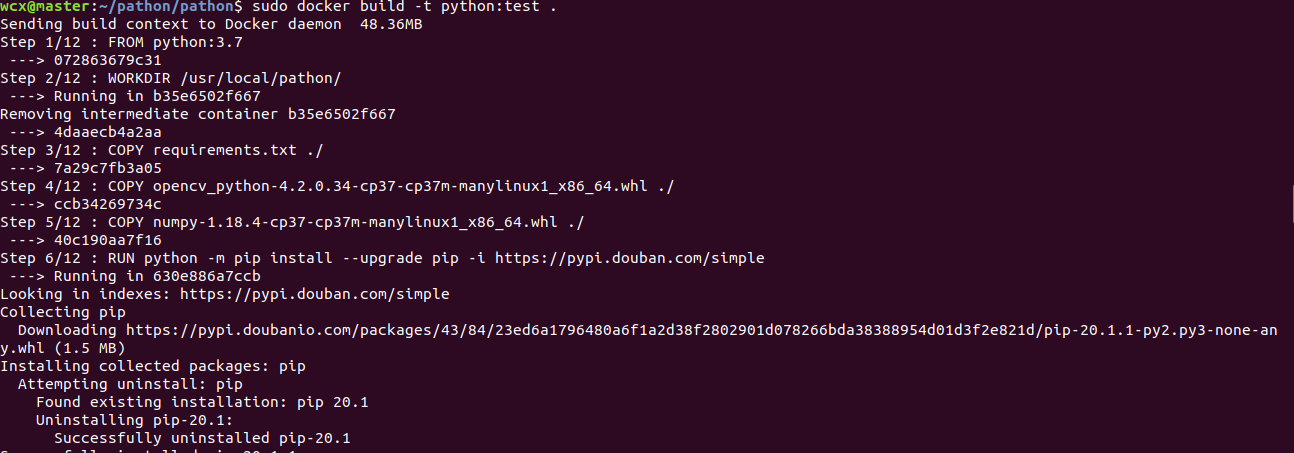
RUN python -m pip install --upgrade pip -i https://pypi.douban.com/simple
RUN pip install --default-timeout=100 -i https://pypi.tuna.tsinghua.edu.cn/simple -r requirements.txt && pip install numpy-1.18.4-cp37-cp37m-manylinux1_x86_64.whl opencv_python-4.2.0.34-cp37-cp37m-manylinux1_x86_64.whl
COPY hello.py ./
COPY data.py ./
COPY db.py ./
ENTRYPOINT ["python"]
EXPOSE 80
requirement.txt
(因为使用pip下载依赖包实在是太慢了,经常出现timeout,于是我从网上事先下载好numpy和openCV的依赖,进行离线安装(虽然网上下载的速度依旧感人,但好歹不会timeout不是....))
PyMySql
创建python镜像
docker build -t python:test .
接下来创建mysql镜像,不过由于之前的实验有制作过mysql的镜像,这里就不再重复,直接使用以前的镜像创建mysql容器并开启服务

查看mysql容器的网络,待会将python容器也加进去
docker inspect mysql

这里mysql容器运行在名为“bridge"的网络中,且ip地址为172.17.0.2
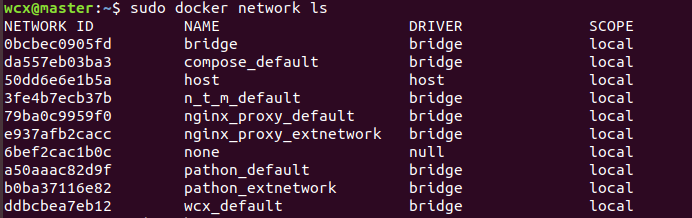
查看本地搭建的网络,这里我选了“bridge”作为此次实验容器运行的网络
创建容器,并进入镜像

进入了python的解释器界面,我不是很懂这个,于是我退出该容器,然后又重启该容器,并使用exec命令试图进入命令行界面,成功
docker exec -it python1 /bin/bash

二,运行python程序
1,hello.py
print('hello world')

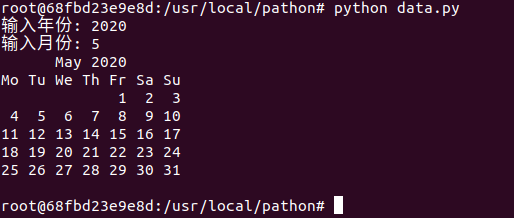
2,data.py(日历)
import calendar
yy = int(input("输入年份: "))
mm = int(input("输入月份: "))
print(calendar.month(yy,mm))
3,db.py
import pymysql

# 打开数据库连接
#数据库地址使用mysql的容器名
#使用实验二时候创建的用户,密码,数据库
db = pymysql.connect(
	host='172.17.0.2',
	user='root',
	password='123456',
	database="Database",
	charset="utf8")
# 使用 cursor() 方法创建一个游标对象 cursor
cursor = db.cursor()

# 使用 execute()  方法执行 SQL 查询
cursor.execute("SELECT VERSION()")

# 使用 fetchone() 方法获取单条数据.
data = cursor.fetchone()

print("Database version : %s " % data)

# SQL 插入语句
sql = """INSERT INTO S(id,name,class,score)
         VALUES ('3', 'wcx','03','60')"""
try:
   # 执行sql语句
   cursor.execute(sql)
   # 提交到数据库执行
   db.commit()
except:
   # 如果发生错误则回滚
   db.rollback()

# SQL 查询语句
sql = """SELECT * FROM S"""

try:
   # 执行SQL语句
   cursor.execute(sql)
   # 获取所有记录列表
   results = cursor.fetchall()
   for row in results:
      S_id = row[0]
      name = row[1]
      S_class = row[2]
      score = row[3]
       # 打印结果
      print ("id=%s,name=%s S_class=%s score =%s" %(S_id, name,S_class, score ))
except:
   print ("Error: unable to fetch data")

# 关闭数据库连接
db.close()

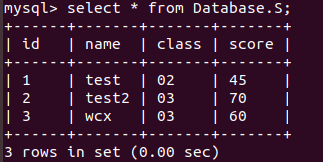
数据库中验证一下
4,CVtest.py
#coding:utf-8

import cv2
img = cv2.imread(r"image.jpg")
# print(img.shape)
img_gray = cv2.cvtColor(img,cv2.COLOR_BGR2GRAY)
ret,img_threshold = cv2.threshold(img_gray,127,255,cv2.THRESH_BINARY)
cv2.imwrite(r"changed_image.jpg",img_threshold)
image.jpg

执行CVtest.py

执行后查看当前目录,发现多了一张changed_image.jpg

实验中遇到的困难
1,构建镜像时总是timeout
解决方法:本地从官网下载相应的依赖包,采用离线安装的方式
2,python容器没有访问mysql容器的权限
(pymysql.err.InternalError: (1130, "Host 'xxxx' is not allowed to connect to this MySQL server"))
解决方法:进入mysql容器,修改mysql.user表,修改如下
 update user set Host='%',authentication_string='123456' where User='root'; #允许其他容器使用root用户登陆
 GRANT ALL PRIVILEGES ON *.* TO 'root'@'%' IDENTIFIED BY '123456' WITH GRANT OPTION;#授予所有root用户对所有数据库的操作权限
 flush privileges;#更新权限表

