网络基础
端口映射
docker run -d -P --name test1 nginx
docker中容器默认是无法沟通的,只有当容器的web服务应用程序端口映射到本机宿主机的端口
#docker port 查看端口映射情况
[root@server01 ~]# docker ps -a  #查看容器
CONTAINER ID        IMAGE               COMMAND                  CREATED             STATUS
74b9933c9c5a        nginx               "/docker-entrypoint.…"   18 seconds ago      Up 16 seconds
[root@server01 ~]# docker port test1  #查看端口
80/tcp -> 0.0.0.0:32768  #映射到宿主机随机端口
docker的-p指定端口8000
docker run -d -p 8000:80 --name test2 nginx
0.0.0.0:111(本机的所有ip都可以访问)
192.168.200.10:111(只有此ip地址和端口才能访问)
127.0.0.1:111(本区域可以访问)
指定传输协议
docker run -d -p 8000:80/tcp --name test3 nginx
#还规定了协议
端口暴露
expose命令:可以指定一定方位内额度端口
容器互联
一个容器可以同时加入多个网络中,使用不同的地址可以访问不同网络中的容器
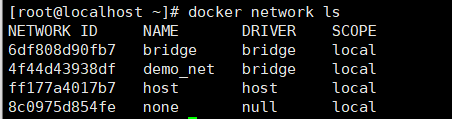
- 将两个容器处于统一网络当中
#创建两个名字镜像busybox
[root@localhost ~]# docker run -itd --name=container1 busybox
1d9b72bf8016ef7a20b1750e32b7fff5cdf79651df8d73496a6fa885a6b515b2
[root@localhost ~]# docker run -itd --name=container2 busybox
429128533cfea0e58c0ee69add173e86a85d786620d5a3c325d82ccdaa012a65

#创建一个独立的容器网络,使用bridge驱动
[root@localhost ~]# docker network create -d bridge --subnet 172.25.0.0/16 demo_net
4f44d43938df86510c70d0593c4ab5b59a67cf5df09d5b6893a04dbe87d2e8bd
#docker network create 创建一个网络
#-d bridge  类型
#--subnet 172.25.0.0/16  定义这个网段
#这个网络名叫 demo_net
[root@localhost ~]# docker network ls
NETWORK ID     NAME       DRIVER    SCOPE
6df808d90fb7   bridge     bridge    local
4f44d43938df   demo_net   bridge    local
ff177a4017b7   host       host      local
8c0975d854fe   none       null      local

#将container2加入到dome_net这个网络中
[root@localhost ~]# docker network connect demo_net container2
[root@localhost ~]# docker network inspect demo_net   #查看这个网络里的模块
"Containers": {
            "429128533cfea0e58c0ee69add173e86a85d786620d5a3c325d82ccdaa012a65": {
                "Name": "container2",
                "EndpointID":   "caddb2d673156b8e74ca8754b4b9e332213bb7a837f5c5c2a6276b25aa80d59c",
                "MacAddress": "02:42:ac:19:00:02",  #此容器本来随机地址
                "IPv4Address": "172.25.0.2/16",  #现在是此地址在范围内
                "IPv6Address": ""
            }
        },

#创建一个容器并加入到demo_net网络给他3的IP地址
[root@localhost ~]# docker run --network=demo_net --ip=172.25.3.3 -itd --name=container3 busybox
[root@localhost ~]# docker network inspect demo_net
"Containers": {
          "23e87e8993b455df9181405ecda0092bc324d09172d03afa99891abe126c79db": {
              "Name": "container3",
              "EndpointID": "9c98ef849927a365b7263c3cf9a374a302d9d9f57384dcabf241896aa8304086",
              "MacAddress": "02:42:ac:19:03:03",
              "IPv4Address": "172.25.3.3/16",  #又分走一个3的ip地址
              "IPv6Address": ""
          },
          "429128533cfea0e58c0ee69add173e86a85d786620d5a3c325d82ccdaa012a65": {
              "Name": "container2",
              "EndpointID":  "caddb2d673156b8e74ca8754b4b9e332213bb7a837f5c5c2a6276b25aa80d59c",
              "MacAddress": "02:42:ac:19:00:02",
              "IPv4Address": "172.25.0.2/16",
              "IPv6Address": ""

#2此时拥有两个网络,bridge,demo_net
#1只有一个网络,bridge
#3只有一个网络,demo_net
#此时2和3同一网络中,1和2也在同一网络中,所以2和1,3都是可以互联的,1和3是不能互联的。
检验互联网络
[root@localhost ~]# docker exec -it container1 ifconfig
eth0      Link encap:Ethernet  HWaddr 02:42:AC:11:00:03    #172.17这个网络
          inet addr:172.17.0.3  Bcast:172.17.255.255  Mask:255.255.0.0
          UP BROADCAST RUNNING MULTICAST  MTU:1500  Metric:1
          RX packets:8 errors:0 dropped:0 overruns:0 frame:0
          TX packets:0 errors:0 dropped:0 overruns:0 carrier:0
          collisions:0 txqueuelen:0
          RX bytes:656 (656.0 B)  TX bytes:0 (0.0 B)

lo        Link encap:Local Loopback
          inet addr:127.0.0.1  Mask:255.0.0.0
          UP LOOPBACK RUNNING  MTU:65536  Metric:1
          RX packets:0 errors:0 dropped:0 overruns:0 frame:0
          TX packets:0 errors:0 dropped:0 overruns:0 carrier:0
          collisions:0 txqueuelen:1000
          RX bytes:0 (0.0 B)  TX bytes:0 (0.0 B)

[root@localhost ~]# docker exec -it container2 ifconfig
eth0      Link encap:Ethernet  HWaddr 02:42:AC:11:00:04    #172.17这个网络
          inet addr:172.17.0.4  Bcast:172.17.255.255  Mask:255.255.0.0
          UP BROADCAST RUNNING MULTICAST  MTU:1500  Metric:1
          RX packets:8 errors:0 dropped:0 overruns:0 frame:0
          TX packets:0 errors:0 dropped:0 overruns:0 carrier:0
          collisions:0 txqueuelen:0
          RX bytes:656 (656.0 B)  TX bytes:0 (0.0 B)

eth1      Link encap:Ethernet  HWaddr 02:42:AC:19:00:02    #172.25这个网络
          inet addr:172.25.0.2  Bcast:172.25.255.255  Mask:255.255.0.0
          UP BROADCAST RUNNING MULTICAST  MTU:1500  Metric:1
          RX packets:21 errors:0 dropped:0 overruns:0 frame:0
          TX packets:0 errors:0 dropped:0 overruns:0 carrier:0
          collisions:0 txqueuelen:0
          RX bytes:2424 (2.3 KiB)  TX bytes:0 (0.0 B)

lo        Link encap:Local Loopback
          inet addr:127.0.0.1  Mask:255.0.0.0
          UP LOOPBACK RUNNING  MTU:65536  Metric:1
          RX packets:0 errors:0 dropped:0 overruns:0 frame:0
          TX packets:0 errors:0 dropped:0 overruns:0 carrier:0
          collisions:0 txqueuelen:1000
          RX bytes:0 (0.0 B)  TX bytes:0 (0.0 B)

[root@localhost ~]# docker exec -it container3 ifconfig
eth0      Link encap:Ethernet  HWaddr 02:42:AC:19:03:03    #只有一个172.25这个网络
          inet addr:172.25.3.3  Bcast:172.25.255.255  Mask:255.255.0.0
          UP BROADCAST RUNNING MULTICAST  MTU:1500  Metric:1
          RX packets:8 errors:0 dropped:0 overruns:0 frame:0
          TX packets:0 errors:0 dropped:0 overruns:0 carrier:0
          collisions:0 txqueuelen:0
          RX bytes:656 (656.0 B)  TX bytes:0 (0.0 B)

lo        Link encap:Local Loopback
          inet addr:127.0.0.1  Mask:255.0.0.0
          UP LOOPBACK RUNNING  MTU:65536  Metric:1
          RX packets:0 errors:0 dropped:0 overruns:0 frame:0
          TX packets:0 errors:0 dropped:0 overruns:0 carrier:0
          collisions:0 txqueuelen:1000
          RX bytes:0 (0.0 B)  TX bytes:0 (0.0 B)
- link参数:会在源和接收器之间创建一个隧道。
#创建一个容器并设置名字
[root@localhost ~]# docker run -itd --name test busybox
[root@localhost ~]# docker run -itd --name=link --link test:test busybox
test:test  ==  名字:别名
[root@localhost ~]# docker exec -it link ping test  #试ping
网络模式
docker 自动创建3个网络
demo_net:是自建的网络
使用docker run 创建容器时,可以使用--net指定加入的网络
常用的4个网络模式
-
host模式:--net=host指定
Network namespace:隔离网络,提供了一份独立的网络环境,包括网卡,路由,lptables规则等,都会与其他的network namespace隔离,使用Host模式后,将不会获得一个独立的network namespace,而是与宿主机使用同一个network namespace,不会特别安全,但是容器的其他方面,还是和宿主机隔离的。 -
Container模式:--net=container:name_or_ID指定
可以指定一个新创建的容器和已存在的容器共享一个network namespace,此时所有的网络配置都是一样的,但其他还是隔离的。两个容器的进程可以通过lo网卡设备通信。--net=container:container_id(已存在的容器)/container_name(新创建的容器) [root@localhost ~]# docker run -itd --name=con1 busybox #已存在的容器 11be5847a56d71792c548750d11a32276096e7017fb2eb6372eccbbe42ec9a53 [root@localhost ~]# docker exec -it con1 ifconfig #查看网络信息 eth0 Link encap:Ethernet HWaddr 02:42:AC:11:00:07 inet addr:172.17.0.7 Bcast:172.17.255.255 Mask:255.255.0.0 UP BROADCAST RUNNING MULTICAST MTU:1500 Metric:1 RX packets:8 errors:0 dropped:0 overruns:0 frame:0 TX packets:0 errors:0 dropped:0 overruns:0 carrier:0 collisions:0 txqueuelen:0 RX bytes:656 (656.0 B) TX bytes:0 (0.0 B) lo Link encap:Local Loopback inet addr:127.0.0.1 Mask:255.0.0.0 UP LOOPBACK RUNNING MTU:65536 Metric:1 RX packets:0 errors:0 dropped:0 overruns:0 frame:0 TX packets:0 errors:0 dropped:0 overruns:0 carrier:0 collisions:0 txqueuelen:1000 RX bytes:0 (0.0 B) TX bytes:0 (0.0 B) [root@localhost ~]# docker run -itd --net=container:con1 --name=con2 busybox #创建新的容器并指定模式与con1使用同一网络 44beb2676dec17aad14afe835e0ebaf54afad8fddb694c21b8d1f943a882f531 [root@localhost ~]# docker exec -it con2 ifconfig #查看网络信息 eth0 Link encap:Ethernet HWaddr 02:42:AC:11:00:07 inet addr:172.17.0.7 Bcast:172.17.255.255 Mask:255.255.0.0 UP BROADCAST RUNNING MULTICAST MTU:1500 Metric:1 RX packets:8 errors:0 dropped:0 overruns:0 frame:0 TX packets:0 errors:0 dropped:0 overruns:0 carrier:0 collisions:0 txqueuelen:0 RX bytes:656 (656.0 B) TX bytes:0 (0.0 B) lo Link encap:Local Loopback inet addr:127.0.0.1 Mask:255.0.0.0 UP LOOPBACK RUNNING MTU:65536 Metric:1 RX packets:0 errors:0 dropped:0 overruns:0 frame:0 TX packets:0 errors:0 dropped:0 overruns:0 carrier:0 collisions:0 txqueuelen:1000 RX bytes:0 (0.0 B) TX bytes:0 (0.0 B) #发现一模一样的网络信息 -
None模式:--net=none指定
就是啥也没有,需要自己配置 -
Bridge模式:--net=bridge指定,默认设置
是docker默认的网络模式(其实是不需要指定的),属于一种NAT网络模式,docker daemon在启动时会建立一个docker0的网桥(-b参数可以指定)每一个容器使用bridge模式时,都会为容器创建一对虚拟的网络接口(veth pair)设备,这对接口一端在容器的network namespace,另一端在docker0,这样实现容器与宿主机之间的通信。
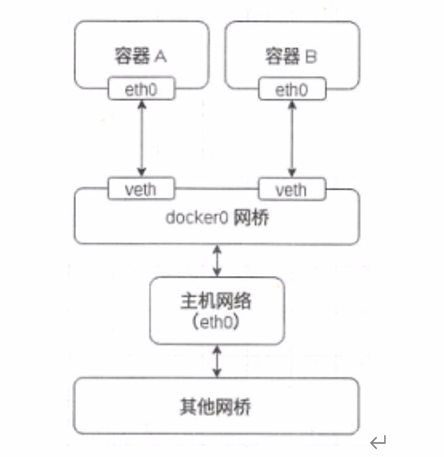
bridge模式下,docker容器与外部网络通信都是通过IPtable规则控制的,也就是docker网络性能底下得到一个原因,使用iptables -vnL -t nat 可以查看nat表。
