Spring Framework 的核心组件有三个: Spring Core,Spring Context 和 Spring Beans,它们奠定了 Spring 的基础并撑起了 Spring 的框架结构。Spring 的其它功能特性例如 Web、AOP、JDBC 等都是在其基础上发展实现的。
I. Bean 组件
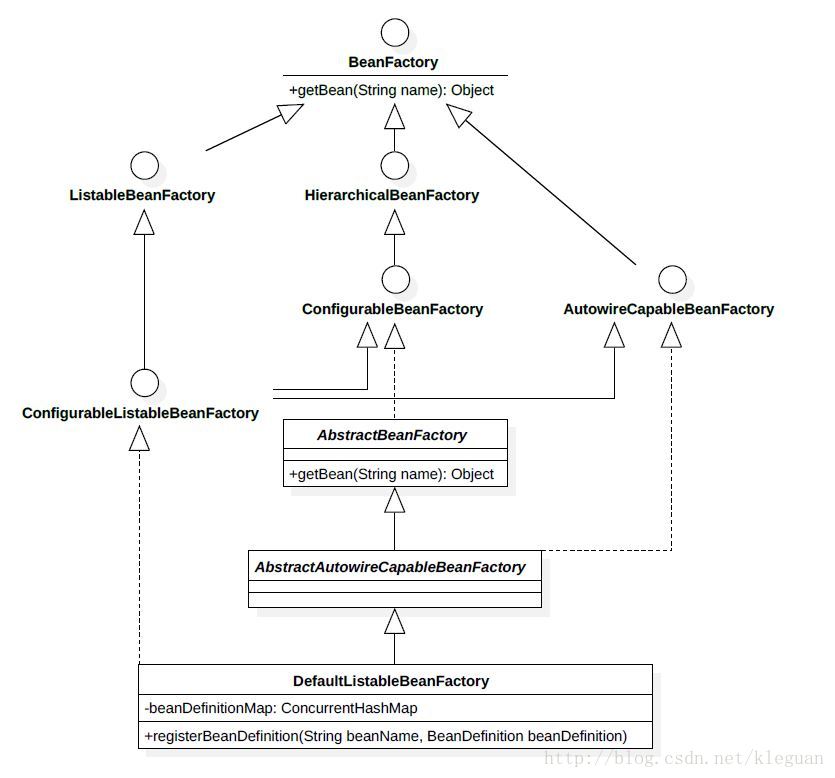
Spring 使用工厂模式来管理程序中使用的对象(Bean),Bean 工厂最上层的接口为 BeanFactory,简单来看,工厂就是根据需要返回相应的 Bean 实例。
public interface BeanFactory {
    //...
    Object getBean(String name);
}
- 1
- 2
- 3
- 4
- 5
在工厂模式中,在工厂的实现类中生成 Bean 返回给调用客户端,这就要求客户端提供生成自己所需类实例的工厂类,增加客户负担。Spring 结合控制反转和依赖注入为客户端提供所需的实例,简化了客户端的操作。具体的实现方式大致如下。
public class DefaultListableBeanFactory extends AbstractAutowireCapableBeanFactory
        implements ConfigurableListableBeanFactory, BeanDefinitionRegistry, Serializable {
    /** Map of bean definition objects, keyed by bean name */
    private final Map<String, BeanDefinition> beanDefinitionMap = new ConcurrentHashMap<String, BeanDefinition>;
    public void registerBeanDefinition(String beanName, BeanDefinition beanDefinition){
        //...
    }
}- 1
- 2
- 3
- 4
- 5
- 6
- 7
- 8
beanDefinitionMap 作为具体的 Bean 容器,Spring 创建的对象实例保存其中。客户端需要时,使用工厂的 getBean 方法去试图得到相应的实例,如果实例已存在,则返回该实例;如果实例不存在,则首先产生相应实例并通过 registerBeanDefinition 方法将其保存在 beanDefinitionMap 中(Lazy Initialization),然后返回该实例给客户端。
Spring 中的相关代码包是 org.springframework.beans
beanDefinitionMap 并不直接保存实例本身,而是将实例封装在 BeanDefinition 对象后进行保存。BeanDefinition 包含了实例的所有信息,其简化版的定义如下。
public class BeanDefinition {
    private Object bean;

    private Class<?> beanClass;
    private String beanClassName;

    // Bean 属性字段的初始化值
    private BeanPropertyValues beanPropertyValues;

    //...
}- 1
- 2
- 3
- 4
- 5
- 6
- 7
- 8
- 9
- 10
- 11
Spring Bean 工厂生产 Bean 时
1) 先将实例的类型参数保存到 beanClass 和 beanClassName,将需要初始化的字段名和值保存到 beanPropertyValues 中,这个过程 Spring 通过控制反转来实现,本文第二小节将予以简要说明
2) 生成 bean 实例,并利用反射机制将需要初始化的字段值写入 bean 实例,将实例保存在 bean 中,完成 BeanDefinition 的构建。
假设我们已经完成了步骤 1) 的操作,之后的过程用代码表述如下所示。
public void registerBeanDefinition(String beanName, BeanDefinition beanDefinition){
    //生成 bean 实例,并完成初始化
    Object bean = createBean(beanDefinition);
    //将 bean 实例保存在 beanDefinition 中
    beanDefinition.setBean(bean);
    //将 beanDefinition 实例保存在 Spring 容器中
    beanDefinitionMap.put(beanName, beanDefinition);
}

protected Object createBean(BeanDefinition beanDefinition) {
    try{
        Object bean = beanDefinition.getBeanClass().newInstance();
        try {
            setBeanPropertyValues(bean, beanDefinition);
        } catch (NoSuchFieldException | SecurityException | IllegalArgumentException e) {
            e.printStackTrace();
        }
        return bean;
    }catch(InstantiationException e){
        e.printStackTrace();
    }catch(IllegalAccessException e){
        e.printStackTrace();
    }

    return null;
}

protected void setBeanPropertyValues(Object bean, BeanDefinition beanDefinition) throws NoSuchFieldException, SecurityException, IllegalArgumentException, IllegalAccessException{
    for(PropertyValue pv : beanDefinition.getBeanPropertyValues().getBeanPropertyValues()){
        Field beanFiled = bean.getClass().getDeclaredField(pv.getName());
        beanFiled.setAccessible(true);
        beanFiled.set(bean, pv.getValue());
    }
}- 1
- 2
- 3
- 4
- 5
- 6
- 7
- 8
- 9
- 10
- 11
- 12
- 13
- 14
- 15
- 16
- 17
- 18
- 19
- 20
- 21
- 22
- 23
- 24
- 25
- 26
- 27
- 28
- 29
- 30
- 31
- 32
- 33
- 34
II. Context 组件
一般地,传统的程序设计中,无论是使用工厂创建实例,或是直接创建实例,实例调用者都要先主动创建实例,而后才能使用。控制反转(Inverse of Control) 将实例的创建过程交由容器实现,调用者将控制权交出,是所谓控制反转。
依赖注入(Dependence Injection) 在控制反转的基础上更进一步。如果没有依赖注入,容器创建实例并保存后,调用者需要使用 getBean(String beanName) 才能获取到实例。使用依赖注入时,容器会将 Bean 实例自动注入到完成相应配置的调用者,供其进一步使用。
Context 组件借助上述的控制反转和依赖注入,协助实现了 Spring 的 Ioc 容器。下面我们以一个 Service 类作为所需的 Bean 实例进行说明。实际应用中,我们会需要 Spring 管理很多 Bean 实例。
public class SampleService {
    private String service;
        public String getService() {
        return service;
    }
    public void setService(String service) {
        this.service= service;
    }
}- 1
- 2
- 3
- 4
- 5
- 6
- 7
- 8
- 9
在程序运行过程中,需要一个 SampleService ,我们不让调用者 new 一个实例,而是在配置文件中表明该 SampleService 的实例交由 Spring 容器进行管理,并指定其初始化参数。配置文件即资源,其内容如下。
<?xml version="1.0" encoding="UTF-8"?>
<beans>
    <bean name="sampleService " class="com.service.SampleService ">
        <property name="service" value="This is a service"></property>
    </bean>
</beans>- 1
- 2
- 3
- 4
- 5
- 6
Spring Core 组件提供 ResourceLoader 接口,便于读入 xml 文件或其他资源文件。其核心功能代码应该提供如下方法。
public class ResourceLoader {
    public Resource getResource(String location){
        URL resource = this.getClass().getClassLoader().getResource(location);
        return new UrlResource(resource);
    }
}

// UrlResource 的功能代码
public class UrlResource implements Resource {
    private final URL url;

    public UrlResource(URL url){
        this.url = url;
    }

    @Override
    public InputStream getInputStream() throws IOException {
        URLConnection urlConnection = url.openConnection();
        urlConnection.connect();
        return urlConnection.getInputStream();
    }

}- 1
- 2
- 3
- 4
- 5
- 6
- 7
- 8
- 9
- 10
- 11
- 12
- 13
- 14
- 15
- 16
- 17
- 18
- 19
- 20
- 21
- 22
- 23
即加载资源文件,并以数据流的形式返回。Context 根据资源中的定义,生成相应的 bean 并保存在容器中,bean 的名字是 sampleService ,供程序进一步使用。这样就完成了控制反转的工作。接下来就需要把 sampleService 注入到需要使用它的地方,亦即完成依赖注入操作。
现在假设 SampleController 中使用 SampleService 的对象,Spring 提供三种依赖注入的方式,构造器注入、setter 注入和注解注入。
public class SampleController {
    /**
     * 3. 注解注入
    **/
    /* @Autowired */
    private SampleService sampleService;

    /**
     * 1. 构造器注入
    **/
    public SampleController(SampleService sampleService){
        this.sampleService = sampleService;
    }
    //无参构造函数
    public SampleController(){}

    // 类的核心功能
    public void process(){
        System.out.println(sampleService.getService());
    }
    /**
     * 2. setter 注入
    **/
    /*public void setService(SampleService service) {
        this.service= service;
    }*/
}- 1
- 2
- 3
- 4
- 5
- 6
- 7
- 8
- 9
- 10
- 11
- 12
- 13
- 14
- 15
- 16
- 17
- 18
- 19
- 20
- 21
- 22
- 23
- 24
- 25
- 26
- 27
三种注入方式在配置文件中对应不同的配置方式,在前面 xml 文件的基础上,我们可以分别实现这三种注入方式。需要注意的是,这里 SampleController 也是使用 Spring 的 Ioc 容器生成管理的。
<?xml version="1.0" encoding="UTF-8"?>
<beans>
    <bean name="sampleService " class="com.service.SampleService ">
        <property name="service" value="This is a service"></property>
    </bean>

<!-- 1. 构造器注入方式为SampleContorller 的 bean 注入 SampleService -->
    <bean name="sampleContorller" class="com.controller.SampleContorller">
        <!-- index 是构造方法中相应参数的顺序 -->
        <constructor-arg index="0" ref="sampleService"></constructor-arg>
    </bean>

<!-- 2. setter 注入方式为SampleContorller 的 bean 注入 SampleService -->
<!--
    <bean name="sampleContorller" class="com.controller.SampleContorller">
        <property name="sampleService " ref="sampleService"></property>
    </bean>
-->

<!-- 3. 注解注入方式为SampleContorller 的 bean 注入 SampleService -->
<!--
    <bean name="sampleContorller" class="com.controller.SampleContorller">

    <!-- 不需要配置,Spring 自动按照类型注入相应的 bean -->
    </bean>
-->
</beans>- 1
- 2
- 3
- 4
- 5
- 6
- 7
- 8
- 9
- 10
- 11
- 12
- 13
- 14
- 15
- 16
- 17
- 18
- 19
- 20
- 21
- 22
- 23
- 24
- 25
- 26
- 27