真正的勇士感觉面对操蛋的人生。之前申请了一个香港的虚拟主机,各种问题各种慢,有时候就无缘无故的打不开了,中途还经历了一次他们更换服务器,还好我有网站备份,要不我只能蹲在墙角哭了。最近在做微信的开发,咱们也与时俱进一把,使用一下thinkphp的3.2版本!刚想愉快的搞一把,what?告诉我php版本小于5.3.0?什么鬼?看了看thinkphp的入口文件,大大的写着下面这句!
// 检测PHP环境
if(version_compare(PHP_VERSION,'5.3.0','<'))  die('require PHP > 5.3.0 !');
另求他法。还好我有备用,去百度的BAE上看看,还行,php版本5.3,满足要求,就他了,代码部署完毕。问题来了,这东西的日志又太麻烦了,做API开发,没日志岂不是个瞎子。好吧,鼓足勇气申请了一个阿里云主机。
下面开始各种安装过程了。
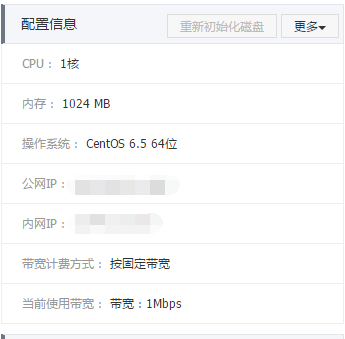
在centos6.5上 64位操作系统安装lamp环境,通过yum安装,前提确保linux已经关闭防火墙。
一、准备工作
1、yum update 检查一下系统更新
2、yum -y install gcc gcc gcc-c 安装编译环境
3、yum erase httpd 卸载系统自带的httpd
4、yum install zlib-devel libtool ncurses-devel libxml2-devel
二、安装 MySQL
1、首先来进行 MySQL 的安装。打开超级终端,输入:
[root@localhost ~]# yum install mysql mysql-server
2、安装完毕,让 MySQL 能够随系统自动启动:
[root@localhost ~]# chkconfig --levels 235 mysqld on

[root@localhost ~]# /etc/init.d/mysqld start
3、设置MySQL 数据 root 账户的密码:
[root@localhost ~]# mysql_secure_installation
当出现如下提示时候直接按回车:
Enter current password for root
出现如下再次回车:
Set root password? [Y/n]
出现如下提示输入你需要设置的密码,回车后在输入一次确认:
New password:
接下来还会有四个确认,分别是:
Remove anonymous users? [Y/n] <– 是否删除匿名用户,生产环境建议删除,所以输入y并回车
Disallow root login remotely? [Y/n] <– 是否禁止root远程登录,根据自己的需求选择Y/n并回车,建议禁止
Remove test database and access to it? [Y/n] <– 是否删除test数据库,输入y并回车
Reload privilege tables now? [Y/n] <- 是否重新加载权限表,输入y并回车
直接回车即可。
4、重启mysql
/etc/init.d/mysqld restart #重启

/etc/init.d/mysqld stop #停止

/etc/init.d/mysqld start #启动
三、安装 Apache 组件
由于 CentOS 已经封装了 Apache,直接运行安装:
[root@localhost ~]# yum install httpd
同样配置系统让 Apache 随系统启动:
[root@localhost ~]# chkconfig --levels 235 httpd on
配置完毕,启动 Apache:
[root@localhost ~]# /etc/init.d/httpd start
如果在启动过程中出现
[root@localhost ~]# Starting httpd: httpd: Could not reliably determine the server's fully qualified domain name, using payment.meijialclub.com for ServerName [ OK ]
那就修改一下httpd.conf
查找一下文件为准
然后修改http.conf
[root@localhost ~]# vi /etc/httpd/conf/httpd.conf
配置完毕,启动 Apache:
找到#ServerName www.example.com:80然后在下面加入如下
ServerName 127.0.0.1:80
然后重启apache
/etc/init.d/httpd restart
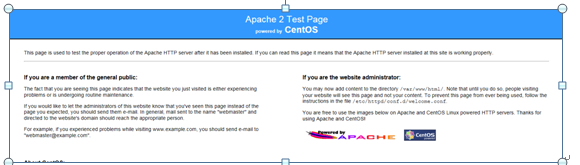
此时apache已经安装好了,访问http://172.16.7.69/就可以看到如下界面(备注:172.16.7.69是服务器的ip)
注意,如果其他机器访问这台服务无法显示这个页面,而直接在这台服务器上可以访问的话,一般情况下是CentOS 自带的防火墙禁止了。你只需要进入防火墙,将 “WWW” 对应的 “80” 端口打开。
开发80端口方法
[root@centos httpd]# /sbin/iptables -I INPUT -p tcp --dport 80 -j ACCEPT
[root@centos httpd]# /etc/rc.d/init.d/iptables save
[root@centos httpd]# /etc/init.d/iptables restart
这样就搞定了,查看效果
[root@centos httpd]# /etc/init.d/iptables status
注意:在CentOS 中 Apache 的默认根目录是/var/www/html,配置文件 /etc/httpd/conf/httpd.conf。其他配置存储在 /etc/httpd/conf.d/ 目录。
四、安装php
输入如下指令安装 PHP:
[root@localhost ~]# yum install php
需要重新启动 Apache 服务:
[root@localhost ~]# /etc/init.d/httpd restart
四、测试 PHP 相关信息
这步实际上可以省略,但是为了测试是否安装成功,你可以新建一个 PHP 页面进行测试,使用 vim 编辑器新建:
[root@localhost ~]# vi /var/www/html/info.php
五、将 PHP 模块和 MySQL 模块关联起来
还需要将 PHP 和 MySQL 关联起来,才能正常工作。搜索模块:
[root@localhost ~]# yum search php
安装相关模块:
[root@localhost ~]# yum install php-mysql php-gd php-imap php-ldap php-odbc php-pear php-xml php-xmlrpc
需要重启 Apache 模块才能生效:
[root@localhost ~]# /etc/init.d/httpd restart
再次刷新刚才建立的 “info.php” 页面,往下拉找到相关 MySQL 模块,看是否检测到相关信息。
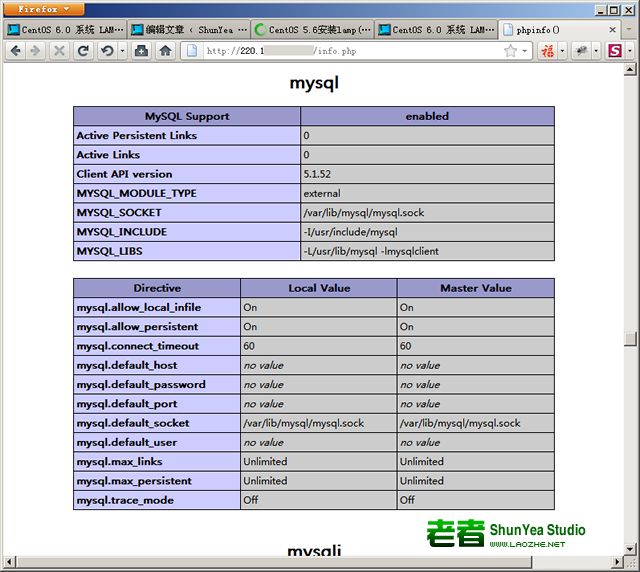
如果看到如上图相关信息,则说明 MySQL 工作正常了。
6 在当下的大环境中,越来越多的人喜欢把Ngnix替代apache,顺便安装一下ngnix。
yum install nginx
安装好以后启动一下
service nginx start

Starting nginx: nginx: [emerg] bind() to 0.0.0.0:80 failed (98: Address already in use)
nginx: [emerg] bind() to 0.0.0.0:80 failed (98: Address already in use)
nginx: [emerg] bind() to 0.0.0.0:80 failed (98: Address already in use)
nginx: [emerg] bind() to 0.0.0.0:80 failed (98: Address already in use)
nginx: [emerg] bind() to 0.0.0.0:80 failed (98: Address already in use)
nginx: [emerg] still could not bind()
[FAILED]
报错的原因是我们 刚才的apache的端口没有关闭,因为都是占用80端口。
所以先把apache停掉。
/etc/init.d/httpd stop
重新启动nginx,如果看到下边的说明你成功了。
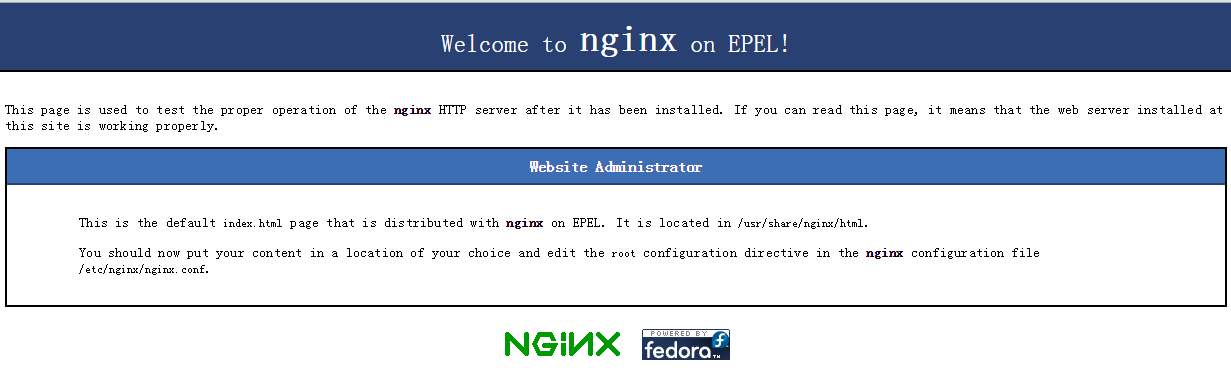
说明一下:ng的静态文件存储在/usr/share/nginx/html中,ng的配置文件存放在/etc/nginx/nginx.conf中。但是要修改web的配置文件,目录为/etc/nginx/conf.d中。
default.conf
#
# The default server
#
server {
    listen       80 default_server;
    server_name  _;

    #charset koi8-r;

    #access_log  logs/host.access.log  main;

    # Load configuration files for the default server block.
    include /etc/nginx/default.d/*.conf;

    location / {
        root   /usr/share/nginx/html;
        index  index.html index.htm;
    }

    error_page  404              /404.html;
    location = /404.html {
        root   /usr/share/nginx/html;
    }

    # redirect server error pages to the static page /50x.html
    #
    error_page   500 502 503 504  /50x.html;
    location = /50x.html {
        root   /usr/share/nginx/html;
    }

    # proxy the PHP scripts to Apache listening on 127.0.0.1:80
    #
    #location ~ .php$ {
    #    proxy_pass   http://127.0.0.1;
    #}

    # pass the PHP scripts to FastCGI server listening on 127.0.0.1:9000
    #
    #location ~ .php$ {
    #    root           html;
    #    fastcgi_pass   127.0.0.1:9000;
    #    fastcgi_index  index.php;
    #    fastcgi_param  SCRIPT_FILENAME  /scripts$fastcgi_script_name;
    #    include        fastcgi_params;
    #}

    # deny access to .htaccess files, if Apache's document root
    # concurs with nginx's one
    #
    #location ~ /.ht {
    #    deny  all;
    #}
}
7 总结:
其实这次安装整体来说并不麻烦,网上的资料也很多,只是没有把他们拼凑在一起,安装的时候会有点小坑,一切搞定。