Struts2框架
Struts2由Struts1和WebWork两个经典的MVC框架发展起来,是一个非常优秀的MVC框架。Struts2中的execute()方法不再与servlet API耦合,因而更容易测试。Struts2支持更多的视图技术,提供了基于AOP思想的拦截机制,以及更强大更容易使用的校验功能和ajax支持。
所有的Web项目都是基于请求/响应模式而建立的。在web.xml中配置Struts的核心Filter就能将Web的流程转入到Struts框架内。
Struts2的运行流程图:
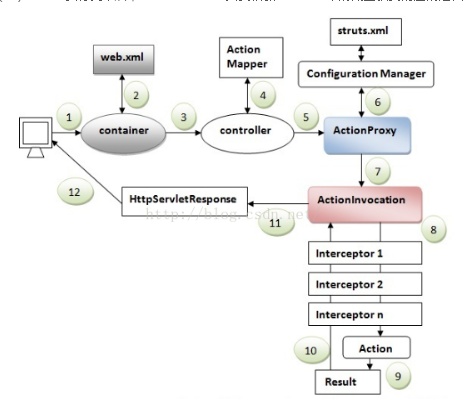
(1)客户端初始化一个指向Servlet容器(例如Tomcat)的请求 (客户端提交一个HttpServletRequest请求。)
(2)请求被提交到一系列的过滤器(Filter)。
如(ActionContextCleanUp、其他过滤器(SiteMesh等)、 FilterDispatcher。注意:这里是有顺序的,先ActionContext CleanUp,再其他过滤器(Othter Filters、SiteMesh等),最后到FilterDispatcher。
FilterDispatcher是控制器的核心,就是MVC的Struts 2实现中控制层(Controller)的核心。
(3)FilterDispatcher询问ActionMapper是否需要调用某个Action来处理这个(HttpServlet Request)请求,如果ActionMapper决定需要调用某个Action,FilterDispatcher则把请求的处理交给ActionProxy。
(4) ActionProxy通过Configuration Manager(struts.xml)询问框架的配置文件,找到需要调用的Action类。
(5)ActionProxy创建一个ActionInvocation实例,同时ActionInvocation通过代理模式调用Action。但在调用之前,ActionInvocation会根据配置加载Action相关的所有Interceptor(拦截器)。
(6)Action执行完毕后,ActionInvocation负责根据struts.xml中的配置找到对应的返回结果result。
下面是Struts2的一个简单的实例
起始页面为一个登陆页面,登陆成功后跳转至登陆成功页面,否则登录页面提示错误信息。
【1、创建项目导入相应的架包】
【2、修改web.xml文件,添加过滤器】
<?xml version="1.0" encoding="UTF-8"?>
<web-app version="2.5" xmlns="http://java.sun.com/xml/ns/javaee" xmlns:xsi="http://www.w3.org/2001/XMLSchema-instance" xsi:schemaLocation="http://java.sun.com/xml/ns/javaeehttp://java.sun.com/xml/ns/javaee/web-app_2_5.xsd">
<!-- 配置项目运行时跳转的厨师页面 -->
<welcome-file-list>
<welcome-file>login.jsp</welcome-file>
</welcome-file-list>
<!-- 配置Struts 2核心过滤器 -->
<filter>
<filter-name>struts2</filter-name>
<filter-class>org.apache.struts2.dispatcher.ng.filter.StrutsPrepareAndExecuteFilter</filter-class>
</filter>
<filter-mapping>
<filter-name>struts2</filter-name>
<url-pattern>/*</url-pattern>
</filter-mapping>
</web-app>
【3、建立Action类】
在action类中默认的execute()方法中,对用户名和密码进行验证
{
return userName;
}
public void setUserName(String userName)
{
this.userName = userName;
}
public String getPassWord()
{
return passWord;
}
public void setPassWord(String passWord)
{
this.passWord = passWord;
}
@Override
public String execute() throws Exception
{
// TODO Auto-generated method stub
// 定义返回值变量
String strResult = INPUT;
// 业务逻辑判断
if (passWord.equals("123") && userName.equals("abc"))
{
strResult = SUCCESS;
}
else
{
ActionContext.getContext().getSession().put("tip", "登陆失败");
}
return strResult;
}
}
【4、建立前台jsp页面,login.jsp和loginSuccess.jsp 用Struts2的标签库】
<%@ page language="java" contentType="text/html; charset=UTF-8"
pageEncoding="UTF-8"%>
<%@ taglib uri="/struts-tags" prefix="s" %>
<!DOCTYPE html PUBLIC "-//W3C//DTD HTML 4.01 Transitional//EN" "http://www.w3.org/TR/html4/loose.dtd">
<html>
<head>
<meta http-equiv="Content-Type" content="text/html; charset=UTF-8">
<title>用户登陆页面</title>
</head>
<body>
<center style="background-color: aqua;">
${tip }
<s:form action="login.action" method="post">
<s:textfield name="userName" label="用户名"></s:textfield>
<s:password name="passWord" label="密码"></s:password>
<s:submit value="登陆"></s:submit>
</s:form>
</center>
</body>
</html>
-=-=-=-=-=-=-=-=-=-=-=-=-=-=-=-=-=-=-=-=-=-=
<%@ page language="java" contentType="text/html; charset=UTF-8"
pageEncoding="UTF-8"%>
<%@ taglib uri="/struts-tags" prefix="s" %>
<!DOCTYPE html PUBLIC "-//W3C//DTD HTML 4.01 Transitional//EN" "http://www.w3.org/TR/html4/loose.dtd">
<html>
<head>
<meta http-equiv="Content-Type" content="text/html; charset=UTF-8">
<title>登陆成功页面</title>
</head>
<body>
<center style="background-color: aqua;">
<span>登陆成功</span>
</center>
</body>
</html>
【4、添加struts文件并对其进行配置】
<?xml version="1.0" encoding="UTF-8"?>
<!DOCTYPE struts PUBLIC "-//Apache Software Foundation//DTD Struts Configuration 2.0//EN"
"http://struts.apache.org/dtds/struts-2.0.dtd">
<struts>
<!-- 设置 struts 的web解码方式-->
<constant name="struts.i18n.encoding" value="UTF-8"></constant>
<package name="myPackage" extends="struts-default">
<!-- 定义登陆的action -->
<action name="login" class="wyl.action.UserAction">
<result>loginSuccess.jsp</result><!-- 默认跳转的页面 -->
<result name="input">login.jsp</result>
</action>
</package>
</struts>
【6、修改web.xml把起始页修改为login.jsp】
<!-- 配置项目运行时跳转的厨师页面 -->
<welcome-file-list>
<welcome-file>login.jsp</welcome-file>
</welcome-file-list>
【最后运行项目】