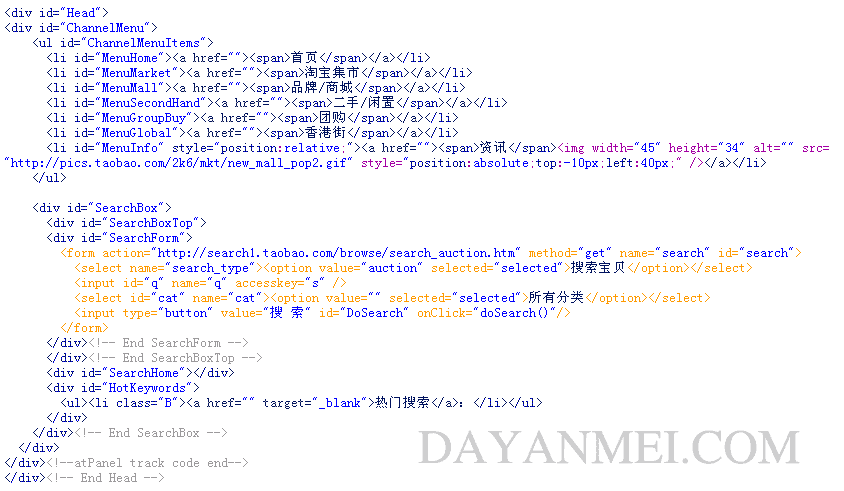
我们还是先来看看网页的实际样式

我们把它分为两个块(其实是三个块)

下面是源码的截图,还是采用Head容器,为了方便查看,很多无关的代码我已经省略了

html源码中 div,css分析
1.#Head在上一节中已经说到,text-align:center;是文本居中对齐
#Head{
text-align:center;
}
2.#ChannelMenu定义了宽度为760px,外补丁上下,左右均为0px,文本居中对齐
#Head #ChannelMenu{
width:760px;
margin:0 auto;
text-align:center;
}
3.#ChannelMenuItems容器在#ChannelMenu内,但#ChannelMenu没有什么限制,所以直接写在容器#Head下面也 是一样的,当然也可以这样写#Head #ChannelMenu #ChannelMenuItems {}效果是一样的,
#Head #ChannelMenuItems{
width:520px;
height:33px;
margin:0 auto;
}
这里定义的是宽度520px,高度33px,外补丁为0px
4.ul跟#ChannelMenuItems一样,虽然在那些容器内,但他们不对ul限制,所以可以直接写在#Head下面,甚至你可以将前面的#Head去掉
#Head ul{
list-style-type:none;
margin:0;
padding:0;
}
这里设定列表样式为 none,即不显示,外补丁,内补丁为0px
5.设定li,在特定的容器#Head #ChannelMenuItems里的样式
#Head #ChannelMenuItems li{
float:left;
height:33px;
margin-right:1px;
}
从左边浮动,高度为33px,右补丁为1px
6.设定链接样式
#Head #ChannelMenuItems a{
display:block;
float:left;
height:33px;
background:transparent url(images/cm_l.gif) left top no-repeat;
text-decoration:none;
}
块状方式显示,左浮动,高度为33px,背景左上排列,不重复,此设定对其下面的 a:link,a:visited,a:hover,a:active均起作用
7.通过添加span属性,用于显示右边图片背景
#Head #ChannelMenuItems a span{
display:block;
float:left;
height:33px!important;
height: 22px;
height /*ie55*/: 33px;
padding:11px 12px 0;
background:transparent url(images/cm_r.gif) right top no-repeat;
text-align:center;
color:#000;
font-size: 14px;
}
以块状方式显示,左浮动,高度为33px(我也有些糊涂了,怎么三个height?),padding有三个参数时,我们回忆一下:第一个参数是上,第二 个参数是左右,第三个参数是下,说明上内补丁为11px,左右内补丁为12px,背景为右上不重复排列,文字居中颜色为#000,大小为14px
我们再来看看左边的背景图和右边的背景图
左边:

右边:

上面的好处就是两个背景图片就可以适应不同宽度的菜单列表,因为左边具有适当的长
8.激活时样式
#Head #ChannelMenuItems a:hover{
background:transparent url(images/cm_hov_l.gif) left -3px no-repeat;
}
当鼠标放上时为了达到效果,将左背景图向右移动3px(差三个象素宽度左对齐),并且背景图片透明,不重复
#Head #ChannelMenuItems a:hover span{
background:transparent url(images/cm_hov_r.gif) right -3px no-repeat;
}
9.当列表有设置ID时以最后设置的id为准
body.CurHome ul#ChannelMenuItems li#MenuHome a, body.CurHome ul#ChannelMenuItems li#MenuHome a:hover{
background:url(http://pics.taobao.com/bao/album/sys/misc/cm_act_l.gif) left top no-repeat;
}
body.CurHome ul#ChannelMenuItems li#MenuHome a span, body.CurHome ul#ChannelMenuItems li#MenuHome a:hover span{
background:transparent url(http://pics.taobao.com/bao/album/sys/misc/cm_act_r.gif) right top no-repeat;
font-weight:bold;
color:#FFF;
}
10.#SearchBox
#Head #SearchBox{
text-align:left;
height:58px;
background:transparent url(images/searchbox_tab_left.gif) 0 0 no-repeat;
background-color:#FF9000;
}
11.#Head #SearchBoxTop
#Head #SearchBoxTop{
width: 740px;
float: left;
height:34px;
overflow: hidden;
}
overflow : visible | auto | hidden | scroll
取值:
visible : 默认值。不剪切内容也不添加滚动条。假如显式声明此默认值,对象将以包含对象的 window 或 frame 的尺寸裁切。并且 clip 属性设置将失效
auto : 在必需时对象内容才会被裁切或显示滚动条
hidden : 不显示超过对象尺寸的内容
scroll : 总是显示滚动条
12.#SearchForm
#Head #SearchForm{
float:left;
width:740px;
height:34px;
}
13.
#Head #HotKeywords{
float:left;
text-indent:8px;
752px;
height:24px;
margin-left:3px;
overflow:hidden;
background:transparent url(images/searchbox_tab_center.gif) 0 0 repeat-x;
}
剩下表单那些就不分析了,基本差不多
总结一下:
1.可以通过a span使用两张背景图片拼合成背景
2.使用相对位置可以使层重叠,比如
<li id="MenuInfo" style="position:relative;"><a href=""><span>资讯</span><img width="45" height="34" alt="" src="http://pics.taobao.com/2k6/mkt/new_mall_pop2.gif" style="position:absolute;top:-10px;left:40px;" /></a></li>
本节完,具体的知识,参数还需要再熟悉