源博客http://my.oschina.net/gccr/blog/321083
当用户量大、应用服务器使用集群来布署时,使用Tomcat默认自带的Session就不能满足需求了。当然解决方法有很多,本文提供了一个解决方案,就是使用Redis来保存Session,好处就是使用Session的代码没有任何变化,Tomcat默认把Session保存到Redis上面了。
使用 Redis 服务器来存储Session非常有优势。首先它是一个NOSQL数据,第二它很容易扩展使用。
下面这种安装方式非常清晰明白的引导你把Redis缓存作为一个Session的存储系统。步骤如下:
1. 下载Redis并且使用下面的命令编译安装:
wget http://download.redis.io/redis-stable.tar.gz
tar xvzf redis-stable.tar.gz
cd redis-stable
make
2. 使用如下命令启动Redis
cd RedisDirectory/src
./redis-server --port 6379
3. 下载最新的Tomcat 7
4. 下载最新的Jedis(一个Redis 的Java客户端),Tomcat Redis Session Manager 和 Apache Commons Pool
5. 将上面所有的Jar包都拷到Tomcat7安装目录下面的Lib目录下
6. 在Tomcat 的conf/context.xml 文件里增加如下内容(或者在server.xml的context块中添加):
<Valve className="com.radiadesign.catalina.session.RedisSessionHandlerValve" /> <Manager className="com.radiadesign.catalina.session.RedisSessionManager" host="localhost" <!-- 可选,默认是"localhost" --> port="6379" <!-- 可选,默认是 "6379" --> database="0" <!-- 可选,默认是 "0" --> maxInactiveInterval="60" <!-- 可选,默认是 "60" (单位:秒)--> />context.xml后把我的备注 复制到
<!-- 可选,默认是"localhost" --> 这些注释去掉 有可能会影响读入xml文件
7. 重启Tomcat7,你现你可以看到,Session的内容开始在Redis中创建了。
现在,Tomcat7的Session就保存到Redis中了,而且它也维护着Session的不同方面。
各个组件的下载地址:
Redis:http://redis.io/
JRedis: https://github.com/xetorthio/jedis
Tomcat Redis Session Manager :https://github.com/jcoleman/tomcat-redis-session-manager/downloads
Apache Commons Pool :http://commons.apache.org/proper/commons-pool/download_pool.cgi

jedis用的jedis-2.2.0.jar
    tomcat-redis-session-manager-1.2-tomcat-7.jar
  commons-pool-1.3.jar
  commons-pool2-2.2.jar
  jdk要用1.7
  测试所用jsp 放到D:apache-tomcat-7.0.56webappsROOT目录下
<%@ page contentType="text/html;charset=UTF-8" isELIgnored="false"%>
SessionID:<%=session.getId()%>
<BR>
SessionIP:<%=request.getServerName()%>
<BR>
SessionPort:<%=request.getServerPort()%>
<%
out.println("This is Tomcat Server 111111!");
%>
访问

 执行过程遇到的问题
tomcat报错java版本问题 需要配置jdk

jedis版本过高 应改为2.2.2
严重: Error deploying web application directory D:apache-tomcat-7.0.56webappsROOT
java.lang.VerifyError: Bad type on operand stack
Exception Details:
Location:
com/radiadesign/catalina/session/RedisSessionManager.initializeDatabaseConnection()V @28: invokespecial
Reason:
Type 'redis/clients/jedis/JedisPoolConfig' (current frame, stack[3]) is not assignable to 'org/apache/commons/pool/impl/GenericObjectPool$Config'
Current Frame:
bci: @28
flags: { }
locals: { 'com/radiadesign/catalina/session/RedisSessionManager' }
stack: { 'com/radiadesign/catalina/session/RedisSessionManager', uninitialized 1, uninitialized 1, 'redis/clients/jedis/JedisPoolConfig', 'java/lang/String', integer, integer, 'java/lang/String' }
Bytecode:
0000000: 2abb 009d 59bb 009e 59b7 009f 2ab6 00a0
0000010: 2ab6 00a1 2ab6 00a2 2ab6 00a3 b700 a4b5
0000020: 0018 a700 134c 2bb6 00a5 bb00 3259 12a6
0000030: 2bb7 00a7 bfb1
Exception Handler Table:
bci [0, 34] => handler: 37
Stackmap Table:
same_locals_1_stack_item_frame(@37,Object[#276])
same_frame(@53)
 更新 基于nginx tomcat redis分布式web应用的session共享配置 源博客 http://www.cnblogs.com/lengfo/p/4260363.html
用nginx实现tomcat服务器的负载均衡
基于nginx tomcat redis分布式web应用的session共享配置
一、前言
nginx 作为目前最流行的开源反向代理HTTP Server,用于实现资源缓存、web server负载均衡等功能,由于其轻量级、高性能、高可靠等特点在互联网项目中有着非常普遍的应用,相关概念网上有丰富的介绍。分布式web server集群部署后需要实现session共享,针对 tomcat 服务器的实现方案多种多样,比如 tomcat cluster session 广播、nginx IP hash策略、nginx sticky module等方案,本文主要介绍了使用 redis 服务器进行 session 统一存储管理的共享方案。
相关应用结构参照下图:

二、环境配置
测试环境基于 Linux CentOS 6.5,请先安装 tomcat、redis、nginx 相关环境,不作详细描述,本文测试配置如下:
| Version | IP_Port | |
| nginx | 1.6.2 | 10.129.221.70:80 |
| tomcat_1 | 7.0.54 | 10.129.221.70:8080 |
| tomcat_2 | 7.0.54 | 10.129.221.70:9090 |
| redis | 2.8.19 | 10.129.221.70:6379 |
三、构建 tomcat-redis-session-manager-master
1、由于源码构建基于 gradle,请先配置 gradle 环境。
2、从 github 获取 tomcat-redis-session-manager-master 源码,地址如下:
https://github.com/jcoleman/tomcat-redis-session-manager
3、找到源码中的 build.gradle 文件,由于作者使用了第三方仓库(sonatype),需要注册帐号,太麻烦,注释后直接使用maven中央仓库,同时注释签名相关脚本并增加依赖包的输出脚本 copyJars(dist目录),修改后的 build.gradle 文件如下:
 View Code
4、执行gradle命令构建源码,编译输出tomcat-redis-session-manager-master 及依赖jar包
gradle build -x test copyJars
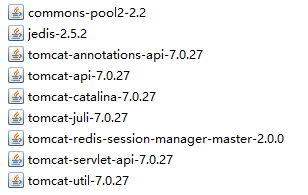
所有输出列表文件如下:
四、tomcat 配置
安装配置两台 tomcat web服务器,分别修改 Connector 端口号为8080和9090,并确保都能正常工作,当然如果分布在不同的主机则可以使用相同端口号。
五、编写测试页面
为了区别2台tomcat的访问,分别编写页面并打包部署:
1、为tomcat_1编写测试页面,显示 “ response from tomcat_1 ”,同时页面提供按钮显示当前session值,打包并发布到 tomcat_1 服务器;
2、为tomcat_2编写测试页面,显示 “ response from tomcat_2 ”,同时页面提供按钮显示当前session值,打包并发布到 tomcat_2 服务器;
此时分别访问 http://10.129.221.70:8080 和 http://10.129.221.70:9090 地址,因为访问的是不同web服务器,所以各自显示不同的页面内容及session值肯定不同。
六、tomcat session manager 配置
修改配置使用 tomcat-redis-session-manager-master 作为 tomcat session 管理器
1、分别将第三步生成的 tomcat-redis-session-manager-master 及依赖jar包覆盖到 tomcat 安装目录的 lib 文件夹
2、分别修改2台 tomcat 的 context.xml 文件,使 tomcat-redis-session-manager-master 作为session管理器,同时指定redis地址和端口。
context.xml 增加以下配置:

<Context>
      <Valve className="com.orangefunction.tomcat.redissessions.RedisSessionHandlerValve" />
      <Manager className="com.orangefunction.tomcat.redissessions.RedisSessionManager"
           host="localhost"
           port="6379"
           database="0"
           maxInactiveInterval="60" />
</Context>
3、分别重启2台 tomcat 服务器。
七、nginx 配置
1、修改 default.conf 配置文件,启用 upstream 负载均衡 tomcat Cluster,默认使用轮询方式。
upstream site {
    server localhost:8080;
    server localhost:9090;
}

server {
    listen       80;
    server_name  localhost;

    #charset koi8-r;
    #access_log  /var/log/nginx/log/host.access.log  main;

    location / {
        #root   /usr/share/nginx/html;
        #index  index.html index.htm;
        index  index_tel.jsp index.jsp index.html index.htm ;
        proxy_redirect          off;
        proxy_set_header        Host            $host;
        proxy_set_header        X-Real-IP       $remote_addr;
        proxy_set_header        X-Forwarded-For $proxy_add_x_forwarded_for;
        client_max_body_size    10m;
        client_body_buffer_size 128k;
        proxy_buffers           32 4k;
        proxy_connect_timeout   3;
        proxy_send_timeout      30;
        proxy_read_timeout      30;
            proxy_pass http://site;

    }

    #error_page  404              /404.html;

    # redirect server error pages to the static page /50x.html
    #
    error_page   500 502 503 504  /50x.html;
    location = /50x.html {
        root   /usr/share/nginx/html;
    }

    # proxy the PHP scripts to Apache listening on 127.0.0.1:80
    #
    #location ~ .php$ {
    #    proxy_pass   http://127.0.0.1;
    #}

    # pass the PHP scripts to FastCGI server listening on 127.0.0.1:9000
    #
    #location ~ .php$ {
    #    root           html;
    #    fastcgi_pass   127.0.0.1:9000;
    #    fastcgi_index  index.php;
    #    fastcgi_param  SCRIPT_FILENAME  /scripts$fastcgi_script_name;
    #    include        fastcgi_params;
    #}

    # deny access to .htaccess files, if Apache's document root
    # concurs with nginx's one
    #
    #location ~ /.ht {
    #    deny  all;
    #}
}
2、nginx 重新加载配置
nginx -s reload
八、测试结果
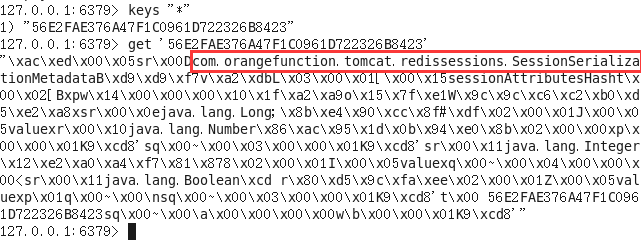
1、访问 http://10.129.221.70:8080 直接请求到tomcat_1服务器,
显示 “ response from tomcat_1 ”, session 值为 ‘56E2FAE376A47F1C0961D722326B8423’;
2、访问 http://10.129.221.70:9090 直接请求到tomcat_2服务器,
显示 “ response from tomcat_2 ”, session 值为 ‘56E2FAE376A47F1C0961D722326B8423’;
3、访问 http://10.129.221.70 (默认80端口)请求到 nginx 反向代理到指定Web服务器,由于默认使用轮询负载方式,
反复刷新页面显示的内容在“ response from tomcat_1 ” 和 “ response from tomcat_2 ”之间切换,但 session 值保持为 ‘56E2FAE376A47F1C0961D722326B8423’;
4、使用 redis-cli 连接 redis 服务器,查看会显示有 “56E2FAE376A47F1C0961D722326B8423” key的 session 数据,value为序列化数据。