概要:
xmind学习思维导图:
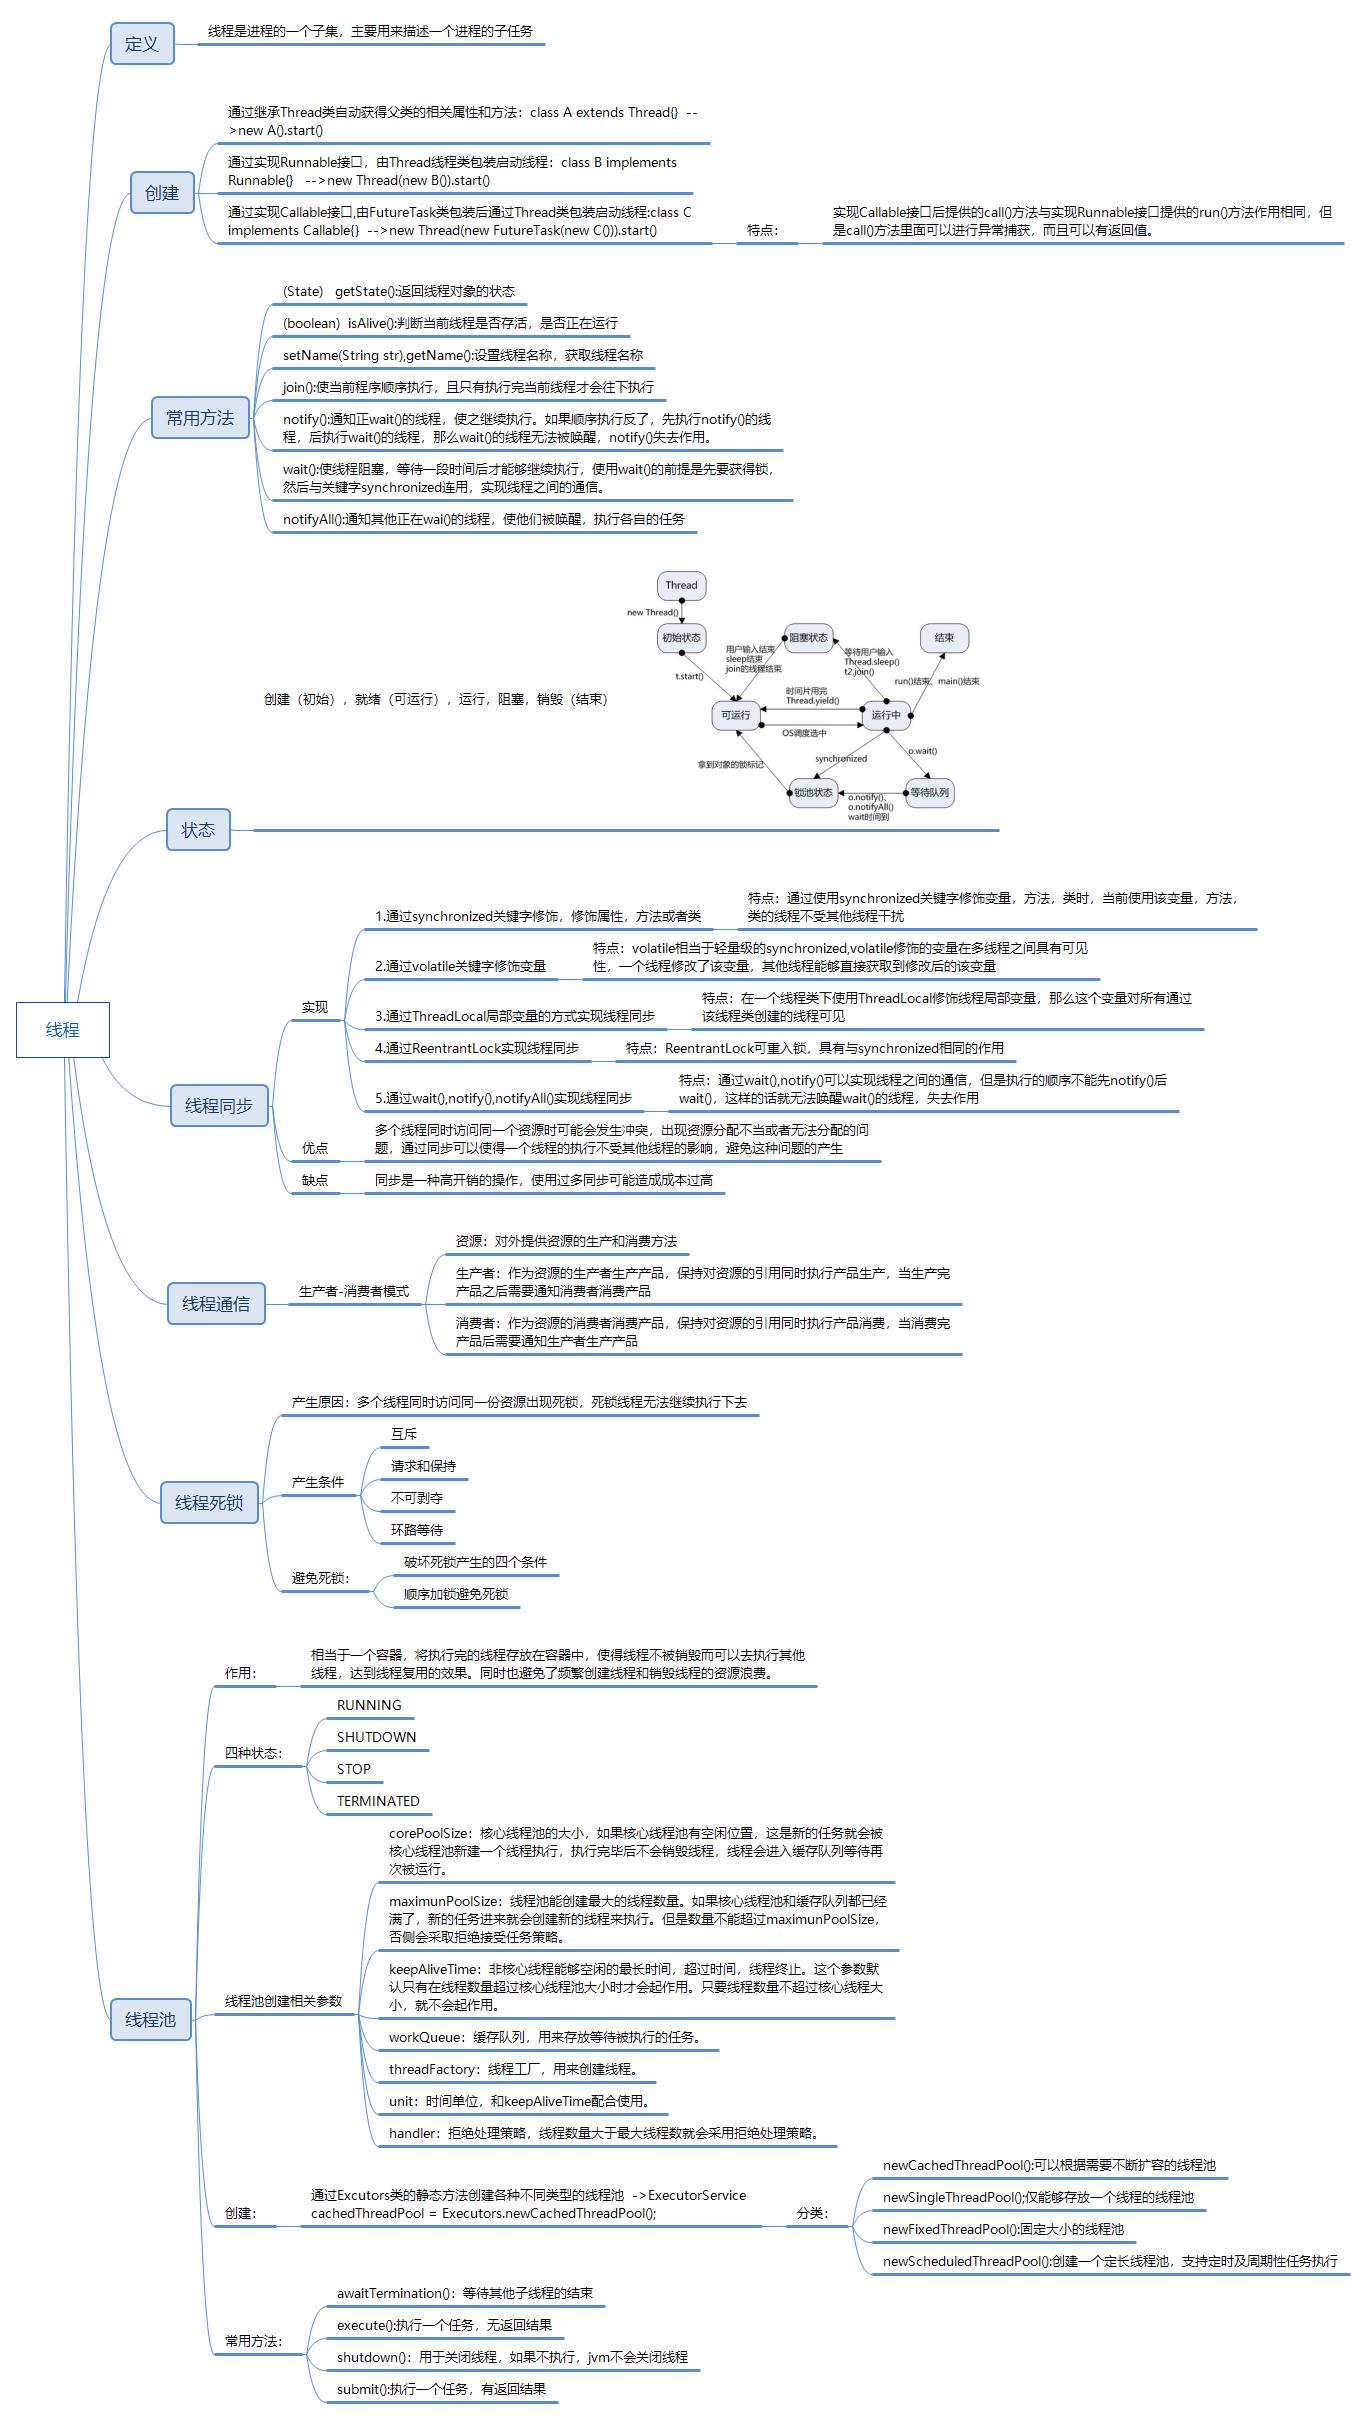
一:线程状态
(1)新生状态-》创建线程对象然后实现start()方法
(2)就绪状态
(3)运行状态-》cpu调度
(4)阻塞状态
(5)死亡状态
二:停止线程
1.自然终止:线程体正常运行完毕
2.外部干涉:
1)线程类中定义线程体的标识
2)线程体使用该标识
3)提供对外的方法改变该标识
4)外部根据条件调用该方法即可
三:阻塞
1.join:合并线程,Y.join(),则先执行Y对象里面的线程体
2.Thread.yield():暂停线程,当前的方法体
3.Thread.sleep():睡眠,模拟延时,但有可能出现数据异常,资源冲突
四:线程基本信息
isAlive():判断线程是否活着,是否未终止
getPriority():获取线程的优先级数据,优先级代表的是概率,并非绝对的先后顺序
setPriority():设置线程的优先级
setName():给线程取名字
getName():获取线程名字
currentThread():获取当前正在运行的线程对象,也就是取得自己本身
五:线程同步(线程并发)
synchronized->同步
(1)同步块:
synchronized(引用类型 || this || 类.class){}
1 public void run() {
2         synchronized (UseSynchronized.class) {
3             while (true) {
4                 System.out.println(Thread.currentThread().getName() + "获得属性" + a);
5             }
6         }
7     }
(2)同步方法:
synchronized 方法名(){}
1  public void run() {
2         synchronized (test()) {
3             while (true) {
4                 System.out.println(Thread.currentThread().getName() + "获得属性" + a);
5             }
6         }
7     }
(3)同步属性:
synchronized(属性){}
1   public void run() {
2         synchronized (a) {
3             for (int i = 0; i < 20; i++) {
4                 System.out.println(Thread.currentThread().getName() + "获得属性" + a);
5             }
6         }
7     }
多个线程访问同一份资源,确保资源安全->线程安全
线程安全则效率低,反之
六:死锁
①、互斥条件:资源不能被共享,只能被同一个进程使用;
②、请求与保持条件:已经得到资源的进程可以申请新的资源;
③、非剥夺条件:已经分配的资源不能从相应的进程中强制剥夺;
④、循环等待条件:系统中若干进程形成环路,该环路中每个进程都在等待相邻进程占用的资源。
过多的同步可能造成死锁-->利用生产者消费者模式解决死锁问题
七:创建线程的三种方式:
(1)继承Thread类,自动拥有Thread类的所有属性,方法。
 1 //第一种创建线程的方式:继承Thread类
 2 public class CreateThread1 extends Thread {
 3
 4     @Override
 5     public void run() {
 6         try {
 7             CreateThread1 t1 = new CreateThread1();
 8             t1.join(1000);
 9             System.out.println("当前线程状态->" + t1.getState());
10             t1.sleep(1000);
11             System.out.println("当前线程状态->" + t1.getState());
12             for (int i = 0; i < 100; i++) {
13                 System.out.println("-->通过继承Thread类实现线程的创建");
14             }
15         } catch (InterruptedException e) {
16
17         }
18     }
19
20     @Test
21     public void test() {
22         //new 出线程对象
23         CreateThread1 createThread1 = new CreateThread1();
24         //设置线程名称
25         createThread1.setName("线程1");
26         //获取上下文类加载器
27         System.out.println("当前线程的类加载器:" + createThread1.getContextClassLoader());
28         //获取当前线程的状态
29         System.out.println("当前线程的状态:" + createThread1.getState());
30         //判断当前线程是否处于运行,存活状态
31         System.out.println("当前线程是否正在运行:" + createThread1.isAlive());
32         //获取当前线程的名称
33         System.out.println("当前线程的名称:" + createThread1.getName());
34     }
35
36
37     public static void main(String[] args) {
38         new CreateThread1().start();
39     }
40 }
(2)实现Runnable接口,通过重写run()方法,需要借助Thread类进行包装然后启动线程。
 1 //通过实现Runnable接口实现线程的创建
 2 public class CreateThread2 implements Runnable {
 3
 4     public void run() {
 5         System.out.println("-->通过实现Runnable接口创建线程");
 6     }
 7
 8     public static void main(String[] args) {
 9         new Thread(new CreateThread2()).start();
10     }
11 }
(3)JDK1.5之后出现了Callable接口,通过实现Callable接口,重写call()方法同样具有修改线程执行体内部的作用,同时call()方法还具有抛出异常的作用。
 1 //通过实现jdk1.5之后推出的Callable接口实现线程创建
 2 public class CreateThread3 implements Callable<Object> {
 3
 4     public Object call() throws Exception {
 5         System.out.println("-->通过实现Callable接口创建线程");
 6         return null;
 7     }
 8
 9     @Test
10     public void testThread() {
11         //通过FutureTask类包装实现Callable接口的类启动线程
12         FutureTask<Object> task = new FutureTask<Object>(new CreateThread3());
13         new Thread(task).start();
14     }
15 }
八.线程池:
 1 //对线程池进行简单了解,简单使用
 2 public class ThreadPool {
 3     //创建一个可根据需要创建线程的线程池
 4     private static ExecutorService cachedThreadPool = Executors.newCachedThreadPool();
 5     //创建一个单例的线程池,也就是线程池中仅能够存放一个线程
 6     private static ExecutorService singleThreadPool = Executors.newSingleThreadExecutor();
 7     //创建一个固定大小的线程池,自定义大小为3
 8     private static ExecutorService fixedThreadPool=Executors.newFixedThreadPool(3);
 9
10     //构造器私有化,外部无法new出对象
11     private ThreadPool() {
12     }
13
14     public static void main(String[] args) {
15         //将一个任务扔到线程池中
16        cachedThreadPool.execute(new Runnable() {
17            public void run() {
18                System.out.println("任务执行中!");
19            }
20        });
21
22     /*   singleThreadPool.execute(new Runnable() {
23            public void run() {
24                System.out.println("任务执行中!");
25            }
26        });*/
27        cachedThreadPool.submit(new Runnable() {
28            public void run() {
29                System.out.println("结果显示!");
30            }
31        });
32        //直接将线程池中所有的任务关闭,不再执行
33        cachedThreadPool.shutdown();
34     }
35 }
代码:
1.具体角色:
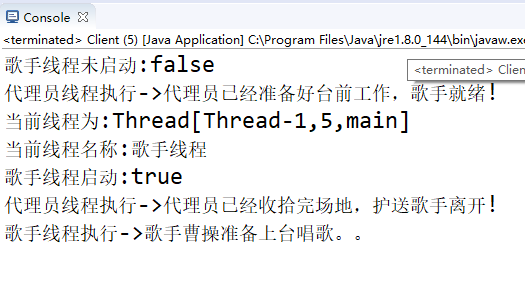
 1 package com.test;
 2 /*使用Runnable创建线程
 3  * 1.使用静态代理模式实现启动多线程
 4  * (1)创建真实角色
 5  * (2)创建代理角色
 6 */
 7 public  class Singer implements Runnable {
 8
 9     @Override
10     public void run() {
11         System.out.println("歌手线程执行->歌手曹操准备上台唱歌。。");
12     }
13 }
2.代理角色:保持对具体角色的引用
 1 package com.test;
 2
 3 public class Agent implements Runnable{
 4     Singer singer=new Singer();
 5     Thread t1=new Thread(singer);
 6     public Agent(Singer singer) {
 7         super();
 8         this.singer = singer;
 9     }
10     private void before() {
11         System.out.println("代理员线程执行->代理员已经准备好台前工作,歌手就绪!");
12     }
13     private void after() {
14         System.out.println("代理员线程执行->代理员已经收拾完场地,护送歌手离开!");
15     }
16
17     @Override
18     public void run() {
19         System.out.println("歌手线程未启动:"+t1.isAlive());
20         before();
21         t1.start();
22         t1.setName("歌手线程");
23         System.out.println("当前线程为:"+t1.currentThread());
24         System.out.println("当前线程名称:"+t1.getName());
25         System.out.println("歌手线程启动:"+t1.isAlive());
26         //这里存在多线程运行的延时,即代理员的线程可能运行在歌手的线程前面
27         after();
28     }
29 }
3.场景模拟:
 1 package com.test;
 2 /*
 3  * 场景模拟:实现多线程的启动
 4  */
 5 public class Client {
 6
 7     public static void main(String[] args) throws InterruptedException {
 8         //具体角色
 9         Singer singer=new Singer();
10         //代理角色
11         Agent ag=new Agent(singer);
12         Thread p2=new Thread(ag);
13         //启动线程
14         p2.start();
15     }
16 }
效果截图:
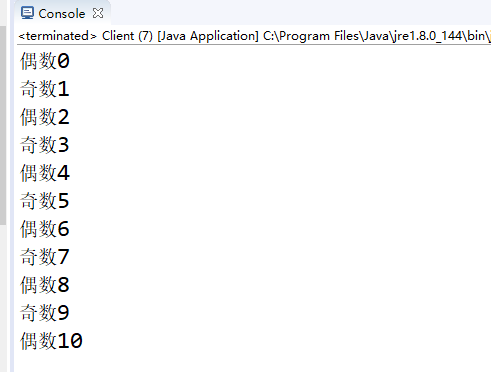
利用生产者消费者模式解决死锁问题:
1.共享资源
 1 package com.deadclock;
 2 //共享资源
 3 public class Movie {
 4     private String pic;
 5     //定义一个信号灯,用于标识生产者消费者的处理结果,以及通知顺序
 6     private boolean flag=true;
 7
 8     //加入同步锁防止资源分配不当出现死锁
 9     public  synchronized void play(String pic) {
10
11         if(!flag) {//生产者等待
12             try {
13                 this.wait();
14             } catch (InterruptedException e) {
15                 e.printStackTrace();
16             }
17         }
18         //开始生产
19         try {
20             Thread.sleep(500);
21         } catch (InterruptedException e) {
22
23             e.printStackTrace();
24         }
25         //生产完毕
26         this.pic=pic;
27         //通知消费者
28         this.notify();
29         this.flag=false;
30     }
31
32     public synchronized void watch() {
33         if(flag) {//消费者等待
34             try {
35                 this.wait();
36             } catch (InterruptedException e) {
37                 e.printStackTrace();
38             }
39             //开始消费
40             try {
41                 Thread.sleep(200);
42             } catch (InterruptedException e) {
43                 e.printStackTrace();
44             }
45         }
46         //消费完毕
47         System.out.println(pic);
48         //通知生产者
49         this.notify();
50         this.flag=true;
51     }
52
53 }
2.具体访问共享资源角色:
 1 package com.deadclock;
 2 //使用共享资源的具体角色
 3 public class Player implements Runnable{
 4
 5     private Movie m;
 6
 7     //构造器,传入movie对象
 8     public Player(Movie m) {
 9         super();
10         this.m=m;
11     }
12
13     @Override
14     public void run() {
15
16         for(int i=0;i<=10;i++) {
17             if(i%2==1) {
18                 m.play("奇数"+i);
19             }
20             else
21                 m.play("偶数"+i);
22         }
23     }
24 }
 1 package com.deadclock;
 2 //使用共享资源的具体角色
 3 public class Watcher implements Runnable{
 4
 5     private Movie m;
 6
 7     //构造器,传入movie对象
 8     public Watcher(Movie m) {
 9         super();
10         this.m=m;
11     }
12
13     @Override
14     public void run() {
15         for(int i=0;i<=10;i++) {
16             m.watch();
17         }
18     }
19 }
3.场景模拟
 1 package com.deadclock;
 2
 3 public class Client {
 4
 5     public static void main(String[] args) {
 6         //共享资源初始化
 7         Movie m=new Movie();
 8         //具体使用资源对象
 9         Player p=new Player(m);
10         Watcher w=new Watcher(m);
11         //创建线程
12         Thread t1=new Thread(p);
13         Thread t2=new Thread(w);
14         //开启线程
15         t1.start();
16         t2.start();
17     }
18
19 }
效果截图:
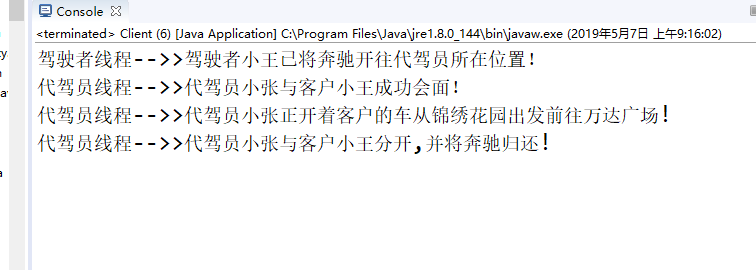
面向对象编程:
场景模拟,使用多线程描述代驾员帮忙代驾的场景
1.首先司机到达代驾员处
2.正式会面
3.然后开始任务交接
4.结束
1.具体的驾驶员角色
 1 package com.oob;
 2 //具体角色->驾驶者
 3 public class Driver implements Runnable{
 4     //驾驶员的名字和车
 5     private String dName;
 6     private String car;
 7
 8     public String getdName() {
 9         return dName;
10     }
11     public void setdName(String dName) {
12         this.dName = dName;
13     }
14     public String getCar() {
15         return car;
16     }
17     public void setCar(String car) {
18         this.car = car;
19     }
20
21     @Override
22     public String toString() {
23         return "驾驶者线程-->>驾驶者"+dName+"已将"+car+"开往代驾员所在位置!";
24     }
25     //构造方法
26     public Driver(String dName, String car) {
27         super();
28         this.dName = dName;
29         this.car = car;
30     }
31     public Driver() {
32
33     }
34     @Override
35     public void run() {
36         Driver d=new Driver("小王","奔驰");
37         System.out.println(d.toString());
38     }
39 }
2.代理角色
 1 package com.oob;
 2 //代理角色,代驾
 3 public class DriverProxy implements Runnable{
 4     //代驾员的名字,代驾起点,终点
 5     private String pName;
 6     private String start;
 7     private String last;
 8
 9     public String getpName() {
10         return pName;
11     }
12
13     public void setpName(String pName) {
14         this.pName = pName;
15     }
16
17     public String getStart() {
18         return start;
19     }
20
21     public void setStart(String start) {
22         this.start = start;
23     }
24
25     public String getLast() {
26         return last;
27     }
28
29     public void setLast(String last) {
30         this.last = last;
31     }
32
33     public DriverProxy(String pName, String start, String last) {
34         super();
35         this.pName = pName;
36         this.start = start;
37         this.last = last;
38     }
39
40     public DriverProxy() {
41         super();
42     }
43
44     @Override
45     public String toString() {
46         return "代驾员线程-->>代驾员"+pName+"正开着客户的车从"+start+"出发前往"+last+"!";
47     }
48
49     @Override
50     public void run() {
51         Driver d=new Driver("小王","奔驰");
52         DriverProxy p=new DriverProxy("小张","锦绣花园","万达广场");
53         System.out.println("代驾员线程-->>代驾员"+p.getpName()+"与客户"+d.getdName()+"成功会面!");
54         System.out.println(p.toString());
55         System.out.println("代驾员线程-->>代驾员"+p.getpName()+"与客户"+d.getdName()+"分开,并将"+d.getCar()+"归还!");
56
57     }
58
59 }
3.场景模拟
 1 package com.oob;
 2 /*场景模拟,使用多线程描述代驾员帮忙代驾的场景
 3   1.首先司机到达代驾员处
 4   2.正式会面
 5   3.然后开始任务交接
 6   4.结束
 7 */
 8 public class Client {
 9
10     public static void main(String[] args) {
11         //具体角色
12         Driver d=new Driver();
13         Thread t1=new Thread(d);
14         t1.start();
15         //代理者角色
16         DriverProxy p=new DriverProxy();
17         Thread t2=new Thread(p);
18         //启动线程    -->由此可以看出当线程启动后具体角色以及代理者角色均被初始化导致数据为空
19         t2.start();
20     }
21 }
效果截图:
ps:文章仅作学习了解,如有不对之处欢迎大佬指正。