项目是SpringCloud框架,分布式项目,包括Eureka、Zuul、Config、User-Svr(用户管理的服务,既是服务端也是客户端);
SpringCloud框架的SpringBoot 的项目搭建就不再赘述,这里重点介绍如何引入集成 Shiro 框架:
Apache Shiro是一个强大且易用的Java安全框架,执行身份验证、授权、密码学和会话管理。使用Shiro的易于理解的API,您可以快速、轻松地获得任何应用程序,从最小的移动应用程序到最大的网络和企业应用程序。
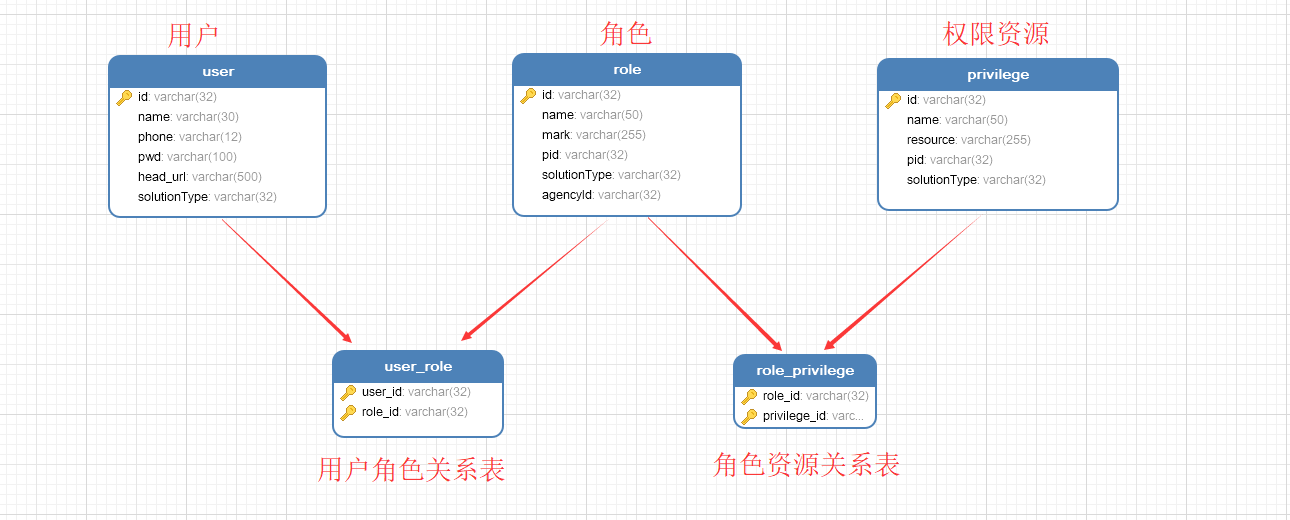
一、数据库设计
这里数据库表为5个分别是: 用户表、角色表、权限表、用户角色关系表、角色权限资源关系表
遵循三步走:导包,配置,写代码
二、导包(引入依赖)
 <!-- shiro -->
      <dependency>
          <groupId>org.apache.shiro</groupId>
          <artifactId>shiro-ehcache</artifactId>
          <version>1.4.2</version>
      </dependency>

      <!-- https://mvnrepository.com/artifact/com.sun.xml.fastinfoset/FastInfoset -->
      <dependency>
          <groupId>org.apache.shiro</groupId>
          <artifactId>shiro-spring</artifactId>
          <scope>compile</scope>
          <version>1.4.2</version>
      </dependency>
      <!-- shiro+redis缓存插件 -->
      <dependency>
          <groupId>org.crazycake</groupId>
          <artifactId>shiro-redis</artifactId>
          <version>2.4.2.1-RELEASE</version>
          <scope>compile</scope>
      </dependency>
三、创建ShiroConfig配置ShiroServerConfig、ShiroAnnotionConfig
package com.iot.microservice.shiroconfig;

import org.apache.shiro.mgt.SecurityManager;
import org.apache.shiro.spring.security.interceptor.AuthorizationAttributeSourceAdvisor;
import org.apache.shiro.spring.web.ShiroFilterFactoryBean;
import org.apache.shiro.web.mgt.DefaultWebSecurityManager;
import org.apache.shiro.web.session.mgt.DefaultWebSessionManager;
import org.crazycake.shiro.RedisCacheManager;
import org.crazycake.shiro.RedisManager;
import org.crazycake.shiro.RedisSessionDAO;
import org.springframework.aop.framework.autoproxy.DefaultAdvisorAutoProxyCreator;
import org.springframework.context.annotation.Bean;
import org.springframework.context.annotation.Configuration;

import java.util.LinkedHashMap;
import java.util.Map;

/**
 * Created by IntelliJ IDEA
 * 这是一个神奇的Class
 *
 * @author zhz
 * @date 2019/12/13 16:31
 */

@Configuration
public class ShiroServerConfig {


        @Bean
    public ShiroFilterFactoryBean shirFilter(SecurityManager securityManager) {
        ShiroFilterFactoryBean shiroFilterFactoryBean = new ShiroFilterFactoryBean();
        // 必须设置 SecurityManager
        shiroFilterFactoryBean.setSecurityManager(securityManager);

        // 如果不设置默认会自动寻找Web工程根目录下的"/login.jsp"页面
        //访问的是后端url的地址,这里要写base 服务的公用登录接口。
        shiroFilterFactoryBean.setLoginUrl("http://localhost:18900/base/loginpage");

        // 登录成功后要跳转的链接;现在应该没用
        //shiroFilterFactoryBean.setSuccessUrl("/index");

        // 未授权界面;可以写个公用的403页面
        shiroFilterFactoryBean.setUnauthorizedUrl("/403");

        // private Map<String, Filter> filters;  shiro有一些默认的拦截器 比如auth,它就是FormAuthenticationFilter表单拦截器  <取名,拦截器地址>,可以自定义拦截器放在这
        //private Map<String, String> filterChainDefinitionMap; <url,拦截器名>哪些路径会被此拦截器拦截到
        //Map<String, Filter> filters = shiroFilterFactoryBean.getFilters();
        //AdminFilter ad=new AdminFilter();
        //filters.put("ad", ad);

        // 拦截器.
        Map<String, String> filterChainDefinitionMap = new LinkedHashMap<String, String>();
        // 配置不会被拦截的链接 顺序判断
        filterChainDefinitionMap.put("/static/**", "anon");
        filterChainDefinitionMap.put("/login", "anon");
        filterChainDefinitionMap.put("/loginpage", "anon");
        filterChainDefinitionMap.put("/swagger-ui.html#", "anon");

        filterChainDefinitionMap.put("/base/test", "authc");

        // 配置退出过滤器,其中的具体的退出代码Shiro已经替我们实现了,加上这个会导致302,请求重置,暂不明白原因
        //filterChainDefinitionMap.put("/logout", "logout");
        //配置某个url需要某个权限码
        //filterChainDefinitionMap.put("/hello", "perms[how_are_you]");

        // 过滤链定义,从上向下顺序执行,一般将 /**放在最为下边
        // <!-- authc:所有url都必须认证通过才可以访问; anon:所有url都都可以匿名访问;user:remember me的可以访问-->
//        filterChainDefinitionMap.put("/fine", "user");
        //filterChainDefinitionMap.put("/focus/**", "ad");

        shiroFilterFactoryBean.setFilterChainDefinitionMap(filterChainDefinitionMap);
        System.out.println("Shiro拦截器工厂类注入成功");
        return shiroFilterFactoryBean;
    }

    @Bean
    public SecurityManager securityManager() {
        DefaultWebSecurityManager securityManager = new DefaultWebSecurityManager();
        // 设置realm.
        securityManager.setRealm(myShiroRealm());
        // 自定义缓存实现 使用redis
        securityManager.setCacheManager(cacheManager());
        // 自定义session管理 使用redis
        securityManager.setSessionManager(sessionManager());
        return securityManager;
    }

    /**
     * 身份认证realm; (这个需要自己写,账号密码校验;权限等)
     *
     * @return
     */
    @Bean
    public ShiroServerRealm myShiroRealm() {
        ShiroServerRealm myShiroRealm = new ShiroServerRealm();
        return myShiroRealm;
    }

    /**
     * cacheManager 缓存 redis实现
     * 使用的是shiro-redis开源插件
     *
     * @return
     */
    public RedisCacheManager cacheManager() {
        RedisCacheManager redisCacheManager = new RedisCacheManager();
        redisCacheManager.setRedisManager(redisManager());
        return redisCacheManager;
    }

    /**
     * 配置shiro redisManager
     * 使用的是shiro-redis开源插件
     *
     * @return
     */
    @Bean
    public RedisManager redisManager() {
        RedisManager redisManager = new MyRedisManager();
//        RedisManager redisManager = new RedisManager();
//        redisManager.setHost(host);
//        redisManager.setPort(port);
//        // 配置缓存过期时间
//        redisManager.setExpire(expireTime);
//        redisManager.setTimeout(timeOut);
        // redisManager.setPassword(password);
        return redisManager;
    }


//    /**
//     * 配置shiro redisManager
//     * 网上的一个 shiro-redis 插件,实现了shiro的cache接口、CacheManager接口就
//     * @return
//     */
//    @Bean
//    public RedisManager redisManager() {
//        RedisManager redisManager = new RedisManager();
//        redisManager.setHost("localhost");
//        redisManager.setPort(6379);
//        redisManager.setExpire(18000);// 配置过期时间
//        // redisManager.setTimeout(timeout);
//        // redisManager.setPassword(password);
//        return redisManager;
//    }

    /**
     * Session Manager
     * 使用的是shiro-redis开源插件
     */
    @Bean
    public DefaultWebSessionManager sessionManager() {
        DefaultWebSessionManager sessionManager = new DefaultWebSessionManager();
        sessionManager.setSessionDAO(redisSessionDAO());
        return sessionManager;
    }

    /**
     * RedisSessionDAO shiro sessionDao层的实现 通过redis
     * 使用的是shiro-redis开源插件
     */
    @Bean
    public RedisSessionDAO redisSessionDAO() {
        RedisSessionDAO redisSessionDAO = new RedisSessionDAO();
        redisSessionDAO.setRedisManager(redisManager());
        return redisSessionDAO;
    }

//    /**
//     * 限制同一账号登录同时登录人数控制
//     *
//     * @return
//     */
//    @Bean
//    public KickoutSessionControlFilter kickoutSessionControlFilter() {
//        KickoutSessionControlFilter kickoutSessionControlFilter = new KickoutSessionControlFilter();
//        kickoutSessionControlFilter.setCacheManager(cacheManager());
//        kickoutSessionControlFilter.setSessionManager(sessionManager());
//        kickoutSessionControlFilter.setKickoutAfter(false);
//        kickoutSessionControlFilter.setMaxSession(1);
//        kickoutSessionControlFilter.setKickoutUrl("/auth/kickout");
//        return kickoutSessionControlFilter;
//    }


    /***
     * 授权所用配置
     *
     * @return
     */
    @Bean
    public DefaultAdvisorAutoProxyCreator getDefaultAdvisorAutoProxyCreator() {
        DefaultAdvisorAutoProxyCreator defaultAdvisorAutoProxyCreator = new DefaultAdvisorAutoProxyCreator();
        defaultAdvisorAutoProxyCreator.setProxyTargetClass(true);
        return defaultAdvisorAutoProxyCreator;
    }

    /***
     * 使授权注解起作用不如不想配置可以在pom文件中加入
     * <dependency>
     *<groupId>org.springframework.boot</groupId>
     *<artifactId>spring-boot-starter-aop</artifactId>
     *</dependency>
     * @param securityManager
     * @return
     */
    @Bean
    public AuthorizationAttributeSourceAdvisor authorizationAttributeSourceAdvisor(SecurityManager securityManager){
        AuthorizationAttributeSourceAdvisor authorizationAttributeSourceAdvisor = new AuthorizationAttributeSourceAdvisor();
        authorizationAttributeSourceAdvisor.setSecurityManager(securityManager);
        return authorizationAttributeSourceAdvisor;
    }

}
package com.iot.microservice.shiroconfig;

import org.apache.shiro.spring.LifecycleBeanPostProcessor;
import org.springframework.aop.framework.autoproxy.DefaultAdvisorAutoProxyCreator;
import org.springframework.context.annotation.Bean;
import org.springframework.context.annotation.Configuration;
import org.springframework.context.annotation.DependsOn;

@Configuration
public class ShiroAnnotionConfig {

      /**
     * Shiro生命周期处理器
     * @return
     */
    @Bean
    public LifecycleBeanPostProcessor lifecycleBeanPostProcessor(){
        return new LifecycleBeanPostProcessor();
    }
    /**
     * 开启Shiro的注解(如@RequiresRoles,@RequiresPermissions),需借助SpringAOP扫描使用Shiro注解的类,并在必要时进行安全逻辑验证
     * 配置以下两个bean(DefaultAdvisorAutoProxyCreator(可选)和AuthorizationAttributeSourceAdvisor)即可实现此功能
     * @return
     */
    @Bean
    @DependsOn({"lifecycleBeanPostProcessor"})
    public DefaultAdvisorAutoProxyCreator advisorAutoProxyCreator(){
        DefaultAdvisorAutoProxyCreator advisorAutoProxyCreator = new DefaultAdvisorAutoProxyCreator();
        advisorAutoProxyCreator.setProxyTargetClass(true);
        return advisorAutoProxyCreator;
    }
}
四、自定义Realm ShiroServerRealm
package com.iot.microservice.shiroconfig;

import com.keenyoda.iot.microservice.userservice.PrivilegeService;
import com.keenyoda.iot.microservice.userservice.UserService;
import com.keenyoda.iot.pojos.rbac.ResourceVo;
import com.keenyoda.iot.pojos.user.UserEntity;
import org.apache.shiro.authc.*;
import org.apache.shiro.authz.AuthorizationInfo;
import org.apache.shiro.authz.SimpleAuthorizationInfo;
import org.apache.shiro.realm.AuthorizingRealm;
import org.apache.shiro.subject.PrincipalCollection;
import org.apache.shiro.util.ByteSource;
import org.springframework.beans.factory.annotation.Autowired;

import java.util.List;


/**
 * Created by IntelliJ IDEA
 * 这是一个神奇的Class
 *
 * @author zhz
 * @date 2019/12/13 16:31
 */
public class ShiroServerRealm extends AuthorizingRealm {

    Boolean cachingEnabled=true;

    @Autowired
    private PrivilegeService privilegeService;

    @Autowired
    private UserService userService;


    /**
     * 1.授权方法,在请求需要操作码的接口时会执行此方法。不需要操作码的接口不会执行
     * 2.实际上是 先执行 AuthorizingRealm,自定义realm的父类中的 getAuthorizationInfo方法,
     * 逻辑是先判断缓存中是否有用户的授权信息(用户拥有的操作码),如果有 就直返回不调用自定义 realm的授权方法了,
     * 如果没缓存,再调用自定义realm,去数据库查询。
     * 用库查询一次过后,如果 在安全管理器中注入了 缓存,授权信息就会自动保存在缓存中,下一次调用需要操作码的接口时,
     * 就肯定不会再调用自定义realm授权方法了。   网上有分析AuthorizingRealm,shiro使用缓存的过程
     * 3.AuthorizingRealm 有多个实现类realm,推测可能是把 自定义realm注入了安全管理器,所以才调用自定义的
     */
    @Override
    protected AuthorizationInfo doGetAuthorizationInfo(PrincipalCollection principals) {
        SimpleAuthorizationInfo simpleAuthorInfo = new SimpleAuthorizationInfo();

        UserEntity userEntity=(UserEntity) principals.getPrimaryPrincipal();

        List<ResourceVo> resourceVos = privilegeService.selectResourceVoListByUserId(userEntity.getId());
        if(resourceVos!=null){
            for (ResourceVo resourceVo:resourceVos) {
                simpleAuthorInfo.addStringPermission(resourceVo.getResource());
            }
        }
        return simpleAuthorInfo;
    }

    /**
     * 1.和授权方法一样,AuthenticatingRealm的getAuthenticationInfo,先判断缓存是否有认证信息,没有就调用
     * 但试验,登录之后,再次登录,发现还是调用了认证方法,说明第一次认证登录时,没有将认证信息存到缓存中。不像授权信息,
     * 将缓存注入安全管理器,就自动保存了授权信息。 难道无法 防止故意多次登录 ,按理说不应该啊?
     * 2  可以在登录controller简单用session是否有key 判断是否登录?
     */
    @Override
    protected AuthenticationInfo doGetAuthenticationInfo(
            AuthenticationToken authcToken) throws AuthenticationException {
        //获取基于用户名和密码的令牌
        //实际上这个authcToken是从LoginController里面currentUser.login(token)传过来的
        UsernamePasswordToken token = (UsernamePasswordToken) authcToken;
        String account = token.getUsername();
        UserEntity user = userService.findUserUserId(account);
        if(user==null){throw new AuthenticationException("用户不存在");}

        //进行认证,将正确数据给shiro处理
        //密码不用自己比对,AuthenticationInfo认证信息对象,一个接口,new他的实现类对象SimpleAuthenticationInfo
        /*    第一个参数随便放,可以放user对象,程序可在任意位置获取 放入的对象
         * 第二个参数必须放密码,
         * 第三个参数放 当前realm的名字,因为可能有多个realm*/
        UserEntity baseUserVM = EntityUtils.entity2VM(user, UserEntity.class, "");
        SimpleAuthenticationInfo authcInfo=new SimpleAuthenticationInfo(baseUserVM, user.getPwd(), this.getName());

        //密码凭证器加盐
        authcInfo.setCredentialsSalt(ByteSource.Util.bytes(user.getId()));
        //清缓存中的授权信息,保证每次登陆 都可以重新授权。因为AuthorizingRealm会先检查缓存有没有 授权信息,再调用授权方法
        super.clearCachedAuthorizationInfo(authcInfo.getPrincipals());

        return authcInfo;
        //返回给安全管理器,securityManager,由securityManager比对数据库查询出的密码和页面提交的密码
        //如果有问题,向上抛异常,一直抛到控制器
    }
}
工具类
package com.iot.microservice.shiroconfig;

import com.github.pagehelper.Page;
import org.springframework.beans.BeanUtils;
import org.springframework.util.CollectionUtils;

import java.lang.reflect.InvocationTargetException;
import java.lang.reflect.Method;
import java.util.ArrayList;
import java.util.Iterator;
import java.util.List;
import java.util.Map;
import java.util.concurrent.ConcurrentHashMap;

public class EntityUtils {

    /**
     * 实体列表转Vm
     *
     * @param source           原列表
     * @param vmClass          vm类
     * @param ignoreProperties 忽略的字段
     * @param <T>              泛型
     * @return vm列表
     */
    public static <T> List<T> entity2VMList(List<?> source, Class<T> vmClass, String... ignoreProperties) {
        List<T> target = (source instanceof Page ? new Page<T>() : new ArrayList<T>());
        if (source instanceof Page) {
            BeanUtils.copyProperties(source, target);
        }
        if (CollectionUtils.isEmpty(source)) {
            return target;
        }
        source.forEach(e -> {
            target.add(entity2VM(e, vmClass, ignoreProperties));
        });
        return target;
    }

    /**
     * 实体转VM
     *
     * @param source           原对象
     * @param vmClass          要转换的对象
     * @param ignoreProperties 忽略的属性
     * @param <T>              泛型
     * @return 转换后对象
     * @author Say
     */
    public static <T> T entity2VM(Object source, Class<T> vmClass, String... ignoreProperties) {
        if (null == source) {
            return null;
        }
        try {
            T target = vmClass.newInstance();
            BeanUtils.copyProperties(source, target, ignoreProperties);
            return target;
        } catch (InstantiationException | IllegalAccessException e) {
            e.printStackTrace();
        }
        return null;
    }

    /**
     * VM转实体
     * 底层用的vm2Entity,只是方法名做区分
     *
     * @param source           vm
     * @param entClass         实体
     * @param ignoreProperties 忽略的属性
     * @param <T>              泛型
     * @return 转换后的对象
     * @author Say
     */
    public static <T> T vm2Entity(Object source, Class<T> entClass, String... ignoreProperties) {
        return entity2VM(source, entClass, ignoreProperties);
    }

    /**
     * VM转实体集合
     * 底层用的entity2VMList,只是方法名做区分
     *
     * @param source           原对象
     * @param entClass         实体
     * @param ignoreProperties 忽略的属性
     * @param <T>              泛型
     * @return 转换后的对象
     * @author Say
     */
    public static <T> List<T> vm2EntityList(List<?> source, Class<T> entClass, String... ignoreProperties) {
        return entity2VMList(source, entClass, ignoreProperties);
    }

    /**
     * Entity VM 互转
     *
     * @param object      数据源
     * @param laterObject 转换对象
     * @param <T>         泛型
     */
    public static <T> void copyProperties(final T object, T laterObject) {

        if (null == object || null == laterObject) {
            return;
        }

        ConcurrentHashMap<String, Method> getMethods = findGetMethods(object.getClass().getMethods());

        ConcurrentHashMap<String, Method> setMethods = findSetMethods(laterObject.getClass().getDeclaredMethods());

        Iterator<Map.Entry<String, Method>> iterator = getMethods.entrySet().iterator();

        while (iterator.hasNext()) {
            Map.Entry<String, Method> entry = iterator.next();
            String methodName = entry.getKey();
            Method getMethod = entry.getValue();
            Method setMethod = setMethods.get(methodName);
            if (null == setMethod) {
                continue;
            }
            try {
                Object value = getMethod.invoke(object, new Object[]{});
                setMethod.invoke(laterObject, value);
            } catch (IllegalAccessException e) {
                e.printStackTrace();
            } catch (IllegalArgumentException e) {
                e.printStackTrace();
            } catch (InvocationTargetException e) {
                e.printStackTrace();
            }
        }
    }

    /**
     * 获取所有的get方法
     *
     * @param methods 所有的方法
     * @return 所有的get方法
     */
    private static ConcurrentHashMap<String, Method> findGetMethods(Method[] methods) {
        ConcurrentHashMap<String, Method> getMethodsMap = new ConcurrentHashMap<>();
        for (Method method : methods) {
            if (isGetMethod(method.getName())) {
                getMethodsMap.put(getMethodName(method.getName()), method);
            }
        }
        return getMethodsMap;
    }

    /**
     * 获取所有的set方法
     *
     * @param methods 所有的方法
     * @return 所有的set方法
     */
    private static ConcurrentHashMap<String, Method> findSetMethods(Method[] methods) {
        ConcurrentHashMap<String, Method> setMethodsMap = new ConcurrentHashMap<>();
        for (Method method : methods) {
            if (isSetMethod(method.getName())) {
                setMethodsMap.put(getMethodName(method.getName()), method);
            }
        }
        return setMethodsMap;
    }


    /**
     * 取方法名
     *
     * @param getMethodName 方法名称
     * @return 去掉get set的方法名
     */
    private static String getMethodName(String getMethodName) {
        String fieldName = getMethodName.substring(3, getMethodName.length());
        return fieldName;
    }

    /**
     * 判断是否是get方法
     *
     * @param methodName
     * @return
     */
    private static boolean isGetMethod(String methodName) {
        int index = methodName.indexOf("get");
        if (index == 0) {
            return true;
        }
        return false;
    }

    /**
     * 判断是否是set方法
     *
     * @param methodName 方法名
     * @return 是否为set 方法
     */
    private static boolean isSetMethod(String methodName) {
        int index = methodName.indexOf("set");
        if (index == 0) {
            return true;
        }
        return false;
    }

}
五、异常处理类,拦截未授权页面(未授权页面有三种实现方式,我这里使用异常处理)
package com.iot.microservice.shiroconfig;

import com.iot.commons.Message;
import com.iot.commons.enumpackage.ErrorCodeEnum;
import org.apache.shiro.authz.AuthorizationException;
import org.apache.shiro.authz.UnauthorizedException;
import org.springframework.web.bind.annotation.ControllerAdvice;
import org.springframework.web.bind.annotation.ExceptionHandler;
import org.springframework.web.bind.annotation.ResponseBody;

import javax.servlet.http.HttpServletRequest;

/**
 * Created by IntelliJ IDEA
 * 这是一个神奇的Class
 * 全局捕捉无权限异常
 *
 * @author zhz
 * @date 2019/12/13 15:40
 */
@ControllerAdvice
public class GlobalDefaultExceptionHandler {

    @ExceptionHandler(UnauthorizedException.class)
    @ResponseBody
    public Message defaultExceptionHandler(HttpServletRequest req,Exception e){

        return new Message(ErrorCodeEnum.UNAUTHORIZED.getValue(),"对不起,你没有访问权限!");
    }

    @ExceptionHandler(AuthorizationException.class)
    @ResponseBody
    public Message throwAuthenticationException(HttpServletRequest req,Exception e){
        return new Message(ErrorCodeEnum.AUTHENTICATION_EXCEPTION.getValue(),"账号验证异常,请重新登录!");
    }
}
六、因为不想我这里把redis单独做成了一个服务,为了不用多次配置,重写RedisManager 中的两个方法
package com.iot.microservice.shiroconfig;

import com.iot.microservice.redisservice.RedisService;
import org.crazycake.shiro.RedisManager;
import org.springframework.beans.factory.annotation.Autowired;
import org.springframework.stereotype.Component;

import java.util.Base64;

/**
 * Created by IntelliJ IDEA
 * 这是一个神奇的Class
 *
 * @author zhz
 * @date 2019/12/13 16:31
 */
@Component
public class MyRedisManager extends RedisManager {

    @Autowired
    RedisService redisService;


    @Override
    public byte[] set(byte[] key, byte[] value, int expire) {
        String val = Base64.getEncoder().encodeToString(value);
        expire=12000;
        redisService.set(new String(key),val,expire);
        return value;
    }


    @Override
    public byte[] get(byte[] key){
        String s = redisService.get(new String(key));
        if (s == null){
            return null;
        }
        return Base64.getDecoder().decode(s);
    }


    public static void main(String[] args) {
        String a = null;
        System.out.println(Base64.getDecoder().decode(a));
    }
}
七、登录部分代码
/**
     * 用户登录
     * zhz
     *
     * @param loginUser
     */
    @RequestMapping("login")
    @ResponseBody
    public Message<String> login(LoginUserVM loginUser) throws IncorrectCredentialsException {
        Asserts.notEmpty(loginUser,"登录用户不能为空");
        String account=loginUser.getLoginName();
        String password=loginUser.getPassword();
        UsernamePasswordToken token = new UsernamePasswordToken(account,password,false);
        token.setRememberMe(true);

        Subject currentUser = SecurityUtils.getSubject();
        try {
            currentUser.login(token);
        } catch(IncorrectCredentialsException e){
            return Message.ok("密码错误",500);
        } catch (AuthenticationException e) {
//            return Message.ok("登录失败");
            return Message.ok(e.getMessage(),500);
        }

        return Message.ok(FocusMicroBaseConstants.SUCCESS);
    }
 private Message getUserToken(UserEntity userEntity, UserInfo userInfo) {
        UsernamePasswordToken userToken = new UsernamePasswordToken(userEntity.getId(), userEntity.getPwd(), false);
        userToken.setRememberMe(true);
        Subject currentUser = SecurityUtils.getSubject();
        try {
            currentUser.login(userToken);
        } catch (IncorrectCredentialsException e) {
            return new Message(ErrorCodeEnum.PARAM_ERROR.getValue(), "密码错误");
        } catch (AuthenticationException e) {
            return new Message(ErrorCodeEnum.FAILED.getValue(), "failed");
        }
        return new Message(ErrorCodeEnum.SUCCESS.getValue(), userInfo);
    }
感谢几位大牛提供的详细介绍
参考 https://www.iteye.com/blog/jinnianshilongnian-2049092;
https://blog.csdn.net/u014203449/article/details/88087516;