文件内容解读
1 <?xml version="1.0" encoding="UTF-8"?> 2 <!-- 3 Licensed to the Apache Software Foundation (ASF) under one or more 4 contributor license agreements. See the NOTICE file distributed with 5 this work for additional information regarding copyright ownership. 6 The ASF licenses this file to You under the Apache License, Version 2.0 7 (the "License"); you may not use this file except in compliance with 8 the License. You may obtain a copy of the License at 9 10 http://www.apache.org/licenses/LICENSE-2.0 11 12 Unless required by applicable law or agreed to in writing, software 13 distributed under the License is distributed on an "AS IS" BASIS, 14 WITHOUT WARRANTIES OR CONDITIONS OF ANY KIND, either express or implied. 15 See the License for the specific language governing permissions and 16 limitations under the License. 17 --> 18 <!-- Note: A "Server" is not itself a "Container", so you may not 19 define subcomponents such as "Valves" at this level. 20 Documentation at /docs/config/server.html 21 --> 22 <Server port="8005" shutdown="SHUTDOWN"> 23 <Listener className="org.apache.catalina.startup.VersionLoggerListener" /> 24 <!-- Security listener. Documentation at /docs/config/listeners.html 25 <Listener className="org.apache.catalina.security.SecurityListener" /> 26 --> 27 <!--APR library loader. Documentation at /docs/apr.html --> 28 <Listener className="org.apache.catalina.core.AprLifecycleListener" SSLEngine="on" /> 29 <!-- Prevent memory leaks due to use of particular java/javax APIs--> 30 <Listener className="org.apache.catalina.core.JreMemoryLeakPreventionListener" /> 31 <Listener className="org.apache.catalina.mbeans.GlobalResourcesLifecycleListener" /> 32 <Listener className="org.apache.catalina.core.ThreadLocalLeakPreventionListener" /> 33 34 <!-- Global JNDI resources 35 Documentation at /docs/jndi-resources-howto.html 36 --> 37 <GlobalNamingResources> 38 <!-- Editable user database that can also be used by 39 UserDatabaseRealm to authenticate users 40 --> 41 <Resource name="UserDatabase" auth="Container" 42 type="org.apache.catalina.UserDatabase" 43 description="User database that can be updated and saved" 44 factory="org.apache.catalina.users.MemoryUserDatabaseFactory" 45 pathname="conf/tomcat-users.xml" /> 46 </GlobalNamingResources> 47 48 <!-- A "Service" is a collection of one or more "Connectors" that share 49 a single "Container" Note: A "Service" is not itself a "Container", 50 so you may not define subcomponents such as "Valves" at this level. 51 Documentation at /docs/config/service.html 52 --> 53 <!-- 代表一个服务,这个Service可以有多个,后面的name是服务名 --> 54 <Service name="Catalina"> 55 56 <!--The connectors can use a shared executor, you can define one or more named thread pools--> 57 <!-- 58 <Executor name="tomcatThreadPool" namePrefix="catalina-exec-" 59 maxThreads="150" minSpareThreads="4"/> 60 --> 61 62 63 <!-- A "Connector" represents an endpoint by which requests are received 64 and responses are returned. Documentation at : 65 Java HTTP Connector: /docs/config/http.html 66 Java AJP Connector: /docs/config/ajp.html 67 APR (HTTP/AJP) Connector: /docs/apr.html 68 Define a non-SSL/TLS HTTP/1.1 Connector on port 8080 69 --> 70 <!-- 71 代表一个连接器,后边指定了这个连接器使用的协议和端口号,还有超时时间,平时修改Tomcat端口号就是修改这个端口号, 72 当然,还有其他连接器,下面就有一个使用AJP1.3协议的连接器,不过平时不使用 73 --> 74 <Connector port="8080" protocol="HTTP/1.1" 75 connectionTimeout="20000" 76 redirectPort="8443" /> 77 <!-- A "Connector" using the shared thread pool--> 78 <!-- 79 <Connector executor="tomcatThreadPool" 80 port="8080" protocol="HTTP/1.1" 81 connectionTimeout="20000" 82 redirectPort="8443" /> 83 --> 84 <!-- Define a SSL/TLS HTTP/1.1 Connector on port 8443 85 This connector uses the NIO implementation. The default 86 SSLImplementation will depend on the presence of the APR/native 87 library and the useOpenSSL attribute of the 88 AprLifecycleListener. 89 Either JSSE or OpenSSL style configuration may be used regardless of 90 the SSLImplementation selected. JSSE style configuration is used below. 91 --> 92 <!-- 93 <Connector port="8443" protocol="org.apache.coyote.http11.Http11NioProtocol" 94 maxThreads="150" SSLEnabled="true"> 95 <SSLHostConfig> 96 <Certificate certificateKeystoreFile="conf/localhost-rsa.jks" 97 type="RSA" /> 98 </SSLHostConfig> 99 </Connector> 100 --> 101 <!-- Define a SSL/TLS HTTP/1.1 Connector on port 8443 with HTTP/2 102 This connector uses the APR/native implementation which always uses 103 OpenSSL for TLS. 104 Either JSSE or OpenSSL style configuration may be used. OpenSSL style 105 configuration is used below. 106 --> 107 <!-- 108 <Connector port="8443" protocol="org.apache.coyote.http11.Http11AprProtocol" 109 maxThreads="150" SSLEnabled="true" > 110 <UpgradeProtocol className="org.apache.coyote.http2.Http2Protocol" /> 111 <SSLHostConfig> 112 <Certificate certificateKeyFile="conf/localhost-rsa-key.pem" 113 certificateFile="conf/localhost-rsa-cert.pem" 114 certificateChainFile="conf/localhost-rsa-chain.pem" 115 type="RSA" /> 116 </SSLHostConfig> 117 </Connector> 118 --> 119 120 <!-- Define an AJP 1.3 Connector on port 8009 --> 121 <Connector port="8009" protocol="AJP/1.3" redirectPort="8443" /> 122 123 124 <!-- An Engine represents the entry point (within Catalina) that processes 125 every request. The Engine implementation for Tomcat stand alone 126 analyzes the HTTP headers included with the request, and passes them 127 on to the appropriate Host (virtual host). 128 Documentation at /docs/config/engine.html --> 129 130 <!-- You should set jvmRoute to support load-balancing via AJP ie : 131 <Engine name="Catalina" defaultHost="localhost" jvmRoute="jvm1"> 132 --> 133 <!-- 服务引擎 defaulltHost用来指定默认的主机--> 134 <Engine name="Catalina" defaultHost="localhost"> 135 136 <!--For clustering, please take a look at documentation at: 137 /docs/cluster-howto.html (simple how to) 138 /docs/config/cluster.html (reference documentation) --> 139 <!-- 140 <Cluster className="org.apache.catalina.ha.tcp.SimpleTcpCluster"/> 141 --> 142 143 <!-- Use the LockOutRealm to prevent attempts to guess user passwords 144 via a brute-force attack --> 145 <!-- 安全策略 --> 146 <Realm className="org.apache.catalina.realm.LockOutRealm"> 147 <!-- This Realm uses the UserDatabase configured in the global JNDI 148 resources under the key "UserDatabase". Any edits 149 that are performed against this UserDatabase are immediately 150 available for use by the Realm. --> 151 <Realm className="org.apache.catalina.realm.UserDatabaseRealm" 152 resourceName="UserDatabase"/> 153 </Realm> 154 155 <!-- 主机:name代表主机名,appBase代表根目录,unpackWARs代表是否自动解压WAR包,autoDeploy代表自动发布,就是启动状态下能直接部署项目 --> 156 <Host name="localhost" appBase="webapps" 157 unpackWARs="true" autoDeploy="true"> 158 159 <!-- SingleSignOn valve, share authentication between web applications 160 Documentation at: /docs/config/valve.html --> 161 <!-- 162 <Valve className="org.apache.catalina.authenticator.SingleSignOn" /> 163 --> 164 165 <!-- Access log processes all example. 166 Documentation at: /docs/config/valve.html 167 Note: The pattern used is equivalent to using pattern="common" --> 168 <Valve className="org.apache.catalina.valves.AccessLogValve" directory="logs" 169 prefix="localhost_access_log" suffix=".txt" 170 pattern="%h %l %u %t "%r" %s %b" /> 171 172 </Host> 173 </Engine> 174 </Service> 175 </Server>
创建虚拟目录
1、直接在server.xml文件的Host标签内添加Context标签用于指定虚拟目录,path表示访问路径,docBase表示项目路径,也就是虚拟目录,下面指定了项目地址,就不会访问webapps目录下的项目了,这种方式有个缺点是修改后必须重启服务器。
直接访问http://localhost:8080/myweb
<Context path="/myweb" docBase="D:Programmermyweb" />
2、虚拟目录的修改还有另外一种方式,就是把这个Context标签放到Tomcat的confCatalinalocalhost目录下,新建一个xxx.xml,里面添加上xml文件的头部和Context标签,这样也能指定虚拟目录,并且不用重启服务器。
<?xml version="1.0" encoding="UTF-8"?>
<Context docBase="D:Programmermyweb" />
直接访问http://localhost:8080/xxx/

创建虚拟主机
1、复制一个Host标签出来,然后修改name为www.wangbo.com,appBase目录也可以修改为D:Programmerweb(将web项目复制一份放到这个目录下)
<Host name="localhost" appBase="webapps" unpackWARs="true" autoDeploy="true"> <!-- SingleSignOn valve, share authentication between web applications Documentation at: /docs/config/valve.html --> <!-- <Valve className="org.apache.catalina.authenticator.SingleSignOn" /> --> <!-- Access log processes all example. Documentation at: /docs/config/valve.html Note: The pattern used is equivalent to using pattern="common" --> <Valve className="org.apache.catalina.valves.AccessLogValve" directory="logs" prefix="localhost_access_log" suffix=".txt" pattern="%h %l %u %t "%r" %s %b" /> </Host> <Host name="www.wangbo.com" appBase="D:Programmerweb" unpackWARs="true" autoDeploy="true"> </Host>
当启动Tomcat后可以看到有两个虚拟主机了

2、修改host文件,将这个域名添加进去,地址:C:WindowsSystem32driversetc(如果无法修改,可以复制一份出来,然后修改完之后去覆盖原文件)

3、访问项目
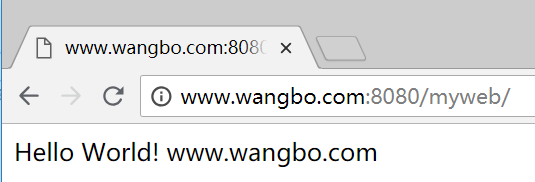
访问http://www.wangbo.com:8080/myweb/
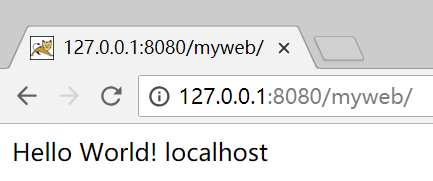
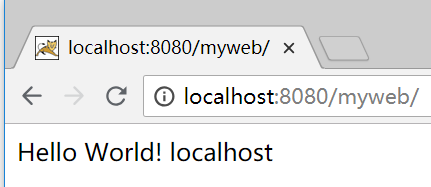
访问http://localhost:8080/myweb/
那么如果直接访问127.0.0.1会访问谁呢,因为这个IP在我的本地电脑上映射了两个地址,一个是localhost,另一个是www.wangbo.com。
因为<Engine name="Catalina" defaultHost="localhost">中的defaultHost里配置的是localhost,所以会访问localhost。