1. SpringMVC入门示例
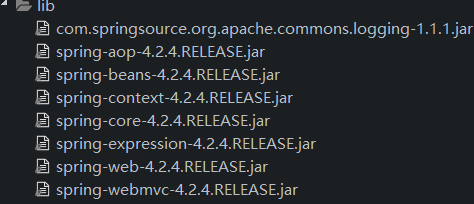
- 导入包

-
web.xml中配置SpringMVC 核心控制器
<!-- 配置SpringMVC 核心控制器 --> <servlet> <servlet-name>springmvc</servlet-name> <servlet-class>org.springframework.web.servlet.DispatcherServlet</servlet-class> <init-param> <param-name>contextConfigLocation</param-name> <param-value>classpath:springmvc.xml</param-value> </init-param> </servlet> <servlet-mapping> <servlet-name>springmvc</servlet-name> <url-pattern>/</url-pattern> </servlet-mapping> -
创建SpringMVC配置文件
<?xml version="1.0" encoding="UTF-8"?> <beans xmlns="http://www.springframework.org/schema/beans" xmlns:xsi="http://www.w3.org/2001/XMLSchema-instance" xmlns:context="http://www.springframework.org/schema/context" xmlns:aop="http://www.springframework.org/schema/aop" xsi:schemaLocation=" http://www.springframework.org/schema/beans http://www.springframework.org/schema/beans/spring-beans.xsd http://www.springframework.org/schema/context http://www.springframework.org/schema/context/spring-context.xsd http://www.springframework.org/schema/aop http://www.springframework.org/schema/aop/spring-aop.xsd"> <!-- bean definitions here --> <context:component-scan base-package="com.ranger.springMVC.helloSpringMVC"></context:component-scan> </beans> -
编写Controller代码
 @Controller
   public class HelloController {
   	@RequestMapping("/hello")
   	public ModelAndView hello(){
   		System.out.println("HelloController.hello()");
   		ModelAndView mav = new ModelAndView();
   		mav.addObject("msg","hello , SpringMVC");
   		mav.setViewName("/WEB-INF/jsp/hello.jsp");
   		return mav;
   	}
   }
-
访问测试
浏览器访问
localhost:8080/01-SpringMVC/hello

2. 配置详解
- Dispatcherservlet
DispatcherServlet是前置控制器,配置在web.xml文件中的。拦截匹配的请求,Servlet拦截匹配规则要自已定义,把拦截下来的请求,依据相应的规则分发到目标Controller来处理,是配置spring MVC的第一步。
- 以上出现的注解
- @Controller 负责注册一个bean 到spring 上下文中
- @RequestMapping 注解为控制器指定可以处理哪些 URL 请求
3. SpringMVC执行流程图(结构图)

解释:
1.用户发送请求至 前端控制器DispatcherServlet。
2.前端控制器DispatcherServlet收到请求后调用处理器映射器HandlerMapping。
3.处理器映射器HandlerMapping根据请求的Url找到具体的处理器,生成处理器对象Handler及处理器拦截器HandlerIntercepter(如果有则生成)一并返回给前端控制器DispatcherServlet。
4.前端控制器DispatcherServlet通过处理器适配器HandlerAdapter调用处理器Controller。
5.执行处理器(Controller,也叫后端控制器)
6.处理器Controller执行完后返回ModelAnView。
7.处理器适配器HandlerAdapter将处理器Controller执行返回的结果ModelAndView返回给前端控制器DispatcherServlet。
8.前端控制器DispatcherServlet将ModelAnView传给视图解析器ViewResolver。
9.视图解析器ViewResolver解析后返回具体的视图View。
10.前端控制器DispatcherServlet对视图View进行渲染视图(即:将模型数据填充至视图中)
11.前端控制器DispatcherServlet响应用户。
4. SpringMVC常用注解
@Controller
负责注册一个bean 到spring 上下文中
@RequestMapping
注解为控制器指定可以处理哪些 URL 请求
@RequestBody
该注解用于读取Request请求的body部分数据,使用系统默认配置的HttpMessageConverter进行解析,然后把相应的数据绑定到要返回的对象上 ,再把HttpMessageConverter返回的对象数据绑定到 controller中方法的参数上
@ResponseBody
该注解用于将Controller的方法返回的对象,通过适当的HttpMessageConverter转换为指定格式后,写入到Response对象的body数据区
@ModelAttribute
在方法定义上使用 @ModelAttribute 注解:Spring MVC 在调用目标处理方法前,会先逐个调用在方法级上标注了@ModelAttribute 的方法
在方法的入参前使用 @ModelAttribute 注解:可以从隐含对象中获取隐含的模型数据中获取对象,再将请求参数 –绑定到对象中,再传入入参将方法入参对象添加到模型中
@RequestParam
在处理方法入参处使用 @RequestParam 可以把请求参 数传递给请求方法
@PathVariable RESTful风格使用
绑定 URL 占位符到入参
@ExceptionHandler
注解到方法上,出现异常时会执行该方法
@ControllerAdvice
使一个Contoller成为全局的异常处理类,类中用@ExceptionHandler方法注解的方法可以处理所有Controller发生的异常
5. SSM 整合配置
整合思路:
- DAO层:
- SqlMapConfig.xml (空文件即可,不过需要包含头文件)
- applicationContext-dao.xml
- 数据库连接池
- SqlSessionFactory对象
- 配置Mapper文件扫描器
- Service层
- applicationContext-service.xml 配置包扫描 ,扫描@Service
- applicationContex-tx.xml 配置事务相关
- Controller层
- springmvc.xml
- 配置包扫描 扫描@Controller类
- 配置注解驱动
- 配置视图解析器
- springmvc.xml
- web.xml
- 配置Spring容器监听器
- 配置前端控制器
6. SpringMVC默认支持的参数
- HttpServletRequest
- HttpServletResponse
- HttpSession
- Model
7. 简单参数传递
@RequestMapping("/editItem")
public ModeAndView editItem(Integer id){     // 会自动将链接中的属性id传到这里的id (参数名要一致)
    itemService.getItemById(id);
    // .......
}

// 如果参数名不一致
@RequestMapping("/editItem")
public ModeAndView editItem(@RequestParam("id")Integer ids){     // 会自动将链接中的属性id传到这里的ids
    itemService.getItemById(ids);
    // .......
}


ReqeustParam注解中的参数
@ReqeustParam(value="id",required=true,defaultValue="1")
8. POJO参数绑定
表单提交的属性和POJO类的属性一致
绑定很简单,对于基本类型,要求页面中input标签的name属性值和controller的pojo形参中的属性名称一致,即可将页面中数据绑定到pojo。也就是说前台页面传进来的name要和要封装的pojo属性名一模一样,然后就可以将该pojo作为形参放到controller的方法中
9. 包装POJO参数绑定
包装类型pojo指的是pojo中有另一个也是pojo的属性,即pojo套pojo,为什么会设计这种pojo呢?在前面的博文中我也有提到,这种组合的设计方法对于后期程序的扩展很有用,比如复杂的查询条件就需要包装到这种包装类型中
使用item.name
10. 高级参数绑定
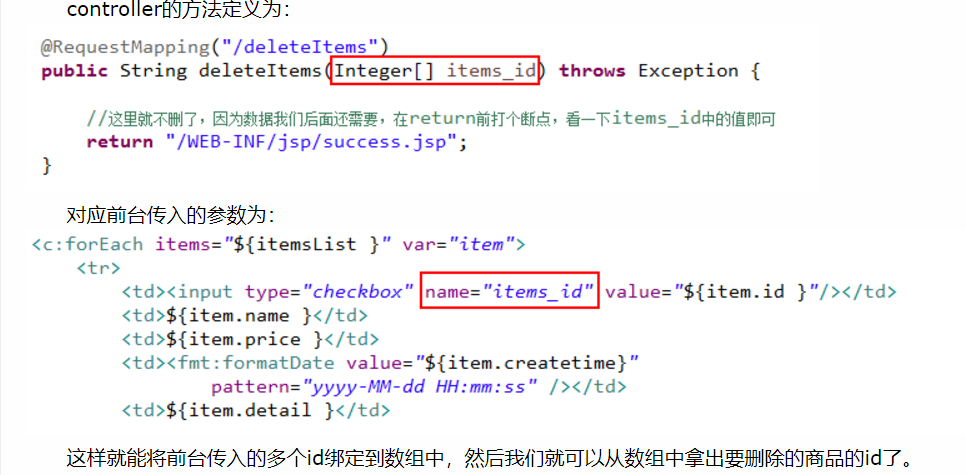
数组参数的传递
数组的绑定指的是前台传来多个同一类型的数据,我们在controller中使用数组形参来接收前台传来的数据。还是以案例来驱动这部分内容,比如现在我们要批量删除商品,那么我们需要勾选好几个商品,这些商品都有id号,在controller中,我们需要将这些id号全部获取并放到一个数组中,然后再根据数组中的id号挨个删除数据库中对应的项。
例如批量删除商品,需要传入删除的id

List类型的绑定
通常在需要批量提交数据时,将提交的数据绑定到list<pojo>中,比如:成绩录入(录入多门课成绩,批量提交),在这里我们假设有需求:批量商品修改,在页面输入多个商品信息,将多个商品信息提交到controller方法中,即一次性更新多个商品信息。
所以思路是在扩展类ItemsQueryVo中新添加一个List<ItemsCustom>,然后将不同商品的信息都存到这个List中

前台是通过类似于list[i].name这种形式来传递参数的。list[i]表示第i个ItemsCustom,然后 list[i].属性 表示第i个ItemsCustom中对应的属性。
Map类型的绑定
Map类型和List差不多

Map的参数绑定传来的是Map中的key,然后value会自动绑定到Map中的那个对象的属性中。在controller中的方法里,形参就直接使用QueryVo接收即可
自定义类型的封装
对于字符串向日期类型的转换,需要自定义转换器

然后在SpringMVC 中配置自定义的转换器

11. RequestMapping 注解详解
-
路径映射可以是数组
@RequestMapping(value={"itemList",itemLIst1})
-
@RequestMapping可以加在类头部,用于目录分级管理
-
限定请求方法
@RequestMapping(method=RequestMethos.POST)
可以是数组
12. 请求乱码问题
-
GET 方式
修改tomcat服务器配置文件server.xml
添加connector标签属性urlEncoding="utf-8"
-
POST 方式

13. Controller的方法返回值
ModeAndView 类型的返回值
- 设置Mode中的属性
- 设置视图
void 类型的返回值
- request
- response
String类型的返回值
- 返回视图名称
- redirect
return “redirect:/itemList”- 参数传递问题
- 通过URL模板以路径变量或查询参数形式传递数据
- 通过flash属性传递数据(RedirectAttributes)
- forward
return "forward:/itemList"- 参数传递
request.setAttribute()
14. SpringMVC 的异常处理
代码中处理
麻烦
统一(全局)处理
-
编写处理程序
/** * 全局异常处理器 * */ public class CustomerException implements HandlerExceptionResolver { @Override public ModelAndView resolveException(HttpServletRequest request, HttpServletResponse response, Object hanlder, Exception e) { //记录日志 e.printStackTrace(); //错误消息 String msg = "很抱歉,系统发生异常了,请联系管理员"; //响应用户错误提示 ModelAndView mav = new ModelAndView(); //返回错误消息 mav.addObject("msg", msg); //响应错误提示页面 mav.setViewName("msg"); return mav; } } -
配置处理器
application-mvc.xml中配置一个bean
<bean class="CLASSPATH" ></bean> -
为了更加友好的显示,处理不同类型异常,可以自定义异常类,然后在异常全局自定义处理类的方法中怕暖异常类型,然后给出不同的提示
15. 图片上传
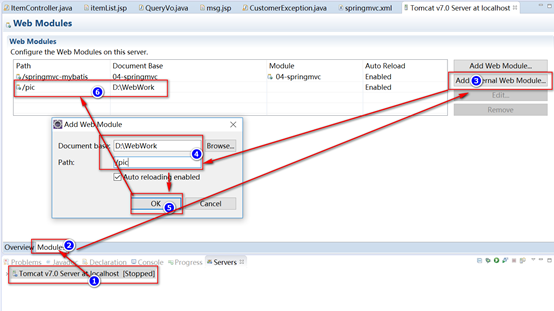
- 配置服务器虚拟路径

- 引入jar包

-
SpringMVC 配置文件中配置多媒体解析器
<!-- 配置多媒体处理器 --> <!-- 注意:这里id必须填写:multipartResolver --> <bean id="multipartResolver" class="org.springframework.web.multipart.commons.CommonsMultipartResolver"> <!-- 最大上传文件大小 --> <property name="maxUploadSize" value="8388608" /> </bean> -
注意文件上传表单中的
enctype='multipart/form-data'method='POST' -
编写文件上传代码
//图片上传用MultipartFile接收文件
@RequestMapping(value = "updateItem", method = { RequestMethod.POST, RequestMethod.GET })
public String updateItem(Item item, Model model, MultipartFile picFile) throws Exception {

    // 图片新名字
    String name = UUID.randomUUID().toString();
    // 图片原名字
    String oldName = picFile.getOriginalFilename();
    // 后缀名
    String exeName = oldName.substring(oldName.lastIndexOf("."));

    File pic = new File("D:\WebWork\" + name + exeName);
    // 保存图片到本地磁盘
    picFile.transferTo(pic);
    // 更新商品图片信息
    item.setPic(name + exeName);

    itemServices.update(item);
    model.addAttribute("item", item);
    model.addAttribute("msg", "修改商品成功");
    return "itemEdit";
}
16. Json数据交互
mvc:annotation-driven/ 提供了json交互
- 导入jar包

-
编码
/** * json数据交互演示 * * @param item2 * @return */ @RequestMapping("getItem") //@ResponseBody把pojo转成json串响应用户 @ResponseBody //@RequestBody用于接收用户传入json串转成pojo public Item getItem(@RequestBody Item item2) { System.out.println("接收到的json商品数据为:" + item2); Item item = itemServices.getItemById(3); return item; } -
测试
17. RESTful风格
代码
/**
	 * RESTful风格演示
	 *
	 * @param ids
	 * @param model
	 * @return
	 */
//RESTful风格url上的参数通过{}占位符绑定
//占位符参数名与方法参数名不一致时,通过@PathVariable绑定
@RequestMapping("/item/{id}")
public String testRest(@PathVariable("id") Integer ids, Model model) {
    Item item = itemServices.getItemById(ids);
    model.addAttribute("item", item);
    return "itemEdit";
}
18. 拦截器
-
定义拦截器
public class MyInterceptor1 implements HandlerInterceptor { //在Controller方法执行后被执行 //处理异常、记录日志 @Override public void afterCompletion(HttpServletRequest arg0, HttpServletResponse arg1, Object arg2, Exception arg3) throws Exception { System.out.println("MyInterceptor1.afterCompletion....."); } //在Controller方法执行后,返回ModelAndView之前被执行 //设置或者清理页面共用参数等等 @Override public void postHandle(HttpServletRequest arg0, HttpServletResponse arg1, Object arg2, ModelAndView arg3) throws Exception { System.out.println("MyInterceptor1.postHandle....."); } //在Controller方法执行前被执行 //登录拦截、权限认证等等 @Override public boolean preHandle(HttpServletRequest arg0, HttpServletResponse arg1, Object arg2) throws Exception { System.out.println("MyInterceptor1.preHandle....."); //返回true放行,false拦截 return true; } } -
SpringMVC中配置拦截器
<!-- 拦截器定义 --> <mvc:interceptors> <!-- 定义一个拦截器 --> <mvc:interceptor> <!-- path配置</**>拦截所有请求,包括二级以上目录,</*>拦截所有请求,不包括二级以上目录 --> <mvc:mapping path="/**"/> <bean class="com.itheima.springmvc.interceptor.MyInterceptor1" /> </mvc:interceptor> <!-- 定义一个拦截器 --> <mvc:interceptor> <!-- path配置</**>拦截所有请求,包括二级以上目录,</*>拦截所有请求,不包括二级以上目录 --> <mvc:mapping path="/**"/> <bean class="com.itheima.springmvc.interceptor.MyInterceptor2" /> </mvc:interceptor> </mvc:interceptors>-
顺序
- preHandler 按照配置顺序调用
- postHandler 按照配置顺序逆序调用
- afterCompletion 按照配置顺序逆序调用
-
案例
-
登录权限验证
判断是否登录,登录则放行
未登录则跳转到登录页面
-
-