start pom是springboot中提供的简化企业级开发绝大多数场景的一个工具,利用好strat pom就可以消除相关技术的配置得到自动配置好的Bean。
举个例子,在一般使用中,我们使用基本的spring-boot-starter配置基本的springboot项目,也使用spring-boot-starter-web去配置web项目,
<dependencies>
        <dependency>
            <groupId>org.springframework.boot</groupId>
            <artifactId>spring-boot-starter</artifactId>
        </dependency>
        <dependency>
            <groupId>org.springframework.boot</groupId>
            <artifactId>spring-boot-starter-web</artifactId>
        </dependency>
    </dependencies>
spring boot官方也给我们提供了很多start pom,当然除了官方的start pom外,我们也可以使用一些第三方为spring boot写的start pom。
本篇文章,则是介绍一个自己写start pom的方法,当能熟练使用这个之后,便可以实现自定义快速编程,敏捷开发了。
- 首先,先新建一个maven工程,在pom文件中引入spring-boot-autoconfigure依赖
pom文件
<project xmlns="http://maven.apache.org/POM/4.0.0" xmlns:xsi="http://www.w3.org/2001/XMLSchema-instance"
    xsi:schemaLocation="http://maven.apache.org/POM/4.0.0 http://maven.apache.org/xsd/maven-4.0.0.xsd">
    <modelVersion>4.0.0</modelVersion>
    <groupId>site.wangxin520</groupId>
    <artifactId>spring-boot-start-hello</artifactId>
    <version>0.0.1-SNAPSHOT</version>
    <name>spring-boot-start-hello</name>
    <description>自定义的一个spring boot的start pom</description>
    <dependencies>
        <dependency>
            <groupId>org.springframework.boot</groupId>
            <artifactId>spring-boot-autoconfigure</artifactId>
            <version>1.5.8.RELEASE</version>
        </dependency>
    </dependencies>
</project>
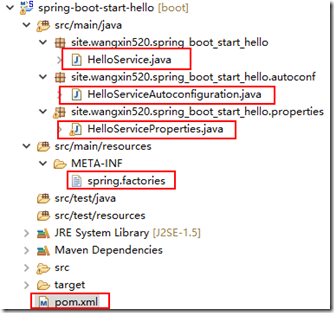
新建的maven工程目录为
其中HelloService.java是我们需要在springboot中引入的实体类。
- HelloService.java如下
package site.wangxin520.spring_boot_start_hello;

/**
 * 这个是Bean类,用于在spring boot中使用的
 *
 * @author wangXgnaw
 *
 */
public class HelloService {

    // 私有属性,与下面的set和get方法一起,用于注入
    private String msg;

    /**
     * 打招呼的类,用于在spring boot中调用
     *
     * @return
     */
    public String sayHello() {
        return "hello " + msg;
    }

    public String getMsg() {
        return msg;
    }

    public void setMsg(String msg) {
        this.msg = msg;
    }

}
- HelloServiceProperties.java相当于是读取到的application.properties中的配置注入到HelloService中,或者说是当没有配置的话,就注入默认配置
package site.wangxin520.spring_boot_start_hello.properties;

import org.springframework.boot.context.properties.ConfigurationProperties;

/**
 * 这个是类型安全属性的获取,用于配置自动注入bean的参数
 *
 * @author wangXgnaw
 *
 */
@ConfigurationProperties(prefix = "hello")
public class HelloServiceProperties {

    // 默认的配置的值
    private final static String MSG = "wangxin";

    // 由于在configuationProperties中配置了前缀,所以可以在application.properties中使用hello.msg配置该值。
    private String msg = MSG;

    // 这里的get和set方法,是方便外部注入参数值用的,需要注意的是这里和HelloService不同,并没有让properties中的参数直接注入到HelloService中
    public String getMsg() {
        return msg;
    }

    public void setMsg(String msg) {
        this.msg = msg;
    }

}
- HelloServiceAutoconfiguration.java是自动注入的一个配置,与spring相关
package site.wangxin520.spring_boot_start_hello.autoconf;

import org.springframework.beans.factory.annotation.Autowired;
import org.springframework.boot.autoconfigure.condition.ConditionalOnClass;
import org.springframework.boot.autoconfigure.condition.ConditionalOnMissingBean;
import org.springframework.boot.autoconfigure.condition.ConditionalOnProperty;
import org.springframework.boot.context.properties.EnableConfigurationProperties;
import org.springframework.context.annotation.Bean;
import org.springframework.context.annotation.Configuration;

import site.wangxin520.spring_boot_start_hello.HelloService;
import site.wangxin520.spring_boot_start_hello.properties.HelloServiceProperties;

/**
 * 自动配置类,给bean注入参数
 *
 * @author wangXgnaw
 *
 */
@Configuration // 标记当前类是配置类
@EnableConfigurationProperties(HelloServiceProperties.class) // 使用java类作为配置文件
@ConditionalOnClass(HelloService.class) // 需要被配置的类
@ConditionalOnProperty(prefix = "hello", value = "enable", matchIfMissing = true)
public class HelloServiceAutoconfiguration {

    // 自动注入配置
    @Autowired
    private HelloServiceProperties helloServiceProperties;

    /**
     * 给bean注入参数,同时返回一个bean实例
     * 同时注解表名,返回是一个bean实例
     * 当容器中没有这个bean实例的时候,就返回一个自动注入好参数的bean实例回去
     * @return HelloService
     */
    @Bean
    @ConditionalOnMissingBean(HelloService.class)
    public HelloService helloService() {
        HelloService helloService = new HelloService();
        helloService.setMsg(helloServiceProperties.getMsg());
        return helloService;
    }

}
- spring.factories在src/main/resources中,添加一个文件夹,即META-INF,然后添加一个文件spring.factories
org.springframework.boot.autoconfigure.EnableAutoConfiguration=site.wangxin520.spring_boot_start_hello.autoconf.HelloServiceAutoconfiguration
这个文件里面,标注出自动注入的配置文件
以上就是全部的start pom案例,当写完后,使用maven的install安装到本地仓库后,在创建好springboot之后,添加上依赖,就可以很方便的使用了。
下面是springboot中引用自定义startpom依赖的实例:
- pom文件
<?xml version="1.0" encoding="UTF-8"?>
<project xmlns="http://maven.apache.org/POM/4.0.0" xmlns:xsi="http://www.w3.org/2001/XMLSchema-instance"
    xsi:schemaLocation="http://maven.apache.org/POM/4.0.0 http://maven.apache.org/xsd/maven-4.0.0.xsd">
    <modelVersion>4.0.0</modelVersion>

    <groupId>site.wangxin520</groupId>
    <artifactId>springboot-starter-test</artifactId>
    <version>0.0.1-SNAPSHOT</version>
    <packaging>jar</packaging>

    <name>springboot-starter-test</name>
    <description>springboot学习</description>

    <parent>
        <groupId>org.springframework.boot</groupId>
        <artifactId>spring-boot-starter-parent</artifactId>
        <version>1.5.8.RELEASE</version>
        <relativePath/> <!-- lookup parent from repository -->
    </parent>

    <properties>
        <project.build.sourceEncoding>UTF-8</project.build.sourceEncoding>
        <project.reporting.outputEncoding>UTF-8</project.reporting.outputEncoding>
        <java.version>1.7</java.version>
    </properties>

    <dependencies>
        <dependency>
            <groupId>org.springframework.boot</groupId>
            <artifactId>spring-boot-starter</artifactId>
        </dependency>

        <dependency>
            <groupId>org.springframework.boot</groupId>
            <artifactId>spring-boot-starter-test</artifactId>
            <scope>test</scope>
        </dependency>
        <dependency>
            <groupId>org.springframework.boot</groupId>
            <artifactId>spring-boot-starter-web</artifactId>
        </dependency>
        <dependency>
            <groupId>site.wangxin520</groupId>
            <artifactId>spring-boot-start-hello</artifactId>
            <version>0.0.1-SNAPSHOT</version>
        </dependency>
    </dependencies>

    <build>
        <plugins>
            <plugin>
                <groupId>org.springframework.boot</groupId>
                <artifactId>spring-boot-maven-plugin</artifactId>
            </plugin>
        </plugins>
    </build>


</project>
代码中标黄了的就是我们自定义的一个startpom依赖坐标。
- 在启动类中,我们就可以使用自定义的helloservice类了。
package site.wangxin520.springbootstartertest;

import org.springframework.beans.factory.annotation.Autowired;
import org.springframework.boot.SpringApplication;
import org.springframework.boot.autoconfigure.SpringBootApplication;
import org.springframework.web.bind.annotation.RequestMapping;
import org.springframework.web.bind.annotation.RestController;

import site.wangxin520.spring_boot_start_hello.HelloService;

@SpringBootApplication
@RestController
public class SpringbootStarterTestApplication {

    @Autowired
    private HelloService helloService;

    @RequestMapping("/")
    public String index(){
        return helloService.sayHello();
    }

    public static void main(String[] args) {
        SpringApplication.run(SpringbootStarterTestApplication.class, args);
    }
}
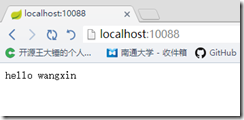
- 实际操作:
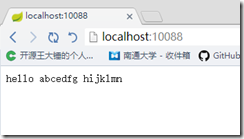
可见,已经自动注入进去了。当我们在application.properties中自行配置的时候,如下
- 得到结果为
可见,我们自定义的start pom成功了!


