如果我们想要在ubuntu20.04系统下开发rasp的i2c设备驱动程序,那我们需要在相应的i2c设备树节点里添加设备的node信息。我们先看/boot下有哪些信息:
# ls /boot/ -l
total 42275
-rw-r--r-- 1 root root   233406 Apr 14 17:42 config-5.11.0-1007-raspi
lrwxrwxrwx 1 root root       44 Apr 21 20:37 dtb -> dtbs/5.11.0-1007-raspi/./bcm2711-rpi-4-b.dtb
lrwxrwxrwx 1 root root       44 Apr 21 20:37 dtb-5.11.0-1007-raspi -> dtbs/5.11.0-1007-raspi/./bcm2711-rpi-4-b.dtb
drwxr-xr-x 3 root root     4096 Apr 21 20:25 dtbs
drwxr-xr-x 3 root root     7168 Dec 31  1969 firmware
drwxr-xr-x 2 root root     4096 Aug 12 23:56 grub
lrwxrwxrwx 1 root root       28 Apr 21 20:33 initrd.img -> initrd.img-5.11.0-1007-raspi
-rw-r--r-- 1 root root 28470360 Apr 21 20:37 initrd.img-5.11.0-1007-raspi
lrwxrwxrwx 1 root root       28 Apr 21 20:01 initrd.img.old -> initrd.img-5.11.0-1007-raspi
-rw------- 1 root root  5099714 Apr 14 17:42 System.map-5.11.0-1007-raspi
lrwxrwxrwx 1 root root       25 Apr 21 20:33 vmlinuz -> vmlinuz-5.11.0-1007-raspi
-rw------- 1 root root  9464117 Apr 14 17:42 vmlinuz-5.11.0-1007-raspi
发现/boot下的dtb软连接到dtbs/5.11.0-1007-raspi/./bcm2711-rpi-4-b.dtb,不要被这个假象迷惑,因为kernel启动时不是加载这里的dtb,本人亲测过!!!
实际上kernel启动时加载的dtb的文件为 /boot/firmware/bcm2711-rpi-4-b.dtb。
反编译dtb,生成dts
dtc -I dtb -O dts -o bcm2711-rpi-4-b.dts bcm2711-rpi-4-b.dtb
然后我们就可以打开 bcm2711-rpi-4-b.dts进行快乐的编辑了。
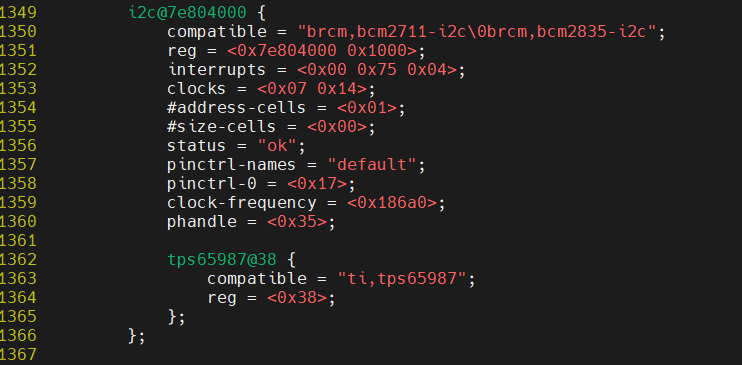
比如我们想在i2c-1适配器的节点下添加一个slave地址为0x38的设备节点,添加内容如下:

编译dts,生成dtb
添加完i2c从设备的node以后,我们需要再把dts编译成dtb文件,从而使我们的修改生效。
dtc -I dts -O dtb -o bcm2711-rpi-4-b.dtb bcm2711-rpi-4-b.dts
reboot 树莓派板子,dts的修改就会生效了。
i2c设备驱动demo
#include <linux/kernel.h>
#include <linux/module.h>
#include <linux/init.h>
#include <linux/platform_device.h>
#include <linux/of.h>
#include <linux/i2c.h>
#include <linux/cdev.h>
#include <linux/version.h>
#include <linux/slab.h>
#include <linux/fs.h>
#include <linux/errno.h>
#include <linux/device.h>
#include <linux/mutex.h>
#include <linux/delay.h>
#include <linux/interrupt.h>
#include <asm/uaccess.h>


struct dummy_dev {
        unsigned char *data;
        struct i2c_client *client;
        struct mutex dummy_mutex;
        struct cdev cdev;
        struct class *dummy_cls;
};


static int mypdrv_probe(struct i2c_client *client, const struct i2c_device_id *id)
{
        int err, index;
        struct dummy_dev *dummy_device = NULL;
        struct device *dev = &client->dev;
        unsigned char read_buf[32] = {0x0};
        unsigned char write_buf[5] = {0x00, 0x12, 0x34, 0x56, 0x78};

        pr_info("[%s] i2c slave address: 0x%.2X irq: %d
", __func__, client->addr, client->irq);

        if (!i2c_check_functionality(client->adapter, I2C_FUNC_SMBUS_WRITE_BLOCK_DATA))
                pr_err("I2C_FUNC_SMBUS_WRITE_BLOCK_DATA is not support
");

      /* 判断client的adapter(适配器)驱动支持I2C_FUNC_SMBUS_READ_BLOCK_DATA功能, 不是所有的适配器驱动程序都支持这一点;它通过I2C消息传递进行模拟,依赖于可能没有实现的特定机制(I2C_M_RECV_LEN)。Raspberry Pi4就不支持*/

     if (!i2c_check_functionality(client->adapter, I2C_FUNC_SMBUS_READ_BLOCK_DATA))
                pr_err("I2C_FUNC_SMBUS_READ_BLOCK_DATA is not support
");


        //write_buf[0] = 0x4;
        //err = i2c_smbus_write_i2c_block_data(client, 0x29, 5, write_buf);
        i2c_smbus_write_block_data(client, 0x29, 4, write_buf);
     //err = i2c_smbus_read_block_data(client, 0x29, read_buf); //不支持这个api!!!!
        err = i2c_smbus_read_i2c_block_data(client, 0x29, 5, read_buf);
        if (err < 0) {
                pr_err("i2c smbus read block faild, err=%d
", err);
                return err;
        }
        pr_info("err=%d; read_buf[0-6]: %.2x %.2x %.2x %.2x %.2x %.2x %.2x
",
                        err, read_buf[0], read_buf[1], read_buf[2],
                        read_buf[3], read_buf[4], read_buf[5], read_buf[6]);
dummy_device->client = client;
client->addr = 0x38; /* if the slave addr from dts is not correct, hardcode it with the right addr */
mutex_init(&dummy_device->dummy_mutex);
i2c_set_clientdata(client, dummy_device);
     ..............


    return 0;
}

static int mypdrv_remove(struct i2c_client *client)
{
        struct dummy_dev *dummy_device = i2c_get_clientdata(client);

        pr_info("[%s] i2c slave addr=0x%.2x
", __func__, client->addr);
        mutex_destroy(&dummy_device->dummy_mutex);
        kfree(dummy_device);

        return 0;
}

/* 如果使用OF匹配表匹配,i2c_driver.id_table必须存在,即使为空 */
static const struct i2c_device_id i2c_id_table[] = {
        {}
};
MODULE_DEVICE_TABLE(i2c, i2c_id_table);

static const struct of_device_id mypdrv_dt_ids[] = {
        {.compatible = "ti,tps65987",},
        {}
};
MODULE_DEVICE_TABLE(of, mypdrv_dt_ids);

static struct i2c_driver mypdrv = {
        .driver = {
                .name = "123",
                .owner = THIS_MODULE,
                .of_match_table = of_match_ptr(mypdrv_dt_ids),
        },
        .probe = mypdrv_probe,
        .remove = mypdrv_remove,
        .id_table = i2c_id_table,
};

module_i2c_driver(mypdrv);

MODULE_DESCRIPTION("i2c driver demo");
MODULE_AUTHOR("xxx");
MODULE_LICENSE("GPL");