0|1一、认证组件的作用
在一个程序中有一些功能是需要登录才能使用的,原生Django中的auth组件可以用来解决这个认证问题,drf框架中也有对应的认证组件来解决这个问题。
- models.py
from django.db import models

# Create your models here.

class User(models.Model):
    name = models.CharField(max_length=16)
    pwd = models.CharField(max_length=16)


class TokenUser(models.Model):
    token = models.CharField(max_length=256)
    user = models.OneToOneField(to='User',null=True,on_delete=models.SET_NULL,db_constraint=False)


class Book(models.Model):
    name = models.CharField(max_length=16)
    price = models.IntegerField()
    publish_date = models.DateField()
- myserializer.py 序列化
from rest_framework import serializers
from app01 import models

class BookSerializer(serializers.ModelSerializer):
    class Meta:
        model = models.Book
        fields = '__all__'


    def validate(self, attrs):
        return attrs
0|1二、自定义版登录验证组件
- urls.py
"""blog_test URL Configuration

The `urlpatterns` list routes URLs to views. For more information please see:
    https://docs.djangoproject.com/en/1.11/topics/http/urls/
Examples:
Function views
    1. Add an import:  from my_app import views
    2. Add a URL to urlpatterns:  url(r'^$', views.home, name='home')
Class-based views
    1. Add an import:  from other_app.views import Home
    2. Add a URL to urlpatterns:  url(r'^$', Home.as_view(), name='home')
Including another URLconf
    1. Import the include() function: from django.conf.urls import url, include
    2. Add a URL to urlpatterns:  url(r'^blog/', include('blog.urls'))
"""
from django.conf.urls import url
from django.contrib import admin
from app01.views import BooksView, BookView,Login

urlpatterns = [
    url(r'^admin/', admin.site.urls),
    url(r'^Login/$', Login.as_view()),
    url(r'^Books/$', BooksView.as_view()),
    url(r'^Books/(?P<pk>d+)/$', BookView.as_view()),
]
- myauth.py 自定义验证类
from rest_framework.authentication import BaseAuthentication
from app01.models import TokenUser
from rest_framework.exceptions import AuthenticationFailed

class MyAuthentication():
    #验证过程
    def authenticate(self, request):
        token = request.GET.get('token')
        token_user = TokenUser.objects.filter(token=token).first()
        if token_user:
            return token_user.user,token
        else:
            raise AuthenticationFailed('你还未登录,请先登录')

    def authenticate_header(self, request):
        pass
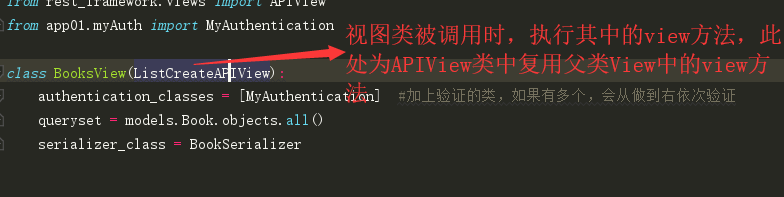
- views.py 视图类
from django.shortcuts import render
from rest_framework.response import Response

# Create your views here.
from rest_framework.generics import ListCreateAPIView,RetrieveUpdateDestroyAPIView
from app01 import models
from app01.myserializer import BookSerializer
from rest_framework.views import APIView
from app01.myAuth import MyAuthentication

class BooksView(ListCreateAPIView):
    authentication_classes = [MyAuthentication]  #加上验证的类,如果有多个,会从做到右依次验证
    queryset = models.Book.objects.all()
    serializer_class = BookSerializer


class BookView(RetrieveUpdateDestroyAPIView):
    authentication_classes = [MyAuthentication]
    queryset = models.Book.objects.all()
    serializer_class = BookSerializer


import uuid
#登录
class Login(APIView):
    def post(self,request):
        name = request.data.get('name')
        pwd = request.data.get('pwd')
        user = models.User.objects.filter(name=name,pwd=pwd).first()
        if user:
            token = uuid.uuid4()
            models.TokenUser.objects.update_or_create(user=user,defaults={"token":token})
            response = {"status":100,"message":"登录成功"}
        else:
            response = {"status": 200, "message": "登录失败"}
        return Response(response)
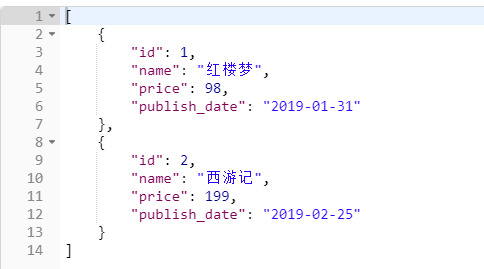
结果:登录后会在数据库中生成一个token,用get请求将其发送,观察各个请求的结果。
结果1:

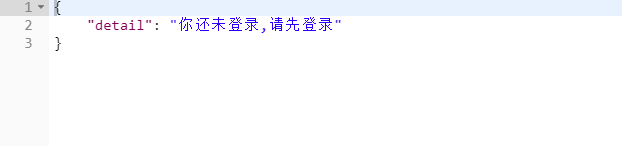
结果2:

0|1三、继承BaseAuthentication的类的登录验证组件
- myauth.py
from rest_framework.authentication import BaseAuthentication
from app01.models import TokenUser
from rest_framework.exceptions import AuthenticationFailed

class MyAuthentication():
    #验证过程
    def authenticate(self, request):
        token = request.GET.get('token')
        token_user = TokenUser.objects.filter(token=token).first()
        if token_user:
            return token_user.user,token
        else:
            raise AuthenticationFailed('你还未登录,请先登录')
其他代码一致
0|1四、认证组件的使用方式
1.局部使用:在需要使用登录验证的视图类中写上变量 authentication_classes= [ 验证类名,]
2.全局使用:在settings.py配置文件中,加入 REST_FRAMEWORK = {‘DEFAULT_AUTHENTICATION_CLASSES’:'验证类的具体位置例如(app01.myauth.MyAuthenyicatin)'}
3.全局使用,局部禁用:在全局使用的基础上,在不需要验证的视图类中,将变量 authentication_classes 改为 [ ] 即 authentication_classes = [ ]
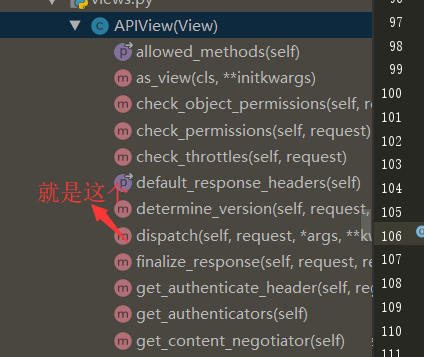
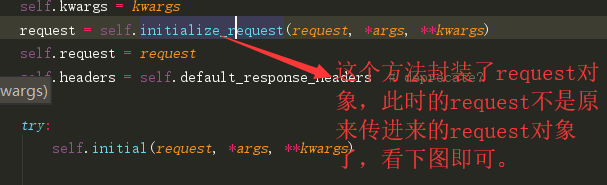
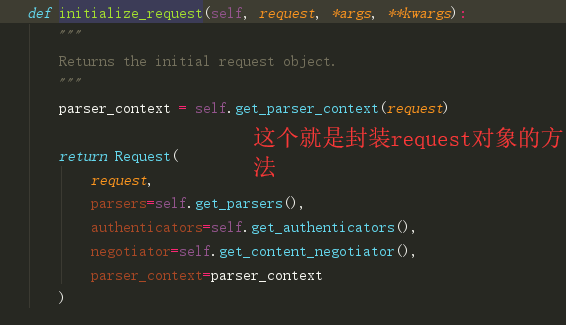
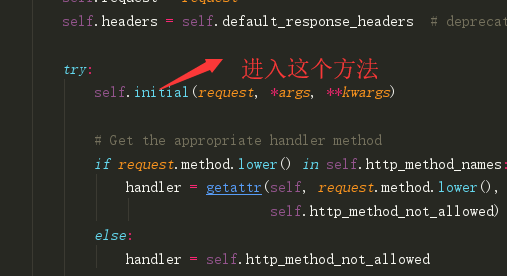
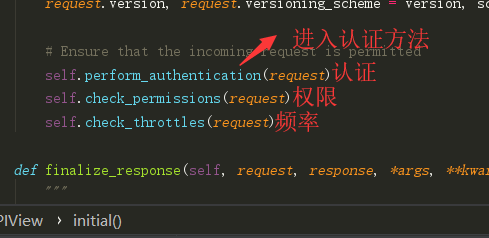
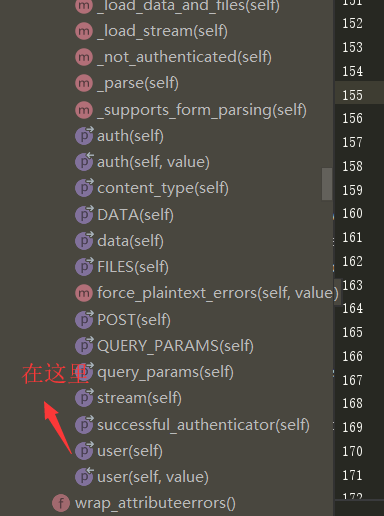
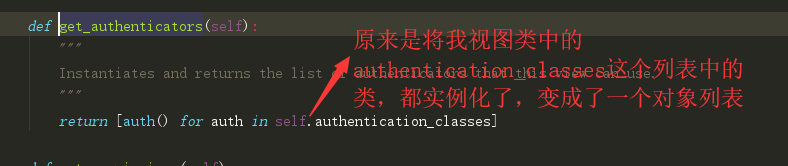
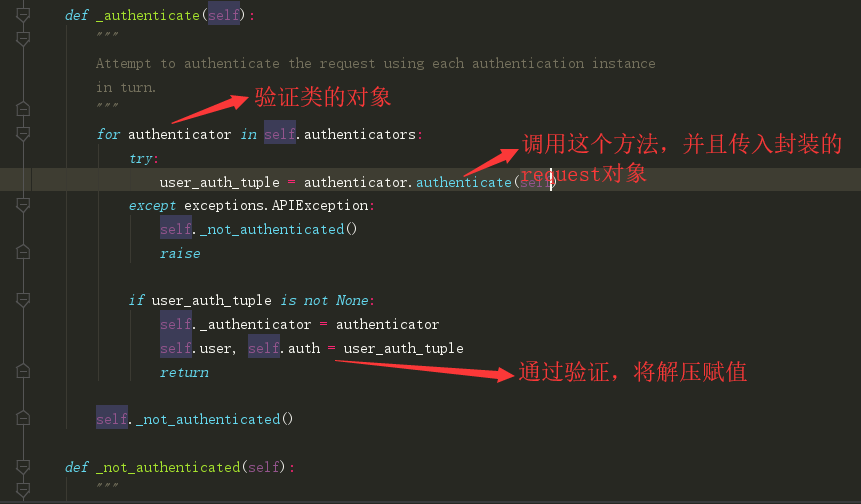
0|1五、认证组件源代码分析