本文我在学习Swift的一些随笔记录,结构可能有点随意,由于处于学习阶段所以仅供参考。
1、什么是Swift语言?
Swift是Apple在WWDC2014所发布的一门编程语言,用来撰写OS X和iOS应用程序[1]。在设计Swift时.就有意和Objective-C共存,Objective-C是Apple操作系统在导入Swift前使用的编程语言
Swift是供iOS和OS X应用编程的新编程语言,基于C和Objective-C,而却没有C的一些兼容约束。Swift采用了安全的编程模式和添加现代的功能来使得编程更加简单、灵活和有趣。界面则基于广受人民群众爱戴的Cocoa和Cocoa Touch框架,展示了软件开发的新方向
/*虽然Swift是一个全新的语言,但与Objective-C和C却有着千丝万缕的关系,Swift其实就是Objective-C的文本变种,对于这门全新的语言,苹果做的工作其实远没有想像的艰巨。LLVM编译器做工作只是先把swift翻译成Objctive-C代码,然后再把Objective-C代码翻译成C语言代码,然后再把C语言代码翻译成汇编,最终翻译成机器码。*/
2、Swift的特点。
Swift是Objective-C语言的一种替代方法,它采用现代编程语言理论概念并致力于提供更简单的语法。在它的介绍中,它被简单地描述为“没有C的Objective-C”。
默认情况下,Swift不公开指针和其他不安全的访问器,与Objective-C不同,它使用指针来普遍引用对象实例。此外,Objective-C使用类似Smalltalk的语法来进行方法调用,已被其他常见的面向对象(OO)语言(如Java或C#)的程序员更熟悉的点符号样式和名称空间系统所取代。Swift引入了真正的命名参数并保留了关键的Objective-C概念,包括协议,闭包和类别,通常用更简洁的版本替换以前的语法,并允许将这些概念应用于其他语言结构,如枚举类型。
语法糖
在Cocoa和Cocoa Touch环境下,许多常见类都是Foundation Kit库的一部分。这包括NSString字符串库(使用Unicode),NSArray和NSDictionary集合类等。Objective-C提供了各种语法糖来允许这些对象在语言中即时创建,但一旦创建,对象就会被对象调用。例如,在Objective-C中连接两个NSString所需的方法调用与此类似:
NSString * str = @“hello,” ;
str = [ str stringByAppendingString :@“world” ];
在Swift中,这些基本类型中的很多都被提升为语言的核心,并且可以直接操纵。例如,字符串不可见地桥接到NSString(当导入Foundation时),现在可以与+运算符串联,从而允许大大简化语法;
var str = “hello”
Str += “world”
库、运行和开发
Swift语言出来后,可能新的项目直接使用swift来开发,但可能在过程中会遇到一些情况,某些已用OC写好的类或封装好的模块,不想再在swift 中再写一次,或者有一些第三方使用OC写的,怎么办?那就使用混编。
Swift使用与现存的Objective-C系统相同的运行时,但需要iOS 7或macOS 10.9或更高版本。Swift和Objective-C代码可以在一个程序中使用,也可以在扩展中使用C和C++。与C不同的是,C++代码不能直接从Swift中使用。必须在Swift和C++之间创建一个Objective-C或C包装器。在Objective-C中,Swift可以很好地访问对象模型,并且可以用来子类化、扩展和使用Objective-C代码来提供协议支持。相反的说法是不正确的:一个敏捷的类不能在Objective-C中被子类。
为了帮助开发这些程序,以及重用现存的代码,Xcode 6提供了一个半自动化系统,它构建并维护一个桥接头,以便将Objective-C代码暴露给Swift。这采用了额外的头文件的形式,它简单地定义或导入了项目Swift代码所需要的所有Objective-C符号。在这一点上,Swift可以引用这些导入中声明的类型、函数和变量,就好像它们是用Swift编写的。Objective-C代码也可以直接使用Swift代码,通过导入一个自动维护的头文件,其中包含了项目的Swift符号的Objective-C声明。例如,一个名为“MyApp”的混合项目中的Objective-C文件可以使用代码导入“MyApp-swift.h”来访问Swift类或函数。然而,并不是所有的符号都可以通过这种机制获得,但是使用诸如泛型类型、非对象可选类型、复杂的枚举,甚至Unicode标识符之类的特定特性可能会使Objective-C无法访问。
Swift对属性、由开发环境读取的元数据的支持也有限,而且并不一定是编译后的代码的一部分。和Objective-C一样,属性使用@语法,但是当前可用的集合是很小的。其中一个例子是@iboutlet属性,它将代码中的给定值标记为outlet,可在Interface Builder(IB)中使用。outlet是一种设备,它将屏幕显示的值绑定到代码中的对象
3、Swift的编译过程
Swift 经由 LLVM,编译成LLVM中间码,最后编译成本地机器代码(二进制)。目前运行的时候会依赖 Objective-C Runtime。
1、解析:首先通过解析器模块把源码转换为没有任何语义或类型信息的抽象语法树(AST),并且针对输入源的语法问题发出警告或者错误。
2、语义分析:负责解析AST并将其格式转换为便于检查的AST,便于为源代码中的语义问题发出警告或者错误。
3、Clang导入器:负责导入Clang模块并将他们导出的C或OCAPI映射到其对应的Swift API中。
4、SIL生成(Swift中间语言):负责将AST转换成原始的SIL.
5、SIL转换:负责将原始的SIL转换成需要的规范的SIL格式。
6、SIL优化:为程序执行额外的高级Swift进行特定的优化,包括自动引用计数优化,
虚拟化和泛型专业化等。
7、LLVM IR生成:将SIL转换为LLVM IR,此时LLVM可以继续对其进行优化并且生成机器码。
4、Swift编译命令详解
MODES:
-dump-ast Parse and type-check input file(s) and dump AST(s) 解析输入文件并转储AST并进行类型检查(支持多文件)
-dump-parse Parse input file(s) and dump AST(s) 解析输入文件并转储AST(支持多文件)
-dump-scope-maps <expanded-or-list-of-line:column>
Parse and type-check input file(s) and dump the scope map(s) 解析和类型检查输入文件,并转储范围映射(s)
-dump-type-refinement-contexts
Type-check input file(s) and dump type refinement contexts(s)
-emit-assembly Emit assembly file(s) (-S) 发表装配文件
-emit-bc Emit LLVM BC file(s) 发表 LLVM BC 文件
-emit-executable Emit a linked executable 发表相关的可执行文件
-emit-imported-modules Emit a list of the imported modules 发出导入的模块列表
-emit-ir Emit LLVM IR file(s) 发表 LLVM IR 文件
-emit-library Emit a linked library 发表一个链接库
-emit-object Emit object file(s) (-c)
-emit-sibgen Emit serialized AST + raw SIL file(s) 发布序列AST 生成sil文件
-emit-sib Emit serialized AST + canonical SIL file(s) 发布序列AST 生成规范的sil文件
-emit-silgen Emit raw SIL file(s) 发表原始的sil
-emit-sil Emit canonical SIL file(s) 发表规范的sil
-index-file Produce index data for a source file 为源文件生成索引数据
-parse Parse input file(s)
-print-ast Parse and type-check input file(s) and pretty print AST(s)
-typecheck Parse and type-check input file(s)
OPTIONS:
-api-diff-data-file <path>
API migration data is from <path> 迁移数据从path
-application-extension Restrict code to those available for App Extensions
-assert-config <value> Specify the assert_configuration replacement. Possible values are Debug, Release, Unchecked, DisableReplacement.
-continue-building-after-errors
Continue building, even after errors are encountered 发生错误可以继续编译
-disable-migrator-fixits
Disable the Migrator phase which automatically applies fix-its 禁止迁移 fix-its
-driver-time-compilation
Prints the total time it took to execute all compilation tasks 打印执行所有编译程序的时间
-dump-migration-states-dir <path>
Dump the input text, output text, and states for migration to <path> 把输入、输出和状态文本迁移到path
-dump-usr Dump USR for each declaration reference 把每个声明引用转存到USR
-D <value> Marks a conditional compilation flag as true 将条件编译标志标记为true
-embed-bitcode-marker Embed placeholder LLVM IR data as a marker 嵌入占位符LLVM IR数据作为标记
-embed-bitcode Embed LLVM IR bitcode as data将LLVM IR 的比特码作为数据嵌入
-emit-dependencies Emit basic Make-compatible dependencies files
-emit-loaded-module-trace-path <path>
Emit the loaded module trace JSON to <path>
-emit-loaded-module-trace
Emit a JSON file containing information about what modules were loaded 发布一个JSON文件里面包含加载的模块信息
-emit-module-path <path>
Emit an importable module to <path> 发出一个可输入的模块 到 path路径下
-emit-module Emit an importable module 发出一个可输入的模块
-emit-objc-header-path <path>
Emit an Objective-C header file to <path> 生成OC头文件 到 指定路径下
-emit-objc-header Emit an Objective-C header file
-emit-tbd-path <path> Emit the TBD file to <path>
-emit-tbd Emit a TBD file
-enforce-exclusivity=<enforcement>
Enforce law of exclusivity
-fixit-all Apply all fixits from diagnostics without any filtering 不需要任何过滤就可以将所有的fixits应用于诊断。
-framework <value> Specifies a framework which should be linked against
-Fsystem <value> Add directory to system framework search path
-F <value> Add directory to framework search path
-gdwarf-types Emit full DWARF type info.
-gline-tables-only Emit minimal debug info for backtraces only
-gnone Don't emit debug info
-g Emit debug info. This is the preferred setting for debugging with LLDB.
-help Display available options
-import-underlying-module
Implicitly imports the Objective-C half of a module
-index-file-path <path> Produce index data for file <path>
-index-store-path <path>
Store indexing data to <path>
-I <value> Add directory to the import search path 将目录添加到导入搜索路径
-j <n> Number of commands to execute in parallel
-L <value> Add directory to library link search path
-l<value> Specifies a library which should be linked against
-migrate-keep-objc-visibility
When migrating, add '@objc' to declarations that would've been implicitly visible in Swift 3
-migrator-update-sdk Does nothing. Temporary compatibility flag for Xcode.
-migrator-update-swift Does nothing. Temporary compatibility flag for Xcode.
-module-cache-path <value>
Specifies the Clang module cache path
-module-link-name <value>
Library to link against when using this module
-module-name <value> Name of the module to build 要构建的模块的名称
-nostdimport Don't search the standard library import path for modules
-num-threads <n> Enable multi-threading and specify number of threads 启用多线程并指定线程数
-Onone Compile without any optimization 编译且没有任何优化
-Ounchecked Compile with optimizations and remove runtime safety checks 编译且优化 移除运行时安全检查
-output-file-map <path> A file which specifies the location of outputs 指定输出的文件位置
-O Compile with optimizations 编译优化
-o <file> Write output to <file> 写到指定文件
-parse-as-library Parse the input file(s) as libraries, not scripts 将输入文件解析为库,不是脚本
-parse-sil Parse the input file as SIL code, not Swift source 将输入文件解析为sil(swift中见文件)
-parseable-output Emit textual output in a parseable format
-profile-coverage-mapping
Generate coverage data for use with profiled execution counts 生成用于提交执行计数的覆盖率数据
-profile-generate Generate instrumented code to collect execution counts 生成用于收集执行计数的检测代码
-sanitize-coverage=<type>
Specify the type of coverage instrumentation for Sanitizers and additional options separated by commas
-sanitize=<check> Turn on runtime checks for erroneous behavior. 在运行时检查错误
-save-temps Save intermediate compilation results 保存中间编译结果
-sdk <sdk> Compile against <sdk>
-serialize-diagnostics Serialize diagnostics in a binary format 以二进制格式序列化
-static-executable Statically link the executable 可执行的静态链接
-static-stdlib Statically link the Swift standard library Swift标准库的静态链接
-suppress-warnings Suppress all warnings 抑制所有警告
-swift-version <vers> Interpret input according to a specific Swift language version number 输出当前Swift的版本号
-target-cpu <value> Generate code for a particular CPU variant 为特定的CPU变量生成代码
-target <value> Generate code for the given target 为给定目标生成代码
-tools-directory <directory>
Look for external executables (ld, clang, binutils) in <directory>
-use-ld=<value> Specifies the linker to be used 指明要使用的链接器
-verify-debug-info Verify the binary representation of debug output.
-version Print version information and exit
-v Show commands to run and use verbose output
-warn-swift3-objc-inference-complete
Warn about deprecated @objc inference in Swift 3 for every declaration that will no longer be inferred as @objc in Swift 4
-warn-swift3-objc-inference-minimal
Warn about deprecated @objc inference in Swift 3 based on direct uses of the Objective-C entrypoint
-warnings-as-errors Treat warnings as errors 将警告视为错误
-whole-module-optimization
Optimize input files together instead of individually
-Xcc <arg> Pass <arg> to the C/C++/Objective-C compiler
-Xlinker <value> Specifies an option which should be passed to the linker
例:swiftc -dump-ast /users/code/a.swift > 1.txt //转储带有类型检查的a.swift语法树
注:中文有些是直译过来的所以有些描述可能不是特别准确
5、Swift包管理器
Swift 包管理器的正式发布是随着 Swift3.0 一起发布的,它是一个用于构建能够运行在 macOS 和 Linux 上的 Swift 库和 app 的新方法。它能够帮助你管理依赖,让你轻松构建、测试和运行你的 Swift 代码。
Swift 包管理器有助于极大地改进 Swift 生态系统,让 Swift 更容易使用、部署到没有 Xcode 的平台上,比如 Linux。Swift 包管理器还能解决在使用多个相互依赖的库时的“依赖地狱”的问题。
注:”依赖地狱”又被称作相依性地狱(英语:dependency hell),是指在操作系统中由于软件之间的依赖性不能被满足而引发的问题。一个软件包依赖于其它必要的软件包(且版本要匹配要求),使得软件包系统形成了复杂的依赖关系网络,并可能引发一系列问题。一些软件包可能因为依赖性无法满足,需要安装大量软件包;另一方面,一个软件包的卸载可能引发数量众多的软件包无法工作。
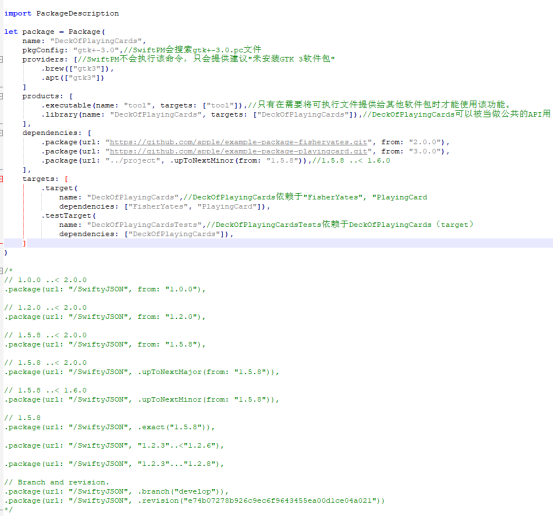
Swift包之间的依赖关系离不开package.swift这个文件
Package.swift文件格式参考
Package(
name:String,
pkgConfig:String ? = nil,
providers:[SystemPackageProvider] ? = nil,
products:[Product] = [],
dependencies:[Dependency] = [],
targets:[Target] = [],
swiftLanguageVersions:[ Int ] ? = nil
)
解释:
- name: 包名
- pkgConfig: 用于获取系统模块附加标志的pkg-config(.pc)文件的名称
- providers: 定义提示以显示安装系统模块。
- products:包装出售的产品。
- dependencies: 外部程序包依赖关系,不包括基础库
- targets: 包中的目标列表
- swiftLanguageVersions: swift语言版本

在语法树中可以通过 import_decl节点读取依赖的包名

6、Swift前端入门
前面我们知道编译一个Swift文件需要的命令是swiftc hello.swift,由于swiftc不包含-frontend所以他会被分解成自作业,swiftc hello.swift -driver-print-jobs
子作业如下:

第一个job调用-frontend命令 生成hello.o 然后通过链接器 ld把/tmp/hello.o连接到名字hello的可执行文件中。
这个命令输出的是一个无类型的语法树,它与swiftc -dump-parse hello.swift是相同的如下图:

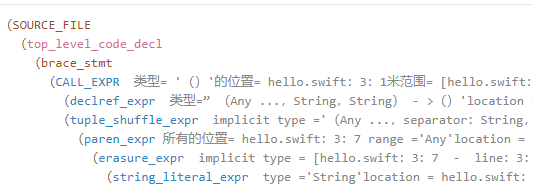
下面展示的是有类型语法树的特点可以使用命令 swiftc -dump-ast hello.swift输出如下图 :

无类型语法树的特点是unresolved_decl_ref_expr节点,并且许多节点都是type = ‘<null>’值。
前面说到编译会调用-frontend命令,那么他是怎么执行的呢,


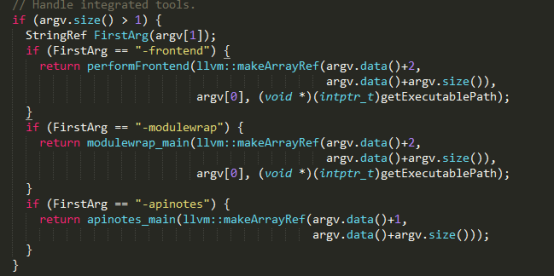
如图是tools/driver/driver.cpp中main函数里面的代码它会读取命令中的第一个参数而且必须是第一个参数判断是不是-frontend,然后调用perfromFrontend函数(它是一个工具方法/lib/FrontendTool)
Swift前端语法的读取和大多数前端没有任何区别,都是把一个Swift文件分割成n个Token然后循环读取Token来解析Swift文件,循环结束的标识为EOF。
例如:print(“hello world!”)解析的Token如下图
