一、Thymeleaf介绍
Thymeleaf是一种Java XML / XHTML / HTML5模板引擎,可以在Web和非Web环境中使用。它更适合在基于MVC的Web应用程序的视图层提供XHTML / HTML5,但即使在脱机环境中,它也可以处理任何XML文件。它提供了完整的Spring Framework集成。
关于Spring推荐Thymeleaf的这种说法,我在Spring官方文档并没有看到具体的说明,只是在和JSP比较的时候,说了JSP和Thymeleaf对比JSP的一些不足,而Thymeleaf只是作为其他模板引擎的一种代表。
作为一款优秀的模板引擎,除了易用性、活跃的社区、健康快速的发展外,还有非常重要的一点就是性能了,那Thymeleaf 3 和 FreeMaker 的性能对比是怎么样的,后续文章会陆续更新。
二、Thymeleaf基础使用
Thymeleaf的使用是由两部分组成的:标签 + 表达式,标签是Thymeleaf的语法结构,而表达式就是语法里的内容实现。
通过标签 + 表达式,让数据和模板结合,最终转换成html代码,返回给用户。
Thymeleaf基础使用分为三部分:
- 标签使用
- 表达式使用
- 设置IDEA 对 Thymeleaf 代码补全
1.标签使用
1.1 th:text 基础信息输出
HTML代码:
<!DOCTYPE html>
<html xmlns="http://www.w3.org/1999/xhtml"
      xmlns:th="http://www.thymeleaf.org">
<head>
    <meta charset="UTF-8">
    <title>王磊的博客</title>
</head>
<body>
<span th:text="${name}"></span>
</body>
</html>
Java代码:
@RequestMapping("/")
public ModelAndView index() {
    ModelAndView modelAndView = new ModelAndView("/index");
    modelAndView.addObject("name", "老王");
    return modelAndView;
}
最终效果: 老王
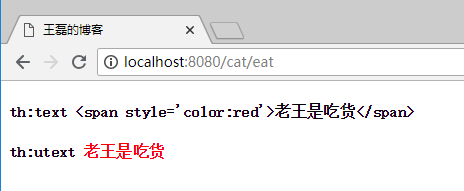
1.2 th:utext html内容输出
使用"th:text"是对内容的原样输出,使用“th:utext”可以进行html标签输出。
Java代码:
@RequestMapping("/eat")
public ModelAndView eat() {
    ModelAndView modelAndView = new ModelAndView("/cat");
    modelAndView.addObject("data", "<span style='color:red'>老王是吃货</span>");
    return modelAndView;
}
HTML代码:
<h4 th:text="'th:text '+${data}"></h4>
<h4 th:utext="'th:utext '+${data}"></h4>
展示效果:
1.3 th:if, th:unless 条件判断
<span th:if="${age > 18}">
    成年
</span>
<span th:unless="${age > 18}">
    未成年
</span>
th:if为满足条件的业务处理,th:unless正好相反,是除去的意思。
1.4 th:switch, th:case 多条件判断
<div th:switch="${age}">
    <span th:case="18">18岁</span>
    <span th:case="19">19岁</span>
    <spa th:case="*">其他</spa>
</div>
注意: 默认选项使用th:case="*" 指定。
1.5 th:each 循环
HTML代码:
<div th:each="name,item:${names}">
    <span th:text="${item.count}"></span>
    <span th:text="${name}"></span>
</div>
Java代码:
@RequestMapping("/")
public ModelAndView index() {
    ArrayList<String> names = new ArrayList<>();
    names.add("java");
    names.add("golang");
    names.add("nodejs");
    ModelAndView modelAndView = new ModelAndView("/index");
    modelAndView.addObject("names",names);
    return modelAndView;
}
访问效果如下:
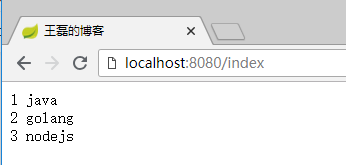
其中item为每行的详细值,key值如下:
- index 下标,从0开始
- count 第x个,从1开始
- size 这个集合的大小
- current 当前行的值
1.6 th:fragment、th:insert、th:replace、th:include 代码片段复用
- th:fragment标签是声明代码片段,用于解决代码复用的问题,好比Java程序写的公用代码一样,每个需要的地方都可以直接调用;
- th:insert 引用fragment的代码,保留自己的主标签;
- th:replace 引用fragment的代码,不保留自己的主标签;
- th:include 使用类似th:replace,Thymeleaf3.0之后不推荐使用;
footer.html页面代码:
<!DOCTYPE html>
<html xmlns="http://www.w3.org/1999/xhtml"
      xmlns:th="http://www.thymeleaf.org">
<head>
    <meta charset="UTF-8">
    <title>王磊的博客</title>
</head>
<body>

<div th:fragment="copyright">
    © 著作权归 老王 所有
</div>

<div th:fragment="about">
    关于
</div>

<div th:fragment="links">
    CCTV
</div>

</body>
</html>
声明了两个代码片段,copyright和about。
cat.html页面代码:
<!DOCTYPE html>
<html xmlns="http://www.w3.org/1999/xhtml"
      xmlns:th="http://www.thymeleaf.org">
<head>
    <meta charset="UTF-8">
    <title>王磊的博客</title>
</head>
<body>
<div th:replace="footer :: copyright"></div>

<div th:insert="footer :: about"></div>

<div th:include="footer :: links"></div>
</body>
</html>
其中第一个div引用了footer.html 的 copyright 代码片段,第二个div引用了 footer.html 的 about 代码片段。
双冒号的理解: 其中使用“::”双冒号来完成对页面片段的引用,有点像php里面的语法,使用双冒号来表示对类的静态属性和方法进行直接引用。
执行效果如下图:
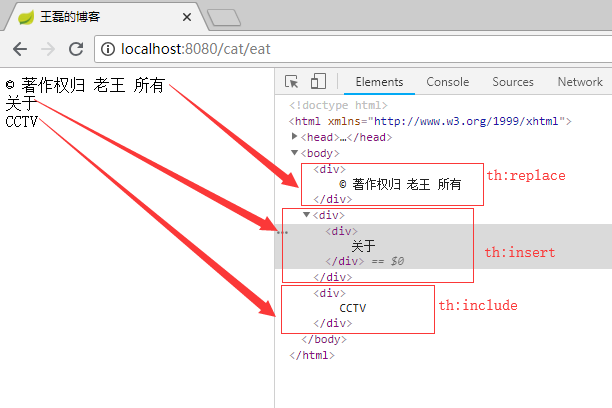
总结: 可以很清晰的看出th:insert、th:replace、th:include之间的区别,在于是否保留自己的主标签,th:include 在3.0之后已经不推荐使用了,可以使用th:replace标签替代。
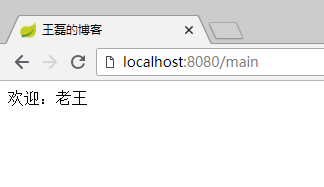
提高班——fragment代码传参
使用fragment我们是可以在html代码中传参的,比如我们定义了一个top.html其中有一个“欢迎XXX”的提示,而这个人名XXX就是需要动态传递的,这样我们可以最大程度的完成代码的复用,这个时候就是一个很好的使用场景,我们需要这样做。
页面main.html代码:
<!DOCTYPE html>
<html xmlns="http://www.w3.org/1999/xhtml"
      xmlns:th="http://www.thymeleaf.org"
>
<head>
    <meta charset="UTF-8">
    <title>王磊的博客</title>
</head>
<body>

<div th:replace="footer :: webcome('老王')"></div>

</body>
</html>
页面top.html
<!DOCTYPE html>
<html xmlns="http://www.w3.org/1999/xhtml"
      xmlns:th="http://www.thymeleaf.org"
>
<head>
    <meta charset="UTF-8">
    <title>王磊的博客</title>
</head>
<body>

<div th:fragment="webcome(about)">
    <span th:text="'欢迎:'+${about}"></span>
</div>

</body>
</html>
最终的效果:
1.7 th:with 定义局部变量
页面代码:
<!DOCTYPE html>
<html xmlns="http://www.w3.org/1999/xhtml"
      xmlns:th="http://www.thymeleaf.org"
>
<head>
    <meta charset="UTF-8">
    <title>王磊的博客</title>
</head>
<body>
<div th:with="sum=4-2">
    <span th:text="${sum}"></span>
</div>
</body>
</html>
页面输出结果:2
1.8 th:remove 删除标签
th:remove用于html代码的删除,th:remove值有五个:
- all 删除本段所有代码
- body 删除主标签内的所有元素
- tag 删除主标签,保留主标签所有的元素
- all-but-first 保留主标签和第一个元素,其他全部删除
- none 不删除任何标签
示例index.html代码如下:
<!DOCTYPE html>
<html xmlns="http://www.w3.org/1999/xhtml"
      xmlns:th="http://www.thymeleaf.org">
<head>
    <meta charset="UTF-8">
    <title>王磊的博客</title>
</head>
<body>

<div id="all" th:remove="all">
    <span>all</span>
    <span>1</span>
</div>

<div id="body" th:remove="body">
    <span>body</span>
    <span>2</span>
</div>

<div id="tag" th:remove="tag">
    <span>tag</span>
    <span>3</span>
</div>


<div id="all-but-first" th:remove="all-but-first">
    <span>all-but-first</span>
    <span>4</span>
</div>

<div id="none" th:remove="none">
    <span>none</span>
    <span>5</span>
</div>

</body>
</html>
最终展示效果如下:

1.9 其他标签
- th:style 定义样式
<div th:style="'color:'+${skinColor}"> - th:onclick 点击事件
<input type="button" value=" Click " th:onclick="'onsub()'"> - th:href 赋值属性href
<a th:href="${myhref}"></a> - th:value 赋值属性value
<input th:value="${user.name}" /> - th:src 赋值src
<img th:src="${img}" /> - th:action 赋值属性action
<form th:action="@{/suburl}"> - th:id 赋值属性id
<form id="${fromid}"> - th:attr 定义多个属性
<img th:attr="src=@{/img/stone.jpg},alt=${alt}" /> - th:object 定义一个对象
<div th:object="${user}"> - ...
2.表达式使用
2.1 表达式概要
2.1.1 简单表达式
变量表达式:${...}
选择变量表达式:*{...}
消息表达式:#{...}
链接表达式:@{...}
片段表达:~{...}
2.1.2 数据的类型
文字:'one text', 'Another one!',…
数字文字:0, 34, 3.0, 12.3,…
布尔文字:true, false
NULL文字:null
文字标记:one, sometext, main,…
2.1.3 文本操作
字符串拼接:+
字面替换:|The name is ${name}|
2.1.4 算术运算
二进制运算符:+, -, *, /, %
减号(一元运算符):-
2.1.5 布尔运算
二进制运算符:and, or
布尔否定(一元运算符):!, false
2.1.6 条件运算符
比较值:>, <, >=, <=
相等判断: ==, !=
2.1.7 条件判断
如果-然后:(if) ? (then)
如果-然后-否则:(if) ? (then) : (else)
违约:(value) ?: (defaultvalue)
所有以上这些表达式都可以组合和嵌套,例如:
'User is of type ' + (${user.isAdmin()} ? 'Administrator' : (${user.type} ?: 'Unknown'))
2.2 表达式使用实例
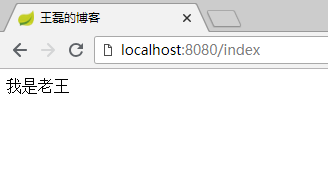
2.2.1 变量表达式 ${...}
变量表达式的使用,我们前面的代码已经见到了,$是我们平常开发中最常用的表达式,用于把后台Java类的动态数据,映射到页面,例如:
Java代码:
public ModelAndView index() {
    ModelAndView modelAndView = new ModelAndView("/cat");
    modelAndView.addObject("data", "我是老王");
    return modelAndView;
}
HTML代码:
<!DOCTYPE html>
<html xmlns="http://www.w3.org/1999/xhtml"
      xmlns:th="http://www.thymeleaf.org">
<head>
    <meta charset="UTF-8">
    <title>王磊的博客</title>
</head>
<body>
<span th:text="${data}"></span>
</body>
</html>
最终效果:
2.2.2 选择表达式 *{...}
选择表达式相当于选择了一个对象,在使用的时候不在需要这个对象的前缀,直接使用属性的key进行内容展示,代码如下:
<div th:object="${goods}">
    <span th:text="${goods.name}"></span>
    <span th:text="*{price}"></span>
    <span th:text="${#dates.format(goods.createTime, 'yyyy-MM-dd HH:mm:ss')}"></span>
</div>
最终效果:
iMac 7999.0 2018-08-10 14:03:51
总结: *{price} = ${goods.price}只是省去了“goods.”前缀,效果都是一样的。
2.2.3 链接表达式 @{...}
用于转换url,代码如下:
<a th:href="@{/footer(id=666,name=laowang)}">链接</a>
最终呈现的效果:
<a href="/footer?id=666&name=laowang">链接</a>
链接表达式,可以传递参数,用逗号分隔。
服务器根相对路径:@{~/path/to/something}
2.2.4 文本操作
文本操作分为两个:文本拼加、文本替换
文本拼加:
<span th:text="'我叫'+${name}"></span>
文本替换:
文本替换的语法:|内容${tag}|
<span th:text="|我叫${name},是一名开发工程师。|"></span>
2.2.5 三元表达式
2.2.6 双括号作用
<p th:text="${val}">...</p>
<p th:text="${{val}}">...</p>
结果:
<p>1234567890</p>
<p>1,234,567,890</p>
2.2.7 嵌入文本标签
虽然标准的标签几乎可以满足所有的业务场景,但某些情况我们更喜欢直接写入HTML文本,例如:
<p>Hello, [[${name}]]</p>嵌入文本有两种写法“[[...]]”和“[(...)]”,分别的作用就像th:text 和 th:utext 一样,例如:
<p>
    [[${name}]]
</p>
<p>
    [(${name})]
</p>
看到的效果是这样的:
2.3 表达式对象概述
表达式里面的对象可以帮助我们处理要展示的内容,比如表达式的工具类dates可以格式化时间,这些内置类的熟练使用,可以让我们使用Thymeleaf的效率提高很多。
2.3.1 表达式基本对象
#ctx: 操作当前上下文.#vars:操作上下文变量.#request: (仅适用于Web项目)HttpServletRequest对象.#response: (仅适用于Web项目)HttpServletResponse对象.#session: (仅适用于Web项目)HttpSession对象.#servletContext: (仅适用于Web项目)ServletContext对象.2.3.2 表达式实用工具类
#execInfo: 操作模板的工具类,包含了一些模板信息,比如:${#execInfo.templateName}.#uris: url处理的工具#conversions: methods for executing the configured conversion service (if any).#dates: 方法来源于java.util.Date对象,用于处理时间,比如:格式化.#calendars: 类似于#dates, 但是来自于java.util.Calendar对象.#numbers: 用于格式化数字.#strings: methods forStringobjects: contains, startsWith, prepending/appending, etc.#objects: 普通的object对象方法.#bools: 判断bool类型的工具.#arrays: 数组操作工具.#lists: 列表操作数据.#sets: Set操作工具.#maps: Map操作工具.#aggregates: 操作数组或集合的工具.每个类中的具体方法,点击查看:https://www.thymeleaf.org/doc/tutorials/3.0/usingthymeleaf.html#appendix-b-expression-utility-objects
3.IDEA设置Thymeleaf自动补全
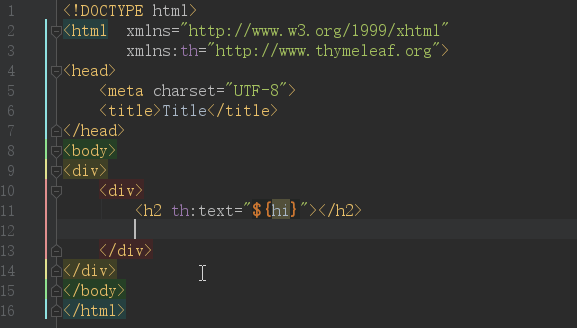
先上效果图:
IDEA默认是开启了Thymeleaf 插件支持的,如果不放心需要验证,请访问:https://www.jetbrains.com/help/idea/2018.2/thymeleaf.html
但仅仅是配置上面的效果,依然是无法正常使用的,原因是你要在html中声明 Thymeleaf 命名空间
xmlns:th="http://www.thymeleaf.org",完整代码如下:<!DOCTYPE html> <html xmlns="http://www.w3.org/1999/xhtml" xmlns:th="http://www.thymeleaf.org"> <head> <meta charset="UTF-8"> <title>Title</title> </head> <body> <h2 th:text="${hi}"></h2> </body> </html>其中关键的代码是:
xmlns:th="http://www.thymeleaf.org"
这样当你在代码输入“th:”的时候就会看到 Thymeleaf 的所有标签了。
三、Spring Boot 集成 Thymeleaf
3.1 开发环境
- Spring Boot 2.0.4
- Thymeleaf 3.0.9
- Jdk 8
- Windows 10
- IDEA 2018.2
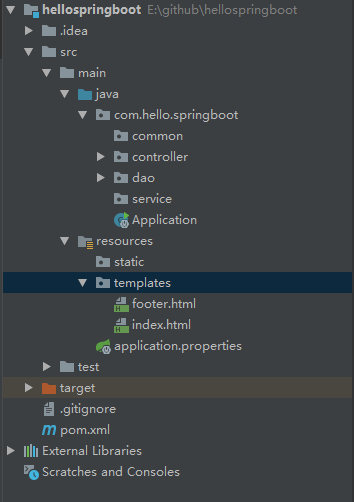
在正式集成Thymeleaf引擎之前,先来看下目录结构如图:
3.2 Spring MVC目录结构
除去包名,我们来解释一下这些目录代表的含义:
- common 通用公共类
- controller 控制器类
- dao 数据交互类
- service 业务逻辑处理类
- Application.java 启动文件
- resources 静态文件存储文件夹
- resources/templates 所有的Thymeleaf目录存放目录
- resources/application.properties 全局配置类
- pom.xml Maven 配置文件
3.3 Spring Boot 集成 Thymeleaf 分为四步:
- pom.xml 添加 Thymeleaf 模板引擎
- application.properties 配置 Thymeleaf 信息
- 创建controller类,编写代码
- 创建模板,编写html代码
接下来我们具体分别来看具体的步骤。
3.3.1 pom.xml 添加 Thymeleaf 模板引擎
<!--thymeleaf模板-->
<dependency>
    <groupId>org.springframework.boot</groupId>
    <artifactId>spring-boot-starter-thymeleaf</artifactId>
</dependency>
3.3.2 application.properties 配置 Thymeleaf 信息
# 启用缓存:建议生产开启
spring.thymeleaf.cache=false
# 建议模版是否存在
spring.thymeleaf.check-template-location=true
# Content-Type 值
spring.thymeleaf.servlet.content-type=text/html
# 是否启用
spring.thymeleaf.enabled=true
# 模版编码
spring.thymeleaf.encoding=utf-8
# 应该从解析中排除的视图名称列表(用逗号分隔)
spring.thymeleaf.excluded-view-names=
# 模版模式
spring.thymeleaf.mode=HTML5
# 模版存放路径
spring.thymeleaf.prefix=classpath:/templates/
# 模版后缀
spring.thymeleaf.suffix=.html
Thymeleaf常用配置说明
配置项 类型 默认值 建议值 说明 spring.thymeleaf.enabled bool true 默认 是否启用 spring.thymeleaf.mode String HTML 默认 模板类型,可以设置为HTML5 spring.thymeleaf.cache bool true 默认 是否启用缓存,生成环境建议设置为true spring.thymeleaf.prefix String classpath:/templates/ 默认 模版存放路径 spring.thymeleaf.suffix String .html 默认 模版后缀 spring.thymeleaf.servlet.content-type String text/html 默认 Content-Type 值 spring.thymeleaf.encoding String - utf-8 模版编码 3.3.3 创建controller类,编写代码
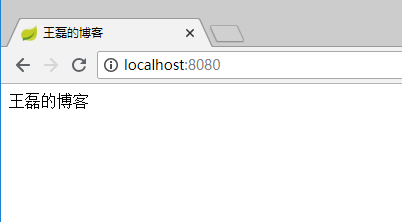
我们在controller文件夹创建index.java,代码如下:
package com.hello.springboot.controller;
import org.springframework.stereotype.Controller;
import org.springframework.web.bind.annotation.RequestMapping;
import org.springframework.web.servlet.ModelAndView;
@Controller
@RequestMapping("/")
public class Index {

    @RequestMapping("/")
    public ModelAndView index() {
        ModelAndView modelAndView = new ModelAndView("/index");
        modelAndView.addObject("name", "王磊的博客");
        return modelAndView;
    }
}
关键代码解读:
- @ResponseBody注解:如果使用该注解,返回结果会直接输出,而不是使用模板引擎渲染
- 使用ModelAndView对象,指定视图名&添加视图对象
3.3.4 创建模板,编写html代码
我们在resources/templates下创建index.html,代码如下:
<!DOCTYPE html> <html xmlns="http://www.w3.org/1999/xhtml" xmlns:th="http://www.thymeleaf.org"> <head> <meta charset="UTF-8"> <title>王磊的博客</title> </head> <body> <span th:text="${name}"></span> </body> </html>启动调试,在浏览器输入:http://localhost:8080/
效果如下:
相关代码GitHub:https://github.com/vipstone/springboot-example.git
四、参考资料
thymeleaf官方文档 Thymeleaf :https://www.thymeleaf.org/doc/tutorials/3.0/usingthymeleaf.html
thymeleaf官方文档 Spring + Thymeleaf :https://www.thymeleaf.org/doc/tutorials/3.0/thymeleafspring.html
- 相关阅读:
299. Bulls and Cows
C# 小知识
C# Excel写入数据及图表
C# 委托高级应用----线程——创建无阻塞的异步调用(二)
C# 委托高级应用----线程——创建无阻塞的异步调用(一)
C#中的GET和SET访问器
C# 委托与事件详解(三)
C# 委托与事件详解(二)
C# 委托详解(一)
Visual Studio 实用技能
- 原文地址:https://www.cnblogs.com/vipstone/p/9594092.html
- 最新文章
asp.net 修改/删除站内目录操作后会导致Session丢失
随机
植物名字
<Effective C++>读书摘要--Templates and Generic Programming<一>
<Effective C++>读书摘要--Inheritance and Object-Oriented Design<二>
<Effective C++>读书摘要--Inheritance and Object-Oriented Design<一>
<Effective C++>读书摘要--Implementations<二>
<Effective C++>读书摘要--Implementations<一>
【转】bind简单示例
<Effective C++>读书摘要--Designs and Declarations<三>
- 热门文章
<Effective C++>读书摘要--Designs and Declarations<二>
308. Range Sum Query 2D
307. Range Sum Query
306. Additive Number
305.Number of Islands II
304. Range Sum Query 2D
303. Range Sum Query
302. Smallest Rectangle Enclosing Black Pixels
301. Remove Invalid Parentheses
300. Longest Increasing Subsequence
Copyright © 2020-2023 润新知