前言:
一、优点:
轻量级、高效率、上手快、简单易学、文档全面而简洁
二、功能:
1、模板渲染
2、模块化
3、扩展功能:路由、Ajax
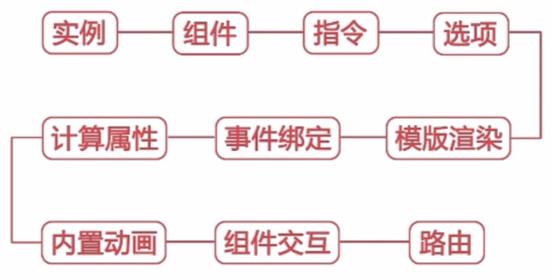
三、课程包含:
1、Vue实例
2、Vue组件
3、Vue指令
4、内置组件
5、实例方法
6、实例选项
7、实例属性
8、模板渲染
9、条件渲染
10、组件交互
11、标签属性
12、事件绑定
13、计算属性
14、属性监听
15、表单
16、动画
17、vue-cli项目搭建
18、Vue-router理由:实现单页面切换
19、vuex

四、vue.js简介
1、轻量级的前端界面框架
2、2016.10发布最新2.0版本,更强大,更快速
3、主要包括:
a) 数据渲染/数据同步
b) 组件化/模块化
c) 其他功能:路由、ajax、数据流
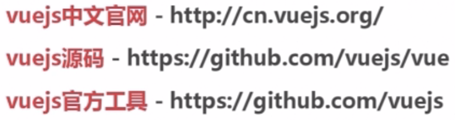
五、Vue.js学习资源
六、Vue.js的特点
1、双向数据绑定
2、组件化/模块化
3、单文件组件 - js、css、html存在于一个.vue文件内
通过什么实现呢?
a) webpack+vue-loader
b) Browserify+vueify
单文件组件的优点:
a) 可以在一个文件里编辑html、css和js
b) <style scoped></style>样式上的scoped属性规定了该样式的作用域,防止污染到其他组件
c) 可以定义语言,如:<template lang=”jade”></template> 预加载器
<style lang=”less”></style> 预处理器
d) 可以使用webpack打包工具,利用它的功能
七、Vue.js的实例对象
1、概念:当项目引入vue.js后,在全局里会有个js的vue的类,通过vue类来实例化的对象就是vue实例对象。通过关键字new Vue()实例。
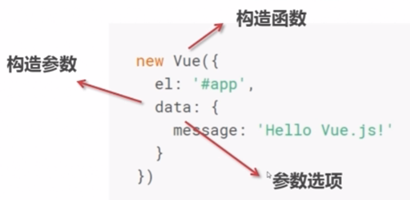
2、选项
(1)el - 决定该vue实例装载到页面的什么位置
(2)模板template - 装载的东西,是指包含指令或html的一个片段
如:template: ‘<div><other-component></div>’
(3)数据data - data中的数据会被代理到实例对象里
如:data: {
fruit: ‘apple’
}
可以通过vm.fruit访问代理到的内容
也可以将data中的数据渲染到template中,如:
template: ‘<div>{{ fruit }}</div>’
(4)组件component - 引入其他子组件
如:component: {App}
3、实际项目中如何使用组件和组件间如何引入
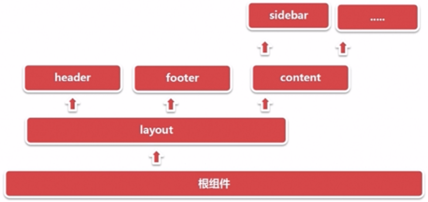
(1)通常一个项目里,我们可以在main.js或入口的js中首先实例化一个根组件,把这个根组件挂载到某个容器中,然后引入第一个子组件App,当然App中也会有其他的组件,比如header、sidebar、footer等,我们的每个页面也是以同样的方式引入到App这样的组件里,然后一层层树状结构,形成一个组件树。
4、生命周期
(1)Vue的一个组件或者vue的一个实例化对象在不同的阶段,vue.js提供了不同的钩子,我们通过这些钩子在特定的阶段执行特定的操作。
(2)钩子函数包括:
a) beforeCreate -- 实例刚刚创建的时候
b) Created -- 初始化完成这样的一个事件
c) beforeMount -- 渲染的时候
d) Mounted -- 渲染完毕
e) beforeDestory & destoryed -- 调用摧毁方法
八、Vue.js的组件
1、如何实现vue.js的根组件及组件之间的相互关系?
(1)通过vue的脚手架工具生成项目
(2)在main.js中通过es6语法引入vue的一个库并赋予Vue这个变量:
import Vue from ‘vue’;
‘vue’ -- vue库或模块
Vue -- 变量
(3)实例化根组件并进行数据渲染
先关注main.js和index.html:
      在main.js中

      import Vue from 'vue'                  (ES6知识点:P272 import导入模块)
      /* eslint-disable no-new */
      new Vue({
        el: '#app',
        template: '<p>hello world {{ word }}</p>',
        data: {
          word: 'hello world'
        }
      })
(4)Vue是自底向上增量开发
(5)组件注册与引入 -- 实现组件树
通过Vue.component(‘组件名’, {组件对象,含有参数template})方法注册全局组件,此处的组件对象相当于new Vue方法,涉及到一个“语法糖”功能。
a) 注册全局组件
js:
Vue.component('my-header', {
template: '<p>this is my header</p>'
})
html:
<div id="app">
<my-header></my-header>
</div>
b) 注册局部组件、子孙组件构成组件树
     js:
      // 孙组件
      var myHeaderChild = {
               template: '<p>this is my header child</p>'
      }
      // 子组件
      var myHeader = {
               template: '<p><my-header-child></my-header-child>this is my header</p>',
               components: {
                      'my-header-child': myHeaderChild
               }
      }
      new Vue({
               el: '#app',
               data: {
                      word: 'hello world'
               },
               components: {
                      'my-header': myHeader
               }
      })

     html:
      <div id="app">
            <my-header></my-header>
      </div>

     局部组件my-header只能在#app中使用。
PS: 实际项目中在components文件夹中存放组件,跟它同级的App.vue引入不同的component,在导出pages的时候使用components来引入其它component就非常清晰.
c) 避免data引用赋值
如果直接给组件的data赋一些值,这样做如果有多个组件用到这个data,其中一个通过事件改变data后,另一些组件中的data也会发生改变,采用return方法返回所需要的数据可避免这种情况。
      var myHeader = {
        template: '<p><my-header-child></my-header-child>this is my header</p>',
        components: {
          'my-header-child': myHeaderChild
        },
        data () {                                  (ES6知识点:P90方法简写)
          return {
            f1: 0,
            f2: 2
          }
        }
      }
九、Vue的基本概念
1、全局api -- vue的实例对象提供的全局方法
(1)Vue.extend(options) -- 用于扩展vue的构造器
(2)Vue.set(object, key, value) -- 是给全局vue设置属性的一个方法
(3)Vue.component(id, [definition]) -- 添加全局组件
(4)Vue.use(plugin) -- 通过它来注册类似vue router、vuex之类的插件
2、实例选项
(1)Data--与数据相关:
a) data
b) computed -- 计算属性值
c) props
d) methods
e) watch
(2)与DOM相关的:
a) el
b) template
c) render -- 方法
(3)Lifecycle Hooks -- 生命周期的钩子
(4)Assets
a) directives -- 输入指令
b) filters -- 过滤器
c) components
(5)Misc -- 合集的一些选项
a) extends
b) functional
3、实例属性/方法 -- 以$开头,直接从实例对象调用
  root.$data/ root.$on
  var root = new Vue({
    el: '#app',
    data: {
      word: 'hello world'
    },
    components: {
      'my-header': myHeader
    }
  })

  // 属性&方法
  console.log(root.$data)
  root.$on('emit', function () {
    alert(1)
  })
4、指令 -- 写在模板里,通过模板与组件的数据进行交互的方法,有时这个指令还包含参数,如v-on:事件
(1)v-html -- 将数据渲染到元素内部
与v-text的区别:前者渲染出的是DOM元素,后者渲染成字符串文本
{{msg}} 与v-text类似,双花括号里可以是一元js表达式
    <template>
        <div>
             <p v-text="hello"></p>
             <p v-html="hello"></p>
             {{ hello }}
             {{ status ? 'success' : 'fail' }}
        </div>
    </template>

    <script>
      export default {
          data () {
               return {
                   hello: '<span>world</span>',
                   status: true
               }
          }
      }
    </script>
(2)v-on:事件 缩写@:事件
有时会与修饰器“.”结合 构成v-on:参数.修饰器
var myHeader = {

  template: '<p v-html="" v-on:click="" v-on:keydown.enter=""><my-header-child></my-header-child>this is my header</p>',

  components: {

    'my-header-child': myHeaderChild

  },

  data () {

    return {

      f1: 0,

      f2: 2

    }

  }

}
常用的修饰器有:
a) .stop 阻止冒泡
b) .prevent
c) .capture
d) .self
e) .{keyCode | keyAlias} -- 如:.enter
f) .native
(3)v-if
(4)v-for -- (详细介绍参见第三章第二项)
5、内置组件 -- 不是自己注册的,而是vue自带的组件
(1)<component></component> 它身上包含:is方法,通过此方法将变量传进去来指定这个组件是个什么样的组件。
(2)<router-view></router-view> 是路由提供的内置组件
(3)<keep-alive></keep-alive> 可以通过它来将上面的router组件进行缓存,即在进行切换的时候,router-view里的内容只要被访问过的就会被缓存起来。
var myHeader = {

  template: '<p v-html="" v-on:click="" v-on:keydown.enter=""> <component :is=""></component> this is my header</p>  <keep-alive><router-view></router-view></keep-alive>',

  components: {

    'my-header-child': myHeaderChild

  },

  data () {

    return {

      f1: 0,

      f2: 2

    }

  }

}
(4)<transition></transition> 动画组件
第三章
一、基本结构
1、在index.html中写下div,并赋予id
<!DOCTYPE html>

<html>

  <head>

    <meta charset="utf-8">

    <title>vue2.0</title>

  </head>

  <body>

    <div id="app"></div>

  </body>

</html>
2、在main.js中通过import引入vue模块(每个项目必引)和相应的组件模块如App.vue
import Vue from 'vue'

import App from './App'


/* eslint-disable no-new */

new Vue({

  el: '#app',

  render: h => h(App)                            (ES6知识点:P69 箭头函数)

})
3、在App.vue中定义template、script、style三部分,在script中使用export导出要显示的页面
<template>

  <div>

    {{ hello }}

  </div>

</template>


<script>

export default {

  data () {

    return {

      hello: 'world'

    }

  }

}

</script>


<style>

#app {

  font-family: 'Avenir', Helvetica, Arial, sans-serif;

  -webkit-font-smoothing: antialiased;

  -moz-osx-font-smoothing: grayscale;

  text-align: center;

  color: #2c3e50;

  margin-top: 60px;

}

</style>
二、列表渲染v-for 数组、对象、子组件
1、v-for指令实现列表循环 -- 数组形式
<template>

  <div>

    <ul>

      <li v-for="item in lists">{{item.name}}的价格是{{item.price}}元</li>

或采用v-text指令:

  <li v-for="item in lists" v-text="item.name + '---' + item.price"></li>

    </ul>

 </div>

</template>


<script>

export default {

  data () {

    return {

      lists: [

        {

          name: 'apple',

          price: 34

        },

        {

          name: 'banana',

          price: 56

        }

      ]

    }

  }

}

</script>
需要注意的是,v-for指令应加在要循环的那一项上面,而不是它的父级。
此外,也可以声明每一项的index
<li v-for="(item, index) in lists" :class="{odd: index % 2}">{{ index }}-{{ item.name }}的价格是{{ item.price }}元</li>
注:此处的:class的值如果是对象,一定别忘记写花括号。
2、v-for指令实现列表循环 -- 对象形式
<template>

  <div>

    <ul>

      <!-- <li v-for="value in listObj">{{ value }}</li> -->

或:

      <li v-for="(value, key) in listObj">{{ key + value}}</li>

    </ul>

 </div>

</template>


<script>

export default {

  data () {

    return {

      listObj: {

        name: 'apple',

        price: 34,

        weight: '100g'

      }

    }

  }

}

</script>
注:这里的v-for指令中必须用key、value in obj,与数组的item(不是定死的)和index in arr相对应。
3、组件之间的相互引用及列表循环之子组件间的渲染
(1)组件间的相互引用
第一步:在script中的export前先把组件引进来
<script>

import componentA from './components/a'

export default {}

</script>
注:此处的componentA代表这个a.vue,在其他组件中直接用<componentA></componentA>
第二步:注册 -- 通过components选项注册到当前组件里
export default {

  components: {componentA},                 (ES6知识点:P90属性简写)

  data () {

    return {  }

  }

}
第三步:使用、渲染 -- 将组件componentA的template渲染到当前的组件的template中
<template>

<div>

<component-a></component-a>

</div>

</template>
(2)列表循环之子组件间的渲染
只需要在template中的componetA组件上添加v-for指令即可:
<componentA v-for="(value, key) in listObj" :key="key"></componentA>
组件渲染的意义:
可以动态的将父组件的数据传给子组件componentA,如上例中通过绑定属性key,然后子组件a.vue中可以拿到传过来的值进行使用。
三、列表数据的同步更新方法
1、methods
<template>
<div>
<ul>
<li v-for="item in list">{{ item.name }} -- {{item.price}}</li>
</ul>
<button @click="addItem">addItem</button>
</div>
</template>
<script>
export default {
data () {
return {
list: [
{
name: 'apple',
price: 34
},
{
name: 'banana',
price: 56
}
]
}
},
methods: {
addItem () {
this.list.push({name: 'pineapple', price: 78})
}
}
}
</script>
PS:此处的逻辑是点击按钮,向列表中添加一项。
数组中并不是所有的方法都能触发列表的更新,下面的这些方法可以触发:
push() 在后面添加一项
pop() 从后面删除一项
shift() 在前面添加一项
unshift() 从前面删除一项
splice() 删除或替换一项
sort() 排序
reverse() 反转
这些方法或情形不会触发列表更新:
filter() 过滤
concat() 拼接数组
slice() 切割数组
两种情形:
(1)直接为其中某一项赋值,如vm.items[indexOfItem] = newValue
所以下例这种情况不生效:
methods: {
addItem () {
this.list[1] = {
name: 'pineapple',
price: 78
}
}
}
如果硬要改变第1项实现列表数据更新,就要借助Vue.set()方法:
methods: {
addItem () {
Vue.set(this.list, 1, {
name: 'pineapple',
price: 78
})}
}
其中第一个参数是数组本身,第二个是要被改变的那项的index,第三项是改变成什么。
PS:但在使用Vue的set方法前,需要在该组件中引入Vue组件,否则会报错
<script>
import Vue from 'Vue'
export ...
</script>
(2)改变数组的长度,如vm.items.length = newLength
四、vue标签属性和条件渲染
1、通过v-bind:参数名 = “数据” 进行动态绑定标签属性,当数据被修改后,该属性对应的数据在页面也会同步更新。
<template>
<div>
<a :href="link" :title="hello">to baidu</a>
<componentA :dataA = "dataA"></componentA>
</div>
</template>
<script>
export default {
data () {
return {
hello: 'world',
link: 'http://www.baidu.com',
dataA: 112
}
}
}
</script>
PS:1)使用v-bind绑定的是个变量,不使用v-bind绑定的属性就只是个字符串。
如:
<a class="link-href" :class="classStr">to baidu</a>
这里的两个class不会冲突。
:class延伸:class属性的几种添加方式
a) 字符串形式:如上例
b) 对象形式:如果class绑定的是一个对象,就可以根据对象的值进行判断是否展示该对象的属性作为class。如:
<a class="link-href" :class="classObj">点我啊</a>
data () {
return {
classObj: {
'red-font': true,
'blue-font': false
}
}
}
c) 数组形式:
<a class="link-href" :class="classArr">再点我啊</a>
data () {
return {
classArr: ['red-font', 'blue-font']
}
}
PS:以上三种形式都可以直接写到行间。
d) 数组、对象混用
<a class="link-href" :class="[classA, {'red-font': hasError}]">第三次点击</a>
data () {
return {
classA: 'blue-font',
hasError: true
}
}
也可以通过:style内联样式将样式展示到便签上:
<a :style="styleCss">测试内联样式</a>
data () {
return {
styleCss: {
color: 'red',
'font-size': '30px'
}
}
}
这时,可以在js中如methods中对this.styleCss进行操作来改变a标签的样式。
2) 如果v-bind属性绑定到子组件标签componentA上,那么在子组件内部a.vue中也可以使用该属性。
2、条件渲染之v-if、v-show
<template>
<p v-if="isPartA">partA</p>
<p v-show="!isPartA">partB</p>
<button @click="toggle">toggle</button>
</template>
<script>
export default {
data () {
return {
isPartA: false
}
},
methods: {
toggle () {
this.isPartA = !this.isPartA
}
}
}
</script>
PS:v-if和v-show的区别:
v-if在DOM元素中不存在,使用v-show时元素存在,只是加了个display=”none”
二者都可以配合v-else指令使用:
<p v-if="isPartA">partA</p>
<p v-else>no data</p>
五、事件绑定
1、基本/内置的事件绑定通过v-on:参数或缩写@:绑定,有时后会用到修饰符“.”
2、自定义事件绑定
流程描述:在子组件中通过点击触发了自己的方法,这个方法$emit发出一个自定义事件(可带参数),父组件监听这个自定义事件,并触发父组件自己的一个方法,这个方法就是要处理的结果,方法中传递参数,可访问到子组件中$emit发出的那个参数。
父组件App.vue中:
<template>
<comA @my-event="onComaMyEvent"></comA>
</template>
<script>
import comA from './components/a'
export default {
components: {comA},
data () {
return {
}
},
methods: {
onComaMyEvent (paramFromA) {
console.log('onComaMyEvent' + paramFromA)
}
}
}
</script>
子组件a.vue中:
<template>
<button @click="emitMyEvent">emit</button></template>
<script>
export default {
data () {
return {
hello: 'I am a component A!'
}
},
methods: {
emitMyEvent () {
this.$emit('my-event', this.hello)
}
}
}
</script>
3、表单事件绑定 -- 双向数据绑定(v-model)
(1)普通的input框
<template>
<input type="text" v-model="myValue">
<p>{{ myValue }}</p>
</template>
<script>
export default {
data () {
return {
myValue: ''
}
}
}
</script>
(2)复选框
<template>
<input v-model="myBox" type="checkbox" value="apple">
<input v-model="myBox" type="checkbox" value="banana">
<input v-model="myBox" type="checkbox" value="pineapple">
<p>{{ myBox }}</p>
</template>
<script>
export default {
data () {
return {
myBox: []
}
}
}
</script>
(3)单选框
<template>
<input v-model="myRadio" type="radio" value="apple">
<input v-model="myRadio" type="radio" value="banana">
<input v-model="myRadio" type="radio" value="pineapple">
<p>{{ myRadio }}</p>
</template>
<script>
export default {
data () {
return {
myRadio: ''
}
}
}
</script>
4、下拉框
<template>
<select name="" id="" v-model="selection">
<option value="apple">apple</option>
<option value="banana">banana</option>
<option value="pineapple">pineapple</option>
</select>
<p>{{ selection }}</p>
</template>
<script>
export default {
data () {
return {
selection: null
}
}
}
</script>
PS:上述的option可以通过v-for循环渲染
select标签及指令不变,只在option上v-for循环即可:
<option v-for="item in selectObj" :value="item.id">{{ item.text}}</option>
<script>
export default {
data () {
return {
selection: null,
selectObj: [
{id: 0, text: 'apple'},
{id: 1, text: 'pineapple'},
{id: 2, text: 'banana'}
]
}
}
}
</script>
另外,也可以把select抽成组件如vSelect,上面也可以绑定自定义事件,并通过操作自定义事件和$emit来实现父子组件之间的通信。
5、v-model.lazy 懒加载
当输入框输完失去焦点后才进行双向数据绑定。
6、v-model.number转换数据类型 由string转为number
注意:字母和数字组合为NaN,数据类型也是number
7、v-model.trim 裁剪空格,只是裁两端空格
六、计算属性computed和数据监听watch
1、计算属性computed是个vue选项,通过computed、通过一个方法来return一个值,这个值可以使用data里面的数据,通过this来引用。会被缓存。
<template>
<input type="text" v-model="myValue">
<p>{{ myValueWithoutNum }}</p>
</template>
<script>
export default {
data () {
return {
myValue: ''
}
},
computed: {
myValueWithoutNum () {
return this.myValue.replace(/d/g, '')
}
}
}
</script>
PS:也可以在methods通过方法myValueWithoutNum()来实现该功能。
二者的区别:
计算属性的更新只会根据另外一个值如myValue进行更新,假如myValue不再更新,那么myValueWithNum也不再更新。
而当我们调用方法里的myValueWithNum()时,无论何时调用,都会重新获取该myValue。
2、数据监听watch
<template>
<ul>
<li v-for="item in myList">{{ item.text }}</li>
</ul>
<button @click="changeList">change</button></template>
<script>
import Vue from 'vue'
export default {
data () {
return {
myList: [
{text: 'apple'},
{text: 'banana'}
]
}
},
methods: {
changeList () {
Vue.set(this.myList, 1, {
text: 'pineapple'
})
},
tellUser () {
alert('will change!')
}
},
watch: {
myList () {
this.tellUser()
}
}
}
</script>
适用场景:对列表进行更改,可以在watch里进行监听,只要更改就调用methods的某个方法。
第四章 深入vue组件
I. 组件
一、组件基础
1、组件名、属性在template中最好把驼峰格式转成中线格式。
2、可以通过:is=””方法在template中使用组件。
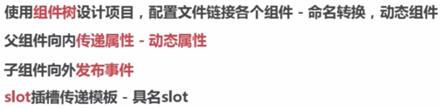
二、组件之间的通信 -- 主要有三种:属性、emit、slot插槽
父向子传 用props,即标签属性
子向父传 用emit,即通过去触发一个事件,这个事件只有emit触发和on监听两种方法

(1)父传子之静态属性传递
父组件App.vue中:
<template>
<div>
<comp-a number-to-do = 78></comp-a>
</div>
</template>
<script>
import compA from './components/a'
export default {
components: {
compA
},
data () {
return {}
}
}
</script>
子组件a.vue中:
<template>
<div>
{{ hello }}
{{ numberToDo }}
</div>
</template>
<script>
export default {
props: ['number-to-do'],
data () {
return {
hello: 'I am a component A!'
}
}
}
</script>
PS:a) 注意以上三处加粗的代码的名字转换。
b) 在子组件中通过props接收父组件传过来的数据,就相当于在自己的data中添加了该数据,在data中就不必重新定义。
c) props除了可以接收数组外,还可以接收对象,对象里可以定义接收的数据类型。
父组件中:
<comp-a number-to-do = 78></comp-a>
子组件中:
props: {
'number-to-do': [Number, String]
},
PS:父组件中的78不管加不加引号,都是String类型,如果子组件中props未指定该类型,就会报错,指定了就不会。
(2)父传子之动态属性传递
父组件App.vue中:
<template>
<div>
<input type="text" v-model="myVal">
<comp-a :my-value="myVal"></comp-a>
</div>
</template>
<script>
import compA from './components/a'
export default {
components: {
compA
},
data () {
return {
myVal: ''
}
}
}
</script>
子组件a.vue中:
<template>
<div>
{{ hello }}
{{ myValue }}
</div>
</template>
<script>
export default {
props: {
'my-value': [Number, String]
},
data () {
return {
hello: 'I am a component A!'
}
}
}
</script>
PS:注意属性如:my-value、事件如@my-event只能用中划线,不能用驼峰方式。
(3)父传子之插槽
如果父组件想向子组件插入一个模板标签元素,要借助<slot>标签。
父组件App.vue中:
<template>
<div>
<comp-a :my-value="myVal">
<p>123</p>
</comp-a>
</div>
</template>
子组件a.vue中:
<template>
<div>
{{ hello }}
{{ myValue }}
<slot></slot>
</div>
</template>
PS:上例中就把父组件放到子组件标签中的p标签插到了子组件的slot位置。
1)插槽的便捷之处:
a) 常用场景:
比如子组件<comp-a>是个dialog,标签里可以插入任何元素<p>、<span>之类的,这样就可以实现弹框内容不同了。
b) 比如子组件<comp-a>中没有内容,可以在插槽<slot>标签中写内容,就会被显示,若子组件有内容,就只展示子组件的内容,而不展示插槽的。
2)关于具名slot -- 可以知道不同部分的插入
父组件中:
<comp-a :my-value="myVal">
<p>123</p>
<p slot="header">xxx header</p>
<p slot="footer">yyy footer</p>
</comp-a>
子组件中:
<slot></slot>
<slot name="header">no header</slot>
balabala
<slot name="footer">no footer</slot>
(4)子传父 使用emit和v-on:,参照第三章P16第五事件绑定。
三、动态组件
1、通过:is="变量如:currentView",将某个组件渲染到某个位置,我们就可以通过currentView来载入不同的组件到那个位置。
2、常用场景:
比如tab切换,tab切换下面会展现不同的小组件,这个小组件由一个组件切换成另一个组件,所以我们只要在切换的方法中更新currentView就会将组件同步更新到相应的位置。
3、动态组件有些类似路由,换句话说<router-view>就相当于一个动态组件。
跟路由相似,动态组件也支持<keep-alive>内置标签,可以缓存组件,提高组件的加载速度。
<template>
<keep-alive>
<p :is = "currentView"></p>
</keep-alive>
</template>
<script>
import comA from './components/a'
export default {
components: {comA},
data () {
return {
currentView: 'com-a'
}
}
}
</script>
PS:加粗的com-a就是子组件变量,该子组件一定要先import再注册,否则就会报错。
四、总结
II. Vue.js的高级功能
一、过渡/动画
1、css实现过渡
css阶段类名:

通过<transition>标签与v-show或v-if指令以及style样式配合,样式中一般都是opacity/transform样式:
(1)淡入淡出
<template>
<button @click="show = !show">toggle</button>
<div>
<transition name="fade">
<p v-show="show">this is toggle show</p>
</transition>
</div>
</template>
<script>
export default {
data () {
return {
show: true
}
}
}
</script>
<style>
.fade-enter,
.fade-leave-active {
opacity: 0;
}
.fade-enter-active,
.fade-leave-active {
transition: all .5s ease-out;
}
</style>
PS:style中的.fade-和<transition>标签的name是对应的。
(2)自定义动画,如位移
<template>
<button @click="show = !show">toggle</button>
<div>
<transition name="my-trans">
<p v-show="show">this is toggle show</p>
</transition>
</div>
</template>
<script>
同上
</script>
<style>
.my-trans-enter-active,
.my-trans-leave-active {
transition: all 1s ease-out;
}
.my-trans-enter {
transform: translateY(-500px);
opacity: 0;
}
.my-trans-leave-active {
transform: translateY(500px);
opacity: 0;
}
</style>
(3)接受的过渡状态、多元素过渡
a) 方式一
<template>
<button @click="toggleCom">toggle</button>
<transition name="fade" mode="out-in">
<div :is="currentView"></div>
</transition>
</template>
<script>
import comA from './components/a'
import comB from './components/b'
export default {
components: {comA, comB},
data () {
return {
currentView: 'com-b'
}
},
methods: {
toggleCom () {
if (this.currentView === 'com-a') {
this.currentView = 'com-b'
} else {
this.currentView = 'com-a'
}
}
}
}
</script>
<style>
.fade-enter,
.fade-leave-active {
opacity: 0;
}
.fade-enter-active,
.fade-leave-active {
transition: all .5s ease-out;
}
</style>
PS:a) style中的.fade-和<transition>标签的name是对应的。
b) 与直接用css过渡不同之处在于,标签上不用加v-show/v-if指令。
c) <transition>标签默认的mode为in-out即新的先进来旧的再出去,这样体验很不好,所以修改为out-in即旧的先出新的再进。
b) 方式二
<template>
<button @click="show = !show">toggle</button>
<transition name="fade" mode="out-in">
<p v-if="show">I am show</p>
<div v-else>I am not show</div>
</transition>
</template>
<script>
import comA from './components/a'
import comB from './components/b'
export default {
components: {comA, comB},
data () {
return {
currentView: 'com-b',
show: true
}
}
}
</script>
<style>
.fade-enter,
.fade-leave-active {
opacity: 0;
}
.fade-enter-active,
.fade-leave-active {
transition: all .5s ease-out;
}
</style>
PS:在vue中如果<transition>中的两个元素是相同标签如都是<p>,则不会执行该动画,需要添加key区分两个标签,动画才能正常执行。
<transition name="fade" mode="out-in">
<p v-if="show" key="0">I am show</p>
<p v-else key="1">not in show</p>
</transition>
2、JS过渡
— 同样也分为一些过渡阶段,与css过渡不同的是,js通过v-on来监听这些事件钩子。
<template>
<transition
@before-enter="beforeEnter"
@enter="enter"
@leave="leave"
:css="false">
<p class="animate-p" v-show="show">I am show</p>
</transition>
<br><br><br><br><br>
<button @click="show = !show">toggle</button>
</template>
<script>
import $ from 'jquery'
export default {
data () {
return {
show: true
}
},
methods: {
beforeEnter (el) {
$(el).css({
left: '-500px',
opacity: 1
})
},
enter (el, done) {
$(el).stop().animate({
left: 0,
opacity: 1
}, {
duration: 1500,
complete: done
})
},
leave (el, done) {
$(el).stop().animate({
left: '500px',
opacity: 0
}, {
duration: 1500,
complete: done
})
}
}
}
</script>
<style>
.animate-p {
position: absolute;
left: 0;
top: 0;
}
</style>
注意:(1)<transition>标签不需要name,但需要绑定属性:css=”false”,避免该标签去检查css中指定的选项。
(2)每个方法其实都要操作传过来的参数el,这个el是<transition>体内的DOM元素。
(3)其中的两个方法enter、leave除了参数el外,还有个done(必须调用),是在两个动作执行完了执行。
(4)用js操作时可能需要用到jquery等公用库,最好把它在index.html中引入,因为那儿的代码不会经过打包和处理资源,只会作为一个入口的页面往里加东西。
PS:如何在项目中引入jquery?
在当前项目的目录下(就是package.json),运行命令 cnpm install jquery --save-dev 这样就将jquery安装到了这个项目中。然后修改webpack.base.conf.js(在build文件下)两个地方:
小注:上面的--save是为了更新package.json,使得别人在用的时候也是更新后的。
a) 加入
var webpack=require('webpack');
b) 在module.exports的里面加入
plugins: [
new webpack.optimize.CommonsChunkPlugin('common.js'),
new webpack.ProvidePlugin({
jQuery: "jquery",
$: "jquery"
})
]
c) 最后在main.js中加入import $ from 'jquery',完成jquery的引入
二、自定义指令
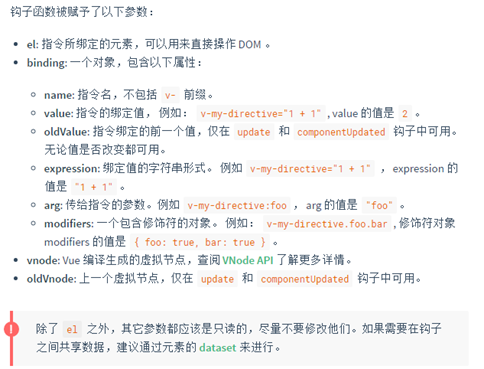
通过选项directives定义如v-color指令,在directives指令选项中定义color函数,传el和binding两个参数,el就代表v-color指令所在的元素,binding是个对象,指它绑定的一些变量或计算表达式等,binding.value指的是指令接收到值。
1、局部指令 -- 把该指令定义到普通组件的directives里
<template>
<p v-color="'red'">这是一个段落</p>
<p v-custom="'40px'">第二段</p>
</template>
<script>
export default {
directives: {
color (el, binding) {
el.style.color = binding.value
},
custom: {
bind (el, binding) {
},
inserted (el, binding) {
el.style.fontSize = binding.value
}
}
}
}
</script>
2、全局指令 -- 把该指令定义到main.js的根组件的directives里,定义方法同上
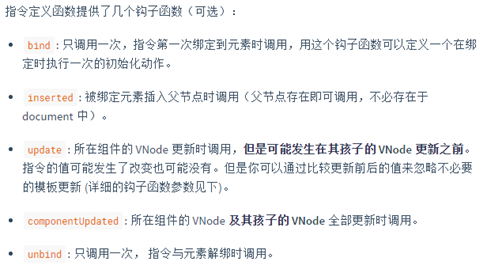
PS:如上例中,color指令方法为合写,custom指令方法为分写,详细介绍参见下面:
3、自定义指令适用场景
实现该元素一插入到页面就获取焦点:
<template>
<input type="text" v-focus>
</template>
<script>
export default {
directives: {
focus: {
inserted (el, binding) {
el.focus()
}
}
}
}
</script>
三、插件 -- 功能完整的一套组件,独立于vue而存在的
1、例如vue-router,如何安装并引用呢?
第一步,在当前项目的目录下(就是package.json),运行命令cnpm install vue-router --save
第二步,如果全局使用,就在main.js中import VueRouter from ‘vue-router’,等同于var VueRouter = require(‘vue-router’)
第三步,注册使用该插件Vue.use(VueRouter)
第四步,实例化该插件let router = new VueRouter()
第五步,正式使用,在根组件中直接使用上面定义的router
以下为入口文件main.js:
import Vue from 'vue'
import App from './App'
import VueRouter from 'vue-router'
// 注册
Vue.use(VueRouter)
// 实例化
let router = new VueRouter()
/* eslint-disable no-new */
new Vue({
router, // 正式使用
el: '#app',
render: h => h(App)
})
2、例如vue-resource,它的安装同vue-router,在main.js中引入时直接注册即可,不需要实例化,这样在每个子组件的方法中都可以直接采用this.$http.get()方法。
更多插件详见https://github.com/vuejs
四、单文件组件和vue-cli
1、单文件组件概念:vue本身是通过vue-cli工具搭建成的,单文件组件是.vue文件,它把template、script和css都集中到一个文件里,实现组件及组件树。所有的组件都是个.vue文件,最终在main.js中将根组件App.vue拼装到页面里。
单文件组件的实现得益于vue-loader,配合webpack,经过一定的处理,最终把template和css插到组件里。
关于css:
在style标签上添加scoped,就限制该css为当前组件的样式,如果不加scoped,样式就会泄漏到全局,导致所有引入该组件的父组件也会接收到这样的样式。
2、vue-cli
(1)用于初始化vue项目,是vue官方提供的一个脚手架工具。
(2)使用vue-cli的优势:
a) 它是一套成熟的vue项目架构设计,会随着版本的更迭而更新(现为2.0)
b) 提供了一套本地的测试服务器
c) 提供了一套自己的打包上线的方案webpack
(3)vue-cli对系统的要求 -- 它是命令行的一个工具
a) 系统必须装NodeJs(>=4.0)
b) git 下载代码
c) 一个能使用Node的命令行终端
(4)使用流程(使用NodeJs的包管理工具):
a) 全局安装vue-cli npm install vue-cli -g
b) 初始化项目 vue init webpack my-project 规定了使用webpack打包方式
c) 安装项目依赖 npm install
d)在localhost启动测试服务器 npm run dev
或:生成上线目录(部署) npm run build
(5)缺少第五章项目安装等笔记
五、ES6语法
1、import、export
(1)语法格式
import 变量名 from ‘’
export default {}
export后面必须跟default,只有这样才可以直接import一个default的内容作为一个变量来引入当前文件。也可以引入或导出一个变量import/export {变量名},但必须带花括号。
2、对象缩写
如componets: {hello}
3、区分var和let、const (ES6知识点)
用var在代码块中定义变量,在外面也能取到该变量,用let可避免这种泄露。
const用来声明常量,也可以避免泄露。
4、函数简写
如data () {}
六、vue-router
1、概念:根据不同的地址发到不同的页面
2、单页面应用:不用频繁地去请求服务器,我们只是通过ajax在切换的时候请求新数据,就实现了不需要刷新整个页面的功能
3、什么是前端路由?
举例说明,当我们请求foo页面,展示其中一个页面,请求bar时展示另一个页面。
前端路由在由一个页面请求另一个页面时,公共的框架、css、js、环境之类的不再请求,只请求页面的不同之处。
4、设置路由
(1)安装路由 cnpm install vue-router --save
(2)在入口文件main.js中引入vue-router
import Vue from 'vue'
import App from './App'
import VueRouter from 'vue-router'
// 注册
Vue.use(VueRouter)
// 实例化
let router = new VueRouter()
/* eslint-disable no-new */
new Vue({
router, // 正式使用
el: '#app',
render: h => h(App)
})
(3)使用vue-router有三个关键点:
a) 一份map 规定什么样的地址访问什么样的页面或组件,在它上上级routes并列要加哈西mode: ‘history’ — 路由map
b) router-view 规定什么样的位置或什么样的区域显示不同的页面 — 路由视图
c) router-link 在页面上如何跳转到下个页面 — 路由导航
如何使用?
第一步,提前写好两个组件apple.vue和banana.vue,并在main.js中引入组件:
import Apple from ‘./components/apple’
import Banana from ‘./components/banana’
第二步,在上述实例化中通过routes选项进行配置(映射关系):
let router = new VueRouter({
mode: ‘history’,
routes: [
{
path: ‘/apple’,
component: Apple
},
{
path: ‘/banana,
component: Banana
}
]
})
第三步,规定在路由里设定的组件在哪显示 —— 在App.vue的template中
<template>
<router-view></router-view>
</template>
第四步,访问地址分别为localhost:8080/#/apple和localhost:8080/#/banana,第二步中使用Mode哈西,地址中就不需要写#了。
另一种方式,可以使用<router-link>组件,并绑定:to属性
<template>
<router-view></router-view>
<router-link :to=”{path: ‘apple’}”>toApple</router-link>
<router-link :to=”{path: ‘banana’}”>banana</router-link>
</template>
这个组件会默认渲染成一个a标签,to代表它的href
5、路由参数
1、我们原来的地址会加上?type=1&mode=2之类的参数,vue-router要在映射表中加入参数:
let router = new VueRouter({
mode: ‘history’,
routes: [
{
path: ‘/apple/:color/detail/:type’,
component: Apple
},
{
path: ‘/banana,
component: Banana
}
]
})
PS:上面的path中只有带引号的才是能被下面的$router.params获取的参数。
2、使用时,在地址中直接通过’/参数值’添加:
localhost:8080/apple/red/detail/3
3、在组件如apple.vue内部如何获取刚设定的这个参数?
设完参数以后,路由会往每个组件的全局的router对象里插入当前页面的params,我们在每个子组件里就可以通过this.$route这样的全局对象来获取当前路由的参数,获取到的是一个参数对象,如{color:’red’, type: 3},或者在template用花括号直接访问如{{$route.params.color}}。
apple.vue中:
<template>
<p>{{ $route.params.color }}</p>
<button @click=”getParam”>getParam</button>
</template>
<script>
export default {
methods: {
getParam () {
console.log(this.$route.params)
}
}
}
</script>
PS:如果在映射表的path中设置了参数,但访问路径中不写这个参数,就找不到这个路由即访问不到相应的页面。
6、路由嵌套vue-touter
在映射表中接着写children,这个children对应的值也是个数组,同样也包含path和component两个属性,该子组件通过<router-view>插入到父组件即apple.vue中,渲染出的页面同样会显示在apple.vue页面。
main.js中路由映射表:
先引入RedApple组件:
import RedApple from ‘./components/redapple’
let router = new VueRouter({
mode: ‘history’,
routes: [
{
path: ‘/apple’,
component: Apple,
children: [
path: ‘red’,
component: RedApple
]
},
{
path: ‘/banana,
component: Banana
}
]
})
该RedApple的父组件apple.vue中:
<template>
{{hello}}
<router-view></router-view>
</template>
export def...
访问地址:
localhost:8080/apple/red
PS:同样我们在App.vue中也可以通过<router-link :to=”{path:’apple/red’}”></router-link>实现相同的路由嵌套。
7、命名的路由视图、路由重定向
(1)在router-link的to属性的值有以下几种:
a) <router-link :to=”’apple’”></router-link>
b) <router-link :to=”{path: ‘apple/red’}”></router-link>
c) <router-link :to=”{path: ‘apple’, param: {color: ‘yellow’}}”></router-link>
d) 具名的路由 <router-link :to=”{name: ‘applePage’}”></router-link>
e) 由于router-link默认生成a标签,要生成其他标签如在ul中生成li,则需加个属性tag=”li”
f) router-link标签被点中之后会自动添加一个class=”router-link-active”
PS:在组件template中的router-link这样的导航叫做声明式的导航。
(2)我们也可以在main.js里采用router.push()方法进行编程式导航,其中push的内容和router-link的to所能指定的格式相同。
怎么使用呢?
比如router.beforEach()方法指每次操作时都为它设定一些操作,此时我们可以进行一些异步操作,比如检查用户信息,如果是未登录状态,可以在回调里使用router.push()把页面导航到登录页。
router.beforEach(router.push(‘login’)或router.push({path: ‘login’})或router.push({name: ‘loginPage’}))
(3)命名的路由视图(第五章4-8 26分钟处)
给App.vue中的多个router-view标签命不同的名字,在main.js的映射表的component中给不同的视图指定不同的组件。
App.vue中:
<router-view name="bananaA"></router-view>
<router-view name="bananaB"></router-view>
main.js中:
routes: [
{
path: '/banana',
components: {
bananaA: Banana,
bananaB: RedBanana
}
}
]
(4)路由重定向
在映射表中加一项,采用redirect属性将地址重定向到其他页面:
main.js中:
routes: [
{
path: ‘/’,
redirect: ‘/banana’
},
{
path: '/banana',
components: {
bananaA: Banana,
bananaB: RedBanana
}
}
]
8、使用过渡制作路由跳转动画
在App.vue中:
<transition name="fade">
<keep-alive>
<router-view></router-view>
</keep-alive>
</transition>
9、总结
(1)路由map 路由视图 路由导航
(2)路由参数 嵌套路由
(3)命名路由和路由视图
(4)重定向
七、vuex — 状态管理插件(原理)
1、原理:有个统一的数据中心store,它用来维护状态数据,每个组件进行更新的时候就通知数据中心,数据中心再将共享的状态触发每个调用这个组件的更新。

2、flux模型 用来实现vuex的流程
vue的组件通过Actions这样一个动作来操作Mutations,Mutations控制数据中心的状态state,状态更改后再反映到页面组件的一个渲染render,下图中绿框虚线标的部分是vuex做的事情。
这个模型的设计含有很多规则,比如:
(1)Actions去执行异步的操作,比如去后台调用API(Backend API)
(2)Mutations是同步地去更改State数据的一种方法,它可以和Devtools交互
这套模型了保证数据的单项流动:
Vue Components通过Dispatch这样的动作去触发Actions,Actions通过Commit去触发Mutations,Mutations直接操作数据。

PS:只适用于复杂项目,也可以自己建造store,然后对外提供些事件接口及更新视图的方法。
3、vuex状态管理(实例)
(1)安装vuex cnpm install vuex --save
然后重启服务器cnpm run dev
(2)使用:
第一步,在main.js中引入插件vuex
import Vuex from 'vuex'
第二步,注册使用
Vue.use(Vuex)
第三步,实例化
let store = new Vuex.Store({
state: {
totalPrice: 0
},
mutations: {
increment (state, price) {
state.totalPrice += price
},
decrement (state, price) {
state.totalPrice -= price
}
}
})
第四步,在根实例中引入store
new Vue({
store
})
第五步,在App.vue中展示totalPrice
<template>
{{ totalPrice }}
</template>
PS:此处的totalPrice为属性或方法,所以需要在script中定义
<script>
import Apple from ‘./components/apple’
export default {
components: {
Apple
},
computed: {
totalPrice () {
return this.$store.state.totalPrice
// PS:此处的totalPrice是刚才在main.js的store实例的state中定义的,和本页面的不一样
}
}
}
</script>
第六步,在子组件apple.vue中添加按钮并对totalPrice进行操作
<template>
<button @click=”add”>add 5<button>
<button @click=”minus”>minus 5</button>
</template>
<script>
export default {
data () {
price: 5
},
methods: {
add () {
this.$store.commit(‘increment’, this.price)
},
minus () {
this.$store.commit(‘decrement’, this.price)
}
}
}
</script>
PS:子组件中用$store.commit方法感觉和子组件向父组件传递事件类似用$emit方法,可一并记忆理解。
其中第三步和第六步可改为:
第三步,实例化
let store = new Vuex.Store({
state: {
totalPrice: 0
},
mutations: {
increment (state, price) {
state.totalPrice += price
},
decrement (state, price) {
state.totalPrice -= price
}
},
actions: {
increase (context, price) {
context.commit(‘increment’, price)
},
decrease (context, price) {
context.commit(‘decrement’, price)
}
}
})
第六步,在子组件apple.vue中添加按钮并对totalPrice进行操作
<template>
<button @click=”add”>add 5<button>
<button @click=”minus”>minus 5</button>
</template>
<script>
export default {
data () {
price: 5
},
methods: {
add () {
this.$store.dispatch(‘increase’, this.price)
},
minus () {
this.$store.dispatch(‘decrease’, this.price)
}
}
}
</script>
PS:actions只能去调用mutations,不能直接修改state;
第一个参数context指当前的store;
在子组件中就不再commit mutations了,而是dispatch actions;
第二种方式把actions作为中介达到执行increment的目的。
PS:actions和mutations的区别:
actions里可以进行异步操作,然后再去触发mutations;而mutations里必须是同步操作数据(即依次向下执行操作)。所以按照之前的图形,跟后端的api接口都必须放在actions里。
举例说明:
actions: {
increase (context, id) {
api(id, function(price){
context.commit(‘increment’, price)
})
}
}
4、vuex除了state、mutations和actions这三个关键的数据流环节以外,还提供了getters用来获取状态集state里的数据。
因此main.js的store实例可改为:
let store = new Vuex.Store({
state: {
totalPrice: 0
},
getters: {
getTotal (state) {
return state.totalPrice
}
},
mutations: {
increment (state, price) {
state.totalPrice += price
},
decrement (state, price) {
state.totalPrice -= price
}
},
actions: {
increase (context, price) {
context.commit(‘increment’, price)
},
decrease (context, price) {
context.commit(‘decrement’, price)
}
}
})
相应地,App.vue中的计算属性computed里可改为:
computed: {
totalPrice () {
return this.$store.getters.getTotal
}
}
5、modules
可以把状态集分成不同的模型,每一个module都维护一套自己的state、mutations、actions和getters,这些状态集module最后合成一个总的对外store接口,我们可以根据不同的参数取不同模型里的状态。
const moduleA = {
state: {...},
mutations: {...},
actions: {...},
getters: {...}
}
const moduleB = {
state: {...},
mutations: {...},
actions: {...},
getters: {...}
}
const store = new Vuex.Store({
modules: {
a: moduleA,
b: moduleB
}
})
store.state.a // -> moduleA’s state
store.state.b // -> moduleB’s state
补充:vuex模块化在实际项目中的应用 *****
1、 实际项目结构
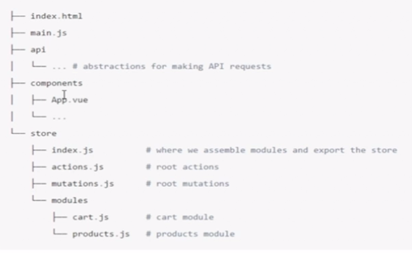
2、 根据以上结构:
(1) 数据中心为store文件夹,包括公用的actions.js和getters.js以及index.js、mutations.js,公用的actions.js和getters.js对mutations的动作进行映射
(2) 数据放在modules的对应模块里如cart.js和products.js,每个数据模型里(即js里)也包含actions和mutations
(3) 最终的输出是在store>index.js里,将vuex.store进行实例化并将所有的actions、getters、modules等输出出来。
3、 简单案例:
Store中只包括modules文件夹和index.js
4、 详细步骤:
(1) 安装vuex
npm install vuex --save
(2) 在store>index.js中引入vuex,并使用Vuex.use方法,故还需引入vue
index.js:
import Vuex from ‘vuex’
import Vue from ‘vue’
Vue.use(Vuex)
引入对应的数据模型,并导出实例化的vuex.store:
import OrderList from ‘./modules/orderList’
export default new Vuex.Store({
modules: {
OrderList
}
})
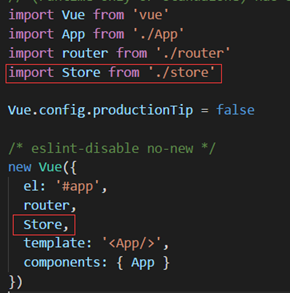
(3) 在入口文件main.js中引入store,并配置到全局
main.js:
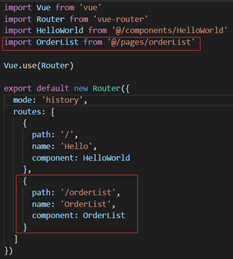
(4) 使用router配置orderlist的访问地址http://localhost:8080/orderList/
router>index.js:
并渲染到父组件中,此处为app.vue:

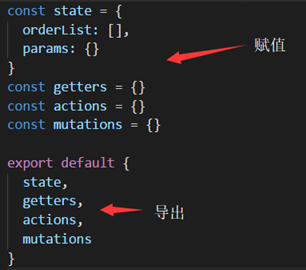
(5) 在每个数据模型中进行设置
- orderList.js:
PS:
1) state中存放数据
2) 由于页面无法直接调用state中的数据,所以采用getters调用state的值

3) actions中进行异步操作
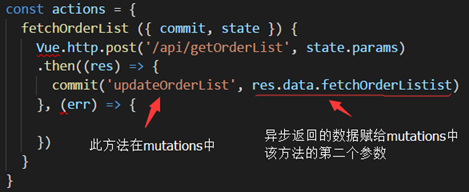
此处通过es6的解构赋值,把参数可以写成{commit, state},commit用来调用mutations,state获取状态集里的数据
4) mutations同步地对状态state进行更改
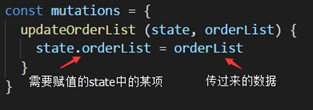
此处有两个参数state和另一个参数,该参数是我们要赋值的state中的某个数据,是在actions或页面要传进去的
严格来讲,只允许mutations对state进行更改,不允许actions
(6) 在相应的页面组件中调用store的方法,采用this.$store
1) 动态获取页面初始化数据tableData
- orderList.vue:

2) mounted时主动调用actions,对orderList进行赋值
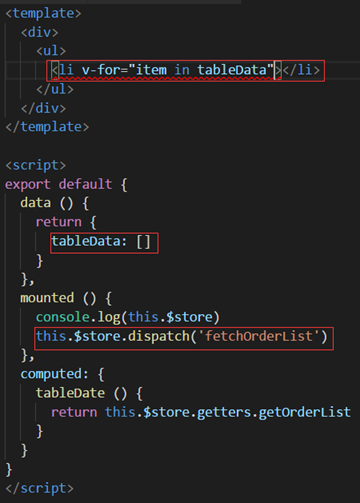
此时状态集中的orderList被更新,当然上面computed中依赖于orderList的tableDate也相应更新,template中的渲染层也会相应更新
(7) 另一个功能:参数更改,页面同步刷新
1) 在orderList.js的mutations中增加方法updateParams
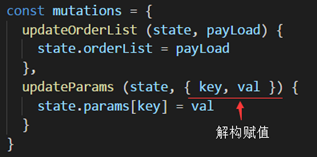
2) 在orderList.vue中调用mutations的方法

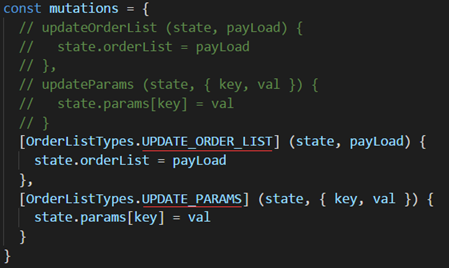
(8) 采用types方式,把各模块方法或变量都放在同一个js中定义
在modules同级建立types文件夹并新建相应的js
types>orderList.js:

modules>orderList.js:
1) 引入所有相关的types:

2) 使用该变量