引言
原文地址: tensorflow2 cifar10 模型训练 demo
欢迎访问我的博客: http://blog.duhbb.com/
文本使用 tensorflow 2.8, CUDA 11.2 以及 cuDNN 8.1.1 训练了 cifar10 数据集. 代码没有那么重要, 主要是完成了环境的安装以及各种问题排查, 最后用一个简单的网络结构跑了一下训练. 如果本文对你有用, 麻烦不吝点个赞; 如果有啥问题, 请不要犹豫, 赶紧联系我.
下载数据集和查看数据
import tensorflow as tf
from keras import datasets, layers, models
import matplotlib.pyplot as plt

(train_images, train_labels), (test_images, test_labels) = datasets.cifar10.load_data()

# 归一化处理
train_images, test_images = train_images / 255.0, test_images / 255.0

class_names = ['airplane', 'automobile', 'bird', 'cat', 'deer',
               'dog', 'frog', 'horse', 'ship', 'truck']

plt.figure(figsize=(10, 10))
for i in range(10):
    plt.subplot(5, 5, i + 1)
    plt.xticks([])
    plt.yticks([])
    plt.grid(False)
    plt.imshow(train_images[i], cmap=plt.cm.binary)
    plt.xlabel(class_names[train_labels[i][0]])
plt.show()
下面的这一行会下载对应的数据集:
(train_images, train_labels), (test_images, test_labels) = datasets.cifar10.load_data()
具体的下载路径就是这里:
C:\Users\tuhoo\.keras\datasets

上面的代码跑完, 我们就可以看到具体的图片了:

如何自己下载数据
keras cifar10.load_data() 自己下载数据
keras 下载数据出错
使用 keras 时, 导入cifar10数据会自动下载 https://www.cs.toronto.edu/~kriz/cifar-10-python.tar.gz, 但是有时会下载出错;
解决方法
自己下载cifar-10-python.tar.gz, 然后将文件放到对应路径(~./keras/datasets/) .
将文件名称 cifar-10-python.tar.gz 改为 cifar-10-batches-py.tar.gz .
这两步操作综合, 在所下载文件 cifar-10-python.tar.gz 的根目录下, 使用如下命令:
cp cifar-10-python.tar.gz ~./keras/datasets/cifar-10-batches-py.tar.gz
原文链接:https://blog.csdn.net/qq_35975447/article/details/88420527
I tensorflow/stream_executor/cuda/cuda_dnn.cc:368] Loaded cuDNN version 8302
似乎是 cuDNN 的版本不对.
在windows上又安装了一个 CUDA 11.2 和 cuDNN 8.1.1, 然后设置了环境变量, 终于可以跑起来了.
D:\PycharmProjects\tensorflow-env\venv\Scripts\python.exe D:/PycharmProjects/tensorflow-cifrar10/main.py
2022-03-11 13:30:28.578133: W tensorflow/stream_executor/platform/default/dso_loader.cc:64] Could not load dynamic library 'cudnn64_8.dll'; dlerror: cudnn64_8.dll not found
2022-03-11 13:30:28.578409: W tensorflow/core/common_runtime/gpu/gpu_device.cc:1850] Cannot dlopen some GPU libraries. Please make sure the missing libraries mentioned above are installed properly if you would like to use GPU. Follow the guide at https://www.tensorflow.org/install/gpu for how to download and setup the required libraries for your platform.
Skipping registering GPU devices...
2022-03-11 13:30:28.579702: I tensorflow/core/platform/cpu_feature_guard.cc:151] This TensorFlow binary is optimized with oneAPI Deep Neural Network Library (oneDNN) to use the following CPU instructions in performance-critical operations:  AVX AVX2
To enable them in other operations, rebuild TensorFlow with the appropriate compiler flags.
Model: "sequential"
_________________________________________________________________
 Layer (type)                Output Shape              Param #
=================================================================
 conv2d (Conv2D)             (None, 30, 30, 32)        896

 max_pooling2d (MaxPooling2D  (None, 15, 15, 32)       0
 )

 conv2d_1 (Conv2D)           (None, 13, 13, 64)        18496

 max_pooling2d_1 (MaxPooling  (None, 6, 6, 64)         0
 2D)

 conv2d_2 (Conv2D)           (None, 4, 4, 64)          36928

 flatten (Flatten)           (None, 1024)              0

 dense (Dense)               (None, 64)                65600

 dense_1 (Dense)             (None, 10)                650

=================================================================
Total params: 122,570
Trainable params: 122,570
Non-trainable params: 0
_________________________________________________________________
Epoch 1/10
1563/1563 [==============================] - 16s 10ms/step - loss: 1.5469 - accuracy: 0.4338 - val_loss: 1.2887 - val_accuracy: 0.5379
Epoch 2/10
1563/1563 [==============================] - 16s 10ms/step - loss: 1.1908 - accuracy: 0.5772 - val_loss: 1.1151 - val_accuracy: 0.6058
Epoch 3/10
1563/1563 [==============================] - 16s 10ms/step - loss: 1.0379 - accuracy: 0.6321 - val_loss: 1.0567 - val_accuracy: 0.6231
Epoch 4/10
1563/1563 [==============================] - 16s 10ms/step - loss: 0.9423 - accuracy: 0.6703 - val_loss: 0.9653 - val_accuracy: 0.6581
Epoch 5/10
1563/1563 [==============================] - 16s 10ms/step - loss: 0.8708 - accuracy: 0.6931 - val_loss: 0.9399 - val_accuracy: 0.6740
Epoch 6/10
1563/1563 [==============================] - 16s 10ms/step - loss: 0.8118 - accuracy: 0.7165 - val_loss: 0.9209 - val_accuracy: 0.6825
Epoch 7/10
1563/1563 [==============================] - 16s 10ms/step - loss: 0.7637 - accuracy: 0.7313 - val_loss: 0.9164 - val_accuracy: 0.6879
Epoch 8/10
1563/1563 [==============================] - 16s 11ms/step - loss: 0.7277 - accuracy: 0.7452 - val_loss: 0.8747 - val_accuracy: 0.7021
Epoch 9/10
1563/1563 [==============================] - 17s 11ms/step - loss: 0.6930 - accuracy: 0.7554 - val_loss: 0.8931 - val_accuracy: 0.7059
Epoch 10/10
1563/1563 [==============================] - 17s 11ms/step - loss: 0.6611 - accuracy: 0.7680 - val_loss: 0.8595 - val_accuracy: 0.7076
313/313 - 1s - loss: 0.8595 - accuracy: 0.7076 - 926ms/epoch - 3ms/step
0.7075999975204468

Process finished with exit code 0
撒花!!!
代码
import matplotlib.pyplot as plt
import tensorflow as tf
from keras import datasets, layers, models

(train_images, train_labels), (test_images, test_labels) = datasets.cifar10.load_data()

# 归一化处理
train_images, test_images = train_images / 255.0, test_images / 255.0

class_names = ['airplane', 'automobile', 'bird', 'cat', 'deer',
               'dog', 'frog', 'horse', 'ship', 'truck']

# plt.figure(figsize=(10, 10))
# for i in range(10):
#     plt.subplot(5, 5, i + 1)
#     plt.xticks([])
#     plt.yticks([])
#     plt.grid(False)
#     plt.imshow(train_images[i], cmap=plt.cm.binary)
#     plt.xlabel(class_names[train_labels[i][0]])
# plt.show()

# 构造网络模型

model = models.Sequential()
model.add(layers.Conv2D(32, (3, 3), activation='relu', input_shape=(32, 32, 3)))
model.add(layers.MaxPooling2D((2, 2)))
model.add(layers.Conv2D(64, (3, 3), activation='relu'))
model.add(layers.MaxPooling2D((2, 2)))
model.add(layers.Conv2D(64, (3, 3), activation='relu'))

# 添加分类器
model.add(layers.Flatten())
model.add(layers.Dense(64, activation='relu'))
model.add(layers.Dense(10))

model.compile(optimizer='adam',
              loss=tf.keras.losses.SparseCategoricalCrossentropy(from_logits=True),
              metrics=['accuracy'])

# 查看网络结构

model.summary()

history = model.fit(train_images, train_labels, epochs=10,
                    validation_data=(test_images, test_labels))

# 测试模型并绘制loss图(history的使用)

plt.plot(history.history['accuracy'], label='accuracy')
plt.plot(history.history['val_accuracy'], label='val_accuracy')
plt.xlabel('Epoch')
plt.ylabel('Accuracy')
plt.ylim([0.0, 1.0])
plt.legend(loc='lower right')

test_loss, test_acc = model.evaluate(test_images, test_labels, verbose=2)
print(test_acc)
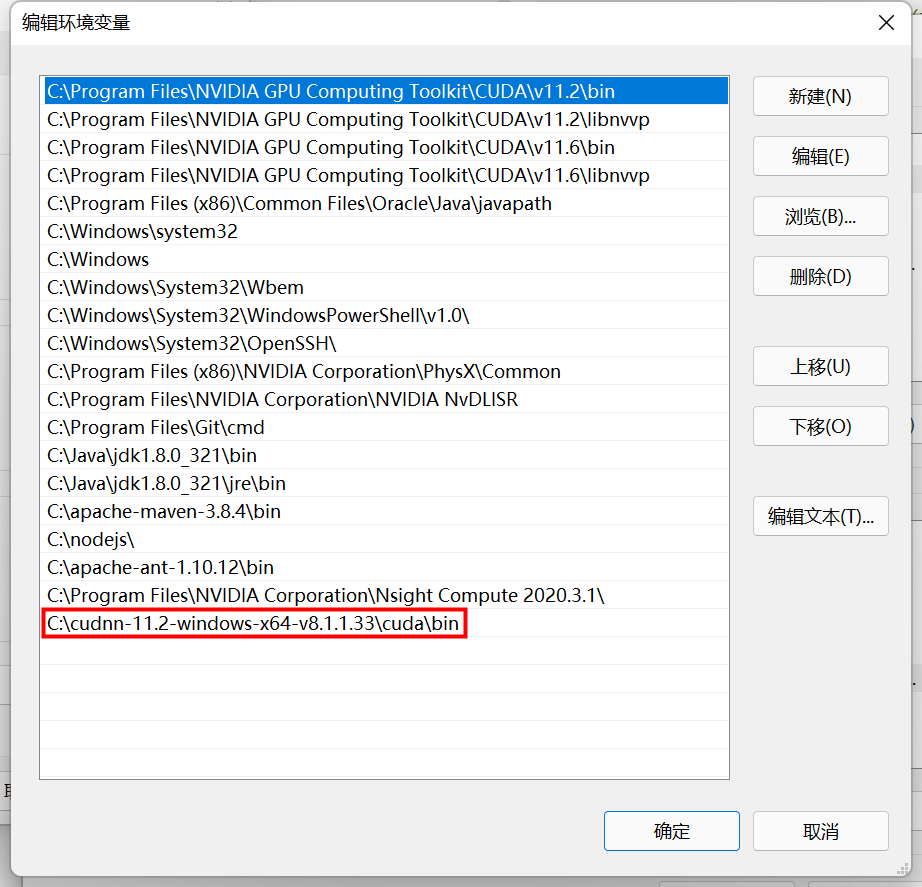
pycharm 设置环境变量
PATH=C:\cudnn-11.2-windows-x64-v8.1.1.33\cuda\bin;C:\Program Files\NVIDIA GPU Computing Toolkit\CUDA\v11.2\include;C:\Program Files\NVIDIA GPU Computing Toolkit\CUDA\v11.2\extras\CUPTI\lib64;C:\Program Files\NVIDIA GPU Computing Toolkit\CUDA\v11.2\bin;%PATH%
好像不设置这些环境变量也可以运行, 这就有点尴尬了, 那么怎么知道 cuDNN 被使用了呢?
好像是没有加载:
2022-03-11 13:36:04.484631: W tensorflow/stream_executor/platform/default/dso_loader.cc:64] Could not load dynamic library 'cudnn64_8.dll'; dlerror: cudnn64_8.dll not found
2022-03-11 13:36:04.484734: W tensorflow/core/common_runtime/gpu/gpu_device.cc:1850] Cannot dlopen some GPU libraries. Please make sure the missing libraries mentioned above are installed properly if you would like to use GPU. Follow the guide at https://www.tensorflow.org/install/gpu for how to download and setup the required libraries for your platform.
Skipping registering GPU devices...
还是得配置环境变量
D:\PycharmProjects\tensorflow-env\venv\Scripts\python.exe D:/PycharmProjects/tensorflow-cifrar10/main.py
2022-03-11 17:17:13.647405: I tensorflow/core/platform/cpu_feature_guard.cc:151] This TensorFlow binary is optimized with oneAPI Deep Neural Network Library (oneDNN) to use the following CPU instructions in performance-critical operations:  AVX AVX2
To enable them in other operations, rebuild TensorFlow with the appropriate compiler flags.
2022-03-11 17:17:14.389746: I tensorflow/core/common_runtime/gpu/gpu_device.cc:1525] Created device /job:localhost/replica:0/task:0/device:GPU:0 with 13626 MB memory:  -> device: 0, name: NVIDIA GeForce RTX 3080 Laptop GPU, pci bus id: 0000:01:00.0, compute capability: 8.6

2022-03-11 17:17:16.695164: I tensorflow/stream_executor/cuda/cuda_dnn.cc:368] Loaded cuDNN version 8101
2022-03-11 17:17:19.482245: I tensorflow/stream_executor/cuda/cuda_blas.cc:1786] TensorFloat-32 will be used for the matrix multiplication. This will only be logged once.
结束语
原文地址: tensorflow2 cifar10 模型训练 demo
欢迎访问我的博客: http://blog.duhbb.com/
文本使用 tensorflow 2.8, CUDA 11.2 以及 cuDNN 8.1.1 训练了 cifar10 数据集. 代码没有那么重要, 主要是完成了环境的安装以及各种问题排查, 最后用一个简单的网络结构跑了一下训练. 如果本文对你有用, 麻烦不吝点个赞; 如果有啥问题, 请不要犹豫, 赶紧联系我.