实验材料准备
下载实验包hit-oslab-linux-20110823.tar.gz(包含linux-0.11源码、bochs虚拟机等):
https://cms.hit.edu.cn/pluginfile.php/3329/mod_folder/content/6/hit-oslab/hit-oslab-linux-20110823.tar.gz?forcedownload=1
下载gcc-3.4-ubuntu.tar.gz(编译linux-0.11需要用到的低版本gcc):
https://cms.hit.edu.cn/pluginfile.php/3329/mod_folder/content/6/hit-oslab/gcc-3.4-ubuntu.tar.gz?forcedownload=1
实验环境设置(ubuntu-16.04.1-desktop-amd64)
实验材料
在~(用户Home文件夹)下创建workspace文件夹,将hit-oslab-linux-20110823.tar.gz解压到workspace下:
mkdir workspace
cd workspace
tar xzf hit-oslab-linux-20110823.tar.gz
gcc-3.4安装
解压gcc-3.4-ubuntu.tar.gz到/opt下:
cd /opt
tar xzf ~/Downloads/gcc-3.4-ubuntu.tar.gz
安装gcc-3.4(因为我的是64位系统,所以安装参数为amd64;若为32位系统,参数应为i386):
cd gcc-3.4
sudo ./inst.sh amd64
as86、ld86安装(用于编译和链接linux-0.11/boot下的bootsect.s和setup.s,它们采用as86汇编语法;而linux-0.11下的其他汇编语言文件采用gas的语法AT&T)
搜索包含as86、ld86的包:
apt-cache search as86 ld86
执行结果:
bin86 - 16-bit x86 assembler and loader
安装bin86:
sudo apt-get install bin86
64位系统需要安装32位兼容库:
sudo apt-get install libc6-dev-i386
C语言编译环境
sudo apt-get install build-essential
安装IDE
sudo apt-get install vim cscope exuberant-ctags
编译内核
1 cd ~/workspace/oslab/linux-0.11
2 make
编译中断,输出错误信息:
In file included from /usr/include/linux/fs.h:10,
                 from tools/build.c:28:
/usr/include/linux/ioctl.h:4:23: asm/ioctl.h: No such file or directory
In file included from /usr/include/linux/fs.h:11,
                 from tools/build.c:28:
/usr/include/linux/types.h:4:23: asm/types.h: No such file or directory
In file included from /usr/include/linux/types.h:8,
                 from /usr/include/linux/fs.h:11,
                 from tools/build.c:28:
/usr/include/linux/posix_types.h:35:29: asm/posix_types.h: No such file or directory
In file included from /usr/include/linux/fs.h:11,
                 from tools/build.c:28:
/usr/include/linux/types.h:27: error: syntax error before "__le16"
/usr/include/linux/types.h:28: error: syntax error before "__be16"
/usr/include/linux/types.h:29: error: syntax error before "__le32"
/usr/include/linux/types.h:30: error: syntax error before "__be32"
/usr/include/linux/types.h:31: error: syntax error before "__le64"
/usr/include/linux/types.h:32: error: syntax error before "__be64"
/usr/include/linux/types.h:34: error: syntax error before "__sum16"
/usr/include/linux/types.h:35: error: syntax error before "__wsum"
In file included from tools/build.c:28:
/usr/include/linux/fs.h:43: error: syntax error before "__u64"
/usr/include/linux/fs.h:45: error: syntax error before "minlen"
make: *** [tools/build] Error 1
google搜索得知是因为64位linux的asm目录为:
/usr/include/x86_64-linux-gnu/asm
make找不到文件从而导致编译中断
解决方法(建立链接):
sudo ln -s /usr/include/x86_64-linux-gnu/asm /usr/include/asm
运行和调试
运行
运行编译好的内核,在oslab目录下:
./run
出现错误:
./bochs/bochs-gdb: error while loading shared libraries: libSM.so.6: cannot open shared object file: No such file or directory
打印动态链接配置:
ldconfig -p | grep libSM.so.6
libSM.so.6的链接信息:
libSM.so.6 (libc6,x86-64) => /usr/lib/x86_64-linux-gnu/libSM.so.6
我们需要的是32位的。搜索库对应的包名称:
apt-file search libSM.so.6
打印结果:
libsm6: /usr/lib/x86_64-linux-gnu/libSM.so.6
libsm6: /usr/lib/x86_64-linux-gnu/libSM.so.6.0.1
得到其对应的包名为libsm6,安装对应的32位库:
sudo apt-get install libsm6:i386
再次尝试,出现错误:
./bochs/bochs-gdb: error while loading shared libraries: libXpm.so.4: cannot open shared object file: No such file or directory
也可按以上方法解决,不过这里用了另一个工具:
dpkg-query -S libXpm.so.4
同理解决之,再次尝试:
./run
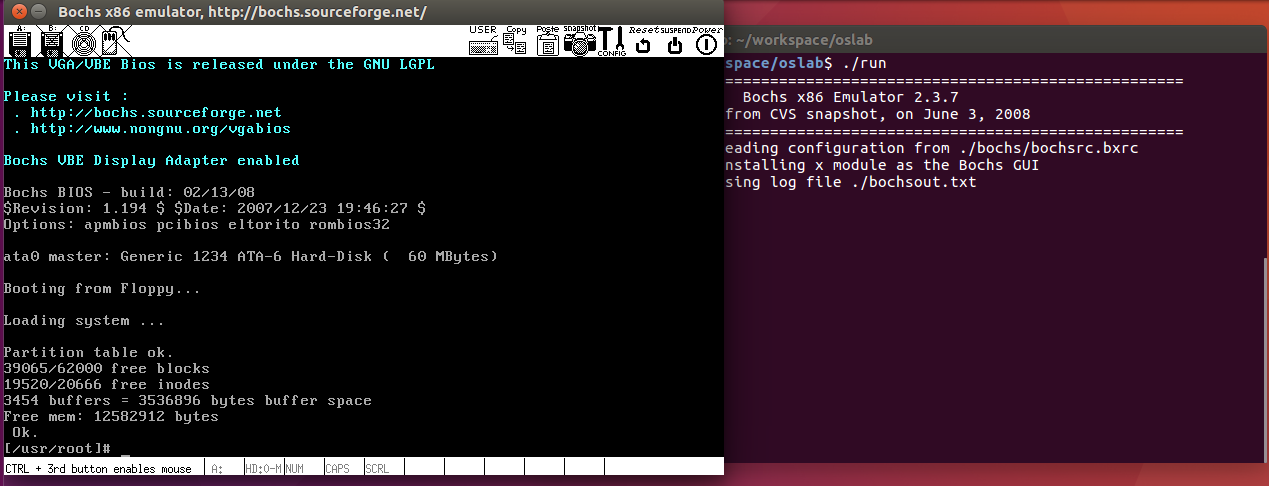
成功运行!
调试
汇编级调试
./dbg-asm
操作参考Bochs使用手册
C语言级调试
./dbg-c
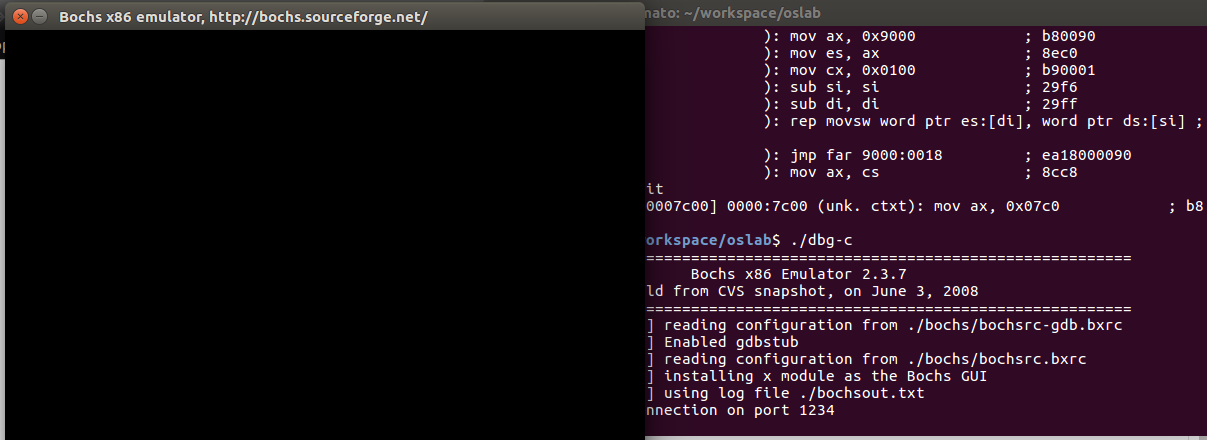
Ctrl+Alt+T打开另一个终端窗口,进到~/workspace/oslab下执行:
./rungdb
出现两次库不存在错误,按照上面的方法安装对应32位库解决后运行成功:

操作参考GDB的Manuel:
man gdb
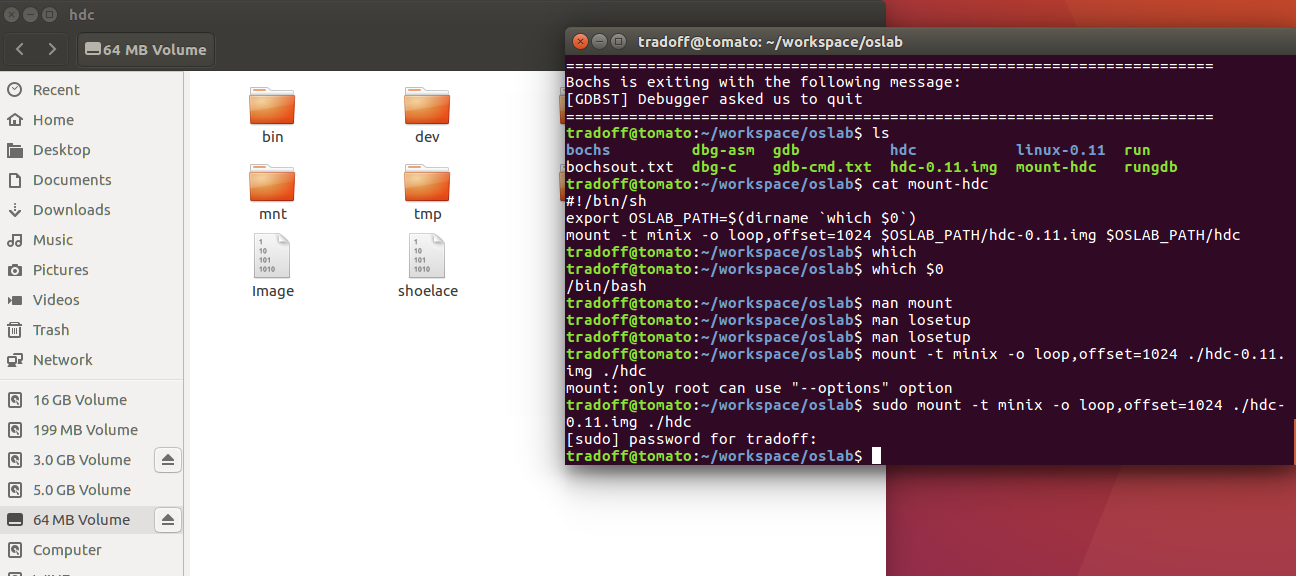
Ubuntu与Linux-0.11之间的文件交换
挂载Linux-0.11
./mount-hdc
mount-hdc是一个shell脚本:
1 #!/bin/sh
2 export OSLAB_PATH=$(dirname `which $0`)
3 mount -t minix -o loop,offset=1024 $OSLAB_PATH/hdc-0.11.img $OSLAB_PATH/hdc
第1行 指明脚本使用的shell
第2行 将调用本脚本的目录设置为oslab的目录
第3行 根据mount的manual手册,
-t minix 表示要挂载的文件系统类型为minix
-o[ption] 可以有3个参数(参考losetup的manual):
loop 可以指定文件所映射的回环设备;若不指定,则由mount自动搜寻
offset 指定文件或设备中数据起始位置在该文件或设备中的偏移
sizelimit 从offset开始算起文件或设备的最大大小
故此行将$OSLAB_PATH/hdc-0.11.img映射到mount搜寻到的设备中,文件系统为minix,数据起始偏移为1024byte,再挂载到$OSLAB_PATH/hdc目录下。
这样Ubuntu就可以在$OSLAB_PATH/hdc下访问Linux-0.11的文件了。
卸载Linux-0.11
在oslab目录下:
umount hdc

注意
1:不要在0.11内核运行的时候mount镜像文件,否则可能会损坏文件系统。同理,也不要在已经mount的时候运行0.11内核;
2:在关闭Bochs之前,需要先在Linux-0.11的命令行运行“sync”,确保所有缓存数据都存盘后,再关闭Bochs。