买了个阿里云,自己折腾一下。
时间:2019年7月17日13:40:18
1、下载
wget https://cdn.mysql.com//Downloads/MySQL-5.7/mysql-5.7.26-linux-glibc2.12-x86_64.tar.gz
2、解压
tar -zxvf mysql-5.7.26-linux-glibc2.12-x86_64.tar.gz
3、移动文件到 usr/local/mysql目录下
mv mysql-5.7.26-linux-glibc2.12-x86_64 /usr/local/mysql
发现写错了,移到上层目录
cd /usr/local/mysql/
cd mysql-5.7.26-linux-glibc2.12-x86_64/
cd ..
mv mysql-5.7.26-linux-glibc2.12-x86_64/* ./
rm -rf mysql-5.7.26-linux-glibc2.12-x86_64/

4、增加用户组
groupadd mysql

useradd -r -g mysql mysql
5、修改当前目录拥有者为mysql用户:执行命令
chown -R mysql:mysql ./
6、安装
cd /usr/local/mysql/bin/
./mysqld --initialize --user=mysql --basedir=/usr/local/mysql --datadir=/usr/local/mysql/data
./mysqld: error while loading shared libraries: libaio.so.1: cannot open shared object file: No such file or directory
报错了
rpm -qa|grep libaio
yum install  libaio-devel.x86_64
安装一个这玩意
./mysqld --initialize --user=mysql --basedir=/usr/local/mysql --datadir=/usr/local/mysql/data
再执行,有warn 没error了
2019-07-17T05:51:34.038056Z 0 [Warning] TIMESTAMP with implicit DEFAULT value is deprecated. Please use --explicit_defaults_for_timestamp server option (see documentation for more details).
2019-07-17T05:51:35.100511Z 0 [Warning] InnoDB: New log files created, LSN=45790
2019-07-17T05:51:35.223640Z 0 [Warning] InnoDB: Creating foreign key constraint system tables.
2019-07-17T05:51:35.287407Z 0 [Warning] No existing UUID has been found, so we assume that this is the first time that this server has been started. Generating a new UUID: efa727f9-a856-11e9-96d2-00163e063119.
2019-07-17T05:51:35.289478Z 0 [Warning] Gtid table is not ready to be used. Table 'mysql.gtid_executed' cannot be opened.
2019-07-17T05:51:35.289924Z 1 [Note] A temporary password is generated for root@localhost: gpPkXgqLT1=S 这个是随机密码
初始化完毕后在命令行最后会提供生成好的随机密码,先拷贝下来
7、修改权限
然后修改下权限,把除了data外的所有mysql文件的权限都设置为root
chown -R root:root ./
chown -R mysql:mysql data
8、启动mysql服务和添加开机启动mysql服务
添加开机启动:执行命令cp support-files/mysql.server /etc/init.d/mysql,把启动脚本放到开机初始化目录
启动mysql服务:执行命令 service mysql start
Starting MySQL.2019-07-17T05:59:19.660315Z mysqld_safe error: log-error set to '/var/log/mariadb/mariadb.log', however file don't exists. Create writable for user 'mysql'.
The server quit without updating PID file (/var/lib/mysql/i[FAILED]gohhgjiy8uy2gZ.pid).
pwd
/usr/local/mysql
报错,权限问题还是文件夹没有。。
建一个
mkdir /var/log/mariadb
touch /var/log/mariadb/mariadb.log
chown -R mysql:mysql /var/log/mariadb/
service mysql start
Starting MySQL.2019-07-17T06:02:23.769297Z mysqld_safe Directory '/var/lib/mysql' for UNIX socket file don't exists.
The server quit without updating PID file (/var/lib/mysql/i[FAILED]gohhgjiy8uy2gZ.pid).
又少了啥
mkdir /var/lib/mysql
chmod 777 /var/lib/mysql
service mysql start
Starting MySQL....The server quit without updating PID file[FAILED]ib/mysql/iZ2ze967kgohhgjiy8uy2gZ.pid).
日了。。
去/etc/下看看 my.cnf
vim /etc/my.cnf
发现datadir 不是咱指定的那个
改一下
datadir = /usr/local/mysql/data
保存,再启动。
service mysql start
Starting MySQL. [ OK ]
没错,绿色是我自己改的!!
搞定了
9、改密码
mysql -u root -p
登录,密码就是上面标红的位置
会提示
ERROR 1862 (HY000): Your password has expired. To log in you must change it using a client that supports expired passwords.
意思就是密码要过期了。

./mysql -u root -p
再登录一遍
Welcome to the MySQL monitor.  Commands end with ; or g.
Your MySQL connection id is 5
Server version: 5.7.26

mysql> set password = password('1111');
Query OK, 0 rows affected, 1 warning (0.00 sec)

完事!
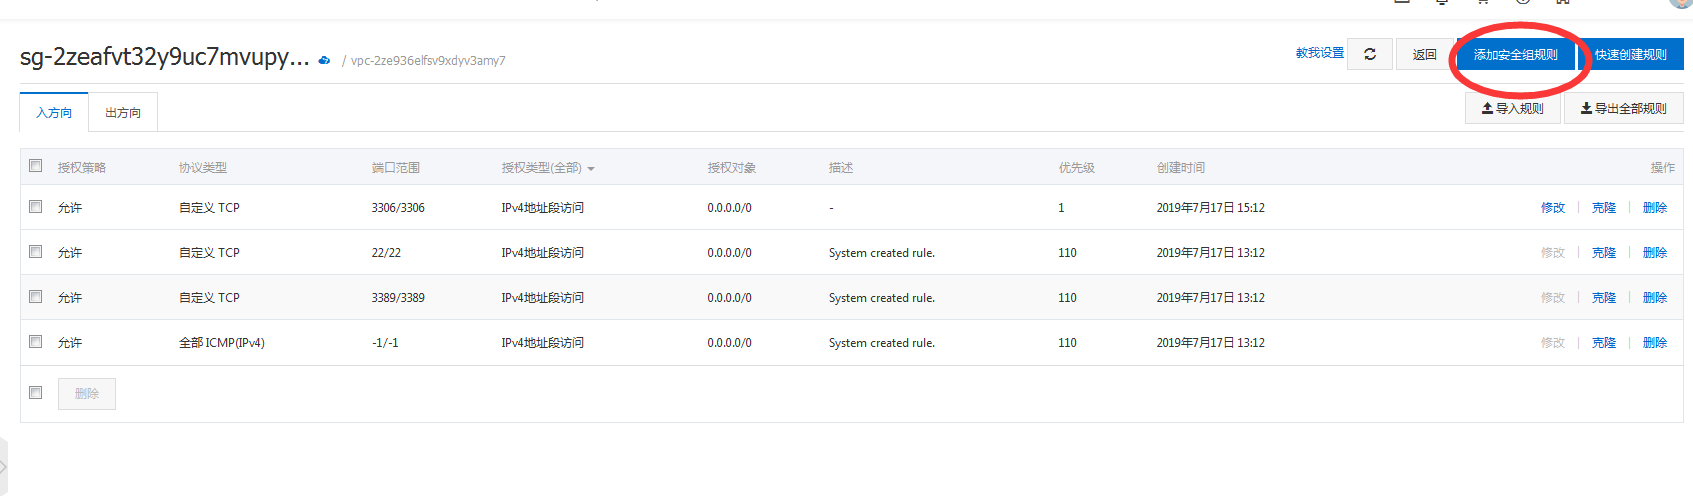
10、备注一下,3306端口默认开放,如果用Navicat去连的话,阿里云服务器连不上,上阿里云控制台